When hiring a tiler, you never know what he will end up with, so this idea is somewhat reminiscent of playing a lottery. And therefore it is useful to know how to lay porcelain stoneware on the floor with your own hands. This information will give you a basic understanding of the topic so you can easily check the work of hired professionals or even try to do it yourself.
Laying porcelain tiles on the floor with your own hands
Calculation of the number of tiles
To determine the required amount of cladding, you should take into account the layout pattern and the width of the seams:
- In corridors, hallways and other rooms with a minimum of furniture (or without it), the size of the cut tiles is more than ½ of its original size.
- If there is furniture in the room and plumbing fixtures in the bathrooms, it is necessary to take into account the visible part of the floor. Near walls, the size of the trim does not matter.
- If opposite walls are not perfectly parallel to each other, then thanks to diagonal laying this defect can be hidden. However, in this case you will have to spend more finishing material and increase the amount of trimming.
- If only 1 day is allotted for work, finishing begins from the far corner and moves towards the door opening.
- If the screed is absolutely flat, the porcelain tiles are laid out dry. After pruning, entire rows are laid.
- Continuous seams are needed when several rooms are tiled.
- If one room is being clad, then the joint should be located in the middle of the door opening - under the threshold or the lower element of the interior door frame.
- An elongated rectangular porcelain tile, similar to a parquet board, should be laid perpendicular to the wall that has a window opening. As a result, the flow of sunlight will fall along the seams.
The “seam to seam” layout and the displacement of transverse seams requires the following procedure for calculating the amount of porcelain stoneware:
- The length of the wall must be divided by the size of the tile, including the width of the joint. The same is done for calculating the second wall.
- Both values should be rounded up and multiplied.
How to work with porcelain stoneware
Before we begin to describe the work, let’s consider the material itself in order to better understand what we will have to face.
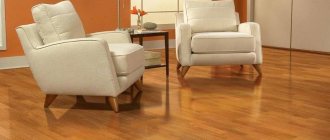
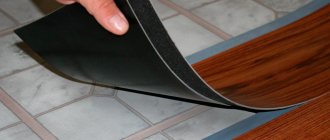
Wood-look porcelain tiles
Porcelain stoneware is a modern finishing material that belongs to ceramic products . What distinguishes it from ordinary tiles is a different production technology and the raw materials used, which results in the following.
- The material turns out to be incredibly durable, capable of withstanding large static loads.
- It has a very low level of water absorption, making it an excellent solution for outdoor installations.
- Porcelain tile has a cast structure and is colored in most cases throughout its mass, which indicates its high resistance to abrasion. There are models that are coated in the same way as regular ceramic tiles with glaze, but this is very rare.
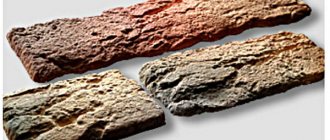
- The surface of the material can have any texture and imitate other materials, for example, wood or natural stone.
Options and installation methods
There are several ways to lay out porcelain stoneware - diagonally, butt to butt, herringbone, mosaic, and also staggered like brickwork.
After this, it is necessary to determine the presence and width of the seams. Large porcelain tiles are most often installed in a seamless manner in the toilet or bathroom. In other rooms, the width of the seams is up to 5 mm with the installation of crosses.
After this, you need to select a technology for controlling the plane of the coating being created. Installation of the first tile is carried out horizontally in two directions at right angles to each other. You can then use the following methods:
- use of the SVP system;
- application of the short 1 m rule;
- checking the level of all subsequent tiles.
The standard installation method is as follows: on the first day, you need to fill the space of the base of the floor with a solid element, and on the second, cut and glue pieces of porcelain stoneware. If the amount of work is minimal, then pruning can be done for each row.
Choosing a tile
Today there is no shortage of choice of porcelain tiles: there are many options in stores that differ in color, structure, and purpose. There are several types of tiles.
Technical
Such tiles are not used for interior decoration of residential premises due to their specific appearance. Its main qualities are high wear resistance and strength.
Polished
Polished tiles have an ideal mirror shine, which is achieved by the fact that manufacturers, along with polishing the surface, cover it with a special varnish. However, such tiles are characterized by an increased risk of injury.
Matte
Matte tiles are not polished, so they have a lower cost and increased strength, as a result of which they receive a number of advantages over polished products.
Structured
Such tiles are similar in appearance to the structure of wood, leather and other materials.
Lapped
This tile is polished, but not completely, so there are both polished and matte areas on its surface. Designed to implement unusual design solutions.
Glazed
These tiles are coated with colored glaze. The product looks beautiful, but is subject to rapid chipping and abrasion. It is better to glue tiles where there are no increased mechanical stress.
Satin
To produce satin tiles, mineral salts and wax are used. Similar products shine, but only a few.
TOP 3 porcelain stoneware manufacturers
| Photo | Name | Rating | Price | |
| #1 | Kerama Marazzi | ⭐ 98 / 100 | More details | |
| #2 | Italon | ⭐ 97 / 100 | More details | |
| #3 | Estima | ⭐ 96 / 100 | More details |
Estima
Estima porcelain tiles (Russia) are produced on modern, latest generation machines in this field, equipment supplied by leading Italian manufacturers
pros
- high wear resistance;
- waterproof;
- the material is fade resistant;
- long service life;
- Can be installed in any room or outdoor area.
Minuses
- bad calibration.
Estima porcelain stoneware
Italon
Italon produces exceptionally high quality porcelain tiles - a product unique in its aesthetic and technical characteristics, as well as in functionality.
pros
- moisture resistance and water resistance;
- the material is frost-resistant;
- long service life;
- resistant to mechanical and shock loads;
- a wide range of.
Minuses
- insufficient wear resistance of the top layer;
- high price.
Italon porcelain tiles
Kerama Marazzi
Kerama Marazzi is a domestic manufacturer that has firmly occupied a leading position for several years in a row. Kerama Marazzi ceramic granite is an innovative, more advanced generation of ceramic tiles.
pros
- good quality;
- wide selection of different textures;
- long service life;
- wear-resistant;
- high strength of the product;
- environmental friendliness and safety.
Minuses
- geometry mismatch.
porcelain tile Kerama Marazzi
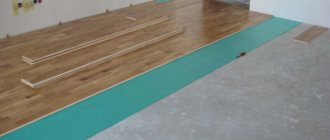
Preparing the base for laying porcelain stoneware
To apply adhesive to the base and tiles, use a notched trowel, which is positioned at right angles to its surface. If the concrete screed is perfectly leveled, then laying and leveling is much easier.
It is not advisable to level the base with tile adhesive - it is difficult and requires a lot of time and money.
To prepare the base of the floor for finishing with cream granite, it is necessary to cover it with a layer of deep penetration primer. As a result, the consumption of glue and the absorption of moisture from it by the screed will decrease, adhesion will increase, and the coated surface will last a long time.
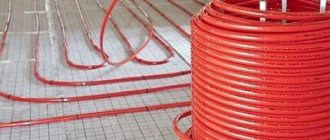
At the same time, at the same step, the installation of TP elements takes place - water pipes, film mats, SIP cable.
Glue selection
If you choose the right adhesive composition for a specific facing material, the coating will last a long time, be strong and reliable. When porcelain tile imitates a natural base, it not only looks beautiful, but is also especially durable. At the same time, its ability to withstand heavy loads is affected by installation, which in turn depends on the selected adhesive mixture.
For each facing material, it is important to choose the right adhesive composition, which will ensure the reliability and durability of the coating. Porcelain tiles that imitate a natural base are distinguished not only by improved aesthetics, but also by increased durability. However, its ability to withstand loads depends on its installation, where the type of adhesive mixture used is key.
Characteristics of mixtures
According to the EN 12004 and EN 12002 standards, adhesives developed for laying tiles are divided into several types depending on their characteristics and chemical properties. composition:
- cement (C);
- reactive (R);
- dispersive (D).
Cement adhesives are especially common - they are universal and suitable for most cases. Reactive compositions based on epoxy resin are characterized by increased adhesion. They are used to glue ceramics with complex compounds, such as wood or metal. When facing a concrete base, it is not advisable to use them due to their high cost. Also, dispersion adhesives are not suitable for concrete bases - they are unable to penetrate deeply into the surface, despite increased adhesion. At the same time, this feature is appreciated when laying the inflow on drywall.
There are several classes into which each type of adhesive composition is divided:
- basic (1):
- improved (2):
- fast setting (F);
- long-setting (E);
- elastic (S1);
- super elastic (S2);
- vertical slip resistant (T).
Tips for choosing a mixture
The quality of the cladding depends on the correct choice of glue. To select a specific composition, it is necessary to take into account the following features:
- What structure does the base have? If the structure is non-standard - old tiles, waterproofing, wood, drywall, standard - plaster, cement screed.
- What tile format? If the tile is large in size, then the glue must have high adhesion.
- What kind of surface the tiles are used on (wall surface, floor surface), and whether they are used inside or outside the building.
- Time period before putting the premises into operation. If time is short or temperatures are minimal, then quick-setting C2F glue is optimal (MAPEI GRANIRAPID is suitable).
- Weather during work.
Working with glue
Due to the near-zero water absorption of porcelain stoneware, certain requirements are put forward for the application of the adhesive composition. So, with standard ceramics, it is enough to coat the surface of the base once. To install porcelain stoneware with a higher quality, it is necessary to apply it on both sides - on the tile and on the screed (or plaster). As a result, no empty spaces are formed under the ceramics, and excellent adhesion will be achieved. When empty spaces appear on the cladding due to impact or increased point load, cracks may occur. There is also a risk of moisture forming in them and further freezing.
When applying glue, use a smooth metal spatula. Remains of glue must be removed with a notched trowel. The dimensions of porcelain stoneware affect the size of the teeth and the type of tool. On the back side of the tile, a thin coating of the mixture will suffice. The main thing is to ensure a strong connection between the glue and the mounting base.
If floor installation is carried out inside a living room, then the connection between the adhesive and the mounting tile side is at least 70% of the total surface. If the tiles are laid in non-residential premises, as well as outside buildings, it is necessary to achieve 100% application of adhesive on both surfaces.
Stages of work
An important criterion for the quality of finishing work is compliance with the correct sequence of stages. Step-by-step instructions will help with this:
- Prepare all necessary materials and tools.
- Start preparing the surfaces. This stage includes several more: elimination of cracks and chips, dust removal and priming.
- Choose a laying option depending on the type and pattern of the tile.
- Mark the surface.
- Prepare the masonry mixture using a mixer and drill.
- Laying tiles.
- The facing is grouted.
Laying porcelain stoneware on the floor can only be done after preliminary leveling and waterproofing of the base surface. Floor tiles are heavy and larger in size than wall tiles. They will be under a lot of stress. If the base surface is not leveled, cracks may appear on the facing coating. Installation on walls does not require such careful preparation of the base.
Preparation
When renovating an apartment yourself, it is important to first read the manufacturer’s instructions for preparing laying and grout mixtures and strictly follow them. The quality of finishing work is ensured by the correct marking of the base. This is best done using a laser level.
Laying porcelain tiles on the wall and floor is possible in two ways:
- with preliminary soaking of the tiles;
- by moistening their back side by spraying from a spray bottle or by hand.
The option for performing the work is chosen depending on the degree of hygroscopicity of the base surface. If it absorbs a lot of moisture, as is the case with wood, the tiles are soaked. This will prevent the masonry mixture from drying out too quickly due to water being absorbed by the base.
Laying on floors and walls
At the initial stage of work, they become familiar with the different methods of laying porcelain stoneware. Manufacturers offer a wide range of tile colors and geometric shapes. There are collections with and without inserts, consisting of square and rectangular products. In order for the cladding to be beautiful, its correct layout is important. Manufacturers always give recommendations regarding it, but you can choose another solution.
Most often, two-color porcelain tiles are laid in a checkerboard pattern. Plain slabs or with the same pattern can be laid out in several ways:
- with rows shifted horizontally (like brickwork);
- with offset rows horizontally and vertically;
- diagonally;
- in a spiral;
- herringbone
Any porcelain tile has almost zero water absorption. Therefore, special requirements are placed on the application of glue. Thin ceramic tiles can be laid by applying the masonry mixture one-sidedly: on the back side of the product. Porcelain tiles require double-sided application: both on the tile and on the base. This will ensure the absence of cavities in the dried mixture and the strength of the facing coating.
When calculating and purchasing glue and grout for finishing with porcelain stoneware, the distance between the tiles is also taken into account. Seamless installation requires more materials.
Stages of masonry work:
- prepare the base;
- using a level, tape measure and marker, mark the base surface;
- prepare glue;
- Using a notched trowel, apply the mixture to the wall and back surface of the porcelain stoneware;
- gently press the tile to the surface;
- apply the mixture to the second tile and place it next to it;
- place a cross between them;
- check with a level the evenness of the resulting surface;
- if necessary, beat the porcelain tiles with a mallet (this work requires special care).
Sawing and drilling
Porcelain stoneware can be processed in several ways. The best choice for cutting slabs is a tile cutter. But since porcelain stoneware has increased strength, it is recommended to use professional or semi-professional. A manual tile cutter is suitable for processing thin tiles: thickness from 3 to 6 mm.
You can cut porcelain tiles with a grinder. To complete the task, you will need a stone or diamond-coated disc. This method of cutting is complicated by the fact that a large amount of dust will be generated during the cut. Therefore, it is necessary to have a respirator. You will also need safety glasses to prevent small particles of porcelain stoneware from getting into your eyes.
Completion of work
After the glue has set, begin grouting the joints. The mixture is prepared in small portions and applied with a rubber spatula, trying to completely fill the gap with it. When laying, the seams are left clean: excess glue is removed from them in a timely manner.
After applying the grout and setting it lightly, wipe the entire treated surface with a damp sponge. This removes excess mixture and smoothes the seams. Thorough washing of porcelain tiles to remove grout residues is not required. After the mixture has hardened further, take a grout float and smooth the seams. Their surface must be perfectly flat.
Required Tools
The tools we need to lay porcelain tiles on the floor:
- container for preparing the solution - usually a plastic bucket 15-20 l;
- trowel or spatula - for laying the adhesive mixture;
- notched spatula - for uniform distribution of glue;
- mixer or attachment for a drill/hammer – for stirring the glue;
- roller, brush - for applying primer;
- level – for horizontal control;
- crosses - to create seams of the required size;
- tile cutter - manual, electric or angle grinder (“grinder”) with a diamond blade;
- primer;
- tile adhesive - any domestic/foreign brand.
After you have purchased the tools for installation work, you should ensure that you have the following tools for finishing:
- Wedges. Another name is the tile leveling system (SVP).
- Crosses. Designed to ensure equally even seams.
By choosing the thickness of the crosses wisely, you will achieve excellent quality flooring. The thickness of porcelain stoneware, which ranges from 3 to 30 mm, should also be taken into account. The thickness of the material for laying tiles on the flooring in an apartment is 4-8 mm. For wall cladding and flooring in public high-traffic areas and building facades, products with increased strength are needed.
Expansion joints
Scheme of floor covering with expansion joints.
To compensate for the deformation of building elements and to avoid damage to the coating, expansion joints are installed in concrete floors. They are divided into three types.
- Perimeter
They are arranged along the contour of walls and columns in order to limit the influence of deformation of structural elements on the screed. To do this, a strip of compressible material, usually 1 cm thick polystyrene foam, is laid around the entire perimeter of the room before pouring the screed.
- Temperature
The screed inevitably cracks during use. To limit the appearance of cracks, expansion joints are installed. It is recommended to cut into squares, but in any case the width should not be less than one and a half times the length. The usual size of squares is 6x6 m.
- Separating
Needed to limit mechanical loads associated with rapid evaporation of moisture in the first half of the year of concrete operation. Performed on an area of up to 30% of the screed. The width of the gaps is usually at least 5 mm.
The last 2 types of expansion joints are used mainly in large commercial premises, or with an area of more than 25 m². For external coverings, at least every 9-12 m².
How to lay porcelain tiles on the floor: all the steps
Installation of porcelain tiles on the floor consists of 5 steps:
- First, glue is applied in the center of the room, which should be spread over the surface using a notched trowel. If the tile is thick, then there should be more glue - but up to a maximum of 5 mm.
- The next step is laying porcelain tiles and tapping the products with a rubber hammer. Separating crosses must be placed between them.
- The glue that comes out through the joints is removed with a sponge or soft cloth. Within an hour after laying the tiles, they will shrink, so they may become lower.
- When laying tiles next to walls, it is necessary to trim porcelain tiles.
- After the work is completed, the glue will dry within 24 hours. After this, you need to prepare the grout and process the seams. To fill the grooves and remove excess mixture, use a rubber spatula. After the grout has dried, remove excess grout with a sponge or damp cloth.
Preparation and calculations
First, establish the sequence of work and draw a diagram.
At the moment, there are several options for how to lay porcelain tiles on the floor. You can lay out a mosaic, place it in a checkerboard pattern, or create a pattern using products of different colors. It all depends on your ideas and imagination.
As soon as you draw up a diagram, you will understand what quantity of tiles and adhesive to purchase in the store. You can use online calculators for calculating finishing materials.
- Decoration Materials
How to glue tiles: a detailed guide that will leave no questions
Rules for laying porcelain tiles on a heated floor
Laying porcelain stoneware on a heated floor is standard, but at the same time it has a number of features.
Make sure the heating system is working properly. When heating with water, the pipes should be covered with a cement screed, but with an electric screed, it is not necessary - the material can be laid on a rubber backing.
The adhesive layer affects the heating of the surface. If the layer is thick, then the heating decreases. The same is true for the thickness of porcelain tiles.
When spreading the glue over the surface, do not damage the heating elements. Do not turn on the heating until the glue and grout are completely dry. After the installation work is completed, gradually increase the temperature - if it increases sharply, cracks may appear under the coating.
To ensure good thermal conductivity of the floor, leave a distance of 2 mm in the seams.
What parameters to pay attention to when choosing porcelain tiles
When choosing porcelain tiles at a retail outlet, the consumer should pay attention to the following basic parameters:
- Correct ratio of thickness and linear dimensions of the material. If the tile has dimensions within 40x40 mm, its thickness can be 5 - 7 mm. In the case where the linear dimensions exceed 60 x 60 cm, the thickness should be at least 8 - 12 mm.
Porcelain tiles 60x60 cm.
- Surface wear resistance indicator - expressed in 3 Latin letters PEI and numerical indices from I (150 abrasion cycles) to V (12000 abrasion cycles).
PEI V tiles
- The slipperiness index of tiles - according to international standards, is designated by the Latin letters A, B or C, which indicates a different coefficient of friction and degree of surface treatment.
- Water absorption rate - it is believed that a high-quality material should absorb no more than 0.5% of the input from the volume of the element. This characteristic is always indicated by the manufacturer.
- Preservation of shade, appearance and uniformity of structure under the influence of aggressive chemically active substances.
- Surface quality, presence of contamination, deviations from geometry. Ideally, porcelain stoneware should have a uniform surface and uniform color. The error of deviations from the geometric parameters specified by the manufacturer should be no more than 0.1% - 0.2%.
Before purchasing porcelain tiles, you should also read positive reviews about the products of the chosen brand. Each company uses its own technological map during production, which affects the performance properties of the material.
Laying porcelain tiles on a wooden floor
It is also possible to lay porcelain tiles on a wooden surface, the main thing is preparation and study of the specifics of the work.
First of all, it is necessary to install wooden logs on the surface, which should already be treated with antiseptic agents. To prevent bending, a gap of 15-20 cm should be left between them.
Next, pour expanded clay between the lags to the top, and then cover the structure with a board and secure it using self-tapping screws. To prevent moisture from the glue from saturating the wood, waterproofing materials are needed. If the wood becomes saturated with moisture, this will lead to its deformation and deterioration in the quality of the coating.
Next, choose one of two styling methods.
- Attach a metal mesh to the treated wooden base using self-tapping screws. Place the beacons and fill them with cement screed - this will become the basis for subsequent installation.
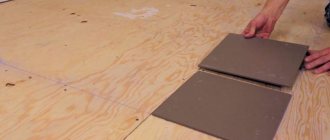
- Use a dry screed: lay multi-layer moisture-resistant plasterboard over the waterproofing. Secure it and start laying tiles. The main thing is to choose an adhesive whose properties are suitable for this material.
Craftsmen often argue about whether laying porcelain stoneware on plywood is acceptable. If you follow the rules and work techniques, complications will not appear. First, you need to install the logs at a minimum distance from each other, and then fix a plywood sheet with a thickness of 3 cm on them. Carefully fix the plywood on the logs, remove debris and sand the seams (when there are several sheets).
Cover the plywood with two layers of primer, wait until it is completely dry and begin installation work. In such a situation, an adhesive designed for installing parquet is optimal.
Preparing the surface for installation
Porcelain stoneware is a durable, inflexible material, so it is not suitable for curved floors. Such floors must first be leveled, for example, by applying a cement screed or pouring a self-leveling mixture.
Before laying porcelain tiles, the prepared base must be cleaned of dirt and dust, and then a primer must be applied. This is especially important for porous surfaces such as plaster and cement screed.
Natural stone has been and remains one of the most durable, durable and, importantly, beautiful coatings. To learn how to make the floor more luxurious, read the article:.
Cutting and processing of porcelain stoneware
Porcelain stoneware is fired in a kiln 2 times at elevated temperatures. There is a hardened layer inside it, so standard cutting of the material becomes more complicated. Thus, when cutting a line with a roller casting cutter, the corners often break off. The size of the floor cladding is large, so a situation may arise in which it does not fit into the tile cutter.
For this reason, other cutting options are optimal:
- angle grinders;
- mobile dry electric tile cutter;
- professional “wet” network tile cutter (an expensive tool).
There may be external corners on the floor, which usually appear at the junctions with the balcony steps. Most often, cutting the edges of two facing elements at an angle of 45 degrees is used.
The grinder requires a separate device. Dry and wet type machines often include angular cutting. Read more about cutting porcelain tiles in our article Methods for cutting porcelain tiles
How to check the level of masonry and grout seams
To check the evenness of the porcelain stoneware covering, you must use a building level. Before installing correctly, you should take into account the difference in the levels of the previous and subsequent layers.
If there is a need to take a break from work, it is important to take into account that the previously laid layer of porcelain tiles has already settled. The subsequent layer, which is planned to be laid later, will only settle. For this reason, different layers of material cannot be laid at the same level.
To lay porcelain tiles correctly, it is necessary to check the level of the laid coating, taking into account that the laying time before the glue hardens is 10-15 minutes. During this interval, items can be moved or removed. The adhesive joint should not have voids, otherwise the tile will crack during use.
A plastic cross for porcelain tiles should be selected depending on the size of the tile. If a material of 30x30 cm is laid, then the seam size should be 3-5 mm. Silicone is used to fill gaps between the wall and the floor, including where pipes pass.
The drying process takes about a day, and the seam becomes completely strong only after 3 days.
Grouting of joints is carried out after the glue is firmly connected to the porcelain stoneware. For this purpose, you can use a fugue of a suitable color. With the help of contrasting grout, the pattern stands out, and the use of a plain material allows you to create a neutral coating with a uniform surface.
When starting to grout the joints, it is important to check their condition, since they should be empty. The entry of any foreign materials into the seam can not only lead to damage to the seam, but also to difficulty in the grouting process. The solution is applied to the cladding diagonally relative to the location of the seams between the elements.
You can use a clean, damp sponge to remove any remaining joint filler. You can start regular cleaning of the floor covering after 2 weeks, but not earlier.
After completion of all work, the quality of the completed coating should be assessed. To do this, attention is usually paid to the following categories:
If the appearance of the porcelain stoneware coating creates a pleasant impression, then it is done correctly. The absence of unevenness indicates good quality of work.
Porcelain tiles in the kitchen
How is porcelain tile different from ceramic tiles? These two materials are similar to each other in appearance, composition and performance characteristics, but due to different production technologies they have significant differences.
Unlike tiles, porcelain stoneware has no porosity, internal voids or microcracks, which provides it with significantly higher strength, water and wear resistance. In addition, it is not afraid of exposure to household chemicals, alkali, acids, or temperature changes. It is because of these qualities that porcelain stoneware is more suitable for the kitchen than any other material, including stone and traditional tiles.
In terms of hardness, porcelain tiles are even superior to natural granite, since they have 8-9 points on the MOOC scale, for comparison: granite is only 6 units, and corundum is 10 units.
Porcelain tiles are made from a special mixture of kaolin clays with the addition of mineral pigments, quartz powder, and metal oxides as coloring agents. It is called ceramic for the reason that it necessarily goes through the stage of high-temperature firing, combined with pressing.
The price of porcelain stoneware floor tiles ranges from 250 to 1800 rubles/sq. m., and the minimum cost for installation is 500 rubles.
Tiles win in this sense; Despite their high strength, porcelain stoneware can crack from a very strong impact; Such a floor will be colder than linoleum, laminate or parquet. Therefore, it is better to insulate the floor. Otherwise, just lay a non-staining carpet in the dining area.
How to distinguish porcelain tiles from regular tiles? This is very easy to do, just look at the cut - on porcelain tiles the coloring pigment is painted to the full depth, as it is added at the very beginning of production.
Alignment methods
When working with porcelain stoneware, use a holder with suction cups. As a result, you will be able to lift heavy tiles when they are piled up.
Often the tiles clearly float on the adhesive, pressing it down, especially if there are differences in plane on the floor. Uneven shrinkage occurs. If the glue is made thicker, it will begin to lag behind the porcelain tiles, so you should use other methods.
When laying heavy porcelain tiles with joints, tile leveling systems should be used. Few piece systems are needed, since the products are usually large in size. Thanks to the SVP, you will ensure an absolutely flat floor surface.
Seamless installation requires a different method. Under the corners of the tiles, 4 screws in plastic plugs should be driven into the floor. Adjust their height by scrolling before applying the adhesive, aligning the tiles in the plane of the floor. This will allow you to lay heavy porcelain tiles evenly, although it will require considerable effort.
Porcelain tiles do not have edging or distorted geometry, so precautions must be taken. An insufficiently responsible approach to work will lead to the fact that even small flaws will completely ruin the floor covering.
Let's go to the store - how not to make a mistake in choosing
When you come to the store to buy porcelain stoneware floor tiles, arm yourself with a pen and a notepad in which you write down:
It’s better not to buy the option you like right away. Return home, think everything over, and calculate the required number of tiles with a 10% margin and taking into account the format.
Consider what components you will need - grout, baseboards, corners, thresholds. If you want to save money, look for the tiles you like in other stores and online stores by article number or simply by brand name, collection, etc.
Grouting joints
There are separate putties for sealing tile joints. Standard adhesive cannot be used for installation - it has a coarse-grained structure and an unaesthetic appearance.
If there are expansion joints, they must be sealed with silicone or two components:
- Elastic filler. Suitable materials include polystyrene foam and polyurethane foam. The depth of the seam should be greater than the size of the strip - this will allow space for the expansion of the filler.
- Surface sealant. There are products based on silicone and polyurethane. Such sealants are characterized by increased elasticity, so they can be used for grouting gaps.
Cement putties
Cement grouts are inexpensive and come in a variety of colors, which makes them popular and widespread. Optimal material from European manufacturers. The choice of fugue must be taken responsibly, because even if the cladding is done at a professional level, poor-quality putty will completely ruin it after a while.
Typically, porcelain stoneware is laid in places of high humidity, so you should buy putty with antifungal and moisture-repellent elements in its composition. To ensure enhanced waterproofing of joints, there are special drinks that are used to cover caulked joints. There are 2 classes of impregnations, differing in the degree of penetration into the fugue:
- Polymer varnish. It is characterized by high waterproofing and deep penetration.
- Water repellent. Used to impregnate the putty surface. If the top layer of the fugue is damaged, water barrier weak points will arise.
Before applying impregnation with a brush, you should protect the tile from contact with the composition, otherwise stains will appear on its surface. Double application is necessary: repeated treatment is carried out every other day.
No earlier than 24 hours after lining, you can begin to cover the seams. But if quick-setting glue was used, then the waiting time is reduced to 3-4 hours from the moment of installation. It is necessary to thoroughly clean the joints from the binder mixture and wash the tiles. When mixing grout, follow the manufacturer's instructions.
Joining requires a rubber spatula or grater - with the help of these tools a fugue is applied to the seams. To prevent the caulk from breaking down, fill at least 2/3 of the depth of the gap with the mixture. The composition should be applied with effort. Voids require re-processing. Residues are immediately removed with a spatula. One approach allows you to process up to 3 m2. The chosen manufacturer and type of putty influence the specific area.
The easiest way to proceed is with glossy porcelain tiles. In the case of structured or matte material, grouting becomes more complicated: due to the penetration of the fugue into the pores, it is difficult to wash out. In such situations, you should wash the mixture using a dampened dish sponge, applying its hard part to the surface.
The final step is to treat the seams with a moistened foam sponge. A number of manufacturers offer special products, but their use is not necessary. The main thing is to move diagonally in relation to the joints, since if you move parallel, the fugue from the gaps will be washed out.
It is first necessary to smooth and compact the fugue layer using a round rubber spatula or a cylindrical cable (8-10 mm). This will ensure that the seams are evenly deepened and smooth. After 10-20 minutes, when the grout begins to dry, you can completely wash the lining.
Epoxy putties
Epoxy putties contain resin and filler. If you grout the seams with such a fugue, this will ensure their higher quality compared to cement putty. The material is characterized by increased density, resistance to moisture and chemicals.
Applying epoxy putty is a more complex procedure compared to standard grout. When mixing the components, carefully observe the gramming and wear rubber gloves to avoid harm to your health. In one approach, a maximum of 1 square of cladding should be processed. The spatula movements are standard. The finished composition “lives” for a maximum of 30 minutes.
Undried seams should be thoroughly wetted with water using a kitchen sponge until an emulsion is formed. Be careful not to allow the mixture to wash out of the joints.
To remove liquid residues of the mixture, a rigid cellulose sponge is used. Once the sponge is soaked in resin, it changes. The manufacturer Litokol offers sponges designed specifically for working with epoxy grout. Their cost is higher, but their service life is longer. It is important to wash off the epoxy before it begins to harden. If plaque remains, use a solution of water and specialized detergents (or 10% ethyl alcohol).
A little about silicone
Silicone gets on the ceramics, so it must be urgently removed with ethyl acetate, toluene or gasoline before it sets. If the material has time to harden, then the solvents will be powerless - you will have to resort to mechanical force, which increases the risk of damaging the tiles.
Floors
0 votes
+
Vote for!
—
Vote against!
Thanks to the lightning-fast development of innovative construction technologies, in the arsenal of home craftsmen planning to repair flooring, in addition to traditional methods, such as installing a self-leveling floor and finishing with tiles, another method has appeared - laying porcelain tiles on the floor. Despite the fact that porcelain stoneware is a relatively new material, it has been used for the installation of floor coverings for quite a long time, along with ceramic tiles. In addition, the relatively recent appearance of porcelain stoneware did not prevent it from occupying a strong niche in the construction market, which is explained by its durability, high aesthetic characteristics and environmental safety. However, the process of laying porcelain tiles is somewhat more complicated than finishing the floor with ceramic tiles and is characterized by certain nuances, ranging from the peculiarities of calculating the required amount of material to the technology of grouting joints. By observing these nuances, you will be able to install high-quality flooring that will last as long as possible and, at the same time, preserve its original appearance.
Content
- Porcelain tiles: features of flooring and rules for choosing materials
- Advantages of porcelain tiles: their differences from ceramic tiles
- Selecting porcelain tiles and preparing them for installation
- Subtleties and options for laying porcelain tiles on the floor
- Methods for laying porcelain tiles: procedure
- Technology for laying porcelain tiles on the floor: recommendations from experts
- Materials and tools for laying porcelain tiles
- Preparing porcelain tiles for installation: expert advice
- Preparation of the base: main nuances
- Choosing adhesive for laying porcelain tiles
- How to install porcelain tiles seamlessly?
- Tips from experts on laying porcelain tiles
Porcelain tiles: features of flooring and rules for choosing materials
Porcelain stoneware is a material made from a mixture of quartz, feldspar, clay and mineral dyes. The technology for manufacturing porcelain stoneware involves pressing and firing the specified composition in special kilns, resulting in high-strength tiles that are no different from natural stone in their aesthetic and performance characteristics. Due to the high strength, wear resistance and moisture resistance of porcelain stoneware floors, the installation of porcelain stoneware slabs, carried out in accordance with all the rules, will guarantee a long service life of the floor covering, which will retain its original appearance.
Since the floor is the basis of any room, in the process of choosing flooring it is necessary to take into account the functional purpose of the space. Due to the fact that porcelain stoneware, unlike ceramic tiles, is a more durable and heavier material, its installation is a technologically more complex process.
When installing flooring in residential premises, take into account the requirements for certain premises. If we are talking about a hallway, then the floor covering must be moisture-resistant, resistant to negative chemical influences (salt, which is sprinkled on sidewalks in winter) and dirt, as well as mechanically strong and wear-resistant.
The floor in the kitchen should be characterized by wear resistance, insensitivity to cyclic temperature fluctuations, and resistance to chemical-based detergents. Similar requirements apply to the floor in the bathroom, which in addition must be resistant to moisture and non-slip. Thus, porcelain stoneware, which is characterized by the above characteristics, can be used for installing flooring in the specified premises.
In addition, matte porcelain stoneware, unlike polished, is characterized by a rough surface and, due to its high resistance to mechanical stress and high humidity, can be used for installing flooring in workshops, boiler rooms and garages, where increased demands are placed on it.
Advantages of porcelain tiles: their differences from ceramic tiles
Despite the fact that porcelain tiles and ceramic tiles are similar in appearance, distinguishing them is not as easy as it seems. However, they have significant differences.
Unlike ceramic tiles, porcelain stoneware can withstand high mechanical loads, being a material with high strength. The manufacturing features of porcelain stoneware determine its specific color not only on the outside, but also on the inside. The features of the pattern are formed during the manufacturing process of the tile itself. Thanks to these nuances, the pattern can be seen not only on the surface, but also on the cut of the porcelain tile. The technology for making ceramic tiles involves applying a pattern only to its surface after production.
In addition, porcelain stoneware has the following advantages:
- Long service life;
- Resistance to high and low temperatures;
- Increased moisture resistance;
- Immunity to chemical-based detergents;
- Wide selection of sizes and colors.
Selecting porcelain tiles and preparing them for installation
Before purchasing porcelain tiles, sketch out a plan of the surface on which installation will be carried out and calculate the required amount of material. Calculate the total area of the room and based on 1 sq. meter of surface, determine the total laying area and the required number of porcelain tiles. Having calculated the required amount of material, add 8-10% of the total amount of material to the resulting figure and thus you will get the required number of porcelain tiles that you need to purchase. This will allow you to insure yourself against errors in calculations and damage to the material during transportation. When purchasing porcelain stoneware slabs, make sure that their design, color scheme and format are identical for the entire purchased batch of material.
In the process of choosing porcelain stoneware, the purpose of the room in which the installation will be carried out is taken into account. If it is a bathroom or kitchen, in order to avoid possible injuries that may occur when water gets on the floor, try to give preference to porcelain tiles with a rough surface.
Subtleties and options for laying porcelain tiles on the floor
It was previously noted that porcelain stoneware has a variety of shapes, a wide color palette and a large selection of sizes. Even without using special types of porcelain stoneware, you can install it in various ways, shown in the figure below.
Methods for laying porcelain tiles on the floor
By choosing one of the presented options and giving preference to single-color porcelain tiles, you will get an original image, especially if you combine tiles of different sizes and colors.
Important! If the room in which the flooring will be installed is characterized by an irregular shape, the installation of porcelain stoneware can be done in accordance with the drawings presented below.
The peculiarities of image perception determine certain subtleties, the observance of which will be appropriate in the process of laying porcelain stoneware. They are as follows:
- The size of the tile has a direct impact on the visual assessment of the room: large tiles visually make the room smaller, small tiles make the room larger;
- To visually increase the width of a room, designers recommend giving preference to patterns laid out across, while patterns laid out along the room help to visually increase its length;
- To combine several areas of the room into a single whole, it is recommended to use a through pattern. The division of a room into several zones is carried out using a single drawing;
- The use of light-colored tiles helps to visually increase the area of the room, while dark colors visually reduce its area;
- If during the installation of the flooring you place the tiles at an angle of 45 degrees, the edges of the porcelain tiles should be positioned strictly parallel to the diagonals of the room, as indicated in the figure below.
Methods for laying porcelain tiles: procedure
Depending on the type of surface on which the installation will be carried out, there are several options for laying porcelain stoneware on the floor, which are most often used in practice. These include:
- Laying porcelain stoneware slabs on raised floors, involving the use of special structures for their fixation. This method of laying porcelain stoneware is relevant not only for installing false floors, but also for ventilated facades. It requires specialized professional skills and is carried out mainly by experienced craftsmen.
- Laying porcelain tiles on the floor using special adhesives, which even a beginner can do.
The procedure for laying porcelain tiles is as follows:
- Preparation of materials and tools that will be required during the work process;
- Preparing the base for laying slabs;
- Laying porcelain stoneware slabs;
- The final stage is grouting the joints.
Technology for laying porcelain tiles on the floor: recommendations from experts
Materials and tools for laying porcelain tiles
To get started, prepare the following tools:
- A grinder equipped with a diamond wheel, or a tile cutter;
- Building level;
- A metal ruler or building level, which are necessary for taking measurements;
- A simple and notched spatula, as well as a rubber trowel;
- A marker with which the surface will be marked;
- Drill equipped with a mixing attachment;
- Container for mixing the solution.
In addition, you will need materials from the list below:
- Primer intended for treating the base;
- Porcelain tiles;
- Adhesive for installation of porcelain tiles;
- Silicone sealant;
- Grout for seams.
Preparing porcelain tiles for installation: expert advice
First of all, experienced craftsmen advise carefully considering the installation plan for porcelain tile flooring, which involves determining the installation method, the nature of the pattern, the thickness of the adhesive layer and the method of its application. Recently, seamless laying of porcelain tiles, which has the visual effect of forming a monolithic coating, has been gaining popularity. However, to install flooring using seamless technology, you will need special rectified tiles characterized by precise geometry, taking into account minimum tolerances. Porcelain tiles with different surfaces can be subjected to the rectification process: polished, matte or structured.
The disadvantage of this installation method is the possibility of using tiles of only one size, as well as the impossibility of ensuring the same length of seams and uniform filling. However, this method also has advantages - its use allows you to provide a uniform surface without seams and save on the materials used. Despite the advantages of the method, many people prefer the traditional installation method.
Before installation work begins, the surface of the tile is cleaned of the protective layer applied by the manufacturers to preserve its integrity. Most often, technical wax is used as a protective layer, which can be removed with warm water and detergent. If paraffin was used as a protective layer, it is removed with a spatula.
Preparation of the base: main nuances
Porcelain stoneware can only be laid on a perfectly flat surface with sufficient load-bearing capacity, which will be the key to the quality of the floor covering. In case of unevenness on the mounted surface, they will cause a difference in the thickness of the laying layer and a subsequent difference in stress on the coating, which will lead to a deterioration in the adhesion of the tiles to the base. In this regard, before laying porcelain stoneware on the floor, the price of which depends on the quality of the material used, the installed surface is cleaned, dusted and primed.
Important! If porcelain tiles are installed on a wooden surface, make sure that it does not spring under the weight of a person. If a defect is detected, pack the reinforcing mesh onto the wooden surface.
Choosing adhesive for laying porcelain tiles
Porcelain stoneware is a material characterized by zero water absorption, and this must be taken into account when choosing an adhesive mixture. Due to the fact that the adhesive for laying porcelain tiles must have a high degree of adhesion to the surface, it is forbidden to use cement mortar to install porcelain tiles on the floor.
Important! The cost of laying porcelain tiles on the floor will be slightly higher if you use adhesive mixtures characterized by a large percentage of polymer additives, however, this option is the most preferable due to its high reliability.
When choosing an adhesive for laying porcelain tiles, take into account the nature of the base on which installation will be carried out, as well as the recommendations of the adhesive manufacturer presented in the instructions.
If the installation of the flooring will be carried out in a corridor or other room with high foot traffic, experts recommend giving preference to more rigid adhesives, for example, two-component cement-based adhesive, which contains latex and epoxy resins. To lay floors in rooms with high humidity, use elastic adhesive with high elasticity.
How to install porcelain tiles seamlessly?
This installation method is relatively new and requires compliance with certain technological nuances.
- Seamless laying of porcelain tiles involves the use of large-sized porcelain tiles measuring at least 600 x 600 mm. By observing this requirement, you can minimize the number of seams;
- As part of the seamless installation of porcelain tiles, the seams act as a kind of buffer that softens the load placed on the porcelain tile surface. Grouting compounds used to finish joints contract and expand during temperature changes, which prevents cracking of the floor covering. If these materials are neglected, the floor covering will soon fail, losing its original characteristics;
- Laying porcelain tiles using seamless technology can only be carried out in a certain temperature range from +5 to +35 degrees;
- In the process of laying porcelain stoneware, you can leave a gap of no more than one millimeter, which is filled with a special grout and epoxy resin, which is matched to the tone of the tile;
Tips from experts on laying porcelain tiles
- If the sketch of the design of your flooring involves creating a symmetrical pattern, it is better to start installing porcelain tiles from the middle of the room, stretching the string along the line of symmetry;
- The adhesive, mixed to a creamy consistency, is applied to a small area of the surface to be mounted and subsequently leveled with a spatula. It is important to prevent the formation of bubbles;
- Make sure that no voids form in the adhesive layer between the floor and the porcelain tiles, which will prevent the tiles from cracking during use.
- The adhesive surface obtained during the installation process is treated with a notched trowel;
- After laying porcelain tiles on the adhesive composition, check the correctness of its installation using a building level;
- The distance between each subsequent laid element should be no more than 3 mm. This laying rule is common for all types of porcelain tiles, with the exception of edged porcelain tiles, when the gap is almost invisible and does not exceed 1 mm;
- The porcelain tile coating, laid in accordance with the rules described above, is left for 3-4 days until the adhesive composition has completely dried, after which it can be used with maximum loads.
- The final stage of installing porcelain stoneware flooring is grouting the joints. When choosing a grout color, several parameters are taken into account - the color of the tile and the width of the joint. In most cases, experts recommend giving preference to the least easily soiled gray tones of grout.
- To grout tile joints, use a rubber spatula, which is also used to remove excess grout.
The quality of installation work performed is assessed in accordance with the following criteria:
- The surface of the porcelain stoneware flooring should be characterized by the absence of bulges and depressions;
- The surface of the flooring should create the impression of a single harmonious composition.
Laying porcelain tiles on the floor video
Tips for use
To extend the life of your flooring, use a number of tips. So, if an acidic composition gets on the seams, remove it immediately - otherwise the seams will be damaged. However, you should not overfill them with water and soak them.
To remove stubborn stains, use alkaline solutions. They can also be used to remove wine and grease stains. Acetone and gasoline will help get rid of resin, wax and other compounds that are hard and sticky.
Acid-based products are suitable for cleaning flooring, but they should not be used regularly - otherwise this can lead to discoloration of the seams and their destruction. Stiff brushes should also be used with caution. The best option is soft-lint mops.
Preparing porcelain tiles for installation
Porcelain stoneware is a very fragile material, so it is protected from breakage during transportation. Technical wax or paraffin is applied to the front side of the panels. Before installation, the protective layer must be removed.
It is better to remove wax by washing the slabs using a fat solvent and other cleaning agents. The paraffin will have to be carefully cleaned with a spatula.