- September 23, 2018
- Terms
- Katerina Belokon
Nowadays, people try to be original and inventive in order to stand out from the rest. This can equally apply to their appearance, hobbies, or even the interior of the apartment. A very interesting fact is that you can succeed in all of the above areas with the help of paint that glows in the dark.
What is it and how does it work
Glow in the dark paint is a specific type of paint that has special characteristics. The thing is that it can glow on its own in absolute darkness, without having any power source. This is possible due to the fact that the paint accumulates the required amount of energy when exposed to light. As a result of this, it can emit light on its own for a long period of time.
Sometimes it happens that buyers do not know the correct name for paint that glows in the dark. Luckily for her, there are many titles, with the following being the most popular:
- phosphor;
- luminescent;
- light accumulative;
- self-luminous.
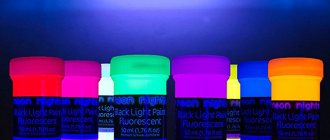
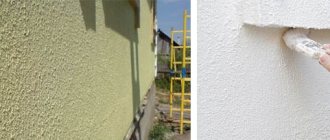
Features of using neon paint in cans
Aerosols are produced for the design of facades and interiors. One package is enough for a single-layer treatment of 2 square meters of area. All neon colors are transparent and vary in their night glow. You can find all the colors of the spectrum from red to violet, super-bright ones - light green (neon) and blue.
To form a uniform layer, it is better to do double spraying. Mixtures packaged in aerosols are alkyd and acrylic. Spray cans can be used to treat any surface:
- Concrete;
- Brick and block masonry;
- Plaster;
- Drywall;
- Wood;
- Wood board;
- Cardboard;
- Thick paper;
- Polymer finishing (any types of plastic, foam);
- Metal;
- Glass.
To create drawings, the contours are sealed with masking tape to create an even border where the color transitions.
To form a uniform layer, it is better to do double spraying.
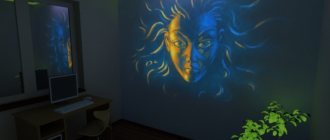
For wall decoration in an apartment
Neon paint is often used for artistic wall painting and ceiling decoration of nightclubs. In an apartment with luminous decoration, it is worth observing moderation. Light-emitting finishing is appropriate on the ceiling and along the baseboards. On the walls, paintings, lamps, and stucco decorations are framed with luminescent paints.
On the walls, paintings, lamps, and stucco decorations are framed with luminescent paints.
In landscape design
Neon paint in cans for stone was invented by landscape designers. A transparent layer adds color to the evening landscape. You can make a luminous version of borders, add light to the design of rockeries. The phosphor can glow with slight attenuation for up to 12 hours. In the southern regions, where it gets dark early, light-emitting paints are an ideal option for wooden fences, garden furniture, and light gazebos. You can highlight window frames and path contours.
A transparent layer adds color to the evening landscape.
Glowing paint has become a common attribute of nightlife establishments; shop windows and park areas are decorated with neon. Due to their versatility, self-luminous compositions are widely used for practical purposes. You can create an unusual interior yourself; making a dye with a phosphor is not difficult.
Compound
It’s worth immediately drawing your attention to the fact that this paint has nothing to do with phosphorus, the main feature of which is the emission of light in the dark. You also need to understand that the composition of this coating does not contain any substances harmful to human health.
It is worth mentioning that a substance with similar properties was an object of desire back in ancient times. Despite the fact that people then did not know what glow-in-the-dark paints were called, they still managed to achieve the desired result, but with the use of harmful and dangerous components.
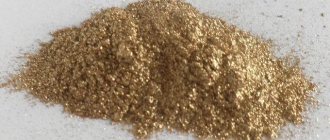
Today, the main property of this substance is possible thanks to the action of a luminescent pigment, which is also known as a phosphor. In itself, it is a powder that is capable of accumulating light radiation. The paint itself is obtained by mixing this powder with a transparent base, which is often acrylic.
You can make the paint glow in different colors by adding fluorescent fillers to its composition. As a result, the paint will emit the following colors:
- blue;
- violet;
- green;
- red;
- yellow.
Material characteristics
Some fluorescent inks are called ultraviolet inks because of their ability to become bright in the dark. High-quality paints and varnishes are safe for health, but it is important to evaluate their exact composition before purchasing. Cheaper products contain a lot of phosphorus, which makes them glow, but are toxic. It is not worth buying such materials.
Most fluorescent enamels contain UV filters (modifiers) that protect them from fading. If such substances are not present, the paint layer will soon fade when used externally, because the initial light fastness of the material is low. Another option to increase UV resistance is to apply a transparent varnish with the desired properties on top of the paint layer.
The pigment grains in the composition of the products are always quite large, so the coating will be grainy. The problem can be solved by providing the required density to the layer by applying 2 layers. Almost all fluorescent coatings cannot tolerate heating above +150...+200 degrees, so they cannot be used for thermally unstable surfaces.
The most important average technical characteristics of the products:
- specific gravity - 1.09 - 1.12 kg/l;
- dry residue – 50 – 55%;
- hazard class - 4 (low-hazard);
- consumption - 70 - 90 g/sq.m;
- viscosity according to the VZ/245 device - 20 - 40 s.
Scope of application
Considering the fact that there are many names for paint that glows in the dark, it is not surprising that it has a very wide range of applications. Due to its unique properties, this substance can be found in the following areas of application:
- Interior Design. This paint is a very popular material for decorating clubs and restaurants, applying certain images to walls, ceilings and even floors. In residential areas, such paint is used quite rarely, since it is impossible to achieve complete darkness, which may sometimes be required for a restful and restful sleep.
- Body art. The harmless paint allows you to apply luminous makeup and manicure.
- Textile. Dye is applied to clothing and shoes either for advertising purposes or to make the products unique. It can remain on textiles even after 50 washes.
- Printing. Production of advertising products that would be visible in the dark.
- Tuning. You can use paint to customize cars, motorcycles and even bicycles.
Additional effects and drawings
The high decorative characteristics of textured paints provide wide scope for creative imagination.
A number of options for additional decoration of the surface of textured paint are used:
- Trowel. If you have enough work experience, you can achieve the creation of full-fledged artistic compositions on the ceiling or walls. Most often, the brush stroke technique is used for this: instead of a brush, in this case the artist holds a trowel.
- Stencils, sponges, stamps, etc. To create a uniform surface for additional decoration, you can use pre-selected stencils or sponges. The print is applied to the still raw material, so in such cases it is better to work together: one person applies the paint with a roller or spatula, and the other then applies additional prints to the surface.
- Graters, scallops. They are used to scratch the surface (this technique is typical for creating the “Marseilles wax” texture).
- Azure. Using this material, the painted surface of the ceiling or walls is created with an additional effect. It can be shine, gloss, mother-of-pearl, etc. This will require a two-layer application of the glaze using a short-nap roller or paint brush. A pre-moistened and wrung-out natural sponge is also often used. Having dipped it in mother-of-pearl azure, decorate the base using circular movements. To increase the clarity of the resulting pattern, the sponge is pressed harder and rolled.
To protect adjacent surfaces from paint, the boundaries of the area to be finished are taped with masking tape. If you lack experience, it is not recommended to immediately take on the design of open areas of the ceiling or walls. It is better to choose for preliminary training a place on the wall that will later be covered by a cabinet. Given the thickness of the textured paint, it takes several days to completely dry.
Variety
All these paints can be classified according to the type of active substance. So, the following options are available:
- Fluorescent paint. Its characteristic feature is that it can study light only under the influence of ultraviolet rays. So, if you've ever wondered whether fluorescent paint glows in the dark or not, now you know for sure that it requires certain conditions in the form of UV radiation. As mentioned above, this paint can glow in different colors.
- Luminescent paint. In the dark, it gives off accumulated sunlight or artificial light. To fully “recharge” it takes about 15 minutes of light exposure.
- Reflective paint has a composition that allows it to glow only when light hits it. That is why it is actively used for road markings and the production of road signs.
Further, such paints can also be classified according to their degree of transparency:
- Translucent. They are distinguished by the fact that in daylight they are almost impossible to notice. In the dark, they emit blue or green light.
- Colored. They are easy to see in daylight and emit light equally well in complete darkness or when exposed to UV rays.
The difference between fluorescent and luminescent paints
Luminescent paint also belongs to the group of luminous coatings. Its difference lies in the content of special phosphors, which determine the presence of unique properties. Luminescent paints are capable of absorbing light from various external sources during the day, and then begin to emit it themselves.
How the material differs from fluorescent is easy to understand. Fluorescent paintwork is beautiful and bright during the day, but practically indistinguishable from plain paint. Luminescent glows at night due to the accumulation of light energy, and is invisible during the day. The duration of the glow varies - from several minutes to several hours.
Luminescent products are more expensive, and their production requires special permission. Phosphors can work for many years, are physically and chemically stable and resistant to external factors.
Application Tips
In order to achieve the maximum effect from such paint, you need to know how to apply it correctly. First of all, it is worth noting that the ideal base is a flat white surface. When applying such coatings to a dark coating, you need to understand that the black color itself absorbs a significant part of the light, thereby taking away the brightness from the luminous paint. If you cannot change the color of the surface, then it is recommended to treat it with a primer before painting.
Before starting work, the paint itself must be thoroughly mixed, since luminous elements may settle to the bottom of the can over time. Regardless of color, the surface must be clean and dry. The painting itself must be carried out in two layers, and the second can be applied only after the first has completely dried.
Application rules and techniques
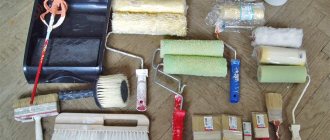
Depending on the scope of work, you need to purchase tools - a brush, roller or spray gun. Cotton swabs are often used for crafts. The paint should be poured into a convenient container. A small item can be dip painted. From a can of spray paint is simply sprayed onto the surface.
The product must first be prepared: washed or cleaned, dried. Work is carried out at a temperature of at least +10 degrees. The paint is stirred or shaken and 2-3 thin layers are applied. The balloon is held at a distance of 30 cm. To create drawings, stencils that have been cut out in advance are used. Each layer should dry for 3 hours or more, depending on the temperature. Final drying lasts up to 24 hours.
How to make it yourself
After we have figured out what the name of the paint that glows in the dark is, what types there are and how to apply it correctly, we can mention that you can make it yourself. To do this, you will need varnish, a solvent, suitable containers (glass or ceramic), and the phosphor itself. The manufacturing process consists of three simple steps:
- Pour the varnish into the container.
- Pour in the powder (the more you pour in, the brighter your paint will be, but the standard ratio is 1:3).
- Add 1% solvent to evenly distribute the luminous substance and mix.
This is a recipe for making transparent enamel. If you want to give your paint a certain color, then you still need to add the dye you need to the above composition.
How to make glowing paint from phosphor powder
They learned to make their own phosphor paint many centuries ago, when they began to extract pure phosphorus. Unlike phosphorus mixtures, phosphor mixtures do not emit harmful fumes. You can make paint with phosphor yourself. Substances that will be required for this:
- A self-charging pigment capable of emitting a glow;
- Ready-made varnish intended for the selected type of surface;
- Solvent or thinner that matches the varnish base;
- A mixing container made of glass, cermet or porcelain (you need a not very porous, chemically neutral material).
Stages of preparing self-luminous varnish:
- Pour the finished coating into the prepared dishes;
- Add phosphor there in an amount from 1/3 to 1/2 of the volume of varnish;
- Add up to 10% solvent;
- The mixture is thoroughly mixed;
- If necessary, the varnish composition is tinted with soluble pigments. The result will be thick enamel, ready for application.
You can make your own luminescent paint for the street, interior, and landscape design of a suburban area.
Unlike phosphorus mixtures, phosphor mixtures do not emit harmful fumes.
When painting, you must adhere to some rules:
- The surface must be pre-cleaned so that there is no dust and debris, and then dried;
- Before application, the mixture is stirred again so that the phosphor that has settled to the bottom rises to the top;
- The second layer of coating is applied only after the first has dried; the recommended interval for acrylic varnishes is from 1.5 to 2 hours.
The phosphor intensely emits light on white surfaces. It is advisable to pre-prime black or dark objects or paint them with white enamel on the same basis as luminescent paint.
The second layer of coating is applied only after the first has dried.
I want to make a night light painting. You can paint this with fluorescent paints. They also say fluorescent colors, as you like. I have acrylic and gouache, so there will be 2 drawings. Such paints are sold both in sets and individually.
Their distinctive feature from other paints is their bright acidic shades in daylight, so it is better to choose a subject for a painting other than classical painting. In the dark, an incredible metamorphosis occurs with fluorescent paints. But more on that later. In addition, there are fluorescent ink and felt-tip pens that can also be used to draw, achieving a similar effect.
Let's start with acrylic paints. They can be used to paint on various non-greasy surfaces. It is better not to use paper, since it cannot withstand the weight of paint; in extreme cases, use special cardboard 3 mm thick. for acrylic and oil painting. I will be painting on a primed canvas stretched on a stretcher, measuring 30x40 cm.
A little theory about acrylic. Acrylic paints, which are intended for painting, are non-toxic, do not have a strong odor, dry quite quickly, darken a little when dry, and are water-based. Until the paint has dried, it dissolves perfectly in water, and after drying it is almost impossible to remove from the surface. Acrylic paints do not require additional solvents or thinners, with the exception of some painting techniques. The paints are lightfast, that is, they do not fade in the sun, so additional protection of the finished work with varnish is not required. The paint adheres well to the painting surface and generally covers it well. For painting with acrylic paints, hard synthetic brushes are best.
Fluorescent paints, including acrylic ones, mix well with each other, which allows you to create different shades. Theoretically, they can also be mixed with matte paints, but in my personal experience it is better not to do this, with the exception of mixing white fluorescent paint into matte pastel paints to create light spots on the canvas. I'll show you why later. And now I’m just applying a background layer of a mixture of matte pink powder paint with white fluorescent paint.
White fluorescent paint is translucent; it not only brightens the shades of the paints to which it is mixed, but also takes away their coverage. Accordingly, to obtain an opaque color area, you need to apply several layers of the mixture to the canvas. You can also use white paint to highlight other shades using the glazed technique, that is, by applying it over colored paint.
After the background layer has dried as a carbon copy, I transfer the contours of the drawing to the canvas. There are an incredible variety of silhouette drawings on the Internet. I chose a romantic couple under an umbrella. Another silhouette drawing can be simply cut out, applied to the canvas and traced along the outline with a pencil. You can read about other ways to transfer contours to a drawing surface here.
Now I need to protect the outlines of the image from other paints getting on them. For this I use masking fluid. In general, it is intended for painting with watercolors on paper. This is a latex solution that, when dried, forms a film on the surface, which is then easily removed by hand or an eraser. It’s just that in watercolor it’s not customary to use white paint, and in order to leave some areas of the picture untouched, such as highlights, they are covered with a mask.
The masking liquid is applied to the surface in a thick layer. Due to the fact that it hardens quickly, it is better to take a separate brush for it, or work quickly and immediately after finishing the work, wash the brush with warm running water and soap or dishwashing liquid.
The mask has dried. Next comes multi-colored fluorescent paints. You can paint with them in different techniques, just like with regular acrylic - you can apply both thick impasto strokes and very liquid ones, heavily diluted with water. In this case, I chose the wet-on-wet technique to achieve a watercolor effect. I wet the surface of the canvas with water from a spray bottle using a very fine spray, covering the silhouette drawing with my hand.
I alternately lay out paints of different colors on the palette and apply them to the canvas with a brush dipped in water. Above the canvas I have a ruler for approximately equal distribution of paints of different colors. First there is lemon paint in the center, then, moving towards the left edge of the canvas - orange, light red and carmine. Then to the right side of lemon comes light green, blue and violet.
Fluorescent paints belong to the category of luminous paints along with phosphorescent and luminescent paints, which are able to accumulate light and emit it for some time in the dark. Phosphorescent paints are used mainly for technical purposes, since the phosphorus they contain is unsafe for human health. They are used to make road markings, paint various signs and indicators, as well as the hands and numbers of some clocks. You can paint with luminescent paints. A separate article will soon be published on our website about the features of painting with luminescent paints.
The maximum glow effect of fluorescent paints is achieved under the influence of ultraviolet radiation, due to the presence in their composition of special organic substances with a fluorophore - a fragment of a molecule that gives the substance luminous properties. The most common substances capable of fluorescence are: quinine, fluorescein, eosin and rhodamine.
Fluorescence is a physical process. Under normal conditions, when light hits any surface, it is partially absorbed and partially reflected. Moreover, only a ray of light from the visible spectrum is reflected that corresponds to the color of the painted surface. This reflected light, entering our eyes, stimulates the functioning of photoreceptors, as a result of which we see what color the surface is painted.
But if an object or object contains fluorescent molecules, they are excited when ultraviolet radiation hits them, which the human eye cannot see, and they themselves begin to emit energy. In this case, the partial expenditure of energy during absorption leads to an increase in the wavelength during emission, as a result of which the color of the light beam shifts towards the visible spectrum, which our brain perceives as a bright color through the eyes.
After applying the paint, before it begins to dry, I again spray the surface with water and slightly lift the top edge by the stretcher so that the liquid paint is evenly distributed over the canvas. They flow down, and at the border of two colors they mix with each other, forming smooth transitions.
While the paint drips on the contour drawing are liquid, I remove them with a damp paper towel and again wait for the paint layer to dry completely.
Even in a very liquid state, fluorescent acrylic almost did not lose its brightness. I remove the frozen masking liquid from the canvas; it is no longer needed here. As you can see, the mask, although it is intended to be applied to paper, performs its function perfectly and is easily separated from the primed canvas without leaving marks.
I paint the silhouettes of the characters black. Black fluorescent paint does not exist at all, neither in sets nor individually. If a drawing requires black color, ordinary black paint is used, mine is matte. With a round brush No. 0 I outline the borders of the silhouettes, and with a brush No. 2 I paint the inside.
I slightly correct the remains of the pink background, and along the edges with a dry sponge I apply a small amount of yellow and green paint mixed with white onto the canvas.
In my opinion, the rainy plot lacks rain. Usually in drawing it is depicted as white, gray or blue. I'll have light blue rain. On the palette, I highlight the blue paint with a white and liner brush over the entire surface of the canvas, including the silhouettes, and draw thin broken lines of different lengths in a chaotic manner, but approximately in the same direction, like an umbrella is tilted. There is a ruler on the canvas. Of course, one does not paint with a brush under a ruler. It acts as a guide for slanting rain.
Well, let me quickly make a gouache drawing, only now on a black background, and then we will analyze both types of fluorescent paints.
The most basic thing you need to know about gouache in painting is that the paint is non-toxic, odorless, dries quickly and dissolves well in water. With it, unlike acrylic paint, you can paint on paper with a density of at least 180 g/m2, otherwise the paper will ripple from the water. Brushes are the same synthetic as for acrylic, but it’s better to be a little softer. Also, so that the paper does not warp too much, it is better to attach it along the edges with masking tape to a table or drawing tablet. It is on paper with a density of 180 g/m2 that I draw. The paper size is standard A4.
I downloaded the outline drawing from the Internet and already applied it to paper. Now I just draw the details of the object. It will be a chameleon - an animal that can change color.
The skin of a chameleon consists of horny scales. I draw their borders with black or darkened paint. Inside some scales I use 2-3 shades of the same tone. Gouache, like watercolor, is lightened with water. It can also be highlighted with white paint. But I don’t recommend bleaching the paints too much, because gouache, again unlike acrylic, becomes lighter after drying. It is very difficult to darken the colors later, so it is customary to paint with gouache according to the principles - from dark to light. But the dark area, after drying, can be easily covered with light paint. We can say that gouache is something between acrylic and watercolor. In some scales I use pairs of adjacent spectral colors: yellow with orange or green, blue with green or violet, and red with violet.
The reptile is drawn. True, I spent a little more time on it than I planned. Now I'm working on the black background. As I get closer to the edges of the sheet of paper, I peel off the tape little by little. Typically, in gouache drawings that are inserted into a frame, the edge remains unpainted and is not visible under the frame. But according to my idea, all areas will be visible. After drying, black gouache also becomes lighter. To achieve complete darkness, you need another coat of paint.
Another feature of gouache is that this paint is afraid of water even after drying. On the one hand, this is good, because paints that have dried in a jar can continue to be used like watercolors. On the other hand, this is bad, because you need to take care of protecting the finished drawing. Even wet hands can cause irreparable harm to your work. I know some people use fixatives meant for pastels. I usually protect gouache with glass and simply insert the drawings into photo frames.
Let's now check how the night light picture will work in the dark!
I turn off the light and...
Nothing happens.
In complete darkness, fluorescent paints do not work. As I said, they need ultraviolet light. Natural sources of ultraviolet radiation are the Sun, stars, nebulae and other space objects. Ultraviolet rays are of 3 types - A, B and C, depending on the wavelength. Only the long-wavelength part of ultraviolet radiation of types A and B reaches the earth's surface; most of it is not transmitted by the ozone layer of the atmosphere.
Conventional household lighting bulbs also emit ultraviolet A, but in very small doses. Moreover, the colder the light, the brighter the fluorescent colors seem to us, although only slightly. Compare for yourself: - warm yellowish light
- white light, close to daytime sunlight
- cold bluish light.
And yet, to reveal all the charm of fluorescent colors, darkness is needed. You also need an ultraviolet lamp. Household UV lamps come in different types, depending on their purpose. In particular, I have: a healing lamp, a phyto-lamp for plants, a lamp for manicure, as well as for get-togethers and parties. There are also lamps for quartzing, for water purification, for heating terrariums, for tanning, for checking documents and banknotes. These lamps have different luminous fluxes and different ultraviolet wavelengths. Some of them, with prolonged exposure, are harmful to health.
To illuminate paintings, choose party lamps with a subdued luminous flux and a shifted spectrum of ultraviolet radiation, which are not very irritating to the eyes, but with constant use, they can cause photoaging of the skin and atrophy of subcutaneous fatty tissue. So, I do not recommend placing such a picture-night light in the bedroom, especially in the nursery, and it is better to direct the UV lamp to the wall with the picture, and not to the center of the room where it hangs.
This is what paintings painted with fluorescent paints look like under ultraviolet light.
Regarding drawing a light background for a painting. Look, ordinary paints look very dark in ultraviolet light, even pastel shades. But adding white fluorescent paint allows you to highlight the background. At the same time, pay attention to the fact that all shades become colder, as if we are adding light purple paint to them.
I also want to clarify the ability of glass to protect against ultraviolet radiation. Ordinary glass does not transmit type B radiation - this is the radiation that gives our skin a tan. For additional protection from type A rays, you need special glass, like in sunglasses. What I mean is that the surface of a picture painted with fluorescent paints can be safely protected with glass.
And as a bonus for those who have patiently read my terribly tedious lecture on physics up to this point, I’ll tell you how to make an imitation of an ultraviolet lamp at home using the example of a flashlight. It is better if it is white cold light, which contains more blue-violet rays.
I paste transparent tape onto the flashlight and color it in with a blue felt-tip pen. I put tape on top again and color it in with a purple felt-tip pen. Then another blue, again purple, etc.
The pigment does not apply well to film, so the more layers, the better. This produces a dark purple translucent filter, which, when hit by white light from a flashlight, will absorb all rays of the visible spectrum except violet.
At the very end, I paste the last piece of tape to cover the felt-tip pen and not get my hands dirty.
Just don't expect a miracle! The flashlight can only illuminate paintings in blue-violet color, creating the illusion of ultraviolet light and slightly changing the shades of paint. It does not turn into a currency detector.
Watermarks on a hryvnia banknote are not visible through a flashlight, unlike a UV lamp.