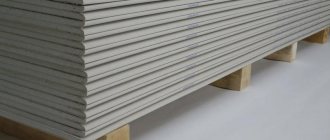
What is good about Perlfix drywall adhesive?
The technical characteristics of Perlfix glue are as follows:
- Temperature range of use – from +5C to +30C.
- The thickness of the adhesive layer for the most durable fixation is 20 mm.
- Resistance to moisture (glue can be used in the bathroom, kitchen, loggia and other rooms with high humidity).
- After preparation, the solution remains viable for half an hour.
- Complete hardening of the composition occurs after 7 days.
- Shelf life in unopened packaging is 6 months.
- Glue consumption is about 5 kg/m2.
- The glue is completely ready to use and does not require the use of additives.
- Environmentally friendly, safe for health.
Such properties make the glue one of the best among its analogues. Among the disadvantages, it is worth noting the rather long hardening time, which is explained by its composition - but after hardening, the glue forms a very strong and durable seam.
This allows you to expand the free space in the room.
In practice, the glue demonstrates the following features:
- The time for adjusting the glued material is no more than 10 minutes, in some cases no more than 5 minutes.
- During the entire hardening period (7 days), the glue shrinks, so it is better to postpone puttying work.
- Deviations from the adhesive consumption specified by the manufacturer are almost inevitable, since when facing with plasterboard, at least three installation options are possible. In each of them, the need for glue will be different.
Scope of application of Perlfix glue : gluing gypsum panels, plasterboard sheets, polystyrene foam and mineral wool boards in residential areas with a natural level of humidity.
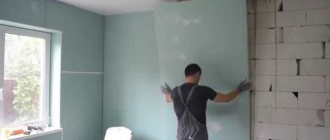
How to glue drywall with Perlfix
Even a non-professional can handle installing drywall using Perlfix glue.
Let's consider the algorithm for gluing gypsum board sheets onto a concrete surface:
- Surface preparation. We remove dust and other contaminants and plaster residues from the walls. At the same stage, electrical networks are laid out and power cables are laid in grooves.
- Applying primer. For concrete walls, we choose an adhesive primer of the “Betokontakt” type.
- We apply markings along which we will glue the sheets of drywall. We will cover the wall only with whole sheets, without using cut fragments.
- Prepare the glue according to the instructions. Mix the dry mixture with water until a homogeneous mass without lumps is obtained for 5 minutes. A 30 kg bag requires 15 liters of water. For mixing, use an electric drill or a construction mixer.
- We apply the composition along the contour of the sheet with an interval of 3-5 cm, as well as in a checkerboard pattern around the perimeter.
- We press the sheet of drywall tightly against the wall and level it, lightly tapping it through the batten.
- We leave the room for 7 days without any impact.
Are there any analogues
Among the analogues of Perlfix glue, it is worth highlighting the following compositions:
1.ByProc. It has a slightly narrower temperature range - up to +25C versus +30C for Perlfix. But it requires a less thick layer of adhesive for joint strength - from 3 to 10 mm versus 20 mm for Perlfix.
2. Volma-Montazh. Experts note almost identical properties to Perlfix, so this glue can be used with confidence for finishing work. Manufacturers promise faster hardening time - about a day, as well as lower consumption - 2-3 kg/m2 versus 5 kg/m2 for Perlfix.
3. Fungenfüller. This is not glue, but a universal putty, which is also often used for installing drywall. Unlike Perlfix, it can only be mixed by hand and sets faster. Price also plays an important role - Fungenfüller costs an order of magnitude more.
Usage
Preparation of the base is an important condition for complying with the technology of applying tile adhesive.
Using Knauf Flizen compositions is very easy; the work does not require special tools or professional skills. When mixing the solution, you need to follow the manufacturer's instructions and maintain the proportions of dry powder and water. The temperature regime is maintained in the range of +5+25 degrees. Laying tiles is carried out in several stages.
Preparatory work
To achieve good adhesion of the glue to the base, the surface needs to be prepared:
The base is cleaned of various contaminants, old coating, water-based paint, cement dust, and debris.
Concrete walls/floors can be washed and the surfaces allowed to dry thoroughly, then treated with one or two coats of primer.
When using the mixture for laying tiles on a heated floor, you need to turn off the heating system a day before performing work.
Substrates made of porous materials and porous concrete are best treated with Tifengrund Knauf primer mixture. If there are pronounced defects on the surface (cracks, crevices), it is recommended to eliminate them. The glue will go into the holes and its consumption will increase.
Breeding
Since the pot life of Knauf adhesives is 3 hours, you can prepare the solution not in measured portions, but in large quantities. The dry powder is poured with clean water in the proportion of 5 kg of glue per 1.4 liters of liquid.
The mixture is prepared as follows:
- Water is poured into a clean container.
- Dry powder is added to the liquid.
3. Mix evenly with a mixer.
4. Let the mixture sit for 5-10 minutes.
5. Stir the solution again.
When the consistency of the mixture is viscous, not runny, you can begin applying glue. If necessary, the mixture can be adjusted by adding dry powder or water little by little. The finished solution should have a homogeneous structure without lumps of dry glue.
Applying Knauf glue
The prepared mixture must be applied to the surface in an even layer, using a notched trowel with the appropriate length of teeth. The glue is distributed along the plane of the base, covering the area that the master will have time to tile within 20-30 minutes. If you need to lay corrugated dies, the composition is applied to the base and back side of the finishing material. To firmly glue the tiles to Knauf Fliesen glue, the dies are lightly pressed into the solution. Allow 10 minutes to level the tiles until the glue begins to set.
Recommendations for laying the material:
- For a more durable fixation, glue can be applied to the base and tiles. Using a notched trowel, spread the solution over the surface of the wall and floor, and remove the excess.
- Apply the composition to the tile, pass over it with a spatula so that when laying, the direction of the adhesive waves on the die and base is perpendicular to each other.
- Gaps are left between the tiles, for which plastic crosses or clips are used. Excess adhesive must be immediately removed from the dies with a rag.
- Lay the tiles by lightly pressing them into the adhesive. You can grout the seams 1-2 days after finishing the cladding, having previously removed the inter-seam crosses.
When working, be sure to use a building level, otherwise the masonry will be done with differences in height. Remains of adhesive from the tiles are removed immediately. Grouting of joints is allowed after the mixture has completely dried. After completing the work, the tool must be washed thoroughly. It is recommended that you wear gloves when laying and do not allow the glue to come into contact with your eyes or skin.
Perlfix assembly adhesive - review and application
Such properties make the glue one of the best among its analogues. Among the disadvantages, it is worth noting the rather long hardening time, which is explained by its composition - but after hardening, the glue forms a very strong and durable seam. Volma-Montazh. Experts note almost identical properties to Perlfix, so this glue can be used with confidence for finishing work.
Manufacturers promise faster hardening time - about a day, as well as lower consumption - 2-3 kg/m2 versus 5 kg/m2 for Perlfix.
- The time for adjusting the glued material is no more than 10 minutes, in some cases no more than 5 minutes.
- During the entire hardening period (7 days), the glue shrinks, so it is better to postpone puttying work.
- Deviations from the adhesive consumption specified by the manufacturer are almost inevitable, since when facing with plasterboard, at least three installation options are possible. In each of them, the need for glue will be different.
ByProc. It has a slightly narrower temperature range - up to +25C versus +30C for Perlfix. But it requires a less thick layer of adhesive for joint strength - from 3 to 10 mm versus 20 mm for Perlfix.
Scope of application of Perlfix glue : gluing gypsum panels, plasterboard sheets, polystyrene foam and mineral wool boards in residential areas with a natural level of humidity.
Instructions for use
The glue is diluted according to the instructions indicated by the manufacturer on the back of the package. It must be diluted before the actual start of the work process. If the proportions specified by the seller are observed, the master produces a paste-like mass of uniform consistency. After the initial stirring, the solution is left and stirred again after 5–7 minutes. Then they begin the main process. The glue is scooped up with a trowel and distributed over a small area of the wall (about 2-4 small tiles). Afterwards, a notched spatula is passed over it, removing excess mass. Next, take the die and spread glue on its back surface. The excess is again removed with a notched spatula. But now in a direction perpendicular to that on the working surface. This will avoid air pockets and will promote stronger adhesion of the composition to the tiles and base.
Then the die is pressed to the base and slightly moved back and forth, after which it is installed in its place. Shifting will also allow you to get rid of excess voids. After installing the first element in place, take the second and install it next to the first in exactly the same way. However, here it is already necessary to maintain equal voids between the elements, since different distances between the parts will make the finished appearance of the cladding sloppy. The size of the seams depends on the size of the element. Usually, the larger it is, the larger the gaps can be, however, craftsmen do not recommend making too wide seams in the finishing, since the seams themselves are a sore spot in the finished tile covering. Distances that are too narrow will result in imperfect geometry.
In order not to suffer with every distance and crosshairs, it is better to use special crosses. This will allow you to control the distance between the tiles and see when it is insufficient (the crosses should not fall out, they should be pressed well with the tiles). Upon completion of work, you must immediately wash the equipment. It is necessary to remove excess glue during the work process. You cannot do this when the composition has hardened, and even by scraping it off the tile. This will leave scratches on the surface.
After the mortar under the tiles has dried, remove all the crosses that were used during installation. Then take the grout mixture, dilute it as indicated in the instructions (usually add water too) to the consistency of sour cream. After it, all the voids between the finishing elements are filled, and then the entire surface is wiped with a dry sponge, removing excess mixture. This is where the finishing ends, however, some craftsmen, after the grout has dried, treat the finished coating with a special spray in the form of an aerosol.
Is it possible to use Perlfix glue to seal the seams between sheets of drywall, or is this not done?
There is about a little more than half a bag of Perlfix glue left, can it be used to putty seams, or do you have to buy putty for seams? Perlfix is not intended for sealing gypsum board seams since it is an assembly adhesive, not a putty for seams, there is no such technology, everything is at your discretion Technically, it is possible to do this, that is, if necessary, remove the chamfer, if it is on a factory seam on a gypsum board and then fill the joints with Perlfix.
Perlfix is available in a classic version; Perlfix GV glue with fiberglass is on sale; it is better not to seal the seams between gypsum board sheets with this kind of glue. But to seal the joints between sheets of drywall, it is still much better to use special putties (as an option Knauf Uniflot, you can do it without serpyanka) than Perlfix gypsum assembly adhesive.
Drywall adhesive: which one is better to choose
The choice of such a composition today is difficult, since a large range of products makes it difficult to understand which composition is suitable for specific operating conditions. After the wall has been leveled using plasterboard, tiles and tiles can be attached to it. But for these purposes you will also need a special adhesive composition. In addition, installation can be carried out only after the sheets of drywall have completely dried and are securely fastened.
These include the following: The process of installing gypsum plasterboard using glue can be carried out on smooth reinforced concrete walls or on partitions, the basis of which is tongue-and-groove blocks. Now you can add PVA glue to the resulting mixture and mix again using a mixer. If you use 12-15 kg of putty, then you will need 1 kg of glue.
It only takes a few minutes for the glue to sit, and then it can be spread over the surface of the wall.
- Perflix is a universal composition based on gypsum binder. You can purchase this composition P erlfix 30 kg for 330 rubles per bag.
- Silicone is an adhesive for installing plasterboard sheets, the use of which ensures rapid adhesion of the material to the base. This glue will cost you 450 rubles.
Application
Currently, Knauf adhesive mixtures are widely used in various finishing works. They can be used both indoors and outdoors. Most often, such adhesives are used to connect ceramic, granite and other slabs to each other. Also, such compositions are often used to glue together PGP and gypsum plaster boards, plasterboard sheets, various structures made from aqua panels, etc.
The solution must be mixed in accordance with the proportions indicated on the instructions for use of the composition. After mixing the components, the resulting mass is applied to the main surface. Most often, the base should be covered with one thin layer using a special spatula.
After applying the mixture to the work surface, you need to evenly bond the coating to the base.
It is important to note that if you are installing slabs, then you definitely need to adjust the elements, since they often move. To avoid such situations, each part can be simply fixed using special plastic crosses
After this, the seams between the individual coating slabs should be processed. This will add aesthetics and neatness to the finished cladding. Otherwise, glue residues will appear on the edges of the elements, which will instantly dry out and spoil the overall picture of the coating.
In the next video you will see the technology for applying Knauf Perlfix glue.
Is it easy to putty with Perlfix?
Modern manufacturers of finishing materials offer a wide variety of products. Each of them is designed for a specific type of work, provides certain properties and requires certain skills in use. But in many cases, materials for related finishing work are completely interchangeable.
The end result may be the same, but the effort spent and the final cost will differ. As they say, patience and work will grind everything down! True, they went home tired, with red faces. They transferred an incredible amount of sanding mesh and spent a whole day on an operation that usually takes no more than an hour and a half. At first I thought that the question was addressed to me, but I looked around and saw that the foreman was addressing an Uzbek who was stirring a fresh putty solution with a mixer. I was surprised what kind of glue he was talking about.
The Uzbek also did not understand the question and continued to knead the solution. And then I saw the printed bag from which he took the putty, and everything became clear. It was not putty, but Perlfix gypsum mounting adhesive.
The external design of bags with Knauf putty is very similar, so it is easy to confuse them if you do not read the labels. But this did not bother the professional finisher from Uzbekistan at all, and he assured the foreman that he could putty with any material. Geologists gave the Chukchi KAMAZ as a gift.
A year later, another expedition arrived in Chukotka and asked the Chukchi whether the gift was useful. Chukchi happily reports:
PERLFIX (Perlfix) - smooth walls without problems
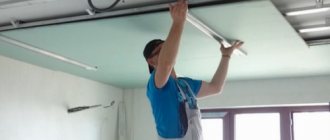
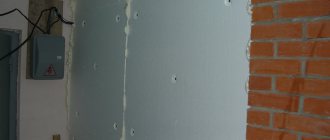
It is recommended to use Perlfix for attaching gypsum plasterboard sheets only to concrete and brick bases, but you should not strictly follow this guide. As practice shows, the glue adheres perfectly to other surfaces, the main thing is that they are strong and preferably rough, for example a layer of plaster, cinder block, foam block, etc. Professionals do not bother themselves with placing gypsum board strips, but screw them into the wall vertically, four screws in a row, at the same level. You need at least three such lines per sheet. And then Perlfix is used again, which is thrown onto the surface in a layer somewhat thicker than the remainder of the protruding screw and the gypsum board is pressed against it.
Separately, it should be noted that it is difficult to hide large communications behind drywall glued to the wall, but there is always enough space for cable routes and metafloor pipes. As a last resort, you can make a shallow groove in the base. Before you begin installing sheets on the wall, you need to know some of the nuances of cladding and prepare the surface in advance.
Thus, using Perlfix glue you can quickly, with minimal costs: time, financial, without stealing useful space, level almost any walls, especially important in small apartments and long narrow rooms, such as corridors.
Tips from the professionals
Doing renovation work for the first time is not so easy. Then the advice of those who do this almost every day will not be superfluous. Professionals know all the nuances of using certain adhesive compositions for working with a wide variety of materials.
Useful recommendations from craftsmen regarding Perlfix glue:
- Before applying the solution, you need to prime the base. The choice of product will depend on the surface material. After priming, you need to wait until the wall dries. You need to make sure that during the drying process, particles of dirt and construction dust do not stick to the wall.
- When fixing blocks, a more liquid solution should be used. After installation, there will be minimal adhesive residue at the seams.
- To extend the viability of the prepared mixture, cold liquid should be used for dilution.
- For better strength of the composition, you need to apply it pointwise, and not smear it over the entire surface. You need to start from the center and further along the perimeter.
- Residual material should not be thrown into unused adhesive. Many people make this mistake, and the result is rapid drying of the product and hardening, which occurs twice as fast.
- Gradually the prepared mixture will begin to dry out. However, this problem cannot be eliminated by adding fluid. This will result in loss of adhesive function.
- It is impossible to accurately calculate the amount of mixture required. This will depend on the type of installation and the option of applying the solution. Each process requires a different amount of glue. In addition to traditional application, there are other methods. In some cases, the mixture is applied with a notched trowel over the entire surface of the sheet in a layer of 1 cm. This option makes it easier to level the sheet already on the wall. When there are depressions and defects on the base, this method of application will facilitate the penetration of the material into cracks, which will extend the service life.
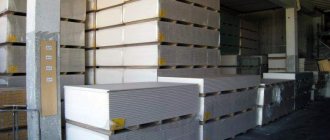
- The dry mixture must be stored correctly, otherwise it will quickly become unusable. This should be a dry place where the mixture cannot become damp.
Perlfix adhesive is a plastic adhesive for drywall, which shows all its best sides if the rules of mixing and application are followed. The low price of the product makes it accessible for large-scale work, which allows you to save a lot of money.
Perlfix assembly adhesive - characteristics, application rules and reviews
There are two types of Perlfix glue - regular and with the addition of gypsum fiber (Perlfix GV). They differ in the level of adhesion to specific substrates. But each glue can only be used for interior work. It can be combined with almost any base, so its type is not so important.
However, attention should be paid to selecting high-quality soil. Knauf compositions are also well suited for insulating materials, combined with expanded polystyrene. It is very important to calculate the amount of material required before starting work. Once mixed, it quickly hardens and becomes unusable. Calculation helps to avoid this, saving money. Consumption is calculated according to the standard, the amount of mixture per square meter. Knauf Perlfix adhesive has a simple composition. It contains natural gypsum and polymers, which will determine the final shade of the material.
The glue meets quality certificates, which guarantees its suitability for the specified work. Guided by the rule “minimum costs - maximum quality,” the manufacturer produces really good products.
- The temperature for using the finished solution is from 5 to 30 degrees.
- Can be used in conditions with moderate humidity.
- Hardening – 7 days.
- Grouting of joints, surface loading - after hardening.
- Storage in original packaging – six months.
- The composition contains no components harmful to humans.
- The optimal layer for high-quality fixation is 2 cm.
- Viability after preparation – half an hour.
The main purpose of the glue is to cover the base with gypsum-based sheets. Perlfix is one of the most popular means for this purpose.
How to treat the surface → Room decoration → How to choose the right paint → Surface treatment technologies → Leveling and finishing the walls → Selecting and applying a primer → Removal from the surface → Stretch ceilings and technologies → Reviews and testimonials
Glue analogues
There are similar products in stores that are practically no different in properties from Knauf Perlfix. The most popular of them:
- ByProc – universal gypsum adhesive GKU-450. Used for interior work at normal and low air humidity. It is used for fastening gypsum plasterboard sheets, heat and sound insulation, mineral wool and polystyrene foam, gypsum fiber. The adhesive is also ideal for gluing stucco molding, a number of decorative materials and small tiles.
- "Volma Montazh". This dry mixture provides high adhesion and long service life, allows you to attach gypsum elements, plasterboard, tongue-and-groove slabs, and thermal insulation sheets to walls. The mixture is characterized by low consumption - up to 2 kg per 1 sq. m, as well as the viability of the solution up to 1 hour.
- Perel Gipsel - the adhesive is famous for its frost resistance, so it can be used in unheated rooms. The time for adjusting the position of the slabs glued to this product is only 5 minutes, so it will be quite difficult for a beginner to work with it.
- "Osnovit" - installation adhesive "Gipsform MG". Used for fastening all types of gypsum boards and gypsum fiber, as well as expanded polystyrene. Produced in medium-sized bags – 20 kg each.