The final stage of construction is finishing the basement space. In houses with pile foundations, space is left, giving an unfinished look.
In this regard, it is important to understand the finishing and study all the nuances that you should pay attention to when performing it.
Let's consider how to cover the base of a house on screw piles, the advantages and disadvantages of finishing materials.
Finishing materials
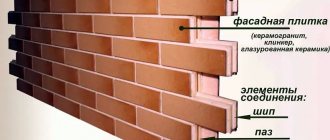
To finish the base, metal plates and wooden guides are used. Using these materials, finishing the foundation will not be difficult.
If you take metal plates with a stone pattern, then you will have a base that looks like it is trimmed with stone.
- Metal plates are attached with self-tapping screws and by welding. Welding is the most reliable and durable method of fastening the casing.
- Be sure to fill the areas where the sheathing comes into contact with the ground with sand to a depth of 30–40 cm.
- The finishing coating is leveled at the corners, the seams are sealed and sealed with a sealing liquid.
- The final job will be to fix the elements that are missing.
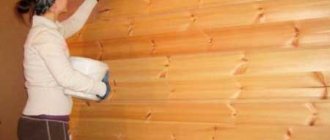
Important! When decorating with wood, it will need to be treated with a special antiseptic. This will prevent damage to the material.
Wall-hung finishing of the plinth
If you make a hanging finish for the base, you can’t go wrong, it has many advantages:
- material efficiency;
- quick construction and simplicity of design;
- beautiful view;
- protection from moisture.
Brick finishing
If you have the desire and finances, you can finish the basement with brick.
The advantages include such qualities as: protection from damage, thermal protection, the ability to create a basement.
Please note that this option has disadvantages: the price and the impossibility of construction on unstable and heaving soils.
Mosaic finishing
In the modern construction market, there is an unusual and expensive finishing option - mosaic plaster. This finish will please the most harmful buyer. Finishing with mosaic plaster looks very impressive, and it does not require much time and is easy to install.
Plastic finish
Plastic panels are also used to finish the basement of a house on screw piles. This is the cheapest option, but it loses in aesthetic aspects. Of course, finishing with brick or stone will look aesthetically pleasing and elite, but plastic panels are quite durable and not susceptible to chemical and weather conditions.
The range of colors and reliefs of plastic panels is quite large, and you will have the opportunity to choose what suits you.
Concrete finishing
The most economical way is to install a concrete plinth; it does not require huge costs and effort.
True, it requires finishing with plaster. After all, plaster is the best option for finishing if it is not possible to purchase more expensive materials for finishing the base.
To do this you need to do:
- basement blind area,
- then finish with moisture-resistant elements (asbestos-cement boards),
- fill the surface with sand near the base,
- then plaster the entire surface of the slabs.
There are many types of finishes and materials for this work; every person who started finishing the base will choose the ideal option for themselves. But the choice must be made with great responsibility; evaluate your physical and financial capabilities soberly.
We wish you good luck and inspiration!
Other options for finishing the basement of a house on screw piles
In addition to base siding, the finishing of the base of a screw foundation can be made from other materials. At the same time, they have advantages and disadvantages, after familiarizing themselves with which, everyone chooses the appropriate option.
Brick finishing
Brick is considered a reliable building material. But to make smooth and high-quality masonry you need experience. Therefore, for such a matter it is better to use the services of professionals.
The cladding is laid on a concrete base or on a metal beam, which will serve as a support. Ventilation gaps must be left in the brickwork. The process takes time and money.
Plastic panels
This option is an affordable and quick way to finish the base. The panels are universal and can be attached to any foundation. They reliably protect against external influences, including biological and chemical. The finish is flexible and can withstand heavy loads.
Corrugated sheet
Another way to arrange a basement is corrugated sheeting. This option is not suitable for wooden and frame houses, because the material is hardly considered universal. But it is durable, perfectly protects from wind and water. It is installed on the sheathing, which makes the process quick and simple.
Flat slate
The appearance of this finish wants to be the best. But slate is used as a base for other decorative finishes, for example, tiles or special plaster.
Several options for this finish can be seen in the photos on the Internet. Asbestos cement sheets are secured with slate nails or bolts. But during installation, you need to remember that slate is quite fragile and cannot withstand strong impacts.
Cement particle board
Instead of flat cement boards, cement-bonded particle boards are chosen. They are more durable, but at the same time lightweight. They are much easier to work with. DSPs are easy to drill and trim. Nails and screws are used as fasteners. This is an excellent base for decorative material.
Moisture-resistant plywood
This is another option that is used as a basis for decoration. Plywood is suitable for the construction of frame houses. The material does not deform under the influence of water. Some craftsmen do not even apply a primer before applying the cladding.
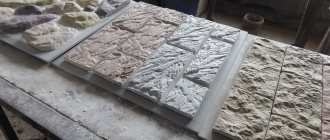
Facing the base with stone
It doesn’t matter whether the stone is natural or artificial, but it is difficult to lay. Therefore, it is better to use the services of a professional team
The material is reliable, durable and resistant to all external influences. But natural stone will be quite expensive, and artificial stone will be cheaper.
Foundations on driven concrete piles
Sealing a pile foundation is essentially the construction of a lightweight base. It will not bear any load other than its own weight, but this does not mean that its construction is a simple matter. A lightweight structure needs protection from ground and subsoil waters, weather influences, and the behavior of the soil at low temperatures must also be taken into account. In order to decide how to cover a pile foundation, you first need to choose a method of sealing it, of which there are several:
brickwork;
monolithic concreting;
concrete panels;
collection device.
Brickwork and concreting are used on soils that are not subject to swelling. Climbing is a method of constructing a suspended plinth made of lightweight materials, the lower edge of which does not rest on the ground and is located at a height of 100-150 mm from its top mark. On stable soils, backfilling is the continuous sealing of the space between piles.
Masonry, concreting and concrete panels when sealing the space under piles are a type of lightweight shallow foundation. Its design requires waterproofing, including grillage
In addition, it is advisable to create a local drainage system to protect the foundation from excess moisture, which is especially important on soils prone to swelling. The thickness of structures for embedding brick and concrete must be at least 100-120 mm
Intakes made from lightweight materials additionally use insulation (foam, polyurethane foam) with a thickness of approximately 50 mm.
Foundations on screw piles
This type of foundation is usually used for lightweight buildings and structures (for example, wooden and frame-panel houses). Screw piles need additional protection from external influences, for which they are lined with brick or concrete. These are the most common ways to solve the question of how to close screw piles. After this, the foundations in appearance become complete analogues of columnar structures.
To embed foundations on screw piles, scaffolds made of lightweight materials are more often used, although there are no obstacles to constructing structures made of brick or concrete. A general mandatory requirement when embedding pile foundations is the installation of a blind area and ventilation holes in the base. They are located at a height of 200-300 mm from the blind area and must have a diameter of at least 100 mm. Their number is determined by the size of the house, but at least 2-3 pieces on each side of the base. For the winter they are closed with tight plugs, and the rest of the time - with bars to prevent animals from getting into the underground. For decorative finishing of the base of a pile foundation, any materials can be used: porcelain stoneware, facing stone, clinker tiles and others.
We also recommend reading:
Anti-pollen mesh is an excellent protection against allergens
Laying out the stove yourself - all the nuances
We compare the advantages and disadvantages of various fence materials
Features of installing plastic windows in a log country house
How are the pile foundations covered?
A closed pile-screw foundation is reliable protection from rodents and other animals that can live in the empty space between the piles. Also, the cladding and finishing of such a base will prevent heat loss in the home and help create a good microclimate there without excess humidity.
The most popular methods of closing a pile-screw foundation:
- creation of a suspended plinth;
- creation of a shallow tape-type base.
For a suspended plinth, thin and not too powerful composite and polymer materials, as well as wood, are used. In this case, the load on the screw piles is minimal, and the simplicity and speed of installation, coupled with low cost, is often captivating.
A suspended plinth covering the foundation with corrugated pipe piping.
However, the pile foundation will last longer when installing a shallow strip plinth, which will become the best protection for the pile frame, guaranteeing its durability.
An option for constructing a shallow base to protect the pile foundation.
Thermal and waterproofing when closing the base
All types of basement finishing require the installation of a heat- and waterproofing layer, which is covered with asbestos-cement slabs, decorative thermal panels mounted on a sheathing of boards or a slate slab, or bricks. All these materials have their pros and cons:
- Asbestos-cement boards do not look very attractive and are characterized by increased fragility, but they are inexpensive.
- Decorative panels, cement-sand or clinker tiles are resistant to atmospheric influences, and some types of them can even easily withstand high humidity. However, to lay them, a perfectly smooth and even surface is required, so the base around the perimeter will have to be covered with sheet material, for example, asbestos cement.
- It is advisable to use brick laying or pouring concrete only when the height of the above-ground part of the base is at least 30-40 cm, which allows you to equip a real basement floor.
Tying and closing screw piles is a very important stage in the construction of a house, which determines how soon it will need major repairs.
Concreting and waterproofing
In order to carry out concreting, it is necessary to purchase: reinforcing mesh, steel wire or rods, asbestos-cement slabs or boards treated with an antiseptic, formwork material and a cement-sand mixture.
It is necessary to build formwork around it, install reinforcement, and then pour it using concrete mortar.
It is imperative to insulate the basement covering from moisture. Waterproofing is laid between the base and the plinth.
If brick or stone was used to create the base surface, a layer of roofing material should be placed between the rows of masonry or bitumen should be poured. In the case of concreting, insulation is made in two layers.
For insulation, it is better to use foam sheets. They must be laid inside the structure. The insulation must exceed the height of the ceiling.
To attach the foam, you can use special glue. After laying the insulation, you should begin the final finishing. This can be done using:
- Decorative facing stone;
- Porcelain tiles;
- Clinker tiles;
- Basement siding;
- Mosaic plaster.
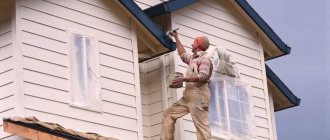
How to close the foundation from the outside, simulating brickwork - watch the video:
If you have already built a house and have not finished finishing the foundation, you should quickly begin to solve this problem. The house will become much warmer, it will take on a more beautiful appearance. You will feel comfort not only being inside the room, but also contemplating it from the outside.
Hello! On the website, we got a lot of ideas for decorating and building a residential building, and today we decided to repay our favorite site by presenting to the readers our version of the answer to the question: “how to cover the pile foundation of a frame house from the outside?”
When starting a construction project, we, like many other people who decided to build a house with their own hands with the minimum possible amount of money spent, chose the most budget-friendly foundation option that allows us to quickly “get down to business” - a foundation on screw piles. And once we’ve built it, we’ll think about what we’ll use to cover it with.
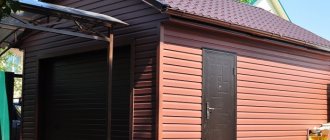
Time passed unnoticed. A year has flown by, the frame house is standing and blown by all the winds, siding has been ordered to finish the house, but as it turned out, another 50-60 thousand rubles need to be spent on the basement siding. according to the most conservative estimates. At that time, we did not have such funds, but after installing the fence we had sheets of corrugated sheets that were exactly the color of our metal tiles. We decided to use these sheets to cover the pile foundation from the outside.
How to finish the base of a pile foundation with your own hands
It is not difficult to do it yourself by cladding the base on screw piles, which are the basis of the frame house. A set of measures related to the finishing of a pile foundation makes it possible to solve several serious problems and involves the following stages:
waterproofing the grillage, which can be made of wood or metal;
Upon completion of the main stages of building the house, they begin finishing the base of the pile-screw foundation
- treatment of piles with a waterproofing compound;
- construction of a suspended plinth structure or lining with bricks;
- external finishing of the structure with panels that improve the appearance of the building;
- installation of special material to provide insulation;
- sealing joint areas with polyurethane foam.
Sealing the space under the building on screw supports can be done in the following way:
- hanging a decorative base;
- construction of a shallowly buried strip foundation.
Let's look at how to make a hanging option:
Form and secure the sheathing from wooden planks or metal profiles pre-impregnated with an antiseptic. Provide a distance of 10–15 cm from the bottom bar from the soil level, and an interval between vertical slats of 40–45 cm. Attach the supporting frame using self-tapping screws or welding.
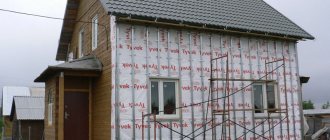
The screw foundation is open to all atmospheric influences, the wind blows under the house and water flows in
- Install the insulation panels and secure them to the sheathing. It is allowed to use thermal panels intended for finishing the basement space, slabs based on asbestos cement, as well as insulation slabs used for thermal insulation of facades.
- Carefully join the corner elements and seal the joint areas. Ensure there are no gaps at all using polyurethane foam. Fix the finishing elements, install canopies that protect from precipitation.
- Perform the final finishing of the formed surface. Depending on the characteristics of the material used and personal preferences, various finishing materials, including siding, can be used for finishing cladding.
Advantages of a suspended plinth:
- insignificant level of costs compared to the construction of a strip foundation;
- easy and quick installation. Do it yourself over the course of one day;
- effective ventilation of the underground space. The design provides reliable protection from dampness and prevents the formation of mold;
- attractive appearance. Improved perception is ensured through the use of modern finishing materials.
A solid brick plinth provides not only high aesthetics of the building, but also durable and reliable protection of the underground space of the house
Let's figure out how to make a shallow version:
- Prepare a trench located along the outer perimeter of the building between the screw supports.
- Place a reinforcement cage in the pit to strengthen the strip base.
- Fill the cavity with concrete mortar and plan the supporting surface.
- Lay brick on the formed strip base. Provide vents for ventilation.
- Carry out external finishing of the surface of the formed base. Traditional stucco, siding or insulated panels may be used.
A base shallowly buried in the ground, made under a pile-screw foundation, has a number of advantages:
- increased safety margin, allowing it to withstand mechanical stress without violating integrity;
- a harmonious combination with the blind area, which can be made in the same style as the finishing of the brick base;
- the need to use insulation in a reduced amount compared to a suspended structure;
- the possibility of creating a basement under the building, protected by brickwork;
- aesthetic appearance, which is achieved by using artificial materials that are difficult to distinguish from natural stone or wood.
Finishing the base will not only make the house more beautiful, but will also extend the life of the screw piles, so it’s definitely worth doing
A shallow base also has disadvantages:
- the possibility of deformation and destruction of the finish due to soil heaving;
- increased level of costs for constructing a shallow foundation compared to the mounted option.
How to make ventilation in the foundation
There are several factors that determine how exactly the basement ventilation needs to be arranged:
- building location;
- foundation type;
- climatic features;
- soil composition.
Taking these features into account, a project is being drawn up for natural ventilation of the underground space and the foundation of the building.
Basic rules for placing ventilation openings:
- the distance between openings is no more than 3 m;
- distance from the inner corner – 1.5 m, no less, to avoid the formation of air pockets;
- the height from the ground level to the middle of the opening is at least 30 cm;
- for construction in a lowland, the number of ventilation openings increases by 1.5-2 times;
- for buildings on hills, on the contrary, it can be reduced;
- the approximate dimensions of the ventilation holes are 15-20 cm in cross section, or 15 cm on the side of a rectangular/square opening.
How to close and how to decorate the basement of a house on stilts from the outside?
The first stage involves creating the sheathing. This frame is necessary for further fastening of the facing material using screws or nails. The lathing consists of boards or metal profiles.
The following are the instructions:
- Installation of vertical slats. After installing the horizontal boards, the vertical ones are also installed. This will help further strengthen the structure. The installation step is 40-50 cm.
- Arrangement of a drainage cushion. A trench is dug along the perimeter of the base and filled with sand or crushed stone.
- Insulation. If you plan to insulate the base, then this procedure is performed at this stage.
- Waterproofing. A waterproofing material is installed on top of the insulation - the end of the roll should be lined with sand, and the edge should be compacted into it.
- Creating a blind area. Paving slabs are laid on top of the sand - this move helps protect the base from excess moisture.
At the final stage, panels or the selected facing material are installed. The corners must be secured with a special profile, and at the end a metal casting is installed.
If another technology for cladding the pile base was chosen, then the masonry is first made, then the surface is finished with the selected material.
Application of basement siding
If you only need to decorate the base, and no additional insulation is required, you can use siding. The material is presented in a wide range, including products with different textures and colors.
With its help, the base will take the form of a neat pedestal, with a building rising on it.
To install siding you will need:
- Clear the construction site of excess debris;
- Select soil around the outer perimeter of the house;
- Form a trench half a meter deep. It should extend slightly under the wall;
- After excavating the earth, a slight slope should form;
- Cover the entire surface of the pit with a layer of waterproofing;
- Pour crushed stone on top and lay a polyvinyl chloride drainage pipe around the perimeter;
- Draw out wells for drainage;
- Fill the trench with sand and compact it well;
- Form a blind area. It can be made from paving slabs or paving stones;
- Weld holders to the surface of the piles. Guides will be installed on them;
- Make a wooden or metal frame. To prevent wood from rotting, it must be treated with an antiseptic;
- Install siding panels;
- Install drip tides. They are needed to remove moisture.
How to close screw piles
The final stage of construction is finishing the basement space. In houses with pile foundations, space is left, giving an unfinished look.
In this regard, it is important to understand the finishing and study all the nuances that you should pay attention to when performing it. Let's consider how to cover the base of a house on screw piles, the advantages and disadvantages of finishing materials
Let's consider how to cover the base of a house on screw piles, the advantages and disadvantages of finishing materials
Let's consider how to cover the base of a house on screw piles, the advantages and disadvantages of finishing materials.
Advantages of finishing the basement space
Finishing the space between the pile foundation and the house has advantages:
- increases thermal insulation;
- prevents medium and large animals from entering under the floor;
- prevents snow and rainwater from accumulating under the house.
In order for the finishing to perform all of the listed functions, when choosing a material you need to carefully study all the advantages and disadvantages of each type.
Finishing methods
To prevent the floors in the house from being blown through, it is necessary to insulate the basement space
The open space between the soil and the floor is blown by the wind and exposed to sub-zero temperatures, resulting in a cold floor in the house. We close the piles under the house using:
- shallow strip plinth devices;
- hanging finishing material between the piles, having previously built a frame.
When choosing a finishing method and material, we consider:
- soil type;
- groundwater level;
- climatic conditions.
First of all, we install the support sheathing from a profile pipe; it will serve as a connection between the supports. The guide spacing should be 300-400 mm. The profile is selected with different side widths (40x20).
To prevent communications from freezing, we insulate them with mineral wool or foil roll insulation.
When choosing a material, we take into account that it is in contact with the surface of the earth, therefore, if water is close to it or flooded, it will be affected by all the harmful factors.
Flat slate
Asbestos boards are not an environmentally friendly material
Every year this material is losing its popularity; it is being replaced by modern, environmentally friendly materials.
Advantages:
- resistant to atmospheric influences;
- durable.
Flaws:
- asbestos is dangerous to human health and pollutes the environment;
- fragile;
- unattractive appearance.
The base of a screw foundation covered with flat slate will not harmonize with a building made from modern materials.
Blind area
The blind area insulates the base from moisture
Upon contact with soil, the quality of the facing materials is lost, so the surface must be isolated from moisture and a blind area made. For waterproofing, we use roofing felt or dense polyethylene, one end of which is tucked under the blind area, and the other edge is folded onto the frame sheathing under the finishing material.
Upon completion of the cladding, we arrange a blind area that will prevent rain and melt water from leaking under the building. To ensure the drainage of water and condensate, it must be mounted with an inclination of 1.5 degrees from the base.
Concrete is poured evenly into the formwork, in which a mesh of reinforcement is laid. We lay an expansion joint at the junction with the foundation plinth.
For more information about blind areas in a house on screw piles, see this video:
If the house is located on a slope, part of the underground can be equipped as a cellar; in this case, we provide for the installation of a door.
How to sheathe the bottom of a house?
Two technologies for external cladding of the base are practiced:
- installation of the screen on a suspended sheathing welded or nailed to the piles;
- laying a shallow strip of brick or stone around the perimeter of the house.
The design features of the hinged screen make the technology effective in the case of metal or wooden piles.
The advantages of this technology are low costs, fast construction speed and sufficient ventilation of the underground space.
Shallow foundations are often built around reinforced concrete supports. This is a rather labor-intensive method, since you first need to dig a trench, lay a drainage pad, and build a ribbon of brick or stone on top with vents for ventilation. At the same time, this fundamental cladding is distinguished by its resistance to external factors and long service life.
To reduce heat loss in the house, experts advise insulating the suspended base. To do this, mineral wool or eco-wool is placed into the frame cells on the inside of the skin. In cold regions, a layer of insulating material is also placed on top of the sheathing under the outer sheathing.
Versatile plants
There are indoor plants that provide many benefits no matter where they are placed.
Dracaena
A truly universal plant for the home is dracaena. It awakens vitality, excites, creates a favorable climate, positive soft energy and harmonious relationships, and protects the room. She is sensitive to the problems of her owners, and is a kind of energy barometer of your home. If suddenly your dracaena gets sick, then it would be nice to think and remember what you and your household had to face not so long ago and try to get rid of the burden of the past. Dracaena is welcome everywhere and in the bedroom too.
Ficus
Ficus trees can be placed in any room of your home. They improve the energy of the home, lift your spirits and give the room a luxurious and respectable look.
Balsam
Place balsam (Vanka wet) in the children's room. It will purify the air and help your child learn to care for plants, as he is not fussy but loves watering.
Geranium
Make sure that there is always a geranium in your house, at least one copy - then you will have no flies or moths, and the air will be fresh and to some extent disinfected. Geranium kills streptococci and staphylococci with the substances it contains. In addition, geranium placed in the bedroom has a beneficial effect on the human nervous system. In case of stress and insomnia, this plant simply needs to be kept near you.
It is better to keep a plant with red flowers in the bedroom - they help strengthen the relationship between a woman and a man. But this is only if you do not suffer from allergies. The same can be said about orchids - they cleanse the energy and improve the mood of everyone in the room who does not suffer from allergies.
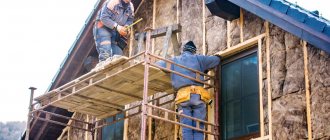
Finishing with insulation
When finishing the foundation on screw piles, it is advisable to provide for its insulation. Energy saving today is more relevant than ever, and by closing the open space under the building and at the same time insulating the basement structure being built, the owner significantly reduces heat loss during the cold season.
Heat-saving cladding means a combination of external insulation with decorative finishing. The following types of materials are used as insulation:
- polystyrene foam, characterized by high thermal insulation properties and ease of installation;
- penoplex, which is durable slabs, the thickness of which varies in the range of 2 – 10 cm;
- polyurethane foam, it is one of the most effective materials for thermal insulation, but requires special expensive equipment to carry out the work;
- special facade slabs with insulation.
Extruded polystyrene foam (foam plastic) is considered the most popular and in demand for basement insulation. The principle of finishing work is similar to finishing siding. A trench is dug along the perimeter, a sheathing is attached to the piles, and insulation sheets are mounted to the elements. They can be covered with slate sheets and faced with porcelain stoneware, basement siding or plastered.
Corrugated sheet
It is quite easy to attach a profiled sheet or corrugated sheet to a wooden sheathing. The frame is installed in the same way as for installing siding. The metal material with a special coating is highly durable, easy to use and operate. There are a large number of color options. But a basement structure made of corrugated sheets is not suitable for all buildings; it is important to pay attention to the cladding material of the main structure.
The principle of attaching corrugated sheets is very simple
When choosing siding, brick, panels or corrugated sheets for work, you must strictly follow the fastening technology and take into account the appearance of the building; the integrity of the facade should not be compromised.
The ventilation of the space under the basement floor of a structure is one of the disadvantages of pile foundation technology, which leads to significant heat loss, accumulation of dirt and the risk of rodents in the house.
The problem can be solved by covering the lower part of the side surfaces of the building with facing material.
In this article we will talk about cladding technologies, as well as the materials that are used for these purposes.
Base finishing options
Pile-screw foundation with a high grillage
Pile-screw base with strapping
- A pile-screw foundation with a high grillage is usually installed on unstable and moisture-saturated soils. The average length of the pile is 2.5 m, so the depth in any case will be about 2 m - in such cases, even the seasonal mobility of dispersed heaving soil is not a problem - such a depth is quite enough for immobility.
- Also, such foundations, using screw piles, are installed on slopes where the differences in the plane at different points of the base area are too large. Perhaps, in such situations, covering the base of a house on screw piles is most relevant, and here it is more convenient to use light finishing materials, for example, base siding.
Finishing work
We close the pile-screw base. Finishing principle
So, our task is to close the base for screw piles with our own hands, and for this we can use many materials. However, the essence of arranging such finishing of the basement of a house with your own hands is very similar to one another, since the principle still does not change.
The brick will be covered with ceramic tiles or simple plaster
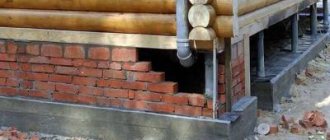
One of the options is when the base on screw piles is sealed using a low grillage. That is, when installing such a foundation, a trench up to 30 cm deep is dug along its perimeter and a tape is poured, where the upper part protrudes 10-20 cm above the ground level. This way you get a pedestal for laying bricks, which, in turn, will serve as a base for tiles or plaster.
Here you get, as it were, two foundations in one - a screw and a strip, but this combination will not only make it possible to easily close the piles, but also increase the strength of the foundation. In addition, concrete is poured with a light reinforcement frame - as a result, the tape will not crack and will also serve as part of the decoration of the lower part of the house.
Finishing with stone panels
Another option you see in the photo above is to install sheathing on piles under some sheet material. In this case, these are stone panels, but you can just as easily install composite or siding on them. Here you see two wooden profiles, but there may be more of them - everything will depend on the height of the base and the size of the finishing material itself.
The sheathing here does not have to be installed from wood - more often it is made from metal, and for this they can use a 20x40 mm metal profile or even a CD, which is used for installing drywall.
Fixation can be done directly on the piles, but this is convenient for timber and metal, where the first is screwed and the second is welded. For CDs, it is best to weld ears (metal plates) onto the piles, onto which the brackets can be fixed.
A corner 120×120 mm serves as a base for a brick
There is another way to close the void under the building, and its price will be much less than installing a strip foundation. A corner of 120×120 mm is welded to the piles, which will serve as the basis for the facing brick, where the width of the bed is exactly 120 mm. The corner is welded strictly level and if the area is inclined, then in the upper part it is better to go deeper into the ground so that there is no void left.
Facing brick laying
Before laying decorative bricks, the corner should be primed to reduce the possibility of rusting to a minimum. The construction of the plinth is carried out as usual masonry with a spoon ligation and a seam of at least 5 mm.
After you have raised the entire perimeter, you need to put ebbs on top, which can be decorative, that is, from a brick set, or make them yourself and galvanized sheet, but the first option will look much better.
Insulation of a screw base with extruded polystyrene foam
You may also need to insulate the foundation base and for this you can use extruded polystyrene foam. A trench 20-30 cm deep and wide is dug along the perimeter of the building using a shovel bayonet and sheathing is mounted on the piles. Then you attach sheets of insulation on top of which you can lay tiles or cover them with slate sheets, as shown in the photo.
Hanging plinth. Installation stages
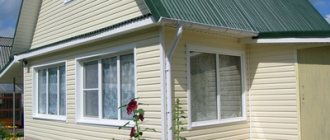
Before starting work, you need to decide what you want to cover the base of the pile foundation with. As we have already said, the choice here is quite wide. Of the materials offered on the market (corrugated sheeting, siding, flat slate, thermal panels), basement siding is the most popular.
These are plastic panels on the surface of which the texture of brickwork, wood or natural stone is applied. Working with them is easy and simple. The most expensive operation is that the basement siding does not need finishing. Its service life is at least 30 years
It is also important that PVC plastic does not rot and does not require updating by painting
Shaped elements (external and internal corners, connecting, starting and finishing strips) are sold complete with plastic cladding.
Any beginner can do the installation of a plastic screen with his own hands.
Let us describe the main stages of this work:
- Before sheathing the pile foundation begins, part of the soil is removed along the outer contour of the building (excavation depth 20-30 cm and width 50-60 cm). Roofing material is laid at the bottom and covered with sand on top. This is done in order to protect the metal of the screw piles from rain and snow moisture. To quickly drain water, a drainage pipe is laid in the sand bed;
- The finishing process involves installing a sheathing (frame) to which the siding will be attached. The lathing consists of two or three horizontal rows of wooden blocks or a 40x20 mm profile pipe. The frame is fixed to the piles through steel angles (brackets) welded to their surface. The size of the corners is selected so that the cladding protrudes beyond the surface of the grillage by 3-4 cm;
- The corner siding elements and the starting profile are attached to the installed frame and the installation of panels begins, moving from the corner from left to right. A gap of 3-5 cm is left between the sheathing and the surface of the blind area. It performs two tasks: ventilating the underground and compensating for frost heaving of the soil;
- The sheathing is secured with self-tapping screws, screwing them into the sheathing through oval holes made in the plastic. To avoid thermal deformation of the panels, self-tapping screws are 1-2 mm to their surface. This allows the plastic to expand and contract under the influence of ambient temperature without warping;
- Having completed the cladding, ebbs made of sheet steel coated with a polymer film are attached to the supporting frame of the foundation. They cover the line where the panels meet the sheathing.
Scheme for installing basement siding on a screw foundation
When using 16 mm thick cement particle boards (CSP) or flat slate for cladding the base, you can refuse to install the sheathing. The rigidity of these materials is quite high. Such cladding will not withstand severe frosts and summer heat.
It should be noted that, while saving on the sheathing, you will have to spend money on finishing. Leaving nondescript gray slate or fiberboard without a decorative layer is not the best option. To improve these materials you will have to hire a plasterer.
When considering materials for finishing a pile foundation, let’s pay attention to thermal panels made of polyurethane foam. Unlike PVC siding, they combine three functions at once: screen, finishing and insulation.
Corrugated sheeting can be classified as budget cladding. The technology for its installation is not fundamentally different from installing basement siding, DSP boards and thermal panels on the sheathing. Profiled sheet grade C (wall) is best suited for the job. It is lightweight and has a low wave height.
In addition to plain-colored materials, today you can purchase corrugated sheets with a pattern that imitates masonry. Low price and durability make this cladding option quite popular. It goes well with walls made of profiled timber, rounded logs and a facade covered with plastic panels.
Problems in the absence of insulation
Whatever the design features of the piles, the option and technology of their installation, this type of foundation has many disadvantages:
- Cold underground, causing significant heat loss during frosts through open space.
- When the grillage is reinforced concrete, it forms a significant cold storage tank. If you do not constantly heat the room, it is not easy to restore a comfortable microclimate in it.
- Freezing of pipelines laid underground is possible.
- Piles anchored in the frost layer can be pushed out. They are an excellent conductor of cold. When insulation measures are not carried out, concrete or metal pillars become the cause of local heaving.
- If some piles are located at points with low soil density, uneven shrinkage of the building occurs.
- Aesthetically, an undecorated foundation of this type looks unattractive.
- The underground space will certainly become littered, so it has to be cleaned periodically.
Interior design
The three-dimensional image of multidimensional ceramics allows you to create a unique interior design. This is truly an immersion into the enchanting world of paintings come to life, and for each room the theme will correspond to the aesthetics of the interior.
Kitchen
The kitchen area is more susceptible to contamination by grease stains and fumes than others. To maximize the service life of a multidimensional coating, you should choose the right textures. So, for a kitchen apron near the stove and sink, ordinary 3D ceramics and stereo tiles, matched to the tone of the entire interior, are most suitable.
Unlike embossed tiles, flat tiles make it easy to clean by wiping the surface as needed with regular detergents. But the relief surface will inevitably collect dirt from evaporation above the stove and limescale from moisture.
You can choose a large pattern for the kitchen panel that matches the color scheme and theme of the overall design of the room. These can be macro images of ripe berries, flower buds, bright abstract figures.
Hallway
A multidimensional image with perspective is an excellent opportunity to visually expand a small hallway or a long narrow corridor. Walls with “live” light landscapes, photographs of roads and streets will create a feeling of freedom of space and add light and air to the room.
If the size of the hallway or hall allows you not to save square meters, then the multidimensional image can contain both macro-pictures and a relief texture for every taste
However, it should be remembered that large images of people, animals, cars - anything that draws too much attention to itself can quickly become boring. Therefore, it is still better to choose a calm landscape theme
Living room
Relief 3D coating is the most fashionable option today for cladding the walls of a state hall or a more modest living room. Stylish wavy pattern, the effect of woven fabric, quilted or crumpled fabric, honeycomb – the choice is huge, and everyone can choose something original that suits their unique interior.
White and black 3D tiles will look perfect in a classic interior and art deco style. Warm wood shades suit both strict classics and eco and country styles.
Bedroom
Since the recreation room does not involve bright decorations or impressive multi-dimensional paintings covering the entire wall, and the landscape perspective can deprive the bedroom of comfort, designers recommend using opaque 3D relief tiles for tiling this room.
Bathroom
It is perhaps difficult to think of a more suitable place for the amazing world created by stereo tiles with a multidimensional effect than the bathroom. Manufacturers offer a huge variety of marine and beach themed options, and these products are in demand. And it’s not surprising, because it’s so nice to feel like you’re on a sunny beach under palm trees or immersed in a fascinating underwater world with corals and goldfish.
Dolphins frolicking on the waves or a mountain waterfall will calm you down after a hard day, and taking a hot bath will truly be a heavenly pleasure.
As with kitchen decor, textured tiles in the bathroom can be a hassle to clean.
Evaporating moisture will settle in the folds of the relief in the form of limescale, which not only spoils the appearance of the coating, but can also cause bacteria and fungus to appear. Therefore, in a small bathroom, from a practical point of view, it would be better to choose glass stereo tiles or 3D ceramics.
The main advantages of pile-screw foundations
This method of creating a foundation is chosen when it is not possible to create a regular strip foundation using a cement-sand mixture. In addition, there are a number of other positive nuances:
- The root system of all plantings around is preserved.
- There is no need to set up a huge construction site.
- Suitable option for marshy soils.
- Work is carried out at any time of the year, including winter.
- The pile is reused.
- Small and medium-sized elements can be installed without the help of special devices.
- Allows you to place the house in close proximity to other residential buildings.
This option for arranging the foundation is also suitable for small country cottages. The work is completed quickly and there is no need to wait until the solution is completely dry, and this greatly reduces construction time.
How is the base of a pile foundation constructed?
In order to construct a plinth for a pile foundation, you must do the following:
- Make a sheathing. To do this, use wooden blocks or a metal profile.
- Insulate. This stage can be skipped, but if you plan to use the space as a full-fledged basement floor, then it is impossible to do without thermal insulation.
- Install finishing on the screw foundation of the house.
- Seal corners and seams.
- If necessary, clean the structure and additionally treat it with special compounds.
Plastic panels
Attaching materials to piles is carried out using the same technology as in the case of siding. If you cover the space under the house with panels, you can get the following benefits:
- attractive appearance;
- a wide range of colors and textures (you can choose imitation brick or natural stone);
- rigidity;
- resistance to mechanical and chemical influences;
- resistance to rotting;
- affordable price.
Plastic plinth panels
But when choosing, it is worth remembering that despite the efforts of manufacturers, natural brick or stone looks better than finishing made from artificial materials.
Design of a shallow foundation
The finishing of the base covering is carried out after pouring the strip base:
- Brickwork is installed on the strip base;
- It is brought under the walls, vents are formed;
- The final finishing of the façade is in progress. Plaster or plastic panels can be used for this.
Advantages of brick finishing:
- This masonry additionally protects the lower part of the structure;
- When finishing, much less insulation is consumed than in a suspended structure;
- The design of the strip plinth is carried out simultaneously with the construction of the blind area;
- The time of construction operations is reduced;
- It becomes possible to create a basement;
- The aesthetics of the structure increases. You can choose any form of finishing.
Hanging structure
Making a hanging structure is not difficult. You just need to follow the order:
A sheathing is created from metal corners, pipes or wooden boards.
- Guides are attached to the piles using any convenient method (with self-tapping screws or welding). This could be a metal profile, wooden beams; a kind of frame for fixing panels or asbestos-cement slabs, combined systems with insulation or slate sheets on it.
- Before installation, a “cushion” of sand up to half a meter thick is poured around the perimeter.
- Corners are formed in a convenient way using accompanying components.
- All seams are sealed with a sealed solution.
- The design is complemented by the installation of ebbs and other elements that are missing for the finished design of the base.
- The crowning achievement is the finishing decorative finish.
Technologies
There are 2 main technologies for cladding the bottom of a house. The materials used may vary.
Frame system
The frame system for covering the plinth is as follows:
- vertical and horizontal guides are attached to the piles;
- a wooden or metal sheathing is mounted on top;
- Acrylic or vinyl siding is attached to the sheathing with a gap of at least 1 mm, compensating for temperature deformation.
The disadvantage of the technology is the excessive consumption of material as a result of cutting and fitting , since non-standard sheet sizes may differ from the height of the base.
Leaf system
The technology involves fastening cement-bonded and asbestos-cement boards to wooden or metal sheathing.
Porcelain tiles, soft tiles or other budget sheet material are laid over the entire surface of the cladding.
Since the base in this case will be solid, it is necessary to equip ventilation openings, which are covered with grilles during facade work.
Advantages of the technology:
- warm and durable foundation cladding;
- a wide variety of finishing options.
The disadvantage is the labor intensity of the work and the high consumption of building materials.