The issue of renovating a room almost always depends on the budget for future work. Most often, the owners of an apartment or house are faced with a choice - to renovate the room with their own hands in a cosmetic way, without postponing the matter, or to plan a major overhaul for the indefinite future with redevelopment and a serious update of the design. Most craftsmen in such a situation recommend redecorating the room, during which the vast majority of problems with the interior of the room can be solved.
How to properly approach the organization of renovation in one room
Starting a room renovation is always inconvenient and even scary, especially if you don’t have enough experience, and the only assistants at hand are a cheat sheet on how to renovate a room with your own hands for beginners. But, as a rule, uncertainty and doubts pass when the scope of future work becomes clear and the question of in what sequence to make repairs in the room is resolved.
Therefore, the first step is to draw up a master plan for cosmetic repairs, and most importantly, before attempting to make repairs in a room, it is necessary to draw up a detailed estimate for the purchased materials and consumables. This is a mandatory condition; even for renovations in a small room you will need to make a list of several dozen items.
Where to start renovating a room is not important; you can carry out repair work in the sequence that seems more convenient in given specific conditions. Traditionally, renovating a room with your own hands begins with the most “dirty” or rough work and ends with delicate finishing procedures.
A typical list of work or sequence of repairs in a room is as follows:
- The old finish is removed from the walls, ceiling and floor. Removing the floor covering produces the largest percentage of dust and dirt, so it is removed first;
- Rough preparation of the floor is carried out for further laying of a new floor covering;
- Wiring repairs are carried out, lamps and switches are moved and hung, corrugations are laid out for television and Internet cables;
- The walls and ceiling are cleaned and puttied. If the redecoration plans involve changing the wallpaper to a more modern type of finish, then you will need to level the walls with gypsum plaster;
- The ceiling surface is leveled in a similar way. Before whitewashing or painting with water-based emulsion, the ceiling is rubbed down, plastered with a lime-gypsum mixture and a decorative coating is laid;
- Decorative finishing of the walls is carried out, ceiling plinths are glued, the lining of interior doors is changed;
- New flooring is being laid, baseboards are being installed, lamps are being hung, and switches are being installed.
Of course, at each stage of room renovation, photo, a large amount of debris and dust will be generated. Not only will you have to regularly clean the room and remove rubbish rubble, you will also need to try to cover areas with already completed repairs with protective plastic film to avoid dust on the surface.
What Shouldn't Be Included in a Room Redecoration
Finishers often call cosmetic repairs a “three-day job”; in order to update the interior of a room, as a rule, no more is required. The list of repair activities does not include the most expensive work:
- Redevelopment of premises with the transfer of interior partitions;
- Replacing the heating system;
- Installation of expensive multi-tiered suspended ceilings;
- Glazing of the balcony and replacement of windows with double-glazed windows;
- Equipment for heated floors in the room.
It is clear that all of the above components of repair require serious financial costs and the involvement of qualified specialists in the work. It will take more than a day or two to carry out such serious events. In addition, such is the specificity of the renovation in the room that, willy-nilly, dust and construction debris spread throughout the apartment. Therefore, the situation is regulated in this way - either cosmetic repairs are made in a single room, or the entire apartment is “stood up” for major repair work.
In general, the redecoration plan includes everything that can be done in a couple of days with your own hands for relatively little money.
Types of construction and finishing works
All repair, installation and finishing work must be carried out taking into account the requirements of SNiP.
- Installation or replacement of doors, as well as their major restoration.
- Installation of heated floors with screed filling.
- Installation of suspended ceilings - matte, glossy, fabric, translucent.
- Installation or replacement of plumbing fixtures, gas boilers, replacement of water pipes, installation of water filters, pumping equipment.
- Electrical installation work – laying or replacing cables and sockets.
- Soundproofing the room - walls, floor, ceiling.
- Tile work, as well as work with artificial and natural decorative finishing materials.
- Installation, restoration or replacement of parquet.
- Laying PVC coverings on the floor - vinyl, polymer, as well as carpet, linoleum, self-leveling floors.
- Leveling the floor using a screed.
- Rough and decorative plaster, painting walls, wallpapering.
Depending on the condition of the room, the amount of work is determined, the amount of materials is calculated, and only after that the repair can begin.
The main task of cosmetic repairs
The main goal of renovation work is to refresh the interior of the room, remove minor defects and damage that have accumulated over the years, which are incredibly annoying and interfere with everyday life.
In rare cases, cosmetic repairs become a consequence of force majeure circumstances, for example, flooding of a room by neighbors on the floor above or preparing the premises for renting. There may be many reasons, but the main thing is still maintaining the premises in a comfortable condition for living.
Properly performed cosmetic repairs make it possible to save on the volume of future major repairs. For example, screeding the base of the floor and leveling the walls will at least reduce the time and effort required to prepare for major repairs, of course, provided that the renovation of the room with your own hands (photo) is carried out as conscientiously and efficiently as possible .
Preparation of tools and materials
It is impossible to carry out major or any other type of repair without tools. If you need a lot of them, it is recommended to rent a set. It will cost less, and in addition, their quality will be better.
An approximate list of tools that will be needed for repairs:
- screwdriver;
- perforator;
- Bulgarian;
- drill;
- level;
- plumb line;
- roulette;
- brushes, rollers, spatula.
If you need to make a screed, you will need a concrete mixer or a drill attachment to mix the solution in the container. Large volumes of concrete are best mixed in a portable concrete mixer.
In addition to the listed tools, you may need a set of screwdrivers and wrenches. It is recommended to buy such a kit, as you will need it more than once.
Valera
The voice of the construction guru
Ask a Question
When preparing materials, it is necessary to take into account their moisture resistance. It is not recommended to open bags of cement and gypsum in advance, as high humidity can make the materials unsuitable for use. Particular attention should be paid to pouring the screed. The floor within one room is poured at the same time so that the previous section does not dry out, as this can cause the formation of cracks.
The next stage of repair, distribution of costs and load
Budget planning and procurement of materials are rightly considered one of the most difficult stages of redecoration. Especially if you plan to do most of the repair procedures yourself. The reason is simple - amateurs and novice craftsmen have no idea how much specific material will be required for this or that area of work.
In this case, the problem can be solved in two ways:
- The compiled list of work and estimate can be shown to an experienced craftsman, who will help calculate the consumption according to the square footage of the room;
- Calculate consumption based on standard recommendations from building materials manufacturers, increasing the supply of glue, plaster mixtures, wallpaper, and flooring by 10% of the calculated values.
In the latter case, the cost of purchasing materials will increase significantly, but ultimately, the remains of cement, dry plaster and glue can be used for cosmetic repairs of other rooms in the apartment. In addition, having a list often helps to get a wholesale discount, so there should not be significant gaps in the budget for a future cosmetic renovation of a room if the purchase is properly organized.
Final recommendations
When determining the order of repair and finishing work in the room where the suspended ceiling structure will be installed, the final recommendations will allow you to get the maximum result:
- It is preferable to install a stretch ceiling before finishing work on the walls.
- Before measurements begin, the walls must be leveled, plastered, puttied and primed.
- Installing the ceiling structure after the wallpaper risks contaminating the wall covering.
- If the wall is not strong enough, a crack may form as a result of drilling, which will be invisible under the wallpaper.
- During the installation of the film product, using a heat gun can damage the wallpaper, leaving stains that cannot be removed.
- High temperatures when the canvas is stretched can cause the wall covering to peel off.
- Before starting work, the floor must be protected from damage.
The main disadvantage of the proposed recommendations is the fact that the subsequent application of the wall covering will be carried out end-to-end to the edge, therefore, particularly high precision and accuracy of actions will be required so as not to spoil the canvas.
Preparatory stages of renovation in a room
The first, most labor-intensive stage has always been and remains the rough stripping of the walls and ceiling. Typically, renovations to a room begin with removing pieces of furniture and sealing the front door with a protective awning. You can use thick plastic wrap or an old blanket. An improvised curtain will protect the rest of the apartment from noise and dust, which, even with very careful work, using a vacuum cleaner and wet cleaning of floors, always accumulates in the room in considerable quantities.
Before repairs, the lamps must be removed; instead of a chandelier, a socket with a light bulb is left in the room. If double-glazed windows are installed in the room, then it would be useful to cover the window opening with film before the repair. It is clear that the film also covers the floor covering; it is easier to roll up the laid polyethylene than to wash the dirt in the room every evening.
Removing old finishes from walls
Preparing for a redecoration takes about a third of the planned time. During this time, you will need to remove the whitewash and wallpaper from the walls of the room. If there are areas with damaged plaster, it will take another day to knock the plaster off the walls.
Old wallpaper is removed either in one sheet or scraped off in small pieces for a long time, it all depends on the glue used. Before removing the wallpaper, moisten the surface with a small amount of water using a spray bottle. After 20-30 minutes, the trellises can be removed in patches. For especially strong adhesives, boiling water and steam are used. In any case, after stripping the old trellises, you will need to use a vacuum cleaner and a stiff brush to remove dust and glue residues.
Peeling and restoration of the ceiling surface
The ceiling is freed from the decorative coating much faster and easier than the walls. If the plans for cosmetic repairs include sticking polystyrene boards or laying plastic panels, then it will be enough to remove the top layer of whitewash.
The situation is more complicated if the ceiling in the room is painted with water-based paint or whitewashed with lime. In this case, it will take at least a day to remove the durable layer of old finish.
The most common option for restoring the ceiling during cosmetic repairs involves leveling the plane of the ceiling. In any room of any apartment, the floor slabs lie with a differential of several degrees, which leads to a difference in ceiling height near the opposing walls of the room from 2 to 5 cm.
If time and budget for cosmetic repairs allow, then it is best to level the ceiling using high-quality gypsum plaster.
To do this, plastic slats are sewn onto the ceiling and the plane is tightened with a plaster mesh. Beacon slats are glued with alabaster, guided by pre-tensioned horizontal marking cords. The mesh is sewn on dowels. The total time required to completely level the ceiling in a room is 5-6 hours of work.
You can complete a complete ceiling repair in one working day. The next day you can sand, prime and paint the surface.
Cosmetic repair work to the walls of the room
During cosmetic repairs, walls are leveled and plastered only in exceptional situations, when the situation requires it, for example, the appearance of a large number of cracks or chipping of the plaster. In addition, the total area of the walls of the room, as a rule, is three times the area of the ceiling, which in itself requires a lot of time and materials.
Therefore, during cosmetic repairs, the preparation process is limited to cutting small cracks, followed by puttying and grinding the surface. Sometimes, in order to level the plane of a single wall, particularly problematic areas are sanded with an electric sander.
In addition, at this stage of the renovation work, it is easy to change the profile and configuration of the electrical wiring in the room. It is enough to drill channels in the lower part of the walls to the installation site of new electrical sockets, punch through “glasses” for the trimmers and install the sockets themselves. The corrugations with wiring laid in the channels can be rubbed with plaster or alabaster mass. All work will take a maximum of 2-3 hours. Upon completion of preparation for finishing, the surface is vacuumed and primed.
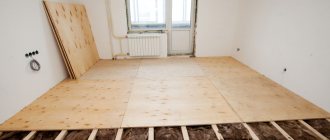
Rough floor preparation
After finishing the most labor-intensive work with preparing the ceiling and walls, you can move on to cleaning and preparing the floor. If the floors are concrete, with laminate flooring, then cosmetic repairs may be limited to re-laying the laminate slabs, with or without replacing the lining material. Most often, damaged slabs in a room are replaced, after which the coating is polished using wax mastic.
During cosmetic repairs, linoleum coverings are cut out, the base is cleaned down to concrete, primed and covered with a heat-insulating lining based on foamed polyethylene.
If the room has wooden floors, then first of all the floorboards themselves are cleaned and repaired, then the joints are hammered and hammered, after which the surface is sanded and prepared for painting.
Don't forget about garbage and dust
Any repair work, even the simplest and most superficial, is always accompanied by the formation of a large amount of debris and dust. Before repairs, you need to prepare two or three polypropylene bags into which all the garbage from the room will be collected daily. At the end of the day, after each finishing operation, the walls and floor are cleaned of crumbled crumbs and remnants of plaster mortar, and before finishing, the walls are cleaned with a vacuum cleaner or a damp brush.
If the walls of the room are supposed to be leveled with gypsum plaster, then the amount of debris will increase five to six times. It will be necessary to think in advance and find a way to collect and remove 150-200 kg of cement-sand waste screenings from the premises. You cannot send it to the garbage chute or trash cans; you will need to order a special service for the removal of construction waste.
Stretch ceiling to wallpaper
If the installation of the structure takes place before the walls are pasted, then their alignment, as well as all preparatory work, must be carried out without fail. Otherwise, the installed baguette will only emphasize unevenness that cannot be hidden using decor. It is also worth considering that while you can try to protect the walls, it is unlikely that you will be able to close the ceiling, so there is a possibility of it getting dirty and damaged.
The positive aspects of this installation method are as follows:
- there is no need to worry about the safety of the wall covering, because the thermal effect will be carried out before finishing the walls;
- Over time it is possible to replace the wallpaper.
It is also worth considering the negative points:
- there is a risk of contamination and damage to the canvas;
- When trimming wallpaper, without special skills, you can damage the decorative tape or even the canvas itself.
If renovations are often taking place in the room, then, of course, it is preferable to first make a tension structure and stick wallpaper closely to its frame. This will not affect the design, and the room will be updated every time.
The most important point that should not be forgotten is to ensure that the walls are perfectly level before installing the frame.
Another factor that can affect the installation of a tensile structure before wallpapering is the material from which the walls are made. If they are made of red brick, then it would be better to first make a suspended ceiling and then glue the walls, because red dust can leave a mark.
Cleaning redecoration operations in the room
The first step is finishing the ceilings. Typically, the repaired and sanded surface is primed and painted with light-colored acrylic paint.
If wallpaper is used in the interior of the room, the ceilings can be decorated with non-woven or vinyl wallpaper to match the color of the future wall decoration. A common practice for decorating lamps and chandeliers is the use of imitation polystyrene stucco molding and decorative ceiling plinths.
Finishing the walls in a room is considered one of the most important and at the same time time-consuming cosmetic operations. Even taking into account the fact that half the walls in the room will be covered with furniture, a certain part of the walls will still be clearly visible to everyone present in the room. If during cosmetic repairs it was not possible to properly level the surface of the walls, you can hide the imperfections only under the wallpaper. It is best to use trellises on a fabric basis or with a pronounced relief textured surface. Pasting a room will take 7-8 hours or a full working day.
Repairing doors and floors in a small room
The wooden plank floor of the old layout often has to be hidden under linoleum or laminate. In this case, the surface of the floorboards is sanded with a sanding machine, and the joints are sewn together with nails driven at an angle to the board. At the next stage of repair, the floor surface is covered with OSB boards, after which linoleum or any other flooring option can be laid in the room.
The situation becomes more complicated if the concrete floors are leveled to the level of the screed throughout the apartment. In this case, any floor covering in the room will lead to the appearance of a threshold, so the installation of laminate or parquet must be planned simultaneously in all rooms.
The final stage is the restoration of interior doors. The hatch and the door itself, if they are in good condition, can not be changed, but undergo restoration with cleaning and polishing of the surface. The outer lining of the door frame is traditionally replaced with a new one during repairs. The replacement of doors with a supporting frame is planned for a major overhaul, usually so that the entire apartment or house has doors of the same style and design.
Design project of an apartment yourself: programs for the designer
In order to successfully plan the interior design of a room, and especially an apartment, it is not enough to come up with some ideas in your head or sketch them out on paper.
If only for the reason that it will be difficult for you to imagine how all this will look in reality. Therefore, the next stage according to professional canons should be the design project of the apartment. But this is only if you decide to actually transform your home in accordance with some new design concept that you came up with.
If you don’t have such plans, then you can skip this point without regret.
But if you still decide to try arranging furniture on your plan and look for the best interior design option, then you can use programs for designers, of which there are a great many.
Currently, there are visualization programs that allow you not only to carry out planning, but also to develop a stylistic concept, arrange furniture and even add the necessary decor.
Scheduler programs exist, both professional and freely distributed on the Internet. There are more than ten popular programs in total, and one of them is called Interior Design 3D.
Here is a list of the most famous designer programs:
- Astron design
- Interior design 3D
- Autodesk homestyler
- Sweet home 3d
- Ikea home planner
- Google sketchup
- Floorplanner
- Planoplan
- PRO100
- Planner 5D
- Roomle
- FloorPlan 3D
- SketchUp
- Homestyler
Most of them are free. In the rest, only the demo version is available for free.
Many of the presented planners are Russified.
If you are confident enough to use a computer, then learning how to work with a scheduler is not very difficult. And even if your plans do not include developing serious design projects, then it’s worth trying to visualize the interior, if only because it is a very exciting activity.
We act according to the scheme
The movement of finishing the apartment should be carried out from top to bottom: ceiling → walls → floor. This way you won’t have to worry that the part of the repair that has already been completed will be spoiled or damaged. However, there are some amendments to this course of events.
Floors. If you intend to make a new floor screed, then your path will begin from the floor, and not from the ceiling. There are two ways:
Leveling the floor using cement mixture
Fill a self-leveling self-leveling floor
The first option is cheap and labor-intensive, the second is more expensive and simpler. If possible, use the second one. You will not regret. The self-leveling floor will dry in a couple of weeks.
If the screed will not be made, follow the above scheme.
Walls. For leveling you will need plaster. The number of layers applied depends on how smooth the walls are. In turn, the time spent on leveling depends on the number of layers of plaster.
The second method is drywall. Installs easily and quickly. It is usually puttied in two layers. The first is the starting one, the second is the finishing one. It is easy to install communications and cut holes in plasterboard structures. For example, under sockets. In addition, such walls will be perfectly smooth. The only disadvantage of a plasterboard block is that it takes up part of the area.
Ceiling. The principle is the same here. Either you putty or use drywall for leveling. Pros of gypsum:
it is very easy to install lighting (spotlights, LEDs);
- the ability to make figured ceilings.
Another point that stands out from the basic scheme of “sequence in repairing floor, walls, ceiling” is a suspended ceiling. This part is best left for last. You can design boxes for suspended ceilings initially, during rough work. But you will mount it at the end.
Is the dirty work done? Start cleaning.
After installing the door frames, proceed to painting and pasting. When the cosmetics are ready, we finish by assembling the baseboards, sockets and other decor.
Dismantling
Once you have everything planned, it's time to dismantle. If you started cosmetic finishing, then everything is simpler. They tore off the old wallpaper and put up new ones. But we are not here to discuss wallpaper. Our plans are more global, which means:
—
We dismantle old floors;
— remove the tiles that have lost their luster;
— we demolish unnecessary partitions;
— moving doorways to new places;
— dismantling old window frames;
— we remove the painted baseboards to the side.
Now that you have gotten rid of everything unnecessary, you can move on to the next step of our plan “sequence in apartment renovation: floor, walls, ceiling.”