On average, according to statistics, a person makes repairs 2-3 times in his life. This procedure cannot be called pleasant, so there are many jokes and funny stories about it. But, no matter how funny they are, sooner or later you will have to face it.
If there are helpers, then the repairs are somehow more fun and there is always someone to help or back up. But what to do if there is no one? How, for example, can you glue wallpaper on the walls yourself? In fact, it is doable and cannot be said to be difficult.
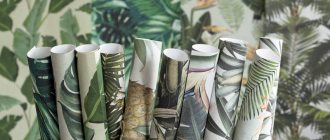
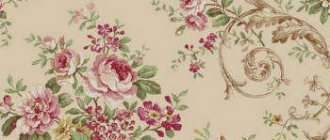
Types and features of wallpaper
Wallpapers are divided into several types depending on the base materials:
- Paper - single-layer or two-layer canvases. Thin, light, can be glued with any glue.
- Vinyl is a two-layer material with a paper or fabric base, the outer layer is PVC film. Such wallpaper can be used on surfaces with minor imperfections; the thickness of the canvas will hide minor imperfections. To glue them, you need special glue.
- Non-woven. Durable, deformation-resistant material that does not shrink after drying. Fixed on the wall using non-woven wallpaper glue.
- Textile. Consist of two layers (paper/non-woven fabric and fabric). Before gluing them, you need to level the surfaces.
- Glass wallpaper. Wear-resistant, durable material that is not afraid of high humidity. After pasting they paint.
The adhesive is chosen taking into account the type of wallpaper. While paper ones can be glued using any composition, others will require specialized ones.
Choice
Let's start with recommendations for choosing materials.
| Paper | The main advantage is the low price. However, due to their low moisture and wear resistance, paper coverings can only be used in rooms with dry air and low traffic – bedrooms and living rooms. |
| Nonwoven | The volumetric texture of the non-woven fabric allows you to hide noticeable unevenness in the base. Its wear resistance is higher than that of the previous solution; The material is also somewhat more resistant to moisture. However, the difference is more quantitative than qualitative: and this type of finishing is best used only for living rooms and bedrooms. |
| Foamed Vinyl | It is resistant to moisture and can be washed using household detergents. Wear resistance, however, leaves much to be desired. The material is quite suitable for the dining area of the kitchen or for the bathroom; but in the bathroom, kitchen and hallway it is better to prefer more durable coatings. |
| Thick vinyl | Durable, washable wallpaper made of thick vinyl on a paper or non-woven backing can be used in any room without any restrictions. The absence of a pronounced relief means that the walls will have to be leveled quite carefully; however, a contrasting pattern can also partially hide flaws. |
| Fiberglass | Maximum resistance to any external influences. The only thing in which glass wallpaper is inferior to dense vinyl is the tightness of the coating: the woven material will allow water and steam to pass to a solid base. |
Useful: we deliberately ignored all types of natural wallpaper (bamboo, jute, etc.). They are expensive and are used relatively rarely in decoration. These materials have only one common feature: they are not friendly with water; wear resistance, density and other characteristics can vary within wide limits.
Bamboo flooring is ideal for a hallway; but he has nothing to do in the kitchen.
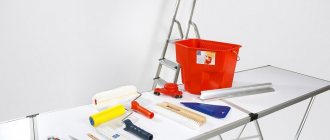
What will you need?
To hang wallpaper yourself, you will need:
- ladder;
- building level;
- 2 rubber rollers (for straight and corner sections);
- paint brush;
- roller;
- glue container;
- construction mixer;
- roulette;
- construction knife;
- rags;
- cuvette;
- wallpaper spatula;
- Ruler and pencil;
- suitable glue.
In addition to the tools for the work, you will need cardboard. It is spread on the floor so as not to stain the canvas or leave traces of glue on the floor covering.
Glue selection
How to glue wallpaper?
| Paper, light vinyl on paper backing (weight below 110 g/m2) | Use conventional wallpaper adhesives based on starch or carboxymethylcellulose (CMC), diluted to a liquid consistency. |
| Non-woven fabric, heavy vinyl, glass wallpaper in dry rooms | The same adhesive compositions are made thicker (about 4-5 liters of water per 500 grams of dry glue). High viscosity will prevent heavy wallpaper from falling off the wall. |
| Vinyl, glass wallpaper in wet areas | The only reasonable choice here is PVA glue, which remains water-resistant after drying. |
Preparatory stage
To quickly hang wallpaper on your own, you should properly prepare for the job: thoroughly clean the walls, calculate the required number of rolls.
Calculation and purchase of wallpaper
Proper calculation of the amount of materials will allow you to avoid unnecessary expenses. The formula for calculating the total surface area on which you need to paste wallpaper: S=2ab+2cb , where:
- a – length of 1 wall;
- b – wall height;
- c – length of wall 2;
- S – area.
You should measure the room and substitute your own data into the formula. This is not the final value - you also need to take into account the sizes of windows and doors (including the balcony, if there is one). Measure the height and width of window and door openings, multiply and add. This amount is subtracted from the area of the surface to be pasted.
Calculate the area that can be covered with 1 roll.
If the height of the walls is equal to or more than 2.5 m, and the length of the roll is 10 m, take into account that after cutting you will get only 3 sheets.
Multiply the total length of the stripes by the width to obtain the desired value. Divide the total area to be covered by it (taking into account the deduction of openings). As a result, they will find out how many rolls will be needed to cover the room. If the value is not an integer, always round up.
It is recommended to add 1-2 rolls to the resulting number. If you need to hang wallpaper alone, some of the strips may be damaged if handled carelessly.
Preparing the walls
Before work, the room is de-energized, cleared of furniture, and sockets and switches are removed. The old covering is removed from the walls. If the finish has not come off completely, remove the stuck pieces using a wide spatula and a construction knife.
Inspect surfaces and remove all defects. Depressions, chips, and cracks must be filled with putty or other leveling material and the area must be sanded after the solution has dried. The protrusions are knocked down with a handy tool and cleaned with sandpaper.
For small curvatures of the walls, it is enough to get rid of recesses and protrusions, but for serious differences, leveling will be required. Afterwards, use a broom or rag to remove construction dust from the surfaces and prime the wall. This must be done so that the wallpaper lies flat, holds better, and when removed, moves away from the base without any problems.
How to prepare the surface?
At the preparatory stage, it is necessary to carry out a certain set of works with the surface. No matter how fashionable and attractive the wallpaper is, the overall appearance will not be ideal as long as there is an uneven surface under the finishing materials, replete with potholes and protrusions. Therefore, the surface must be plastered, puttied, and sanded. Moreover, each layer requires a good primer. Such walls will last for many years, the wallpaper on them can be changed many times.
Of course, the remains of previous wallpaper are removed from the walls. If non-woven wallpaper was pasted there, it will be removed without a trace. When removing vinyl, which is the most common type, the backing will definitely come off and remain on the wall. There is nothing wrong with this; it will be the basis for new decorative finishing. If the layer of plaster and putty holds up well, then there is no need to worry about the fact that some of the vinyl wallpaper remains on the wall.
Advice! To make sure the surface is durable, you need to draw two intersecting lines with a sharp object. If only the indentations from a sharp object remain without chips at their intersection, then the surface is durable. This test should be carried out in places where the scratches will not be very noticeable later.
Detailed instructions for gluing
When the preparation of tools and surfaces is completed, proceed to gluing. When performing work alone, some nuances are taken into account.
How to carry out pattern fitting and marking?
Patterned wallpaper is customizable. If you cut the roll into strips of the required size without taking into account the repeat, the pattern elements on the wall will not match. The joints will become noticeable. In this case, it is important to find the beginning of the repeat (the repeating pattern that makes up the pattern), measure a strip from it with a length equal to the height of the walls + 10 cm. Cut it off and turn it over to the front side. Unwind a new piece from the roll, attach it to the first piece, combine so that the pattern matches.
Before gluing the cut strips, mark the wall. They do this using a level. Measure a distance from the corner 5 cm less than the width of the wallpaper and apply it vertically. Align the position so that the bubble is located strictly in the center. Make a mark with a pencil. This line will serve as a guide when gluing the first canvas. The next ones, before gluing, are aligned with it.
How to apply glue and stick canvases?
First prepare the glue following the instructions. It is recommended to dilute it in small portions, especially if you plan to glue the wallpaper alone. The work will go slower, the composition will thicken.
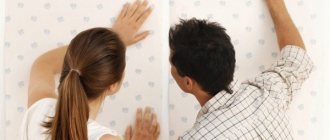
Begin pasting the room from the corner, with markings. The first strip is spread face down on the cardboard and coated with glue with a roller or brush. Fold the fabric in half and leave for 5–10 minutes. During this time, you can prepare the next strip.
Without unfolding, take the wallpaper and apply it to the wall. Be careful not to confuse the top and bottom. Carefully pull off the lower end of the strip and stick it to the wall. The top edge should protrude a few cm above the wall; the excess should be trimmed after drying. Then they get off the stepladder and lightly pull the bottom edge to straighten the fold. Align along the drawn line. Next, you need to use a rubber roller from top to bottom to remove air voids. Use the same method to glue the next section. Wallpaper is joined with an overlap using a roller. Press lightly so as not to deform the finishing material. The leaked glue is removed with a rag.
If there is a gap between the sheets, you need to peel off the strip and glue it again. You cannot pull back the edges in an attempt to stretch wet wallpaper. After drying, they will shrink back.
We recommend watching the video instructions:
How to cover areas with sockets and switches?
Before wallpapering, switches and sockets are removed so that they do not interfere with work. The canvases in these areas should be glued as usual. Then use a construction knife to cut out holes slightly smaller in diameter than the recess in the wall.
How to cover the area where heating radiators are installed?
In order to hang wallpaper on the wall behind the radiator alone, you need to determine whether the radiator can be removed. In new heating systems, the elements are usually removable. In this case, shut off the coolant supply to the pipes, drain the remaining liquid, open the tap, and remove the radiator. Gluing the exposed area will not be difficult.
Old cast iron batteries are not removable, making them more difficult to work with. The wallpaper that needs to be pasted behind the radiator is coated and folded as usual. Then they apply it to the wall and straighten it to the radiator line. The remaining part is cut into several strips. They stretch them one by one behind the battery, straighten them, and smooth them down.
Features of gluing to the ceiling
The hardest thing is to hang wallpaper on the ceiling alone. Particular care must be taken in this area, since all flaws will be visible.
It is almost impossible to hold the canvas while simultaneously smoothing the already pasted areas, so a special device is used. It is made from several bars and a plastic or metal pipe. The timber is taken with a small cross-section in order to minimize the weight of the finished structure.
How to make a frame that helps you hang wallpaper on the ceiling alone:
- Cut 2 bars 3–4 cm long less than the height of the wall.
- From the third block and pipe, cut off 1 piece 10 cm longer than the width of the blade.
- Place 2 long bars on the floor and connect the ends at one end with a pipe. Fasten with self-tapping screws.
- Place the short bar approximately in the middle of the long bars, also secure with self-tapping screws.
- Build supports for the structure from the remaining wood.
- Place the frame on supports.
To glue ceiling wallpaper, you need:
- throw the glue-coated canvas over the top crossbar, face down;
- place this structure next to the stepladder;
- pull the end, pull out a short piece, attach it to the ceiling;
- iron with a roller;
- move the stepladder and frame a meter to the side, glue the next part;
- Continue this way until the entire canvas is pasted.
After completion of the work, the structure is dismantled.
How to cover the area where heating radiators are installed?
The installation location of heating radiators is considered the most difficult for the wallpapering process. To complete all the work efficiently, you will have to make every effort. In new buildings there are fewer problems; there you can find radiators that can be dismantled and, after pasting, installed in their original place. Photo 20 shows how radiators are dismantled. After its removal, wall fasteners and floor outlets equipped with American-type connections remain.
Photo 20
In this case, pasting will not be a big problem. However, the process of removing the battery and then installing it will take time. Before disconnecting, you need to turn off the water supply, then the return line, and drain everything that is inside the radiator. At the same time, we must not forget about pressure. It is reduced by unscrewing the shut-off screw located on the drain valve.
If the situation is such that it is impossible to remove the radiator, you will have to insert strips about 15 cm under it. If the battery is working, you need to additionally coat the surface under it with glue.
HOW TO GLUE WALLPAPER WITHOUT STRESSING
Tips for working alone
To carry out wallpapering without using additional force, you should adhere to the following tips:
- The preparatory work must be done as efficiently as possible, since it is much easier to join the panels on flat surfaces.
- The purchased glue must match the type of wallpaper and provide quick fixation, especially when it comes to gluing the ceiling.
- Wall marking is carried out with a laser level; this tool will allow you to accurately distribute the lines yourself, which cannot be said about a plumb line or a water level, where you need to use additional forces.
- It is easier and faster to apply glue with a roller than with just a wide brush.
- It is better to buy wallpaper with a pattern that does not need to be selected, but simply pasting the strips one after another.
- Pasting begins from the top position in a downward direction, with careful smoothing and expulsion of air.
- Pressing tightly will help to make a rubber roller; they can also be used to roll the joining parts.
- Trim excess wallpaper in the corners and in openings after drying, this will help avoid tearing of the soaked strips.
Required Tools
To ensure that nothing distracts you from your work, prepare all the necessary equipment in advance.
- ladder;
- plumb line or level;
- knife-cutter;
- scissors, pencil, ruler;
- cuvette and glue bucket;
- wide brush for applying glue;
- rubber roller, wallpaper brush or spatula;
- screwdriver and electrical tape (for electrical appliances);
- sponge, rags for cleaning excess glue and covering material for the floor.
Professional Rules
What you need to know before hanging wallpaper alone:
- During work, doors and windows in the room must be closed. Recommended air temperature – not lower than 5, not higher than 25 °C. Air humidity should be moderate. If gluing is planned in cold weather, it is advisable to turn off the heating.
- To apply wallpaper to areas around doorways, the canvases are positioned so that they protrude a couple of centimeters. After the adhesive solution has dried, use a construction knife to trim off the excess to create a neat edge.
- Wallpaper should be glued only with suitable adhesive: vinyl with a compound for vinyl, non-woven wallpaper with a compound for non-woven wallpaper.
- The strips are trimmed only after drying. If you do this immediately after gluing, the canvas will shrink. You will get a large open distance from the floor and from the ceiling.
- When gluing corners, the canvas should extend slightly onto the adjacent wall. If you glue them close to the adjacent wall, they will not fit tightly to each other, and after drying, in addition, they may separate.
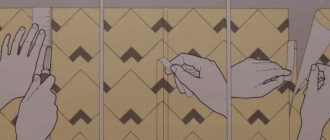
How to trim off excess?
Here you will need a flexible ruler; this is a plastic tool 60 cm long; a stainless steel strip is built into its body. It is flexible, so the ruler can be pressed firmly even on an uneven surface. What such a tool looks like and how to use it can be seen in photo 18.