The puttying process is not so difficult to master, but in order to learn how to feel how the mixture is laid on the surface, you need to devote more than one hour to this process, constantly practicing. Regular work will allow you to develop the correct movements with your hands and increase the speed of work, but there is one point that beginners will not be able to grasp so quickly. We are talking about puttying internal and external corners. The reason for the difficulty of mastering is that there are always a limited number of these corners on objects, especially external ones. In today's article we will look in detail at how to plaster and putty walls, install beacons, spread putty and, of course, how to level the corners of walls with putty, and we will do all this taking into account how to make the task of removing the corners as easy as possible.
Learning to work with plaster
The main nuances of puttying corner joints
During repairs, there is a need to putty the internal and external corners of the walls. It is important to choose the right mixture, taking into account the type of surface and room.
The putty is sold ready-made and dry. In the first case, labor costs are less, but the costs are more expensive. Nuances of puttying:
- An ideally even angle can be achieved only by grinding the surface, but not by puttying.
- It is necessary to control the size of the putty fraction - the larger it is, the thicker the layer.
- Initially, measure the depth of the drop. If it is less than 1 mm, use a finishing solution.
- Perforated corners are required for external corners; they are not needed for internal corners.
- To determine the vertical skew in the corner, install a ruler along the laser line of the level.
- After the putty has dried on the internal corner joints, they need to be adjusted with a sanding float.
Tip
It is not recommended to align corners if significant distortions are detected. The material consumption will increase, but will not give a noticeable result. Here it is better to use a gypsum mixture.
When is it necessary to putty the corners of the walls?
Page navigation
It is necessary that the corners are even and strong so that they do not crack or crumble when the building shrinks. Leveling them with putty increases the adhesion of the wall to paint or wallpaper. Also, when planning the subsequent wallpapering of walls with thin wallpaper, you need to make everything as even as possible, otherwise all defects and flaws will be clearly visible.
What compositions should I use?
They can be puttied with universal compounds. If the unevenness is significant, then it is better to choose a starting mixture, which is then covered with a finishing layer. For rooms with high humidity and facade work, polymer and cement compositions are suitable, for internal dry walls - gypsum. A deep penetration primer will also be required.
Tools:
- container for mixing the solution;
- construction mixer;
- medium painting spatula (up to 10–15 cm);
- wide metal spatula (up to 45 cm);
- metal grinder;
- corner spatula;
- reinforcing mesh (serpyanka);
- laser level;
- angular sanding float;
- sandpaper P100–200.
Attention
To reinforce the joints of plasterboard sheets, 60 mm serpyanka is used. It is fixed with mounting adhesive, which is embedded in the gypsum board seams, having previously opened them.
Putty under the baseboard
There is no need to perfect the putty under the ceiling cornice; there is also no point in using reinforcing tape or metallized tape. The main task of puttying in this case is to prepare the base for the baseboard, because it will not stick to bare plaster.
For work, a starting mixture will be used, you can use Acrylic Puts, or you can use an analogue with an acrylic base. The putty is diluted to medium thickness and first with a narrow spatula along the joint line, then with a wide spatula from the corner. There is only one requirement - there should be no snot . Sanding is not necessary; one coat is sufficient for gypsum plaster. Before gluing the plinth, the corner is primed.
How to carry out the procedure correctly?
Puttying them is relatively easy. Pre-marking is carried out, distortions are identified, then the mixture is prepared. After applying the solution, the corners are rubbed with a sanding float.
Preparing to start puttying
If there are protruding corners on the surface, they must be cleaned off with a utility knife or a hammer and chisel. The mixture is kneaded according to the instructions until the lumps and paste-like consistency are eliminated.
You can check the right angle between the walls with a laser level, a construction pencil and a ruler:
- select the vertical plane construction mode at the level;
- move the device as close to the wall as possible, fix the beam parallel;
- starting from the top edge of the corner, apply a ruler in increments of 5–7 cm;
- the laser mark on the ruler will indicate the distance from the wall to the tool;
- After each step, make marks on the base, indicating the depth of the drop.
At this stage, it will become clear what maximum depth of drop you need to work with.
- If the distortion is more than 5 mm, then leveling with plaster along the beacons is required.
- If more than 1 mm, but less than 5 mm, then you first need to apply a layer of starting solution.
- Otherwise, you can use finishing or universal.
It is necessary to pour the mixture into water, and not vice versa. If the plaster contains a large filler, then keep the mixer at low speed or mix by hand. Let the mixture sit for 3-5 minutes, stir again. After this it is ready for use.
Applying the mixture
It is almost impossible to create a perfect corner joint right away. Therefore, at the first stage, it is important to distribute the solution evenly, and remove small flaws during grouting. The mixture must be applied with a wide metal spatula. How to apply it:
- use a paint spatula to transfer the mixture to the edge of the main working tool;
- Apply the spatula with the mortar to the wall from the inside with a gentle slope;
- press lightly, sharply move the tool along the wall towards you;
- randomly fill with putty, making sure that the composition fills the cracks;
- a similar procedure must be performed on the other wall from the same corner;
- to squeeze out the putty, apply the spatula almost parallel to the surface;
- after application, immediately cut off the composition, placing the tool almost perpendicularly;
- after processing, drown the sickle in the composition so that the solution is squeezed out through the mesh;
- cover the reinforcing mesh with a layer of finishing mortar until the pattern is hidden.
An alternative is to use an angle spatula. The tool is applied to the wall, but not parallel, but almost perpendicular. The point should touch the corner line from the inside and insert the putty there. There will be almost no composition left on the walls. Therefore, another layer is applied under the serpyanka, but with strict fixation of the instrument.
Advice
When removing, perforated corners are not used. The procedure is carried out manually and involves preparation for grouting or final leveling.
Alignment
The corner under the baseboard does not need to be carefully aligned. To do this, it is better to use acrylic-based putty. It is enough to lay a layer of no more than 1 mm and level it. The spatula is installed with a slight inclination, then the composition is leveled with vertical movements of the tool, moving from the inner corner joint. Along the upper perimeter, the putty is squeezed out with a metal trowel and goes to the corner.
Straight corners without a plinth are formed using sickle tape or tape with metal threads, by analogy with removing internal ones. Serpyanka, unlike adhesive tape, can lag behind, but does not deform under the putty layer. Therefore, it is necessary to apply at least 2 overlapping layers here. Metallized tape also resists cracking.
Grouting the surface
When they form, the coating forms the sky
A larger rounding that can be sharpened by grinding. For this, special corner graters (for internal ones) or regular ones (for external ones) are used.
Technology:
- install a P100 or P150 attachment on the tool so that its edge protrudes 15–20 mm beyond the grater;
- It is faster to work with an angled float - it is applied to the surface, then rubbed at 900;
- You can also sharpen it with a regular grater by sanding the walls first on one side, then on the other;
- make energetic and fast movements, but do not jerk the instrument if you feel resistance;
- the latter is possible if roughness has formed on the surface - they need to be cut off with a knife or spatula;
- You can sand up to 30–40% of the coating; after finishing work, the surface can be dusted with a dry brush or rag;
- the outer corners are sharpened in the same way.
Important
Do not use a damp cloth to remove dust from the surface, or a household vacuum cleaner. After sanding, it is necessary to apply 1-2 layers of penetrating primer. After 3–4 hours the surface is ready for decorative finishing.
Briefly about the main thing
Puttying of corners is carried out for the purpose of final leveling after preliminary preparation using a plaster solution (if necessary).
To reinforce (strengthen) the turn, corner-forming guides made of metal or plastic, paper tapes and metallized analogues, a construction bandage or a serpyanka-type mesh are used.
To work with tools, spatulas, corner-forming trowels are used, as a rule, and in the case of external corners, temporary guidelines may be needed (wooden beams, plasterboard profiles).
Before each stage of installation work, the work site must be treated with one or another primer.
The preparatory stage includes repairing cracks, unfinished seams between sheet materials, degreasing, removing fungal and corrosive formations with subsequent impregnation with protective compounds, dismantling loose and peeling areas, old decorative finishes, and finishing priming.
Ratings 0
Possible errors in operation
Some mistakes when working with putty can shorten the service life of the coating:
- Don't neglect preliminary markings. The optimal method for removing corners (plaster or putty) will depend on the depth of the difference. This factor also affects the type of composition (universal, finishing, starting).
- Cover the layer of starting putty with the finish. Starting compositions are distinguished by a large fraction, which allows them to be applied in a thick layer. They are difficult to grind and do not form a smooth surface.
- Do not neglect reinforcing materials. Some building bases can shrink, which leads to cracking of the putty and chipping. Serpyanka and metallized tape help prevent cracks; it is better to choose non-shrinking compositions.
- Do not try to manually fill joints and cracks in corners. Follow the technology for laying the putty, squeezing the composition with mechanical force onto the spatula. The solution will lie evenly and cover defects.
- Do not putty the corner joints of drywall without first jointing it. The structure must be disassembled and the seams cleaned. They are filled with adhesive and then stitched together. First, the serpyanka is attached, then puttying is done.
Advice
Lay the mesh as carefully as possible, trying to give it a rectangular shape. Maintain the same temperature in the room so that the putty does not flow or shrink.
Forming an angle
There are two types of corners: external and internal. They differ in their formation technique. Particular attention must be paid to the former.
Outer
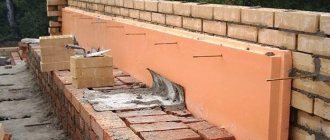
Making an outside corner perfect is not an easy task. Therefore, it is better to use special corner pads, which make the work much easier and faster.
External corner trims
Attention! Such products should not be confused with other materials. They are used exclusively for 90 degree angles.
There are several types of overlays:
- Metal For production, aluminum alloy or thin steel is used. All products are perforated. This reduces weight and also allows it to be sunk much deeper into the wall. Unfortunately, there is often corrosion that can appear on the surface.
- Plastic Almost identical to metal ones, but are not subject to destruction processes. They are used only when applying a fairly thick layer, several layers. This is due to their significant thickness of the sides.
- Flexible parts These products are used to work on curved surfaces. They can be used to align the edges of the arches. They do not form cracks and easily take on the desired shape.
Arched corner
Work technology
Working with corner elements requires adherence to a certain technology. It consists of the following:
- The putty is applied to the wall - along the entire height of the corner.
- The corner element is applied and pressed well into the previously applied solution.
- Now you need to use the level. They are used to measure the correct fit and level it if necessary. To do this, add the solution in small portions.
You need to wait a little, the solution should set. It is advisable to measure it again by level. Often the solution exhibits slight shrinkage, which needs to be compensated.
Expert advice
Use the following expert tips to make your job easier:
- take measures to protect mucous membranes and skin, work in a respirator, safety glasses, rubber gloves;
- follow the coating thickness specified in the instructions on the packaging (within 1–2 mm for different compositions);
- apply several layers of mortar if required, but the total thickness of the coating should not exceed 10 mm;
- if the putty is applied on top of the plaster, then sanding in case of significant differences is better done before starting puttying;
- the depth of the distortion allows you to more accurately calculate the material consumption and determine the optimal coating thickness;
- It is better to plaster uneven walls first and only then putty;
- when puttingtying drywall, do not use a universal self-adhesive mesh, giving preference to profile materials;
- before puttying, check the end between the wall and the ceiling for protrusions, remove them with a plane or knife;
- To level the outside, you can use the construction rule, leveling the mortar along the wall.
You can form right internal angles yourself, without the help of craftsmen or special tools. Set the depth of the distortion - the type of putty used, the thickness of the coating, as well as the material consumption will depend on this. It is optimal to lay the solution in 2-3 layers to completely cover the serpyanka and level the corners. During final sanding, it is especially important to consider eye and respiratory protection.
A New Way to Create Strong Corners on Walls: Metal Tape
When renovating, we think through a lot in advance - so that later the result will please you for a long time, and you won’t have to do additional work, returning the finish to a fresh look. This also applies to the corners of the walls in the apartment, especially those that protrude outward. And, especially, made of plasterboard. Of course, they need to be strengthened! There are many ways to do this, and today we will turn to a new combination of materials - a corner glued together from metal and special tape. It will provide a completely monolithic result.
There are many things in the apartment that have to withstand constant load. Some of them are the corners of the walls, which protrude where we walk a lot. How to make sure that the inevitable touches, pokes, and leans do not leave traces? The key is to lay a solid foundation.
This is especially true when finishing with plasterboard. Excellent material, allows you to quickly create a completely smooth wall surface. But in such areas of constant contact, as in panel joints, the drywall definitely needs to be strengthened.
The first solution that came to mind was to install a protective corner made of durable material. And this is absolutely the right way. Where there are a lot of people walking around all the time, the corner may need to be placed on the outside of everything. In an apartment, it will be enough to strengthen the corner on the wall, and the usual finishing will go on top of it. The corner will take the load and nothing will happen to the coating.
- Apply finishing putty to the place where we glue the corner.
- Place the corner and press it slightly onto the surface, moving from the center to the edges.
- Smooth out the sides of the corner and remove excess glue with a spatula. The remaining putty hardens in these perforation holes and holds the corner.
- We cover the corner with finishing putty, and now we have a surface ready for painting and (after priming) for wallpaper.
The new composition of materials is more convenient: a solid straight corner made of stainless steel, covered with a special paper tape. They form a single structure, as they are connected with the strongest industrial glue.
The special characteristics of the tape are that it is made from natural, long wood fibers (recycled paper with a finer structure is not used here). This gives high strength. The paper is fibrous, with a rough surface to absorb and hold putty and glue. The trowel or spatula will glide across the paper without scratching the metal.
How to install this metal corner on a paper base
:
- Apply finishing putty to the place where we glue the corner, leaving a little more of it than needed for a completely even layer.
- We press our metal corner with the tape and iron it with a spatula.
- The putty will be partially absorbed into both the wall slab and the paper tape itself, binding the surfaces into a monolith when dry. Complete drying time for, for example, Sheetrock polymer putty is up to 5 hours.
- Then we will cover the top with the final layer.
Why is this necessary?
Previously, no one leveled the walls before gluing wallpaper. The only thing that was done was to cover the walls with newspapers using PVA glue, which slightly masked surface imperfections. Another option is pasting over old wallpaper. Even now in apartments of old construction you can find such puff pastries from previous wallpapers.
However, this method will not be able to hide all the irregularities. Moreover, defects will be visible if you glue wallpaper directly onto plaster or concrete (read how to glue wallpaper on walls here). Even gluing to drywall requires preliminary work, regardless of what wallpaper is chosen. The following will stand out on the paper web:
- any depressions;
- small tubercles;
- differences in levels between layers of plaster.
If the paper is too thin, then they can not only be felt by running your hand, but also noticed visually. On thicker vinyl or non-woven fabric, small irregularities will not be emphasized as much as on paper. But there are pitfalls here. Pasting such wallpaper onto an unprepared surface will, over time, cause the material to begin to peel away under its own weight. First, voids will appear under the canvas, which will then only grow.
Materials for making profiles
Depending on the material that became the basis, devices for designing joints can be as follows:
- Galvanized steel. They are made of galvanized steel, which is practically not subject to rust, since it has a layer of zinc coating on top. But with prolonged use in rooms with high humidity, even such products can become rusty, resulting in unsightly red spots on the finish.
- Aluminum. They are considered lightweight, wear-resistant, and are not afraid of corrosion, but they are more expensive than galvanized ones. They do not tolerate the presence of copper in close proximity.
- Plastic. Most often, such products are made from PVC (polyvinyl chloride). They are very cheap, but have many advantages over their “brothers”. Plastic profiles are chemically inert, do not rot or rust, and do not deteriorate from water. They are produced in a wide range, have various shapes, sizes, widths, and can be equipped with a painting mesh or an adhesive layer under a removable film. Corners that are too thin can bend and become deformed, so it is better to immediately choose high-quality products.
Complex shapes
To putty complex architectural structures and arches, it is recommended to use a plastic corner that bends in any direction and allows you to form smooth and beautiful corners. Before you begin applying putty, you need to visually inspect the surface and remove protrusions using a plane or construction knife. When finishing drywall structures, you need to run your hand along the edge of the surface and check it for protruding screws. If protruding caps are detected, the fasteners should be tightened.
Then the surface needs to be primed and allowed to dry. Next, you should measure the edge of the corner being formed and measure the arched corner of the required length. You need to cut so that there are no joints throughout the entire rib.
If for some reason the overlay is mounted end-to-end, then the joining ends of the corner should be secured with Fugen glue and additionally secured using a construction stapler.
After fixing the lining, you should begin to putty the curly bends. You need to start drawing the angle from a curved surface, and then move on to a flat one. An important condition is uniform application of the composition. Excessive thickness and inaccuracies in the formation of smooth transitions can be smoothed out by sanding, for which paper marked P120 is recommended. Next, the surface is dusted and primed.
Leveling with plasterboard
There are two technologies for how to independently level walls for wallpaper using plasterboard sheets.
- Gluing.
It is used on relatively flat walls with slight curvature. It is possible to pre-fill large depressions with plaster. Glue is poured onto the back side of the sheet in small piles, then pressed against the wall and leveled. The glue squeezed out at the joints is removed with a spatula. For additional fixation, use dowels in several places.
Gluing drywall to the wall Source lifehacker.ru
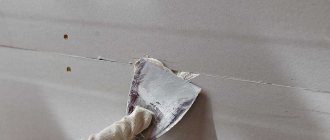
Grouting and grinding the corner
Taking into account nuances
After internal cladding, small protrusions are formed. They are removed by grinding as follows:
- An emery cloth is installed on the prepared hand grater so that its edge protrudes beyond the edges of the tool by 20 mm.
- This device processes one side of the corner, and then the other. Movements during processing should be sharp and fast.
- Due to its plasticity, sandpaper will remove curves, creating a smooth and sharp surface.
Selecting an alignment method
You can level the walls with plaster, putty and drywall. The choice of method is not so much a matter of the personal wishes of the home owners as the need to give these structures all the required characteristics. Namely, heat and sound insulation properties, being in a vertical plane, strength and smoothness of the surface. If there is a need for hidden wiring and other communications, this must also be taken into account.
- First of all, the strength and integrity of the walls, especially the external ones bordering the street, are assessed.
The presence of through seams, cracks and other serious defects will require their elimination before leveling the walls for wallpaper. Moreover, such walls need to be repaired not only inside, but also outside, in order to protect them from atmospheric moisture, blowing and other negative influences. Without this, dampness and fungus will settle in the house, it will be cold, and no finishing will stick to the walls.
Such defects require serious repairs Source vop.ru
- The second factor influencing the choice of leveling method is the curvature of the walls: the deviation of their plane from the vertical, the presence of noticeable depressions and bumps, and peeling areas.
The degree of curvature is determined using a plumb line and any building level. If the deviation from the level and the depth of the unevenness is no more than 10-15 mm, you can get by with leveling putty on the walls. If they are larger, you must use plaster or drywall.
Checking the vertical level using a plumb line and tape measure Source legkovmeste.ru
Advice! It is better to assess the condition and curvature of the walls after removing the old coating, under which cracks, peeling plaster, wet areas and areas affected by fungus may be found.
- Also, the need to insulate them and lay communications influences how to line the walls with wallpaper.
You can insulate the walls by installing a heat-insulating layer and plastering it or covering it with sheets of plasterboard. It is easiest to lay pipes or electrical wires under them. But if the walls are fairly even, communications can be laid in grooves or specially made decorative boxes, so as not to reduce the area of the room with thick-layer finishing.
Even heating pipes can be hidden under a layer of plaster Source oboiman.ru
Video description
How to install gypsum boards on a frame, see this video:
The second method of leveling walls with plasterboard reduces the area of the room due to the indentation from the base surface. But it will allow you not to dismantle the old finish, lay any communications behind the cladding and install a thermal insulation layer.
It is important! When installing gypsum boards in any way, you need to mark out sockets, switches, meters and other equipment on sheets in advance.
After completing the installation, it is mandatory to putty the joints between the sheets and cover the recesses above the screw heads. The dried putty is sanded with fine sandpaper.
The result is a perfectly smooth and even base on which you can glue wallpaper. But first you need to make sure that they have sufficient density and are not see-through. If the wallpaper is thin and light, stripes of putty on the seams can stand out on the freshly wallpapered wall and spoil the look.
These spots and stripes can show through the wallpaper Source roomble.com
Experts advise in any case to cover the drywall with a thin layer of finishing putty, which will even out the color of the surface, protect the cardboard layer from being soaked with wallpaper glue and allow you to easily dismantle the outdated decorative coating when the time comes for the next repair.
But if you have thick non-woven wallpaper, simply priming the walls is enough. When you remove such wallpaper during the next repair, its bottom layer will remain on the surface.