Vadim
14595 0 0
Vadim November 1, 2017
Many people believe that finishing a chimney on the roof is needed only for beauty, this is partly true, but the aesthetic component is not in the first place here. The lining is needed, first of all, to protect the chimney, both from the inside and the outside. Next, we will look at the 3 most popular methods of arranging a chimney, plus you will learn why this is necessary and how to sheathe the pipe with your own hands.
It is quite possible to install a chimney yourself.
Why finish the pipe?
The aesthetic requirement of lining a chimney on the roof is not the most important reason for starting work. The need for pipe finishing is justified by the three most common reasons:
Temperature difference (high inside the chimney and low outside). This phenomenon leads to the appearance of condensation. In this case, the liquid is not simple water, but a combination of elements that create an acid that gradually corrodes the material from which the pipe is made. Insulating the pipe from the outside allows you to get rid of this phenomenon by shifting the dew point.
Atmospheric precipitation and wind. Not all materials can withstand rain, snow and wind like stainless steel or clinker bricks. When using simple bricks without the necessary external finishing, which is protection, the pipe will begin to crumble within a few years, and the steel will become covered with rust.
Protecting the roof from rain. If done irresponsibly, rain entering the junction of the roof and the pipe will lead to serious consequences. First, the liquid will destroy the insulation, and then it will begin to negatively affect the rafter system.
But to fully protect the pipe, it is not enough just to finish it. The procedure must be carried out in accordance with approved norms and rules.
The chimney made of an iron pipe is rusty Source googleusercontent.com
Finishing standards and rules
Everything related to the stove facility is a fire hazard, therefore the norms and rules are strictly regulated. In the Russian Federation, there is SNiP 41-01-2003 for this. The basic standards for finishing chimneys are:
- all finishing materials must have a flash point 20 degrees Celsius greater than the maximum temperature outside the chimney, but it is best to take care of finishing with non-combustible materials;
- smoke should come out of the chimney freely;
- if a concrete chimney is being built, then the material must be reinforced, heat-resistant and have a thickness of more than 60 mm;
- if the pipe casing is entirely made of metal, then it must be anti-corrosion (for this purpose a special coating is applied to the material);
- ceramic chimneys that are not equipped with special thermal insulation must have a gap to wooden structures of at least 250 mm;
- Asbestos materials should not be used in the manufacture and finishing of pipes;
- the distance between the chimney and the wooden sheathing must exceed 130 mm;
- The pipe walls must have a thickness of more than 120 mm.
Installation of the pipe relative to the roof according to SNIP 01/41/2003 Source yandex.net
If possible, it is best to use materials that are by nature resistant to rust. This will eliminate the need for treatment with special solutions and the creation of additional coatings.
When working with a chimney based on these rules and regulations, the owner will receive a safe pipe that will not cause a fire or destruction of the building.
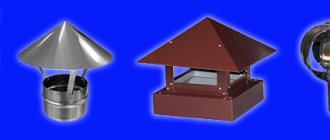
Chimney insulation options
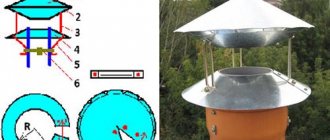
Sandwich chimney
Previously, ceramic, asbestos-cement and metal chimneys were additionally insulated using ready-made heat-insulating cylinders, or “the old fashioned way” - wrapped in mineral wool and secured with wire. But this method is becoming a thing of the past, since now the overwhelming number of manufacturers produce ready-made insulated chimneys. Most often these are steel sandwich chimneys, which consist of two pipes with non-combustible insulation between them. Such chimneys have another unobvious advantage - more relaxed requirements for indoor installation. Insulated chimneys do not heat up as much, which means the risk of ignition of adjacent materials is much lower.
Three-piece ceramic chimney
There are also three-component ceramic chimneys , which also do not require additional insulation. In their composition, the chimney itself, made of refractory ceramics, is insulated with a non-combustible mat and protected by a box made of lightweight cellular concrete.
Selection of materials for finishing on the roof
When determining the material to be used for finishing the roof, it is necessary to pay attention to its functions in terms of protecting the chimney. During operation, this material will be affected by the following factors:
- wind;
- heat;
- precipitation;
- temperature changes;
- Sun rays.
One of the reasons for installing chimney trim is the formation of condensation due to the temperature difference in the pipe during operation and in the atmosphere. If left unattended, such condensation will destroy not only the pipe, but also the rafter system. To prevent the occurrence of such a situation, specialists work with the cause of the occurrence, for which they create good insulation, which includes lining the chimney on the roof.
Chimney finishing Source yandex.net
Any of the selected materials must be resistant to atmospheric influences (precipitation, wind) and wear-resistant. According to these parameters, the following materials are suitable for finishing the pipe on the roof:
- ready-made solutions;
- decorative brick;
- roofing materials;
- tile;
- cement slabs.
Often experts choose clinker tiles or clinker bricks from a wide variety. Both options cope well with exposure to the atmosphere and temperature. The first is used to protect tall pipes. And the second is considered the most practical option. It not only meets all regulatory and safety requirements, but also goes well with any roofing material. Since clinker bricks are dark in color, the ash and fumes that form during the operation of the chimney system are not as noticeable as with alternative finishing methods.
You can also see how corrugated sheeting is used for these purposes. The reason for the spread of pipe finishing on the roof with corrugated sheeting is explained by its durability and excellent protective properties. Lightness, ease of installation and aesthetic appearance attract many home owners.
Protective aprons made of corrugated sheets Source static.tildacdn.com
See also: Companies specializing in finishing and roofing materials.
Ready-made structures are special protective aprons. They are made of rubber and other materials, which together provide good water and thermal insulation. Due to the variety of options, when constructing a pipe, you can choose a ready-made structure that will ideally suit the design of the building.
Vaka strips: reliable connection
So, to protect the abutment seams:
- Step 1. Install the strips and fill the top flange with sealant. In traditional units, a brick overlap is usually used, but here the plank performs exactly this function.
- Step 2. Cut the bottom strip to the required length - so that the length of the strip is the width of the pipe and 5 cm on the sides.
- Step 3. Cut the top of the strip and bend it along the line of the pipe itself.
- Step 4. Now cut the bottom part of the pipe and bend it along the line that will be 1 cm further from the corner of the pipe.
- Step 5. Cut the strips to 1 cm and bend the top flange with a hammer to the pipe.
- Step 6. On the bottom, cut a corner parallel to the slope line.
- Step 7. On the top part, drill holes in increments of up to 20 cm, for dowels 6 mm. The holes for them need to be drilled 6x40 mm.
- Step 8. Attach the strip directly to the chimney with heat-resistant dowels.
The finished chimney bypass should look like this from all sides:
Next, attach the side bar so that it is parallel to the line of the slope, and follow these instructions:
- Step 1. Mark the outline of the bottom strip on the inside surface of the plank.
- Step 2. Cut the top of the strip along the line of the pipe, and the bottom of the strip along a line that is 1 cm away from the corner of the chimney.
- Step 3. Cut the side strip along the contour of the bottom strip that is already attached.
- Step 4. Secure the plank with screws in increments of up to 20 cm, and do the same with the second plank.
- Step 5. Now cut the top strip to the width of the pipe with a 2cm overhang on both sides.
- Step 6. On the inside of the top plank, mark the contours of the already installed side strips.
- Step 7. Cut the top strip and bend it along the line of the pipe. Make the necessary cuts, drill holes in the pipe for dowels, 6x40 mm. Secure the bar.
Finally, apply sealant to the flange around the entire pipe. For convenience, take a construction syringe, and to make the seam neat, stretch it with cardboard.
Materials for decorating pipes in the house
The chimney is indispensable for structures such as a stove or fireplace, which are often located in the living room. There are smoke exhaust systems that run through the entire house, so it becomes an integral part of the interior. So that it can become a harmonious detail of the room design, experts adhere to the following algorithm:
- A frame is created from a metal profile, which is subsequently covered with fire-resistant plasterboard sheets (it is marked with the abbreviation GKLO).
- Thermal insulation is achieved through fiberglass or mineral wool. This allows you to decorate the chimney inside the house with any material.
- At the end of the finish, it is best to use gypsum stucco or ceramic tiles.
Ceramic tiles for chimney decoration Source bestor.ee
Sealing
Finishing the chimney necessarily begins with the arrangement of the point where the pipe protrudes onto the roof. For this purpose, a protective apron is used, laid in two layers: on top of the covering and under the roof. A prerequisite is the sealing of the junction points.
Additional finishing of the chimney pipe on the roof is necessary only if:
- the materials from which the chimney is made do not have synergy with the design of the house;
- chimney decoration is necessary;
- cladding - brick, which the owner of the house does not like from an aesthetic point of view;
- the draft in the chimney system is not enough to fulfill the intended purpose of the system.
Pipe sealing Source www.baywa-baumarkt.de
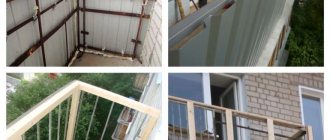
Preparatory stage of work
To avoid any difficulties during the pipe installation process, you need to prepare the work site and tools in advance. A hole from corrugated sheeting is cut according to the following technology:
- After determining the configuration of the chimney, they plan where the exit to the roof will be located. Let us remind you that it is better to place the pipe vertically.
- The cross-sectional size of the chimney pipes is selected based on the recommendations of the heating device manufacturer. The thicker and higher the pipe, the better the smoke is removed from the stove.
It is important that all segments are of the same cross-section and fit each other, and are inserted without creating a gap.
- On a corrugated roof, mark the outline of the pipe using a permanent marker.
- Using a grinder with a thin metal cutter, cut out a hole, moving a couple of centimeters inward from the intended line. You should work with corrugated sheeting carefully and slowly so that the edge of the cut is smooth, without jagged edges that could cause injury during the pipe removal process.
- You need to make short cuts in the corners of the hole to bend the edges of the corrugated board upward.
- They cut out the same weight in the ceiling.
- A metal box is installed that will connect the pipe to the rafters. The chimney will pass through the hole inside the box; the distance between their walls should be at least 15 cm.
- The insulation, waterproofing film, and vapor barrier membrane are removed from the hole made in the roof. It is necessary that the hole goes through.
Stitching
Additional stitching is not needed in every case; it is a necessity if:
- standard brick was used for masonry;
- the pipe rises above the roof by more than two meters (this height negatively affects traction, and lining will restore its strength).
Lining the pipe Source amazonaws.com
Due to the availability of modern mixtures that make it possible to give the material increased resistance to high temperatures, fire and parasites, wood began to be used as a frame in the construction of the chimney. But not all experts agree with this decision, since extreme temperature changes can still harm the wood due to the formation of condensation that is absorbed by the material.
It is ideal to use metal when finishing a chimney on the roof. It is easy to install, low price and lightweight. You just need to pay close attention to the thermal insulation process. Then heating of the skin will be eliminated. This adds aesthetics and the ability to use any material for decoration. Decorative stone is also a good option; both natural and artificial are suitable.
Metal apron
Connecting a chimney to a metal tile roof
The connection between the chimney and the roof can be covered with a metal apron. This option looks great on roofs covered with corrugated sheets, metal tiles, and also on seam roofs. The apron elements must rise above the top points of the coating wave by at least 150 mm. You can “cut” the apron from sheet metal yourself, or you can buy a ready-made prefabricated structure.
Video description
Watch the video on how to line a pipe:
Corrugated sheeting is considered one of the best. Due to its positive qualities, low price and the ability to accept any color from a range of options, it is extremely common. But this material also has a negative side, like any other metal - low sound insulation.
Metal tiles have the same disadvantage. In all other parameters, this material is in no way inferior to corrugated sheeting.
Ceramic tiles are only suitable for cladding inside a building. For this material it is necessary to carry out high-quality preparatory work. Installation must be carried out on a flat surface. But the tiles look great.
Clinker brick is suitable for those who value durability and strength. But not everyone will like its appearance. The main disadvantage is the high cost and weight. Due to the last drawback, reinforcement structures are installed during construction.