DIY plaster station
The homemade device is inferior in performance to its factory counterparts, but it speeds up the application of plaster. The mixture is applied without loss. This cannot be done manually. For non-professionals, the speed and power of the unit, which operates on manual pumping from the mains, is enough. All stages occur under human control; complex and routine work is performed by a machine.
The plastering station model consists of individual parts. Easy to assemble and disassemble.
Note! When using the device, two people perform the same volume as a team working manually.
Main functional parts:
- container for mixing the solution;
- pump supplying the mixture;
- vessel for dry composition;
- drive for supplying the mixture to the mortar sleeve;
- sleeve going to the sprayer.
When assembling the device, spare parts from other mechanisms are used. You just need to show your imagination.
Tools and materials needed for manufacturing
A machine for plastering walls with your own hands is equipped according to the principle:
- hopper bucket, simplified assembly;
- a mortar pump made from various spare parts;
- mortar sleeve - supply of mortar using mechanics or electrics.
The hopper bucket can be metal or plastic.
Materials for metal products:
- galvanized sheet metal 0.4−1.2 mm thick, profiles for stiffeners;
- nozzle;
- pneumatic gun or ball valve;
- washers for making nozzles, diameter 8−12 mm.
Tools:
- Bulgarian;
- metal scissors;
- ruler;
- pencil, felt-tip pen;
- drill, drill bits;
- welding machine or riveting equipment.
Materials needed for a plastic bucket:
- 10 liter primer canister;
- ball valve 1/2;
- sleeve;
- 2 fittings, internal diameter 6 mm;
- PVC plug measuring 10 by 10;
- winding
Models
Plastering stations of this brand are characterized by high productivity. This is largely due to the powerful compressors that are available in the devices. It should also be noted that they are quite easy to maintain. At the same time, cleaning the equipment is very convenient. The cases of many models are made of steel and are therefore resistant to corrosion.
Experts also note the ease of management. Manufacturers provide clear instructions for users. In general, according to the owners, it is possible to regulate the supply of solution without any extra effort.
Advantages of a homemade device
During manual work, the mixture is prepared and applied to the wall in small sections. Drying occurs unevenly, which leads to unevenness and cracks.
When using mechanics, the solution can be saved by saturation with air during the process of mixing and spraying under pressure. For finishing 1 sq. m with the manual method it takes 16 kg, mechanized - 13 (calculation is approximate, depends on the thickness of the layer).
Comparative characteristics:
| Manual application | Application of Plastering Machine | |
| Mixture quantity | Prepare in small portions as it hardens quickly | Large volume, fast consumption |
| Consistency | Every batch is different | Same, no lumps |
| Application area | Gradually, on part of the wall | Immediately on the entire surface |
| Saving solution | No. Loss occurs | Yes. With constant stirring, air becomes saturated and it increases in volume. |
| Working hours | For a long time. Requires several people | Fast. Two people can cope |
| Result | Due to uneven drying, cracking and collapse of the entire layer is possible. | Under pressure, additional adhesion of the mixture to the base occurs |
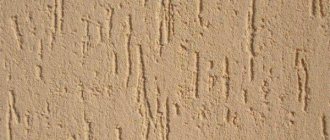
| Surface | Scaly | Rovnaya |
A do-it-yourself plastering machine, assembled from what you found in the garage, can make finishing work easier.
Walls
The use of a mechanized method of plastering the surface allows you to obtain a perfectly flat base for further finishing in just one day. At the same time, the quality of plastering walls is much higher than when using a mechanized method. We’ll talk about how to plaster walls using a machine later.
Content:
Machine plastering by hand: features of a machine for making plaster
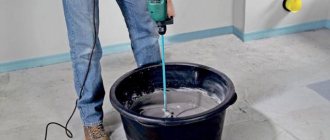
In the process of making machine plaster, a special device is used. Its main function is to mix the solution and ensure its high-quality mixing. As a result, it is possible to obtain a composition that is ideal in consistency for plastering.
The manual part of the work only involves pouring the necessary components into the inside of the device in the required quantity. In the mixing part of the mechanism, the composition is mixed, and from the storage hopper the plaster is supplied to the surface. Using a special nozzle, the composition is evenly sprayed on the wall.
This device has a rather complex structure, so it is quite difficult to make a device for machine plastering with your own hands.
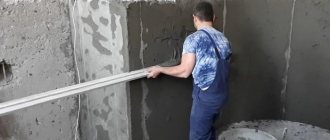
The person performing the plastering must only direct the hose away from the device, ensuring uniform coverage of the wall in relation to the beacons. Excessive application of the solution reduces the strength of the plaster, and insufficient application leads to the appearance of gaps on the walls. The optimal spray thickness is from 10 to 35 cm.
The plastering device must include a reservoir into which water and cement flow. Thanks to a specific program, the device independently controls the proportions of ingredients. Inside a special tank, the ingredients are combined with each other.
The principle of operation of the unit and the technology of applying the solution
For mechanized application, you need to become familiar with the operating principles of the machine.
Sequencing.
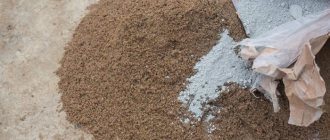
- Pour the dry mixture into the container.
- Water is added in a certain proportion.
- The components are thoroughly mixed, the solution is saturated with air.
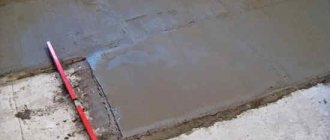
- The surface of the wall is covered with the mixture using a hose.
- Various nozzles, rules, spatulas are used, which reduces the completion time.
Important! Consistency of the solution: when squeezed into a fist, a lump is formed that does not release moisture. The plaster is laid in an even layer on the surface of the wall.
Plastering instructions:
- The base needs to be cleaned. It should be free of oil stains, moisture, and mold. The surface is dry and clean.
- Measure the curvature of the walls. This is done using a level.
- It is necessary to install guide beacons.
- Connect the plastering machine to the power supply and ensure the water supply.
- Pour the dry mixture into the container of the device.
- The solution enters the chamber through the feed auger to be mixed with water.
- The machine mixes the mixture during its operation.
- Using a mortar hose, the plaster mixture is applied to the surface.
- The solution is leveled and given time to dry. They are finishing the corners.
- The stages are controlled at the construction level.
- Minor irregularities are eliminated.
Before applying the plaster mixture, the surface is treated with a primer. The working solution is used at a temperature of 5−29 degrees.
Additional Information! If there is no water supply at the site, use a pump that supplies liquid from any container.
What mixtures are suitable for application by machine:
- fixation of the corner profile is carried out with a solution with a special composition;
- when plastering the facade, it is needed with the mark “for external work”;
- Gypsum-based plaster is used indoors.
Features of the Kaleta A6 modification
This plastering station (photo shown below) is well suited for high mixture flow. The pump in the device is of a plunger type. The performance of this model is quite good. Additionally, many consumers positively noted the quality of the bunker, however, the pipes for the solution are very thin. At the same time, they can withstand little pressure. If we take this into account, the range of supply of the mixture is insignificant.
The small volume of the water tank should also be taken into account. The power of its tubular electric heater is 4.5 kW. The model has a powerful electromechanical drive. At the same time, the manufacturers have provided the “Ts2U” series gearbox.
How to make a machine for applying plaster
Common models are made of a fire extinguisher and a hopper bucket.
The do-it-yourself plastering station, made on the basis of a fire extinguisher, has become the most widely known.
The fire extinguisher has a handle, a lever, and a nozzle, which makes it a favorite among devices for homemade mechanical plastering devices.
Step by step description.
- The factory fire extinguisher (bottom) is cut off and a container of several liters is obtained. The working solution will flow through the hole. The volume must be at least 4 liters. If it is larger, the device becomes heavy. If less, you need to frequently fill the container with solution.
- A tube with a nozzle with a diameter of 4 mm is inserted into it. The diameter of the fire extinguisher hole is 10 mm, the distance from it to the nozzle is 20 mm. Nozzles can be of different sizes: from 3 to 5 mm. Resin is suitable for attaching the tube, the level of which is below the nozzle.
- The compressor is connected to the fire extinguisher using a tube, through which compressed air is supplied. The tube is embedded in the wall of the container and is located opposite the outlet of the finished mixture.
- The solution supply power is regulated by increasing (decreasing) the diameter of the nozzle, air pressure, and the distance between the nozzle and the nozzle.
The average pressure is approximately 2 atmospheres. If it is larger, finishing is carried out, all pores and cracks of the coating are filled.
Productivity of the device: 4 liters of mixture are applied in 1 minute.
Homemade hopper bucket
It is used for renovation of the entire building.
Benefits at work:
- high spraying speed, which creates conditions for better adhesion of the mixture;
- the use of various impurities;
- outdoor and indoor use.
Before assembly, you need to understand the principle of its operation. Sequencing:
- The compressor supplies a stream of air through a hose into the bucket with the mixture.
- The other side of the bucket has holes d 12 mm for the solution to exit.
- The front wall is slightly inclined for ease of taking the mixture from the common container.
- A nozzle d 5 mm is placed on the hose. The distance from it to the outlet hole is 20 mm.
- The top of the bucket is wider than the bottom. It is fixed with two clamps.
- The device is connected to a compressor. Pressure 2-3 atmospheres. Distance to wall 18-20 cm.
When assembling a machine yourself, devices and spare parts from other products are used.
Making a metal hopper bucket
Sequencing:
- The drawing is made on a galvanized sheet.
- Cut using a grinder or scissors. When using rivets, an allowance of 15 mm is left.
- The parts are bent and connected by welding and riveting.
- A handle is attached.
- Holes are drilled for the nozzles (on the front wall) and for the spray gun (on the back).
- The nozzle is attached to the inside of the container.
- Additional stiffening ribs are attached.
- It is filled with solution, covered with a lid on top, and sprayed.
Additional Information! Use a lid to cover the top of the ladle. This will prevent the solution from splashing.
Additional nozzles and outlet openings increase operating speed. One hose is needed.
Reviews of the new Knauf Ritmo model
According to experts, this plastering station is most suitable for dry mixes. This is largely due to the high operating pressure of 20 bar. Additionally, there is a large water pump in the central frame. The drive in this model is electromechanical.
In this case, the reducer is of the CC435 series, and the diameter of the water hose is 55 mm. In general, the finished mixture can be supplied to a height of no more than 50 m. Due to the small size of the unit, it is quite easy to transport. Moreover, it can be used in different weather conditions. This is largely due to the high-quality casing, which protects all important components and parts of the station.
What equipment is offered for automated plastering?
There are only two basic principles of machine application: jet and mechanized. In addition, the jet type is divided into two more categories: screw and pneumatic.
Installation of pneumatic hammer: machine for applying plaster using a mechanized method
A pneumatic hammer or pneumatic shovel is equipped with several nozzles that are designed for hard and soft solutions. The device consists of:
- steel container for scooping the mixture;
- four nozzles for supplying the composition;
- four nozzles for air supply;
- tube holder with a built-in valve for supplying and adjusting compressed air.
Automatic pneumatic pistol
A pneumatic gun for automatic plastering is a short nozzle barrel, which has a threaded connection for installing various nozzles. Depending on the type of nozzle used, the degree of spraying of the mixture and other parameters are determined.
At the top of the machine there is a container for the mixture, usually five liters. The device is also equipped with a trigger that controls the supply of plaster. A hose for supplying compressed air is inserted into the lower part of the gun, into a specially provided hole.
Operating principle
They begin to spray the solution almost immediately after its preparation. The distance over which the mixture is scattered is selected based on the expected result. Usually the hopper is kept at a distance of 5 centimeters from the treated area.
Plastering surfaces using this device is quite convenient and quick. The operating principle of the hopper device is as follows:
If you have to perform more complex work, the manufacturers of these devices offer to purchase additional attachments and accessories. This will allow you to use these devices even in rather hard-to-reach places.