Construction mixtures for leveling floors make it possible to quickly and efficiently prepare the base for any coating. In this case, it will take much less time for the surface to dry than for a classic screed. When starting repairs, it is necessary to make correct calculations and find out the approximate consumption of the self-leveling mixture, which will allow you to avoid unnecessary costs.
Self-leveling floor mixtures
Basic properties of self-leveling mixtures
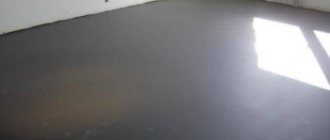
Self-leveling mixtures are distributed over the work surface due to their fluidity and require almost no leveling. They penetrate well even into the smallest cracks and irregularities, firmly adhere to the base and create a horizontal, perfectly even coating.
Self-leveling mixtures
The distinctive features of such mixtures include:
- durability and high strength even with minimal layer thickness;
- fine-grained structure;
- minimal shrinkage;
- quick drying;
- ease of filling;
- resistance to temperature changes.
Types of mixtures for leveling
Leveling mixtures are made based on gypsum and cement; Additionally, the composition includes modified additives and various fillers. Gypsum compositions are intended for use in dry rooms; they dry faster, are lighter in weight, and can be laid in a thicker layer. Cement mixtures are resistant to water, so they are suitable for both dry and wet rooms. Both types are applied to concrete, anhydrite and cement-sand substrates.
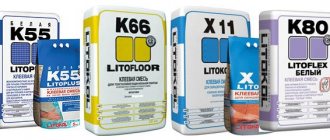
Forward Tsemopol and Forward Teplopol are intended for the initial leveling of concrete floors and monolithic cement screeds inside residential buildings
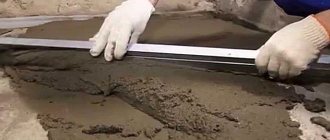
Depending on the fraction of fillers, self-levelers are divided into finishing and coarse. Finishing compositions are characterized by greater fluidity, high penetrating ability, and are applied in a thin layer. Rough levelers are designed for repairing and leveling rough foundations. Such mixtures are applied in a thick layer - from 1 to 8 cm, and contain expanded clay crushed stone, coarse sand, and ground granite. Due to their higher density, coarse levelers do not spread as well as finishing ones, so they need to be distributed over the floor using a rule. The viability of self-leveling mixtures usually does not exceed 30 minutes; for quick-drying compositions it is even less - about 15 minutes.
The dry mixture Forward Cast Concrete is intended for leveling concrete floors and monolithic cement screeds inside residential and office premises with any humidity regime. The Forward Finishfloor leveler is intended for the final leveling of concrete floors.
A competent foundation preparation process is the key to an impeccable result!
Polymer compositions can be poured onto any type of hard surface, but the ideal base on which the thin finishing layer is best held will always be a concrete floor.
Important! To obtain maximum results, it is best to make a new screed with ideal horizontality. Laying the liquid composition is permissible only after complete drying - after 4 weeks.
In this case, you can create an impeccable polymer coating that will retain its unchanged appearance for a long time (for 15-20 years of intensive use).
How to calculate the consumption of self-leveling mixture
Dry self-leveling mixtures are not stored for a long time, and there is no point in taking them in reserve. At the same time, if the mixture is not enough to fill the entire room, there can be no question of the quality of the coating. To correctly calculate the amount of material, you must accurately assess the condition of the base and determine the thickness of the leveling layer. As a rule, the packaging of the dry mixture indicates its consumption per square meter with a layer thickness of 1 millimeter. For a coarse leveler this is approximately 2-2.5 kg, for a finishing leveler 1.5-1.7 kg.
Technical characteristics of leveling mixtures for floors
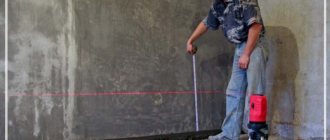
It is not difficult to calculate the thickness of the base layer: to do this, you need to find the highest point of the floor, from this height measure the depth of the largest recess and add the minimum thickness of the fill.
Calculating the thickness of the base layer is not difficult: to do this, you need to find the highest point of the floor, from this height measure the depth of the largest recess and add the minimum thickness of the fill
If the difference in unevenness is more than 80 mm, all deep recesses must first be sealed with mortar or putty and wait until the surface dries. Now multiply the minimum mixture consumption by the thickness of the layer, and then by the floor area - this way you will find out how much mixture you will need for the job. Since these calculations are approximate, you should add 10% to the resulting number. Levelers are usually packaged in 25 kg packs, so by dividing the found value by 25 and rounding to the nearest whole number, you can calculate how many bags of the mixture will be needed.
Most often, levelers are packaged in 25 kg packs.
The finishing leveler is more expensive than the coarse leveler, and in order to save money, it is recommended to fill the base with minimal differences. Very often, thin-layer mixtures are used together with coarse levelers: first, a base layer is poured, which evens out all defects, then the surface is leveled with the finishing composition. This is due to the fact that coarse levelers, after hardening, form a rough surface due to the large fillers contained in them. This surface is not suitable for laying thin floor coverings, so the floor is filled with a finishing mixture that forms a very smooth base.
Sample of self-leveling mixture
When pouring in this way, the finishing layer can be of minimal thickness, and then it is enough to just multiply the floor area by the specified mixture consumption. If the self-leveler is poured onto a concrete or wooden base, the thickness of the layer depends on the difference in unevenness on the floor. Since the maximum thickness is 5 mm, unevenness should not exceed 3 mm. Having determined the height differences, further calculations are performed using the same formula as for the base mixture.
Consumption table for self-leveling mixtures
| Name | Consumption kg/m2 at a thickness of 1 mm |
| Ceresit CN 69 | 1,8 |
| Ceresit CN 76, 178 | 2,0 |
| Isoflor 707 | 1,5 |
| Uniflor 710 | 1,6 |
| Duraflor 721 | 1,6 |
| Vetonit 3000 | 1,5 |
Preparation of the base is carried out in four main stages:
- 1.If a new screed is being made, after complete drying it is necessary to remove dust and dirt. The old base must be carefully restored: remove all irregularities with a hammer drill, fill in all voids, holes and cracks with a spatula. To get the best result, you need to use special PolyTek repair mixtures. After repair, it is better to sand the entire surface. Despite the fact that the pouring technology allows for a difference of 2 mm for every two linear meters, it is better to eliminate any unevenness.
- 2. An important installation condition is the creation of optimal conditions. In the room, the humidity level should not exceed 55-60%, concrete - 4%, and the ambient temperature should be within 15-25 degrees. Remember! Most polymer coatings are waterproof, so the appearance of a minimal amount of condensation can cause peeling and even swelling of the base layer.
- 3.Laying damper tape. All monolithic coatings are susceptible to thermal expansion, so this measure is compensatory. After installing the floor, the tape can be cut and the seams sealed with sealant. After installation, it is necessary to remove all dust and debris.
- 4.Priming. This is a mandatory measure with the help of which the structure of concrete is strengthened, its hygroscopicity is reduced and adhesion is increased. Polyurethane or epoxy impregnation is applied in 2-3 layers; at the last stage, the entire surface is sprinkled with dry quartz sand, and after drying, excess material is removed with a vacuum cleaner.
How to reduce the consumption of levelers
The consumption of the building mixture directly depends on the total area of the uneven surfaces and the absorbency of the base itself. It is better to level overly porous and damaged surfaces using a regular cement or dry screed, since filling with a leveling solution will be too expensive. But if the base is dense and the uneven area is small, proper preparation of the floor will help reduce the consumption of the mixture without reducing the quality of the pour.
Elimination of irregularities
The smaller the number of recesses and cracks, the less mortar will be needed for filling. The main defects can be eliminated using available tools and putty.
Putty for concrete floors
To work you will need:
- grinding attachment;
- perforator;
- putty knife;
- primer;
- putty solution.
Concrete floor repair
In order not to miss a single crack, the base must not only be swept, but also vacuumed. The exfoliated concrete is cleaned off, and the tubercles protruding above the floor are knocked down with a hammer drill. Cracks with a width of more than 2 mm should be expanded along their length and removed from dust; on long cracks, perpendicular notches should be made with a grinder. It is convenient to remove roughness and small irregularities using a grinding wheel. After this, the floor is vacuumed again, all recesses and cracks are treated with a primer, dried and filled with polymer putty. When the putty areas have dried, their surface must be sanded.
| Name and packaging | Application base | Consumption kg/m2 | Maximum layer thickness | Drying time | Price RUR/pack |
| PVA-based putty, 4 kg | Plaster, concrete | 0,450 | 3 mm | 5 minutes | 154 |
| Putty stone flower, 25 kg | Concrete, wood, plaster, drywall | 1,4 | 10 mm | 24 hours | 138 |
| Ready putty Sheetrock, 3.5 l | Any | 0,67 | 2 mm | 5 o'clock | 350 |
Padding
Padding
Primers impregnate the top layer of concrete or screed, filling pores and microscopic cracks. Thanks to this, the leveler spreads better over the base and is consumed less. But keep in mind that the primer must match the surface to which it is applied and have high penetrating properties. For porous substrates there is a special strengthening primer, which is not suitable for ordinary floors. Before applying the primer, the floor must be cleaned of dust and oil stains must be removed. As a rule, the base under the self-leveling floor is primed twice; Until the first layer has dried, the surface cannot be treated again.
| Name, weight | Description | Drying time | Consumption kg/m2 | Price |
| Acrylic universal primer, 10 l | Suitable for concrete, cement-sand and gypsum bases; strengthens the surface layer, reduces diffusion capacity | 1 hour | 10 | 151 rub. |
| Soil BOLARS Betonkontakt, 12 kg | Suitable for concrete, stone, plastered surfaces, increases adhesion | 15 o'clock | 0,3 | 712 rub. |
| Primer for absorbent substrates CT17, 5 kg | Suitable for concrete and cement-sand screeds, has antifungal properties and elasticity | 4 hours | 0,2 | 251 rub. |
| Axton concrete contact, 18 kg | For treating smooth concrete substrates, increases adhesion | 2 hours | 0,25-0,3 | 788 rub. |
| Adhesive primer GLIMS BetoContact, 4 kg | For processing smooth concrete substrates, floor tiles | 24 hours | 0,3 | 272 rub. |
DIY self-leveling floor video
Viewed times: 11,060
Great article 0
Author's rating
Author of the article
Oleg Grishin
Flooring specialist with 10 years of experience. Oleg has something to share with our readers
Articles written
105
- Even more interesting:
- Self-leveling floors - types and characteristics
- How to make a 3D floor with your own hands: step by step and with photos
- What is an epoxy self-leveling floor?
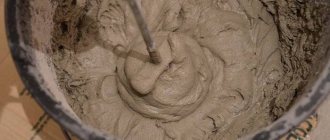
How to properly mix leveling compounds
How to properly mix leveling compounds
If the mixture is diluted incorrectly, no amount of tricks will help make a high-quality coating. The main mistake beginners make is adding more water than indicated in the instructions. A more liquid composition spreads faster, but the strength and durability of the floor is reduced several times. In addition, peeling, cracks, and other defects may appear on the coating.
To properly prepare the solution, you will need water with a temperature of at least +10 degrees, a convenient container for mixing, a drill with an attachment and a dry mixture. Strictly adhering to the specified proportions, pour the mixture into water and mix for 3-4 minutes with a mixer attachment. Then leave the solution for 3 minutes to ripen and mix again for a minute. The result should be a homogeneous mass without lumps, liquid enough to spread without additional leveling. If the technology is followed, the filling process will not cause difficulties, and the mixture consumption will not exceed the calculated one.
| Name | Drying time | Layer thickness | Consumption kg/m2 | Price RUR/kg |
| Horizon universal | 3-7 days | 2-100 mm | 3-4 | 236/20 |
| BOLARS | 4 hours | 2-100 mm | 3-4 | 239/20 |
| Vetonit 3000 | 4 hours | 1-5 mm | 1,5 | 622/25 |
| Palafloor-303 | 4-6 hours | 2-100 mm | 1,4-1,6 | 308/20 |
| GLIMS-S-Level | 24 hours | 2-5 mm | 3 | 478/20 |
| Perfecta Multilayer | 2-3 hours | 2-200 mm | 7-14 | 312/20 |
| xton | 3-4 hours | 6-100 mm | 14-16 | 256/20 |
| Name. Short description | Packaging kg | Consumption kg/mm/m2 | Price | Strength MPa | Layer thickness in mm |
| ALFAPOL VP - finishing self-leveling self-leveling floor M200 F200 Pk5 W12 on a cement base | 25 | 1,75 | 375-471 | 20 | 2-40 |
| REAL Floor leveler, High-quality dry cement-based mortar | 25 | 1,7 | 360 | 20 | 2-80 |
| Bergauf BODEN ZEMENT MEDIUM, self-leveling floor for the final leveling of horizontal surfaces, ideal for further installation of any floor coverings (ceramic tiles, parquet, carpet, linoleum) | 25 | 2 | 289-324 | 20 | 6-60 |
| Forbo Eurobond 915, fast-hardening self-leveling floor, low shrinkage, self-leveling, quick-drying. Suitable for heated floors. For indoor use, incl. in damp areas. Withstands the load from furniture on casters. | 25 | 1,7 | 405 | 20 | 3-50 |
| Petromix PS, for leveling floors on concrete and other hard substrates in dry, damp and damp areas. Serves as a base for floor coverings (parquet, ceramic tiles, textile carpets, plastic coverings, linoleum, etc.) | 25 | 1,5 | 441-471 | 25 | 2-30 |
| The foundation will be T-42 Nipline, a self-leveling, high-strength, moisture-resistant, non-shrinking leveler on a cement-sand base using special chemical additives. | 25 | 1,7 | 342-433 | 25 | 3-30 |
| Ceresit CN 178, for the manufacture of screeds operating under conditions of low and moderate mechanical loads, incl. with constant exposure to moisture (in residential and public premises, on exploited roofs, balconies, terraces, open areas, etc.), during external and internal work, in civil and industrial construction. | 25 | 2 | 370 | 35 | 5-80 |
| Vetonit 4100 cement-based mixture for leveling concrete floors indoors | 25 | 1,6 | 520-537 | 20 | 2-30 |
| vetonit 4150, suitable for quickly leveling concrete floors and creating screeds in residential buildings, offices and public buildings. It is used for repairs and new construction under various types of floor coverings. Used in “Warm Floor” designs | 25 | 1,6 | 520-550 | 20 | 2-30 |
| Berghauf BODEN ZEMENT FINAL, self-leveling cement-based flooring for perfectly smooth surfaces. For rooms with normal and high humidity (bathroom). | 25 | 1,8 | 435-490 | 20 | 0,5-5 |
Filling process step by step
The solution must be mixed strictly following the instructions of the material manufacturer. Violations of proportions and deviations from instructions, entailing a deterioration in technological qualities and operational characteristics, are not allowed.
Important. Polymerization of the mixture for manual pouring occurs after 35-40 minutes. after cooking. Accurate data on the life of the solution must be indicated on the packaging.
Due to the short period of time when the solution is suitable for pouring, attempts to install a self-leveling floor without an assistant must be nipped in the bud. It is better to enlist two pairs of friendly hands and initially distribute responsibilities. One prepares the mass, the second pours it, the third distributes it with a spatula or a long-handled iron.
All that remains is to list the actions, following the sequence:
We install a limiter in the doorway - a rail, a piece of drywall or profile. We will do the same if it is not possible to fill in one step in a room that is too large or if you plan to install combined floors. We fill the mass prepared according to all the rules in strips no more than 50 cm wide.
The first strip runs along the wall opposite the entrance. Avoiding any breaks, fill in the second strip, at the same time evenly distributing the solution with a spatula or iron.
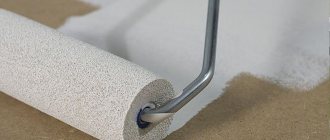
And we continue this way until the work is completed. We treat the filled layer with an aeration roller, due to which the self-leveling floor will be free of air bubbles. During processing, we move along the surface in paint shoes - shoes with support spikes on the sole.
We cover the filling with polyethylene and wait the time required according to the instructions for the self-leveling mass to mature.
If the surface needs to be given anti-slip properties, the poured floor is sprinkled with washed sand or not too zealous, expelling air from the mixture with an aeration roller. The “craters” left from the bursting bubbles will interfere with sliding.
It’s not difficult to understand the technology of applying self-leveling flooring, and it’s also easy to do it with skill. You just need to find out all the important points in advance, take into account the technological specifics and plan your actions correctly. Knowing the nuances of pouring will not harm those who decide to entrust it to workers.
Well, now it's time to finish the article. All the material I wanted to share has been reviewed. I hope it will be useful to you, and you will use it if you need to lay a self-leveling floor with your own hands. Improve your own practical skills and gain new knowledge, as they say: “It’s never too late to learn!” That's all, thank you for your attention, successful and easy repair!
Stirring the solution
The composition of any mixture for self-leveling floor includes various components and additives that allow you to obtain one or another result in the end. In this case, the properties of the finished solutions will have different qualities that improve the base to the required limit. In certain situations, the mixture may also include dyes. This is done when adjusting the floor to the interior of the room in which the pouring takes place.
In addition, the mixture contains substances that evaporate after contact with water. For this reason, after mixing the solution, the contractor has no more than 40 minutes to use everything for installation. Otherwise, the solution will begin to harden and nothing good will come out. When you lack confidence in your abilities, it is better to use a service such as turnkey floor filling.
A well-chosen solution will give you the answer to how to properly screed the floor. The finished composition for pouring should resemble sour cream in consistency. There are some exceptions to this, but few people talk about them or use them in their work.
To mix the mixture, special containers are used of a volume that is enough for all rooms at once. After all, there should be no interruptions in pouring in order for the surface to be high-quality and durable. This does not apply to the implementation of a self-leveling floor on a self-leveling floor, when it is necessary to level the base to the required level.