Partitions made from tongue-and-groove slabs have been used in construction for a long time. But they received their new life relatively recently, when life became better, citizens began to carry out repairs and remodeling of apartments and houses using modern materials. The latter did not always turn out to be easy to use, especially for inexperienced craftsmen who did the repairs with their own hands. In this regard, tongue-and-groove slabs are better because their installation is a simple process.
Partitions made of tongue-and-groove panels
What kind of material is this and its types
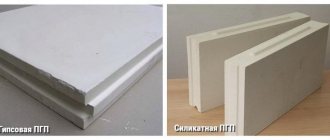
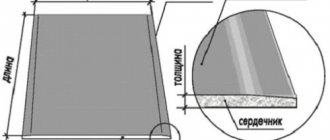
Tongue-and-groove slabs (abbreviated as GGP) or blocks are a large-format building material for the construction of partitions in the form of a slab, at the ends of which a ridge (tenon) and groove are formed. Hence the name - tongue-and-groove slabs. They are:
- gypsum based (cast gypsum);
- made of sand and quicklime, pressed under a certain pressure and treated with steam in an autoclave (silicate).
Plasticizers and hydrophobic (water-repellent) additives are added to the solution to improve properties. Gypsum gypsum boards have another name - gypsum boards. It is understandable: the gypsum solution is poured into molds. Here is the “source” of this variant of the name.
Moisture resistance and hollowness
Depending on the area of use, tongue-and-groove slabs can be intended for normal operating conditions (ordinary, standard) or for wet rooms (moisture-resistant). Moisture-resistant ones are tinted greenish for better identification.
Solid and hollow differ in weight and strength
Both gypsum and silicate tongue-and-groove slabs are either solid or hollow. Solid ones are more durable; hollow ones, due to their lower weight, create less load on the floors. The choice between solid and hollow must be made based on several factors:
- Soundproofing characteristics. Monolithic material without voids conducts sounds better, so it is used if sound insulation will be made in a separate layer (the best option) or if it is not so important.
- Loads on partitions. If you need to hang shelves, furniture, or fasten some heavy objects on the walls, it is better to use a monolith.
- Load on floors or floors. It is better to place less heavy (hollow) blocks on a wooden floor or on old wooden floors.
If several factors need to be taken into account, sound insulation is considered last. You can increase noise protection by using a special installation technology (on vibration-damping pads), as well as by adding an additional layer of sound-proofing materials.
Specifications
If we compare conventional and moisture-resistant tongue-and-groove slabs, the differences in characteristics are only in water absorption and strength. Moisture-resistant, due to the large number of hydrophobic additives, they almost do not absorb moisture. Due to the large number of these additives, they are more expensive, since these additives are expensive. At the same time, they increase strength (M50 compared to M35).
By the way, you can check “without leaving the checkout” whether what you have in front of you is really moisture-resistant PGP or just standard ones painted green. Just pour some water on the surface. Standard slabs will quickly absorb it, but on water-repellent slabs it will remain in a puddle for a long time.
Main technical characteristics of gypsum and silicate PPG
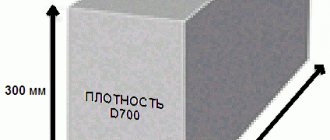
If we compare gypsum and silicate partition blocks, the increased strength of the latter immediately catches the eye - M150 compared to M50 and M35. That is, the strength of silicate slabs is comparable to concrete of a good grade. If you are going to hang something very heavy on the partition, it is better to use silicate. Manufacturers also produce blocks 115 mm thick, which are called inter-apartment blocks.
Technical characteristics of tongue-and-groove partition blocks made of gypsum
How else do silicate slabs differ from their gypsum counterparts? Because the standard version does not have such a high absorbency. It is not as low as that of moisture-resistant blocks, but this material can be used in any wet areas without problems (13% compared to 26-32%). The disadvantages of this material are greater weight (with equal dimensions) and lower thermal insulation characteristics.
Finishing
If the wall is built correctly, it will not need to be leveled. However, it is possible to plaster the GGP, but only a gypsum plaster mixture will do , and before starting work, the GGP should be treated with a primer so that the gypsum does not absorb moisture from the solution. And in the case of using plaster, even without a slab, you can paint, cover with wallpaper or ceramics.
The use of lime paints and paints on liquid glass is prohibited.
Items lighter than 30 kilograms (mirrors, lamps, decor) are attached to the PGP with dowels, heavy items , for example, wall cabinets, are attached with anchor bolts.
Silicate GGP
The production of silicate products is based on quartz sand, slaked lime and water. The pressing technique involves treating products with steam under high pressure. The structure of the building material ensures evenness, smoothness of the surface, and correct geometry of the workpieces. The tongue-and-groove fastening system increases the strength of element fixation.
Raw materials and production methods contribute to weighting and increasing the density of the slabs. The thermal conductivity coefficient and strength characteristics of the material increase. The sizes of silicate products are different and depend on the manufacturer. If we compare with a gypsum analogue, they are smaller.
Silicate
Two types of slabs are produced: solid and hollow. In the second case, there is an increase in sound insulation characteristics. One unit of building material weighs less.
When determining the type of slab material for the construction of partitions, the type of floor and the purpose of the room are taken into account. Arrangement of silicate raw materials for wooden logs, work in a children's room, requires a lightweight version of the void. In the case of cladding concrete walls on which heavy furniture or decor is attached, durable solid silicate products are used.
Sometimes a two-layer partition is required to protect the room from heat loss and noise. Mineral wool is placed in the cavity between the two balls of the slabs. Engineering communication lines are being laid. The insulating building material may be different.
Technical characteristics of silicate products
The physical and technical parameters of sand-lime brick allow it to be actively used in construction. Silicate resists fire. Does not emit toxic fumes into the air. Does not allow electric current to pass through, a good insulator. The gas permeability of the structure ensures good microclimatic conditions in the room. Under the influence of insignificant fluctuations in humidity, it does not rot or deform.
Technical properties
Dimensions, weight of silicate GGP
Slab products with good geometry. But the size chart depends on the manufacturer. If we compare the overall size of the blocks, they are smaller than gypsum ones. Everything is explained by the large weight of the building material.
Options
Conclusion
If the soundproofing characteristics of the wall are very important to you , then they can be increased by creating double partitions, between which insulation is laid, or by covering the wall with sound-absorbing materials.
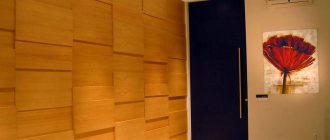
Follow the instructions, and you will be able to create an interior partition in your house with your own hands, which will have high strength and soundproofing characteristics. Or make a decorative partition to zone a room
Installation
First you need to calculate the number of slabs needed for the partition. Today this is done very simply. On any online construction portal you can find an online calculator; in the cells, indicate the size of the selected block, the length and height of the walls, as well as the area of door and window openings. Then click “Calculate”. The calculator will provide the total area in cubes and the required number of slabs of the specified sizes.
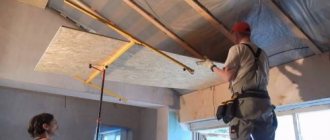
Raising PGP partitions must begin after rough work on finishing the walls and ceiling, but before pouring the screed
It is important to consider that the humidity in the room where the PGP walls are being installed should be 55-60%, and the temperature should not be lower than 5 degrees. Before you begin installing the slabs, you should prepare the base
Adjacent elements must be level and located strictly in horizontal and vertical positions. If there are flaws, concrete or cement-sand mortar will help correct them, which will need to be primed after drying.
Markings are made on the base of the floor. The coordinates of the future door are also set there. Using a level, floor markings are transferred to the ceiling and walls. To increase the noise insulation parameter, an elastic cork gasket is glued to the adjacent partitions, and a backing is attached to the floor
It is important not to forget about purchasing special fasteners. They are fixed with self-tapping screws, anchors or dowels
If the ceiling height is 2.8 m, it is enough to fasten the partition at three points. In the horizontal direction, the distance between fasteners should be 70-100 cm. Corner plates should be connected to each other with perforated tape. Next, the laying of blocks begins. The panels can be laid with grooves both up and down. In the first case, the solution should be evenly laid at the point of contact of the elements, and the lower protruding ridge will have to be carefully cut off.
Next you can start installation
When building an interior partition with your own hands, it is very important to adhere to the installation technology, otherwise the work will have to be redone
- First, the adhesive solution is mixed.
- The adhesive mass is applied to the walls and floor according to the markings made.
- The first block is placed. A level is applied on top. When unevenness is identified, lightly knocking with a mallet adjusts the surface to be evenly horizontal and vertical.
- Any excess solution that appears must be removed immediately.
- If necessary, the slab can be fixed to the enclosing structures.
After laying the first row, subsequent slabs can be installed
And here the technology for constructing GGP blocks requires paying attention to some nuances. The connecting seams should not coincide with the contact points of the upper rows
To do this, you need to cut one block exactly in the middle. One part of it will be the beginning of a new row, and the second will be the end. Otherwise, the principle of operation is similar to installing the first row of blocks.
Particular attention should be paid to the formation of the doorway. If you need to install an opening less than 90 cm, additional supporting structures do not need to be used
But you cannot allow a whole slab to hang over the doorway. For such situations, it is recommended to make a plan in advance and set the rows correctly. During the process of raising the wall, it is necessary to install a temporary lintel. It can be made of wood or profile. When the adhesive is completely dry, the jumpers can be removed.
All that remains is to make the top row. It is inconvenient to lay the slabs close to the ceiling, which is why it is possible to change the direction of the installed blocks from a horizontal position to a vertical one. The fastening system of the plates does not make it possible to place the blocks flush against the ceiling - a small gap is required. 2-3 mm will be quite enough. If you plan to install a suspended ceiling, the gap can be filled with polyurethane foam.
Fastening to the ceilings should be done with brackets or corners, otherwise the upper part of the structure will become loose. As it became clear, GGP panels are the best material for the construction of new walls. With them, installing load-bearing partitions takes very little time.
To learn how to build an interior partition from tongue-and-groove slabs, see the following video.
Pros and cons of using tongue-and-groove blocks for partitions
Advantages:
- Availability. The use of the material is economically justified. Prefabricated gypsum structures are lighter than ceramic bricks and stronger than plasterboard and foam gas silicate. At the same time, their cost is 10-30% lower.
- Safety. The raw materials for the production of PGP do not contain any harmful impurities. The products themselves are highly fire resistant.
- Soundproofing. If the installation technology is followed, the wall prevents loud sounds from penetrating into adjacent rooms.
- Easy to install. Thanks to the connection of individual elements according to the tongue-and-groove principle, even a person without experience in carrying out such work can cope with the construction of the PGP. The main thing is to correctly mark and constantly monitor straightness as a rule.
- Ease. The material is almost half the weight of brick, which reduces the load on the interfloor ceiling. At the same time, you get thinner interior partitions, which gives additional usable space.
Flaws:
- Hygroscopicity. Standard tongue-and-groove slabs absorb moisture well, but during the drying process they can become deformed. Therefore, it is important to install them after completing all wet processes in the room.
- Fragility. Under high loads, the material bursts at the point of greatest stress. Therefore, before installing a wall on a wooden floor, it must be well strengthened. In new buildings that may shrink, it is imperative to use damping tapes.
- Demanding requirements for the foundation. The large-block structure does not allow the adjacent surfaces to be leveled during the construction of walls, as can be done, for example, with bricks. This means that you first have to carefully align all planes.
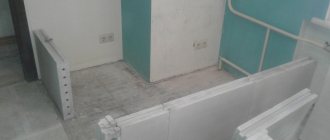
Installation of the first row
Installation of PGP is carried out strictly in rows, starting from the bottom. The first row is basic and must be correctly oriented in space, vertically and horizontally. The most common error during installation is “waviness” of the partition, which occurs due to a slight displacement in the grooves. To eliminate this phenomenon, when laying each slab, you need to use a rule strip and check the general plane of the partition against it.
The first row should be laid from the corner. The area where the slab touches the floor and wall is covered with GGP glue, then the block is installed with the ridge up and its position is leveled. It is convenient to use a rubber mallet to move the slabs. Be sure to fasten the first block to the wall and floor using L-shaped plates, the role of which is successfully performed by direct hangers. To use them, you need to cut off the toothed comb from the edges and bring the thickness of the plate to the width of the comb. The plates are first attached to the base using quick-installation dowels with a length of 80 mm or more, then to the slab with black self-tapping screws no less than 60 mm long.
Subsequently, the slabs are attached through one side: on one side to the floor, on the other - to the previous slab, with a preliminary coating of the joint with a thin layer of glue and strong pressing. To control the placement of slabs according to the project, it is convenient to use lacing or a laser level. It would also be a good idea to mark the partition on the floor and walls indicating the locations for the doorways.
Preparing the base
Before laying the first tongue-and-groove blocks, you need to check the horizontalness of the base using a level. If there are differences in height, we make a leveling screed, as stated in my article. After the cement-sand mortar gains its strength, the surface of the screed must be treated with a primer for better adhesion of the mounting adhesive and gypsum products.
After this, we mark where the doorway is supposed to be in the partition. The level of sound insulation of walls made of tongue-and-groove blocks can be increased by a damper tape made from natural cork, which should be glued to all surfaces where the gypsum boards will be joined to other structures - the ceiling, walls, floor, without forgetting to check the horizontality of the material being laid.
How to choose a stove
As noted above, tongue-and-groove slabs are produced in two versions:
- hollow;
- monolithic.
No one will argue that monolithic slabs are more functional than hollow ones. But at the same time, they have a lot of weight. That is why it is not advisable to use such slabs for partitions that should be installed on a floor with wooden joists.
Meanwhile, hollow PGPs show excellent sound insulation parameters. They do not allow extraneous noise to pass through at levels up to 43 dB. And at the same time, due to their low weight, the floor structure is not overloaded. Meanwhile, some developers are confident that harmful bacteria and various insects can safely live in hollow parts. But studies have not confirmed these fears.
Both types of PGP are used for the construction of partitions or wall decoration in rooms where the humidity level can be attributed to a dry climate. To construct such structures in rooms with high moisture content, it is necessary to use slabs that successfully resist water. They have a greenish tint. When creating a project, it is necessary to take into account that these slabs are slightly heavier.
Construction of a doorway in a tongue-and-groove wall
During the laying process, it is necessary to immediately determine where the doorway will be located, calculating the placement of the blocks in such a way that there is no junction of two slabs above the future door. If the doorway is supposed to be no more than 0.9 m wide, it is not necessary to install a permanent lintel. You can install a temporary support from a wooden plank or profile, which is used when constructing frames for plasterboard cladding walls or ceilings. Therefore, a preliminary diagram of the layout of the slabs is made on paper.
When the opening width is more than 90 cm, laying a lintel is required. This element can be made from a wooden block, rolled metal in the form of an angle, strip or channel. The lintel should rest on the walls along a length of 10-15 cm. If, when laying a tongue-and-groove wall, the height of the doorway turns out to be higher than the lower edge of the laid blocks, then here you just need to cut out part of them so that you can lay the lintel, taking into account the length of its support.
The embedded parts, metal or wooden bosses necessary for fastening the door, are installed during the installation of tongue-and-groove slabs.
Strengthening corners
To ensure that the external corners are 90 degrees and not destroyed by mechanical stress, they are strengthened using a 3 x 3 cm perforated corner.
Instructions for attaching corners:
- Using a spatula, apply putty to the surface of the corner and press the steel corner to it. Press it along its entire length.
- If the length is not enough, take another strip and overlap it by 3 cm.
- Apply a layer of putty on top using an angle spatula.
Serpyanka tape is laid along the inner corners. If it does not have a self-adhesive base, it is attached using the same technology as a perforated corner.
Remove the protective layer from the serpyanka on a self-adhesive base and glue it along the entire length of the corner.