Cheese Gallery Parmesan cheese, 32%, granules, 100 g
172 ₽ More details
Cheese Gallery Parmesan cheese, 32%, flakes, 100 g
139 ₽ More details
Pool filter pumps Bestway
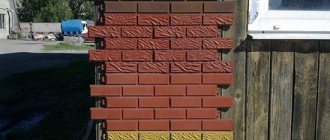
The basement part of the structure is exposed to mechanical stress, temperature changes and precipitation. If the foundation waterproofing is damaged, the lower part of the building will quickly darken, and white salt stains will form here. One of the options to overcome this problem is porcelain stoneware for the plinth.
Other natural stones, plaster or siding can also be used for such purposes. But ceramic granite is considered the most practical and durable material. It is capable of not only actively resisting various irritants, but will also highlight the original design solution of the building designers. This material has many more advantages than disadvantages.
Use porcelain stoneware for the basement cladding
Not a stone, but very similar
Undoubtedly, one of the main qualities that determines the success of porcelain stoneware in the finishing materials market is its appearance, namely the ability to imitate natural stone.
The production technology of this material includes unglazed and glazed (salted) tiles. The main difference is in the application of the dye. In the first case, coloring is done before the pressing process. In the second, the finished product is painted (glazed).
Today's achievements of technological progress make it possible to offer the buyer porcelain tiles in more than three hundred tones, patterns and shades. The most popular of them are those imitating natural stone. These are marble and granite, sandstone and onyx, jasper, onyx and many, many others.
Such tiles are successfully used not only for decorating floors, but also for walls, stairs, finishing plinths, columns, etc., etc.
There are entire multi-page catalogs where the buyer can choose the ideal option for him from hundreds, or even thousands of options. That is why almost no one leaves specialized stores without purchasing something.
Information to note: decorative brick in the interior
Ceramic granite
Porcelain stoneware for the plinth is an ideal cladding option. The technology for laying it is not very complicated, and the quality characteristics are excellent. This material is produced from a special type of clay; it also contains quartz sand and feldspar.
By pressing, all components are combined and granite tiles of the required size are formed.
To give them the desired shade, dye is added to the composition. The final stage of creating ceramic granite is high-temperature firing, which results in tiles with a minimum number of pores.
Laying tiles on mortar
During the installation process you will need:
- level;
- roulette;
- pencil;
- glue (for example, Ceresit);
- Master OK;
- notched trowel (useful if the length is equal to or greater than the width of the tile);
- grinder or hacksaw for metal.
The installation goes like this:
- Determine the lower level of the cladding.
- Using a tape measure and a level, mark it on all walls.
- Dilute tile adhesive in the proportion indicated on the package. The solution retains its properties for a certain period (usually from 30 minutes to an hour). They make enough to use it up in that time.
- Apply the mixture to the lower part of the facade.
- Remove excess with a notched spatula.
- Place the tile and press lightly. Remove any glue that has come out around the edges. Within 10-15 minutes you can correct the position, then the mixture will “set.”
- If installation is carried out with seams, crosses of a suitable size are inserted into the corners of the slab.
- Continue the bottom row, adding solution if necessary.
- The following ones are placed similarly. If the whole number of slabs does not fit, it is cut with a grinder or a hacksaw.
- Corner elements can be used around door and window openings.
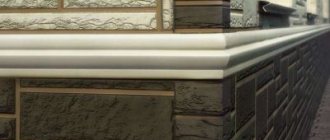
Installation of ebb tides
They can be metal, aluminum, plastic. A more beautiful, but expensive, ebb can be installed from clinker shaped bricks or beveled clinker tiles, but the installation method is quite complicated, so you can’t do it without a professional.
Installation of basement drip sill
Stages of work:
After cladding the base and before cladding the walls of the house, it is necessary to strengthen the flashings.
- for better adhesion of the ebb to the surface of the base, we make slopes at an angle of 15 degrees, level the top line horizontally, if necessary. The cement mortar should be thick.
- We wait a few days, the cement should dry thoroughly.
- We attach the sills directly to the wall using dowel nails.
- if the facade of the wall is sheathed along guides, then the ebbs must be attached to these guides with self-tapping screws.
The process of finishing the basement is quite labor-intensive, so it is important to use high-quality materials from the huge selection of building materials for finishing it, so that you don’t regret anything later, since the basement is a very important part of the house for preserving the warmth and strength of the building. And don’t forget about the exterior of the building, everything should be harmonious
Advantages and disadvantages of the material
Porcelain tiles are the result of mixing natural ingredients with natural production methods, without adding overt chemicals.
Environmentally friendly raw materials are non-flammable and increase the fire safety of the home.
Despite the climatic conditions, the scorching sun, the cladding regularly fulfills its main purpose.
The material repels moisture, improves heat and noise insulation, and is easy to install.
Finished base option
Even in the most unfavorable scenario, if basic installation standards are observed, a service life of about 50 years can be achieved. If you go deeper into the topic and take into account possible nuances, you will be able to significantly increase the period.
The finished surface is not prone to the accumulation of dirt and dust and does not require special care. It is enough to periodically rinse the finish with water from a hose.
A heavily contaminated surface can be washed and cleaned with almost anything; the surface is inert to chemicals and ultraviolet radiation.
Disadvantages - cost, large weight of individual tiles, construction.
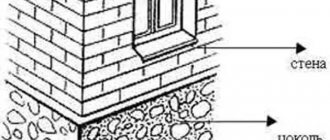
Why do you need to finish the basement of a private house?
Most of the building's foundation is below ground level and hidden from view. The protruding part above ground level is called the plinth. According to standards, the height of the plinth from the ground must be at least 20 cm. It is usually made of brick, stone or concrete slabs.
The material for covering the plinth should be chosen based on the type of base and the overall design of the building’s decoration
The construction of a stone plinth is the most practical solution, since the structure does not require additional finishing. However, it is worth considering that this is the most expensive method. Laying a brick plinth is more affordable. This material is environmentally friendly, has low thermal conductivity and good strength characteristics.
Cladding the basement of a house is not only aesthetic. This is reliable protection of the building from external influences. Finishing materials that will be used to cover the base must have a high level of strength. Together with the plinth, its cladding will absorb the load created by the wall structures of the building and distribute it evenly over the foundation of the building. It must withstand pressure and protect the base from external factors, such as precipitation, sunlight, humidity, and temperature fluctuations.
The finishing material protects the foundation of the building from damage by mold, mildew and various types of insects. The cladding of the base is carried out to insulate the building. This is also necessary to protect the foundation from severe frosts, under the influence of which its strength decreases and the process of erosion develops.
Finishing the base helps protect the foundation from premature destruction
If you leave the surface of the base without covering, this will contribute to its slow destruction as a result of constant exposure to dry or liquid dirt containing aggressive chemicals and minerals.
Various options for finishing the basement of a private house, photos clearly confirm this, transform the building into a masterpiece of design art, making its appearance complete and unique.
Porcelain stoneware plinth design
The appearance of the plinth, finished with porcelain stoneware, is attractive and original. This finish is self-sufficient, and it is possible to create a unique cladding and implement bold design ideas.
Unique design
You can use the services of specialists, but these are additional costs. Another option is to look at photos of granite plinths and determine the most suitable one for a particular situation.
Types of porcelain stoneware
Today, the buyer can choose several varieties of porcelain stoneware. Based on their structure, tiles can be divided into the following types:
- Unglazed. This material is characterized by increased durability and strength due to its uniform structure around the entire perimeter.
- Polished. Used in cases where decorative shine of the surface is required.
- Satin. Before firing, the surface of the material is covered with a special layer of wax, which gives the shade a natural softness.
- Glazed. This material has improved performance characteristics due to additional firing and coating with waterproof glassy enamel.
- Matte. Suitable in cases where the cladding needs to be made of porcelain stoneware in pastel colors.
Porcelain tiles are produced in the shape of a square, with sides measuring 60, 40 and 30 cm, with a thickness of 1.7 to 13 mm. Thanks to this variety, the finishing of the plinth can be done in the shortest possible time.
Types of porcelain tiles
Porcelain tiles are available in different structures:
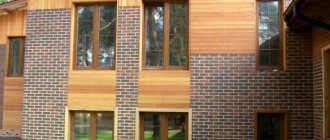
Modern industry offers several sizes of porcelain tiles, which are squares with a side of 30, 40 or 60 cm. Their thickness varies from 1.6 to 8 mm, so finishing houses with porcelain tiles can be done by choosing the most suitable material.
Today, the surface of porcelain stoneware imitates various materials, in this example the appearance of natural stone
Features of tiled basement cladding
The basement of the house is not only exposed to constant high loads, but it is almost always in contact with a humid environment. In this connection, the cladding of the base should not only act as decoration, but also as a kind of protection from external aggressive factors.
At the same time, such an option as laying ceramic plinth tiles is considered the most common method of protection from atmospheric influences and moisture. In addition, a building with such decor acquires its own unique design. The whole difference between base and façade tiles lies in the higher strength of the former, which is achieved, among other things, by the considerable thickness of the elements. In connection with this, the thermal insulation of the building is increased and its lower part is strengthened. Also, the tiles in the decoration of the basement of the house act as a kind of line separating the bottom of the house from its top part.
Cladding elements are often combined with waterproofing and thermal insulation materials. With the required strength, tiles for the basement of a house are available in various variations. If the owner of the house has little experience in handling standard tiles, he will not have any problems when laying basement tiles. However, the best solution in such a situation is to seek help from specialists. After all, you cannot skimp on the quality of foundation cladding; the longevity of its operation depends on it. At the same time, the master is the owner of specific knowledge and experience. He will be able to warn you which materials can and cannot be used to install tiles.
Purpose of the plinth cladding
The upper part of the foundation - the plinth - takes the main load of the building's superstructure. The stability of the structure, service life, and the need for restoration and repair work depend on the reliability of the support.
A sufficient height of the base, usually 0.5-0.8 m, ensures a comfortable temperature regime and reduces humidity in the underground floor - basement, cellar, garage. But the part protruding above the ground requires protection. The waterproofing treatment of the foundation may not be enough for the base of the house in contact with the ground. Additional protection is provided by the cladding of the basement area. The choice of plinth tiles for finishing work guarantees:
- minimizing the influence of precipitation and the biological influence of soils on the structure of the building;
- protection from mechanical and shock influences;
- increasing the thickness of the protective layer;
- resistance to multiple freezing cycles;
- additional insulation of the foundation;
- aesthetics.
The popularity of the material is explained by the following technical characteristics:
- The thickness is greater than that of samples for facade cladding - 15-20 mm. The products are denser, stronger and have a relatively low weight.
- Increased moisture resistance, chemical inertness.
- Low thermal conductivity.
- The service life of the cladding is not inferior to the building.
- Compatible with frame systems.
- Easy installation, repair, replacement of individual products.
- Easy to care for tiled surface.
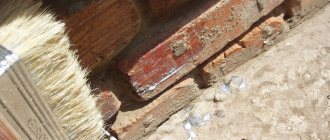
Preliminary surface finishing
One of the key points of construction and finishing work is the preparation of the underlying surface. Laying the plinth with tiles begins immediately after the preparatory work:
The old coating from the base must be removed
Pay attention to even the smallest pieces that can cause poor adhesion of the new material. The surface of the base must be leveled, especially if there are unevenness and gross defects. After thorough cleaning of dust, they begin laying hydro- and thermal insulation. If necessary, install a reinforcing mesh.
Applying several layers of primer to the surface will increase the resistance of the facing tiles to low temperatures.
Types of stone for cladding
Stone has long been considered one of the best materials for finishing a base and has been used throughout human history. However, if previously its diversity was limited to a few types of natural rocks, today they have been supplemented by a variety of materials that can be used to imitate the texture and shape of minerals.
This is interesting: how to choose an artificial stone for a plinth.
Therefore, before choosing a specific material, it is worth familiarizing yourself with each of them to understand which one is best suited to your requirements and financial capabilities.
Flexible finishing stone
This variety appeared not so long ago, but quickly gained popularity. It consists of two layers, the first is decorative, under which thin sections of sand agglomerates are often used, and the second is an adhesive base made of acrylic dispersion. It is produced in the form of rolls and piece tiles; there is no difference in shapes other than the convenience of their transportation. It has a high level of environmental friendliness and good appearance, does not burn, is waterproof and is extremely convenient for installation, saving builders a lot of time.
Artificial stone made from a polymer-sand mixture
A composite material is used, made from a mixture of sand and various polymers. The technology makes it possible to get as close as possible in appearance to a natural fossil, not only in shape, but also in texture.
Moreover, in the case of a polymer-sand mixture, you get several additional advantages. So, the material is quite light, it is simply attached to the facade and is unpretentious. Otherwise, all characteristics, including service life, correspond to or exceed the natural analogue.
Clinker
Clinker tiles are made using several special types of clay, as well as high-temperature processing technology for raw materials. The decorative layer can imitate a stone or brick cut, but at the same time has a huge variety of colors and shapes. Such an assortment will allow you to choose the right cladding for any type of interior; moreover, the price of clinker tiles is not high, which is the second important argument when choosing them. All this served as an incentive for the growth of her popularity.
Each type of stone has its own nuances
Artificial concrete stone
Among artificial facade finishing materials, concrete stone was the first, and for a long time it managed to maintain its leading position. He managed to win the favor of the buyer due to his resistance to fungal infections and other biological environmental factors, as well as durability in case of modern repairs.
Plinth tiles: varieties, which one to choose and how to lay it yourself
Tiles for the basement: clinker and its characteristicsTiles for cladding the basement of a house: other optionsHow to lay tiles for the basement: subtleties and nuances
In almost all one hundred percent of cases, the finishing of the basement of a house is done using various types of tiles - there are, of course, exceptions, but they occur mainly because people do not know how susceptible this part of the facade is to damage.
In general, tiles for the plinth are the best option, and among materials of this type you can find cladding to suit any wallet size. It is all these varieties of base tiles that will be discussed in this article - together with the stroisovety website.
org we will study the varieties of this finishing material, get acquainted with their features and consider the process of laying base tiles yourself.
Plinth tiles: clinker and its characteristics
Clinker is the most common material used for finishing the base. There are clinker bricks and clinker tiles, which, according to experts, are the best option for a plinth. Among its qualities are high strength and the ability to withstand very low temperatures - such tiles have almost zero ability to absorb moisture, due to which they last longer than the adhesive used for its installation.
There are two types of clinker facade tiles, which are determined by the method of their production.
In appearance they do not differ from each other, but... The machine pressing method allows us to produce tiles of very high density - this is very high strength, frost resistance and all other characteristics of this finishing material for the facade. Do you want to get a beautiful, high-quality and durable base? This means that you need to give preference to clinker facade tiles made by machine pressing.
Tiles for cladding the basement of a house: other options
Clinker tiles for the plinth are an excellent option, but besides it, there are other materials that are not much inferior to it in many of their parameters. Such finishing materials include the following types.
In addition to the materials listed above, there are other options for finishing the base. For example, ceramic tiles for the plinth - any similar tile, the marking of which contains a snowflake, indicating resistance to frost, can be used to finish the plinth.
Alternatively, you can abandon tiles altogether in favor of modern, and most importantly, cheaper base panels or decorative plasters. In principle, it’s up to you to choose – the only thing that can be added here is to say that almost all base tiles last quite a long time.
The difference between them lies in appearance, some technical characteristics and, naturally, the subtleties and nuances of installation, which will be discussed further.
How to lay plinth tiles: subtleties and nuances
The main problem of covering a plinth with tiles (no matter what) is the large length of the horizontal row - even for a professional it is difficult to maintain the horizontal seam along the entire length of the plinth
It is for this reason that special attention should be paid to the first row - as a rule, it is laid along a horizontally installed guide. A long and even strip is attached to the base, clearly level (plasterboard profiles are mainly used for this purpose), which is used as the base for the first row
When the entire upper part located above the profile is tiled, the lath is removed and the rest of the tiles are laid.
This is not the only nuance that you will have to face in the process of tiling the base.
In principle, these are all the nuances characteristic of most plinth tiles. In all other respects, its installation is not much different from a similar process carried out indoors.
And in conclusion to the topic of how basement tiles are laid and what features they have, I’ll say a few words about fiber cement panels - these, of course, are not exactly tiles, but in some way they can be called that.
In essence, this is a large tile (or basement siding), in the manufacture of which nanotechnology is used - special capsules are introduced into this material, which work like a sponge.
How to decorate the surface?
The plinth cannot be faced until its surface is waterproofed, insulated and leveled. Waterproofing and insulation will prevent rapid destruction of the structure due to changes in temperature and humidity. And leveling the surface will help make the cladding smooth and neat.
Waterproofing
Necessary:
- carry out excavation work by digging out the soil approximately 80 cm deep;
- cover the lower part of the foundation with a special bitumen solution to prevent moisture from entering the building.
Insulation
After the waterproofing material has dried, apply insulation (foam plastic, expanded polystyrene, etc.) to the foundation. The slabs are glued from bottom to top.
Alignment
Necessary:
- Remove dust and dirt from the insulation. You can prime it.
- A plaster mixture is applied to the insulation, then a construction mesh for reinforcement and another layer of plaster.
- After the plaster mixture has completely dried, the surface should be treated with a primer again to ensure better adhesion of the finish to the surface.
How to sheathe?
What is important to consider:
You can decorate the plastered surface only after it has completely dried (after 1-3 days, depending on the weather). When using artificial stone, it must first be treated with a water-repellent mixture, and when working with clinker tiles, it must be immersed in warm water for 10-15 minutes. The tiles are laid on a flat surface or on a sheathing. The siding is attached only to the sheathing. To form even corners, special metal perforated corners with an anti-corrosion coating are used. It is important to immediately remove the remaining mortar between the seams of stone, tiles, and bricks, and fill the seams or open them after the adhesive mixture has hardened.
The video will tell you about finishing the base with your own hands:
Method 4: plinth panels
Features of the material
When talking about the cladding of the lower part of the wall, it is impossible not to mention basement siding - a special material of increased strength:
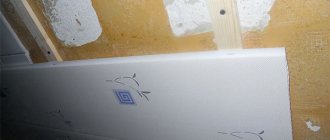
Typical basement siding panel
- The basis of basement siding is either a thin metal sheet with an anti-corrosion coating or a sheet of polymer material;
- A polymer layer of PVC or polyurethane is applied on top of the base - in addition to giving the panel an attractive appearance (imitation of chipped wood, stone or brickwork), the polymer also provides additional heat and waterproofing;
- Finally, a protective layer is applied to prevent the plastic coating from being damaged by moisture, wind, UV radiation, etc.
Typical panel size is 1220 x 470 mm. This ratio may be different for different manufacturers, but, as a rule, they do not deviate from the standard “1 x 0.5 m”.
A small part of the range of plinth panels
Installation method
In addition to high stability and attractiveness, the advantages of basement siding also include fairly easy installation.
The technology for its installation will be as follows:
- The panels are attached either to the base of the wall itself or to a metal/wooden frame. The second method is clearly preferable, since it allows not only to provide a perfectly flat base for installation, but also to insulate the base by placing panels with low thermal conductivity under the siding;
Algorithm for starting work
- Installation begins with the installation of the starting rail. We fix it strictly horizontally, leveling it;
- Then we install internal and external corner elements at the corners of the house. Installation usually starts from the left corner;
- After this, the edge of one plinth panel is trimmed: we need to cut off the protruding parts to obtain a straight line. The panel is inserted into the corner trim, aligned and fixed to the frame using galvanized nails or self-tapping screws. The lower part of the panel is fixed on the starting bar;
Installed first panel
- The following panels are assembled according to the principle of the designer: we insert the protrusions into the grooves of the already installed element, align them to obtain a minimum gap and fix them;
- After completing the covering of the entire base, we attach a finishing strip along the upper edge, which will limit the movement of the panels in the vertical plane.
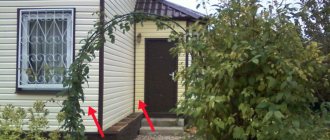
Photo of a finished unit with a lower base and an upper visor
As in the case of cladding with other materials, it would not be superfluous to install a drainage canopy.
Surface marking
If you plan to install tiles on a subsystem, then preliminary marking of the surface will be required. It is necessary that the location of the sheathing strips corresponds to the tile attachment points. To do this, measure the distance between adjacent fastening elements vertically and horizontally and, taking into account the obtained values, apply markings on the wall with the resulting pitch.
When performing the operation, it is necessary to control the horizontal and vertical using a building level. If you plan to use corner profiles, then when marking you should take into account the features of their installation and ensure the appropriate arrangement of the strips.
About sizes and caliber
The most popular sizes of ceramic granite, occupying more than 80% of the market:
- 300x300 – (length x width, in mm).
- 400x400 – (length x width, in mm).
- 500x500 – (length x width, in mm).
There are other formats:
- 120x60 – (length x width, in mm).
- 20x20 – (length x width, in mm).
- 90x60 – (length x width, in mm).
- 180x120 – (length x width, in mm).
The thickness of the product ranges from 7 to 30 mm.
Typically, porcelain stoneware is not adjusted to exact geometric parameters, so there is a discrepancy of 1-2 mm
Reputable companies that care about their image carry out additional processing of the slabs: the edges are trimmed and the tiles come out to the exact size, the so-called caliber, which is important for the seamless cladding method. This type of tile is called rectified.
Technology of cladding work
It is quite possible to install porcelain stoneware on the plinth yourself. There are two main ways:
- Ventilated porcelain stoneware plinth.
- Cladding the plinth with porcelain tiles on glue.
Let's look at each of them separately:
Ventilated porcelain stoneware plinth
A feature of the technology is the presence of a small indentation between the tile and the insulation layer through which air circulates. The base is constantly ventilated, the insulation does not get wet and does not rot. The porcelain tiles are fastened to the base using the frame. Usually, the entire facade is finished in this way, and not its individual sections. The technology is rarely used for finishing cottages.
Work order
- Surface repair. All mortar deposits are removed and potholes are filled. You can treat the surface of the base with an antiseptic to prevent the development of fungus.
- Marking. Using a laser level and tape measure, vertical and horizontal lines with mounting points for the brackets are drawn on the wall. If the profile is installed vertically, then the horizontal distance between the brackets depends on the size of the ceramic tiles, usually 300-800 mm. The vertical distance between the brackets is 600-1200 mm. If the profile is installed horizontally, then the opposite is true. The minimum distance for installing brackets from the corner is 100 mm.
- Installation of brackets. A hole is drilled for each element. Then the bracket is pressed against the wall, and a plastic dowel is inserted. A screw is screwed into it. You can use fasteners with variable lengths to level out wall unevenness.
- A T-shaped or U-shaped supporting profile is attached to the brackets using metal screws.
- Basalt mineral wool is inserted into the cells between the profiles. It is attached with special glue with additional fixation with plastic dowels.
- The entire base is covered with a membrane protective material, which allows steam to pass through from the inside, but retains moisture from the outside.
- The tiles are attached to the frame using clamps.
Cladding the plinth with porcelain tiles on glue
A popular method of finishing the above-ground part of the foundation. It can be used both as part of a complex façade decoration and separately.
The plinth can be faced with porcelain stoneware with or without insulation. When insulating, several stages are added.
Work order
- The surface of the base is cleaned of dust and primed. The soil increases the adhesive properties of the stone.
- If the base is uneven, then a layer of cement-based plaster is applied. You can use both regular cement-sand and special façade. Layer thickness 20-30 mm. If the difference is more significant, the wall is reinforced with galvanized plaster mesh, which is secured with self-tapping dowels. The plastered surface will be ready for tiling in 48 hours.
- Installation of insulation. Extruded polystyrene foam is used. A special glue is applied to each sheet over the entire surface with a notched trowel. Then the sheet is applied to the wall and fixed for 10 seconds. To prevent heavy ceramic granite from collapsing the insulation, each sheet is additionally secured with 5 dowels with a round head. The glue will gain strength after 48 hours.
- The insulated wall is primed and covered with sickle mesh.
- Then we glue the porcelain tiles onto the plinth. At the bottom of the plinth you can install a profile on which the artificial stone cladding will rest. Laying tiles starts from the bottom corner. First the first row goes through, then the rest.
Special glue is applied to the inner surface of the tile using a comb spatula. The tiles are then attached to the base of the wall. To maintain the same distance between the tiles, crosses are inserted.
If ceramic granite is laid without insulation, then after leveling the base is primed and tiled in the manner described above.
Preparing a base for porcelain tiles does not take much time. You can lay the tiles yourself, and the result justifies all the efforts. The beautiful and durable lower part of the building made of stone will not fade for a long time and will not lose its appearance.
Suitability of use for cladding
The material has thermal insulation and sound insulation properties, so it is recommended for use in buildings with a residential basement.
Due to the absence of pores, porcelain stoneware does not allow moisture to pass through and is not afraid of flooding, which allows it to be used for finishing foundations in regions with high humidity and snowy winters. And resistance to temperature changes makes this material ideal for regions with hot summers and frosty winters.
Finishing with ceramic granite will also be required if you need to give the building a presentable, beautiful appearance.
As a rule, ceramic granite is used for finishing ventilated facades of industrial and public buildings. In low-rise buildings it is often used for cladding walls, terraces, steps, and floors.
Preparing the base
The condition of the base for the tile material determines the quality of the work and affects the service life of the facing finish. The surface of the base is leveled; the small thickness of the finish will not allow you to hide the significant relief of the base; the resulting facing layer will be uneven.
Surface preparation begins with inspection, identifying problem areas with protrusions, greasy spots, cracks, paint residues, and depressions. Then, existing contaminants are removed and the base is leveled with building solutions. To prepare the surface, a reinforcing mesh can be used; when installing additional hydro- and thermal insulation, the installation of a mesh is mandatory. Reinforcement will provide additional mechanical adhesion to the base and neighboring elements.
After the leveling layer has dried, 2-3 layers of primer are applied to the prepared surface at time intervals and allowed to soak in. After the work has been done, the base is ready for installation of the cladding.
If a frame system is provided to protect the base, preparation consists of arranging the sheathing frame. You can take metal profiles or wooden beams. Profiles are selected from stainless steel, aluminum, coated with an anti-corrosion layer of ordinary metal. Wood is used for small areas of the base surface for laying lightweight types of tiles. Wooden elements are treated with water-repellent compounds and fire retardants (for fire protection).
With frame protection of the base, the requirements for the flatness of the working surface are reduced; height differences and minor defects will be hidden during the cladding process.
Frame structure
Holes are made in the base material to install the brackets. Then the bracket is pressed against the wall, and then a plastic dowel is inserted. You need to screw a screw into it. If desired, the master can use fasteners with variable length. This will help level out surface imperfections.
When arranging the frame, at the next stage you will need to fix the supporting profiles using self-tapping screws. They are installed on brackets. If the technology provides for the presence of insulation, it is inserted into the frame cells at the next stage. You can use mineral wool or basalt wool.
Glue is applied to the reverse side of the canvas and to the surface of the base. Additionally, the plates are fixed with mechanical fasteners - dowels. When installing a ventilated façade, the wall and plinth must be covered with a wind and vapor barrier. The latter allows steam to pass from inside the premises to the outside, but does not allow moisture to penetrate into the thickness of the thermal insulation. When all the layers on top of the insulation have been spread and strengthened, you can proceed to installing the cladding. This must be done using clamps.
Useful properties of porcelain stoneware
As a facing material, porcelain stoneware for plinths is not found in natural conditions, but is produced artificially. It is based on various types of clay, as well as granite chips and some minerals. As a result of the complex technology of pressing all components, their subsequent drying and high-temperature firing, it is possible to create a cladding material that is homogeneous in structure and durable. Limited additives in the form of oxides of various metals make it possible to give porcelain stoneware a wide range of color shades. It is enough to look at how varied in color the facades of photo porcelain stoneware houses are in order to appreciate the aesthetic appeal of this material.
Useful properties that make this artificial material ideal for cladding a porcelain stoneware house:
If the base is faced with porcelain stoneware, then you can be sure that such material is able to withstand numerous cycles of changing summer and winter temperatures without any damage. It is not afraid of freezing, since its dense structure has virtually no pores into which moisture could enter. But cracking of the facing material in the cold occurs precisely because water droplets, turning into ice, provoke the occurrence of cracks.
Features, pros and cons of ceramic granite
Porcelain stoneware is not a natural facing material, as it cannot be found in nature. This composition is produced artificially at enterprises. To obtain it, raw materials such as white clay, water, flux and fine-grained quartz sand are used. Under the influence of high temperatures and pressure, very resistant and durable porcelain stoneware is obtained.
The material obtained a wide range of color shades by adding different pigment components, as well as structural compositions. First of all, this includes wood and stone. Thus, during the creation of the project, specialists will be able to emphasize even the most daring design decision.
The main advantages of porcelain stoneware include the following:
- Harmlessness of all constituent elements.
- High strength.
- Ability to withstand high temperatures.
- Resistance to mechanical damage and moisture penetration.
- If a fire occurs, this material will not ignite.
After covering the base with porcelain stoneware, the home owner can be sure that moisture that has penetrated inside the facing material will cause cracks there during the cold season: the monolithic structure will prevent this possibility. In addition, porcelain stoneware can provide a constant temperature in the house.
In this video we will look at how to cladding a basement floor with granite:
Or maybe on your own
As you can understand, installing suspended facades made of porcelain stoneware is a rather labor-intensive process, technologically complex, requiring certain skills and knowledge from the performer.
How many tools will be needed to implement it? At the first stage - a level, a laser level and a tape measure, which is the most accessible and cheapest tool on this list, indelible paint (although oil paint will do). At subsequent stages - an electric drill, a device for fastening rivets, a screwdriver, a hammer drill.
So the question is not about the tool; every normal home owner has such a set. The main thing is that, due to inexperience, you will have to spend much more time than professionals will need, as well as the help of a friend or comrade, since somewhere you need to support this or that structural element and the like.
So the question is: Is it better to make Porcelain Ventilated Facade yourself or trust the professionals? — the answer suggests itself.
Preparatory work
To prepare the surface for laying porcelain tiles, cement or concrete mortar is usually used. Their main difference is that sand is not added to the cement mortar, and after drying this composition will be very smooth and characterized by high reliability and strength.
Only purified sand is usually added to the concrete solution. Some people think that this negatively affects the density and strength of the material, but this is not at all true. When choosing a particular composition, first of all you should pay attention to the size of the base and the height of the building. Experts know that if a house is recently built, shrinkage will occur over a period of time.
In this case, the most correct option would be to use cement mortar. But if you are working on a project that is already established, you can use concrete mortar. Each person can prepare both the first and second compositions independently. To do this, you should first prepare a container and several tools to help mix the solution, but this is only if you do not have a concrete mixer.
Possible errors during the installation process
Inexperienced craftsmen often make mistakes in the process of laying clinker tiles on the base. If you avoid them, you can get a durable and beautiful cladding.
The most common mistakes:
- applying too much glue;
- non-compliance with temperature conditions during laying;
- lack of checking the evenness of the rows;
- slowness when removing the adhesive solution;
- improper preparation of the solution.
If you apply too much glue to the wall, you may not have time to put the clinker on the base and the composition will harden. It will not adhere to the next portion of glue, which will lead to a violation of the technology. To avoid making a mistake, you can apply glue to the clinker tiles themselves, and not to the wall.
During work, it is necessary to observe the temperature and humidity conditions: masonry should not be carried out in rain or bad weather. After each odd row, it is recommended to check the horizontal lines. A stretched string or a building level will help here.
How to care for the facade
The process of caring for a granite facade is extremely simple. To maintain an attractive appearance you must:
- wipe the surface with a solution of water and soap;
- treat the façade and plinth with water- and dust-repellent compounds;
- additionally cover the surface with polish, having previously sanded it, which will help give it shine.
It is important to monitor the vegetation adjacent to the structure, as some types of trees can leave resin marks on porcelain stoneware.
Timely maintenance
The base, finished with ceramic granite, is distinguished by its durability and reliable protection. In addition, this cladding looks rich and beautiful. If you need to completely cover the entire facade, then it is better to turn to professionals, but you can handle the cladding of the basement part on your own if you strictly follow the technology and recommendations of specialists.