What is it for?
Boxes can be used for the following purposes:
- as organizers (for example, sort documents and so on);
- put things in them that are not used every day (for example, New Year's toys);
- as gift packaging (to give gifts in them for which factory packaging is not provided).
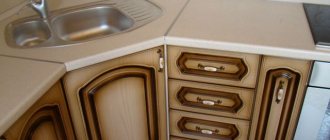
Most often, hard packaging is used for shoes that have already been worn out and disposed of, household appliances, and so on. By and large, any packaging can be used. But to make everything look neat and orderly, the box should be decorated.
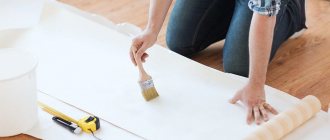
The simplest and most budget-friendly way to decorate is to cover the box with paper. And there are a lot of options and methods.
What paper is suitable for lining a box?
To transform a cardboard box, you can take absolutely any paper. Anything suitable for this purpose:
- colored paper;
- gift;
- paper for decoupage and crafting;
- self-adhesive paper;
- wallpaper (vinyl, paper, non-woven, textile, etc.);
- napkins and much more.
What tools and materials are still needed?
In addition to paper and the cardboard box itself, you need the following tools and materials:
- scissors and/or stationery knife;
- ruler;
- pencil.
Depending on the type of paper you will use to decorate the boxes, you will need to stock up on:
- double tape;
- PVA glue;
- glue gun;
- wallpaper glue (sometimes depending on the type);
- glue brush.
The easiest way
A master class showing how to cover a box with paper can be seen in the photo provided.
- Unroll the paper roll and place your box on it.
- Measure how much material you need so that it completely covers the bottom of the box, its walls and bends slightly inward (Illustration 1). This can also be done using a ruler. To do this, measure the height and width of the box and measure on the sheet a length equal to these parameters plus another width and plus six to ten centimeters for the bend.
- Cut out the desired piece of paper (Illustration 2).
- Place the box in the center of the cut out piece of paper and cut out the excess pieces at the corners (Illustration 3).
- Cut four small pieces of paper and glue them to the corners of the box (Illustration 4).
- Now coat the walls with glue and glue the paper (Illustration 5).
- Coat the inside of the box and wrap the paper (Illustration 6).
- Cover the lid in the same way.
- Let the box dry.
All is ready! Now you can use the box as you wish.
Tip: Don't use too much glue or the paper may warp and ruin the whole look.
How to weave a bottom
In the article we looked at how to weave a box based on two cardboard rectangles. Let's find out how to make the whole craft with weaving.
The bottom can be made in different ways. The photo below shows how it is woven from bundles consisting of 4 tubes. You need to prepare free space on the table and lay out two bunches horizontally, that is, from left to right. Then lay out 4 vertical beams as follows:
- The first pack is laid out on top of the horizontal one and then pushed under the bottom of the second horizontal pack of tubes.
- The next one is done in a checkerboard pattern in reverse, that is, it first goes around the first bundle from below, then the tubes pass over the top.
- The same movement is performed with the remaining two beams.
Some craftsmen press down the base, for example, with a three-liter glass jar of water. Then they take an additional tube, the edge of which is braided a couple of times around one of the packs and attached to the bottom with PVA glue.
- Weaving is done on the sides of four tubes at once, and at the corners the pack is divided in half, and the tubes are braided separately in pairs. However, here simple zigzag movements are no longer performed, but the pack is wrapped around a circle, that is, the element goes around the pack from above, the next one from below, then the tube is brought out and goes around the same pack on top.
- Next, the tube is inserted into the hole between the first and second packs and is pulled along the bottom side to the third part.
- Such movements are repeated until the very end.
The second way to decorate with paper
Here is another instruction on how to cover a box with paper:
- Place the bottom of the box on the selected paper and trace it (Illustration 1).
- Cut out the bottom piece so that there is a margin of two to three centimeters on each side (Illustration 2).
- Glue the part to the bottom of the box and fold up the protruding edges (illustrations 3 and 4).
- Place one side on the paper and outline it. Cut out the part with a margin of a few centimeters on all sides. Glue the paper to one of the sides (illustrations 5 and 6).
- Carefully fold the edges of the paper (to the bottom, to the sides and inward). If necessary, make small cuts (Figure 7).
- Cover all sides of the box in the same way (Illustrations 8 and 9).
- You can paint the inside of the boxes with a suitable color paint. It is better to use acrylic (Illustration 10).
- Let the glue and paint dry completely.
The decorated box is ready!
Beginning of work
The actual weaving begins after all the tubes are raised up at right angles to the base of the box. Using an additional element rolled from newspaper, weaving is carried out in a zigzag manner. To do this, one tube is bent around the outside, the next one - inside the box. The beginning of the weaving is fixed on PVA.
As you understand, one tube, of course, is not enough. Therefore, it needs to be increased. This is done as follows:
- the edge of the additional tube is lubricated with glue;
- the used part is turned horizontally and held straight with your fingers;
- insert the next one with glue inside the first part;
- tightly insert one into the other one centimeter;
- Press the joint with your fingers until it dries completely, and zigzag progress continues.
When the weaving material lengthens, you can insert a tube of a different color, then a stripe will appear on the product. A multi-colored box with several (2-3) stripes will look beautiful.
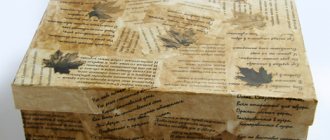
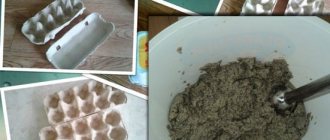
Decoupage technique for decorating cardboard packaging
Some people are in a hurry to throw away not only shoes, boots and other footwear that they have taken down, but also the box from under it. But if you cover a shoebox with paper, it will be transformed and become an irreplaceable thing. It can be used as a box or a place to store various little things that tend to get lost.
The master class will show you how to cover a box with paper using the decoupage technique:
- Take a clean shoebox and remove tape and other stickers from it.
- Take two shades of paint (preferably acrylic) and cover the sides and lid of your box. Paint the sides black and the top white.
- Make a frame on the lid using the same color as the sides of the box. To do this, step back a few centimeters from the edge of the top and stick on a square of masking tape. Cover the indents with black. After this, remove the tape. As a result, you have a frame for a white square in the middle with smooth edges.
- Choose a suitable picture. It can be depicted on a napkin, plain paper, wallpaper, and so on.
- Cut out the picture and put it in the water.
- Then take the picture out of the water, place it on a piece of oilcloth (an A4 file is perfect for this purpose) face down, and blot the top several times with a cotton or paper towel to remove excess moisture.
- Cover the picture with PVA glue or decoupage glue.
- Also coat the lid where the picture will be glued with glue.
- Transfer the oilcloth with the image to the lid. To do this, simply turn the picture over and straighten it with your fingers.
- Carefully remove the oilcloth.
- When the picture is dry, the entire cover should be coated with acrylic varnish.
- To prevent the borders of the picture from being too prominent and conspicuous, apply white paint to the edges of the image and gently blend it with a large brush or sponge (you can take a piece of foam rubber).
- To make the picture look harmonious, you can additionally add some touches with acrylic paint (for example, shadows and highlights, background).
- When you are done with the background and image, coat the entire surface of the box lid with varnish.
- Decorate the walls if desired.
When everything is dry, the box can be used.
Conclusion
Before you cover a box with wallpaper and paper, or cover it with fabric, it is advisable to thoroughly study more than one master class. Any instruction is additional knowledge. In addition, it is necessary to take into account that for the first time it is advisable to practice working with boxes of simpler shapes (square and rectangular). Only after this will you be able to confidently decorate more complex options.
Be that as it may, with the proper skill and careful attitude, you can make an excellent gift for your friends or relatives. Besides the fact that the price of such a gift will be very small (since it uses free material - an old box), in addition to this, you will be able to create a truly unique thing, one of a kind.
Examples of photos (click to enlarge):
Guys, we put our hearts into Bright Side. Thank you for revealing this beauty. Thanks for the inspiration and goosebumps. Join us on Facebook and VKontakte
There are empty boxes in every home. Having freed ourselves from valuable contents, we usually send them straight to the shelf with other unnecessary gizmos or throw them away altogether. But there's no need to rush. All of them can easily turn into useful and pleasing to the eye gizmos.
Bright Side is sharing a selection of items that you can easily make at home.
Picnic basket
By attaching handles and decorating with fabric, you will get a box in which it is quite convenient to carry cutlery and treats for a summer picnic. Read more about this here.
Cosmetics storage box
By connecting together the boxes that are left over from new shoes, you will become the owner of a fashionable box where you can store anything you want. Find out how to do this here.
Projector
To watch photos and videos from your phone in large format, get a shoebox projector and a magnifying glass. Instructions here.
Sheets with mulberry fibers: how to cover a box with paper?
Master class on gluing a box with mulberry leaves:
- Mulberry paper has a number of features that should be taken into account when working with it. The most important thing is that the material is very thin. Therefore, if you are decorating not a single-color surface, but with different images, then you need to cover it all with paint.
- When the paint is dry, cover the surface with PVA or decoupage glue.
- Tear the mulberry paper into pieces of different sizes and cover the box with them.
- If you want, additionally decorate the surface using the decoupage technique with napkins or other pictures. This should be done after the mulberry paper layer is completely dry.
- Finally, you need to cover the box with a layer of varnish.
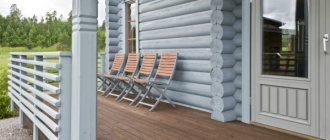
This box looks antique and will fit perfectly into any interior.
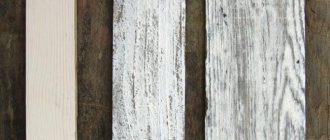
How to decorate
You can decorate the boxes with all kinds of available materials:
- fabric, ribbons, colored threads;
- lace, crocheted, knitted;
- straw, rope;
- jute cord, burlap;
- napkins for decoupage;
- seeds, plant twigs, dried flowers coated with varnish;
- pebbles, shells;
- colored electrical tape;
- photographs, stickers;
- using hand painting with paints and markers.
It looks interesting to decorate the top of a round hat box with one or two fans attached to it using double-sided tape or a stapler.
Simple plain boxes, when there are many of the same type, are decorated with stickers with a photo of the contents.
Decoupage
A box with a lid, decorated with decoupage, looks very festive. It is completely covered with decoupage napkins, only on top, or individual details are cut out from them - pictures, letters, inscriptions, figures.
The item will fit well into the following styles:
- vintage;
- classical;
- country.
To work you will need:
- base – box made of cardboard, plastic;
- decorative three-layer napkins for decoupage;
- PVA glue;
- acrylic varnish, paints;
- tassels;
- decorative beads, seed beads, sequins.
The necessary fragments are cut out of the napkin, the box is covered with white acrylic, and dried. Pieces of napkins are placed on the pre-carefully spread glue, and the top is also covered with PVA glue. When everything is dry, empty spaces and the edges of napkins are painted over with acrylic paint, varnished, and the structure is dried again. Afterwards, you can glue any decor - beads, sparkles, beautiful buttons, decorative insects or leaves with Velcro. This box is convenient for storing jewelry, buttons, rubber bands, and hair clips. It will fit perfectly into the living room interior, children's room, bedroom, and will become a holiday decoration.
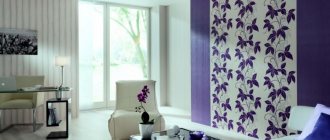
Decoration with fabrics
For covering with fabric, choose boxes that are strong enough that they will not deform during decoration or subsequent storage. The fabric is cut to the size of the box with allowances of up to two centimeters, and attached with colorless glue or double-sided tape. The lid is decorated in the same way, if you sew a piece of decorative tape, strap, or braid onto it, you will get a handle by which the lid can be removed.
You can make a two-layer box almost entirely out of fabric, placing sheets of cardboard and a special plastic canvas between the two layers of fabric for rigidity. Pockets or dividing fabric strips are pre-sewn inside. The lid is attached with Velcro, zipper, and buttons.Is it possible to decorate a box of a different shape?
How to cover a round box with paper:
- Place the box on a piece of paper and outline its bottom.
- Cut out two of these circles.
- Then cut a rectangular strip. Its height should be equal to the height of the sides of the box plus four extra centimeters.
- Cover a rectangular piece of paper and the sides of the box with glue.
- Step by step glue the rectangle to the side so that it extends beyond the edges from the bottom and top.
- Make cuts all the way around the exposed edges of the paper and fold them over the box.
- Glue the cut out circles to the bottom and lid of the round box.
The decor is complete.
Tips and tricks for covering boxes with paper
- How to cover a box with colored paper if there is no other paper? These sheets can be used to decorate cardboard packaging in two ways: as usual or using the decoupage technique.
- To cover a box with wallpaper, use special wallpaper glue. This way you will be sure that the paper will not move away from the walls over time.
- How to cover a box with gift paper or corrugated paper? Such leaves are very thin, and tearing them, as is the case with mulberries, is not recommended. This decor does not look very nice and neat. In this case, it is better to take thin double-sided tape and stick it around the entire perimeter of the box. Then the protective layer is removed from it, on which the paper is applied. This way the entire box is gradually covered.
- How to properly cover a box with paper so that it does not delaminate? To do this, you need to select the appropriate glue and carefully glue the sheets to the surface. Then the craft must be dried well.
What you will need
So, let's start our master class and learn how to beautifully decorate a cardboard box for gifts, both outside and inside. What materials and tools will be needed for work? Here's a short list of everything you might need when decorating a box with wallpaper:
Of course, you need to choose a box that will become the basis for creating a beautiful decoration. One of the main conditions is the strength of the material. It is desirable that the walls of the box are thick, and the corners and joints are connected by reinforcing elements. Packaging from small appliances, for example, an electric kettle, shoes, etc., is quite suitable.
Attention! Despite the fact that a significant part of the packaging boxes from modern technology are made of corrugated cardboard, this material is very suitable. The only condition for its use is that before gluing it is recommended to additionally glue the edges of the box so that they are not damaged in the future.