The installation of a vapor barrier is an important stage in construction necessary to protect against the effects of water vapor on the insulation. The absence of such a layer during sudden temperature changes contributes to the deterioration of the characteristics of most building materials and a reduction in their service life. Moisture ingress also causes mold to appear on them.
Vapor barrier is installed using a variety of materials both from the outside and from the inside of the house. During installation, compliance with technology is required, as well as rules on which the quality of the finished work directly depends.
The principle of operation of vapor barrier in general
The main task is to create an obstacle to the permeability of vapors. Thanks to this property, the walls are protected from destruction from accumulated moisture (condensation). But the very definition of “vapor barrier” does not mean that the film creates a barrier and completely interferes with the circulation of steam. Modern materials are aimed at providing a slight air flow to eliminate the greenhouse effect in the house itself.
The best manufacturers
To purchase high-quality building materials, you need to focus, among other things, on the manufacturer. Choosing a reliable and trusted supplier will help you avoid possible problems. Let's look at the two most famous ones.
Where vapor barrier is needed
There is a category of premises where installing a vapor barrier is a mandatory measure. Such cases include the following:
- Premises with high temperatures and high air humidity, in particular baths and basements;
- The use of materials that become wet due to high humidity and lose all the characteristics declared by the manufacturer, deteriorating over time, for example, glass wool and mineral wool;
- In the construction of multilayer walls of frame houses, since condensation is likely to occur between the layers;
- When installing ventilated facades, in this option the vapor barrier makes the air flow weaker, protecting the insulation from excessive load, for example, a brick wall with cotton insulation and sheathed with siding.
Let's sum it up
A wall vapor barrier is always needed if the structure is insulated. This is necessary to avoid moisture condensation inside the insulation cake.
How to make a vapor barrier:
- If the house is insulated from the outside, the vapor barrier is attached directly to the wall on one side. If there is interior decoration, it will be from the inside. If not, then on the outside of the wall.
- When insulating a house from the inside, a vapor barrier is always mounted on the wall from the inside. But in this case, it is extremely important that it fits tightly to the surface and is airtight.
Polyethylene
Traditionally available material with a thickness of only 1 mm. It should be fastened with concentration and care to prevent excessive tension, which could damage the film due to temperature changes.
There are several types of film protection:
- Perforated with small vapor-permeable holes;
- Non-perforated.
In the absence of perforation, along with steam, the flow of air is also limited, which affects the acceptable microclimate in the room. Polyethylene is practically not used at present, as there are more modern materials.
What is dew point
The dew point is the temperature of the air at which the vapor it contains reaches a state of saturation and begins to condense into dew. Therefore, when it cools, the “excess” gaseous moisture turns into liquid, or condensate.
Note! At t° = +20°C and relative humidity of 100%, one cubic meter of air contains 17.3 grams of vaporous moisture. At t° = -10°C, and the same relative humidity, the moisture content decreases to 2.3 grams. That is, with a given cooling of this air, 15 grams of condensate are formed from one cubic meter.
Membrane films
The base of the vapor barrier membrane is polypropylene, with fiberglass mesh. The rough surface of the film creates a barrier that does not allow moisture to pass into both the wall and the insulation.
Due to the fact that the membrane is multi-layered, it stops not only the permeability of moisture, but also allows a small amount of air to pass inside.
Advantages:
- Can be used for wooden and frame houses;
- No need to create an air gap;
- Easy installation;
- Strength;
- Resistance to an increase in the number of mold microorganisms on the surface of the walls;
- Resistance to putrefactive processes;
- The material is harmless to humans;
- Extended service life - the film retains the original properties declared by the manufacturers for 50 years;
- Large temperature coverage during operation (from -60 to +80 °C);
- The presence of types of membranes reinforced with a layer of foil, which will reflect the heat coming from the house.
Advantages and disadvantages
Today there are a huge number of varieties of vapor barrier membranes and films. Of course, some have more advantages, others less. However, there are advantages inherent in absolutely every type.
For example, all modern films and membranes are known:
- safety and environmental friendliness;
- functionality and practicality;
- resistance to the harmful effects of climatic factors;
- resisting the destructive effects of chemical influences;
- resistance to the harmful effects of reasonable mechanical actions;
- invulnerability to the negative influence of biological factors;
- simple installation.
The disadvantage is the fear of fire, that is, the material burns.
Thus, dear friends, vapor barrier can solve a number of problems associated with the construction of a particular object, regardless of its properties and purpose.
How to install a vapor barrier on a wall
This type of installation is often used if mineral materials are used as thermal insulation. As a result, a multilayer structure appears, consisting of such layers as:
- External cladding;
- Windproofing;
- Insulation;
- Frame;
- Vapor barrier;
- Interior decoration.
Attention! It is strictly forbidden to attach a vapor barrier to both sides of the insulation at once - this leads to the formation of condensation due to a violation of the natural insulation.
The correct order guarantees a long service life of the insulation and the house as a whole. The process consists of several stages:
- Installing the film and securing it to the sheathing;
- Sizing of formed cracks, overlaps and puncture sites;
- Installation of sheathing using beams to provide ventilation;
- Sheathing with finishing materials, such as plasterboard or panels.
Which side to attach the vapor barrier to the insulation
If both surfaces of the material are the same, then it does not matter which side to attach the vapor barrier material - this will not affect the protective function. If one of them is rough, then it should be the one that “faces” the house; thanks to such a surface, droplets of condensation are retained.
The foil membrane fixes the shiny surface inside the room - this helps retain heat in the room.
Film materials - smooth side to the insulation.
Preparatory work
Before installing the insulating layer, you should select a material taking into account the characteristics of its installation process. For example, when working in a wooden house, all materials must undergo protective treatment with antiseptic agents and fire retardants.
Before attaching the vapor barrier to the insulation layer of the internal walls, dismantling work should be carried out to clean the surfaces from the remnants of previous finishing materials. Cleaned natural wood surfaces are treated with compounds to prevent burning and rotting. Concrete or block buildings should also be treated with a deep penetration antiseptic compound.
When insulating brick walls from the outside, it is recommended to carefully eliminate all cracks and cracks. And after this, treat the surfaces with an antiseptic solution. Only on completely cleaned surfaces can leveling mixtures be applied and a vapor barrier coating system installed.
Ceiling vapor barrier
For the ceiling, you can also use materials with foil surfaces. They are laid with the heat-reflecting side inside the room for better heat retention. Fastenings are made using nails with wide heads, and the joints are additionally insulated with tape.
It is necessary to lay a layer of vapor barrier on the ceiling on laid layers or rolls of insulation, previously laid in the spaces between the joists and rafters. If the thickness of such insulation is equal to the height of the logs, it may be necessary to install a slatted counter-lattice to maintain a constant level of ventilation. In this case, you need to fasten it correctly: with a slight overlap on the walls around the perimeter. Particular attention should be paid to the corners: we fix the film with an overlap and tightly.
Roof vapor barrier
It is better to choose a membrane film for the roof. How to properly install such a vapor barrier? Place the smooth side on the insulation. To prevent steam particles from penetrating through the mounting holes, it is recommended to fasten the insulation directly to the wooden beams with a staple gun. This ensures the tightest possible fit. Therefore, perforated films are not used for vapor barrier of roofs and ceilings.
There are films with an anti-condensation coating that are placed under materials susceptible to rust (galvanized steel, corrugated sheets or metal tiles). This film can protect metal surfaces from moisture droplets. Such materials are laid with the fabric side down at a short distance from the layer of mineral wool or any other insulation. It is possible to lay two layers of film with anti-condensation treatment.
External vapor barrier of the walls of the house is necessary to combat atmospheric moisture, which can destroy the insulating material. It is important to make a double vapor barrier layer of insulation. This will cover all the joints of the sheets and provide more reliable protection from steam and unnecessary moisture.
How is vapor barrier attached?
Fixation is done in several ways:
- Nails with wide heads;
- Construction stapler;
- A lathing of wooden sticks at a certain distance.
Izospan
A domestic manufacturer whose products meet all international standards. Produces 3 types of products:
Izospan C. Two-layer film, one side of which is slightly rough. It retains excess moisture, facilitating its effective evaporation. It is laid on the other side, which is smoother. Well suited as a vapor barrier for roofing.
Izospan B. Differs from the previous one in that it is more suitable for protecting walls.
Izospan D. Universal film equipped with an anti-condensation coating. It has increased strength, thanks to which it can be used as a temporary roof and cladding of external walls.
Vapor barrier of frame structures
A layer of vapor barrier in a frame house may not be needed. This happens when using such insulation - ecowool, polyurethane foam, polystyrene foam, and provided that an effective ventilation system is created.
If the need for installation does arise, then one of the two schemes given below is used. It is chosen based on the expected intensity of use of the premises in a certain season:
1 scheme:
- The vapor barrier is attached to the frame posts;
- The walls are covered with clapboard, plasterboard or other interior finishing materials.
This method is used in buildings for the warm season, without being in them during the cold season. For example, a dacha, a workshop, a summer guest house.
2 scheme:
- Installation of horizontal or vertical sheathing located 30-50 mm from the wall to create an air gap;
- Fastening the membrane under the sheathing side exclusively indoors when using a construction stapler;
- Taping the joints with construction tape.
The scope of application of this method is for buildings with active use in the winter season.
Content
Most modern standard thermal insulation mineral wool materials are capable of fully protecting housing only in a dry state. Therefore, it becomes important to take into account the dew point, and, if necessary, provide additional vapor barrier for the room. The dew point is the point where warm and cold air touch and the result is condensation of water vapor. If condensation occurs inside the insulation, its characteristics will be significantly deteriorated, even to the point of destruction of the material. Therefore, let's take a closer look at how to avoid this, what a vapor barrier is, why it is needed and how to install it.
Vapor barrier in wooden houses
Wood is a material that requires mandatory vapor protection due to the passage of air and the absorption of excess moisture, which causes its swelling.
Since logs shrink during the first 5 years, when installing a vapor barrier, you must adhere to the following rules:
- Before using laminated veneer lumber, it must be dried as best as possible;
- There should be grooves on the timber so that over time, during drying, the material becomes compacted to minimize the formation of steam.
If shrinkage has occurred for less than 5 years, then membranes of the type “Izospan B”, “Izospan FB”, “Izospan FS” are used.
Vapor barrier installation on the outside of a wooden house
The sequence is:
- The vapor barrier layer is laid directly on the wall;
- A sheathing made of beams or metal profiles is installed;
- Thermal insulation material is placed in the cells of the sheathing;
- Finishing in the form of siding and other types of materials.
This method is suitable for rectangular timber.
Vapor barrier device inside a wooden house
The method of installing a vapor barrier from the inside of a room is suitable for preserving the appearance of a wooden house. Produced in the following sequence:
- Insulation is laid between the wooden beams;
- The vapor barrier film is attached to the sheathing using a special stapler;
- After fastening, seal the membrane joints with mounting tape;
- The interior decoration of the room is installed on the vapor barrier layer.
This technology is used when using cylindrical timber.
General rules for installing a vapor barrier film for a wooden house:
The film is stretched tightly without sagging, overlapping by about 10 cm. To connect them together, adhesive tapes are used.
Types of vapor barrier materials
The material for wall insulation is selected for a specific object and its design features. Therefore, talking about universal options is biased.
In the range of options offered, you can choose either rolled or liquid materials. They differ in composition and purpose:
- mastic is a bitumen-polymer base that is applied to surfaces, creating a protective layer. It is used for wooden, brick and concrete buildings. It is recommended to apply it in two layers to dry surfaces. The advantage of this material is the ability to use it immediately after purchase. The service life of such an insulating layer reaches 25 years while maintaining its vapor barrier functions;
- membranes have a number of advantages over other materials: they protect external walls and go well with clapboard or siding. The main condition for installing such a film is a tight fit to the insulation and its reliable fixation. The most popular membrane options: Izospan FD, FS, FX (used in saunas, baths and bathrooms) and “Megaizol B” with an “anti-condensation” surface. They are produced for various purposes, so it is important to pay attention to this factor when purchasing. Izospan is usually used for interior wall decoration;
- vapor barrier film of minimal thickness (less than 0.1 mm) is considered the most popular, since it is not perforated and does not allow air to pass through. It is suitable for organizing micro-ventilation of walls and insulating material, for partial removal of condensate and for creating a vapor barrier in damp rooms;
- Liquid rubber is produced in the form of a bitumen-polymer product that creates a covering that exactly follows the surface topography. It does not allow moisture to pass through, but provides hydro- and thermal insulation. There are several types of liquid rubber: emulsion for application by machine (usually used on the floor) and for manual application. These are materials used to protect the foundation from the street.
The choice of materials is huge, so it is up to the owner to decide which vapor barrier to choose for the walls of a brick or frame house, inside and out.
Installation features
The variety of vapor barrier materials implies differences in fastening. Detailed instructions are provided on the packaging; if it is not there or is difficult to understand, then there are two general rules:
- The light side (provided that the material is colored) must be applied to the heat-insulating layer.
- If the vapor barrier is rolled up, then the inside side is placed on the insulation.
We will also consider the features of laying popular materials:
- polyethylene - have the same structure on both sides, so during installation you don’t have to worry about the issue;
- polypropylene - rough on one side and glossy on the other, which must be placed on the insulation, while leaving space for air circulation;
Rules for laying polypropylene vapor barrier.
Selecting the side of the location
- membrane - also the smooth side must be in contact with the heat-insulating layer;
- foil - the shiny side is placed on the insulation.
For flat roof
Reference. Despite the wide choice of materials, owners of buildings with a flat roof continue to use roofing felt or glassine when carrying out vapor barrier work, since they are cheap, although their service life is several years.
Installation of vapor barrier begins after the thermal insulation layer is laid. The process is quite simple, it only involves two steps:
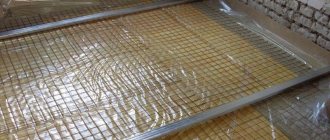
- At the first stage, vapor barrier sheets are laid overlapping in increments of 10 cm. They are connected to each other with construction tape, and attached to the supporting structures with a stapler or flat-head galvanized nails.
- On the second, horizontal bars are attached at a distance of 50 cm from each other. They not only fix the vapor barrier material, but also contribute to the formation of a layer of air between it and the interior decoration, which is necessary so that the condensate that appears can be quickly removed.
Visual representation of step-by-step instructions
For pitched roof
Before laying vapor barrier materials, it is necessary to check that the insulation laid between the rafters does not have any flaws on the surface, and that the beams intended for sheathing have been treated with antifungal agents. After this, you can begin installing the vapor barrier.
Reference. The required amount of vapor barrier film is calculated using the formula: surface area + 15%.
Main stages:
- A sheathing is nailed to the lower part of the rafters, onto which double-sided tape is attached, and a vapor barrier is laid on it, with a slight tension, and fixed along the edges with a stapler.
- Then the protective layer is removed from the tape and the material is glued to the sheathing.
- After 15 cm, the next part of the adhesive tape is glued and overlapped. In this case, it is necessary to ensure that the vapor barrier is straightened and has no defects. Otherwise, it must be replaced.
- This way all the material is laid out. The ridge is covered with a solid piece of canvas, but it is necessary to avoid the joint at the corner in order to create an overlap. And then the other side of the roof is covered.
- After the material is laid, it is secured at the edges with bars with a cross-section of 30x50 mm, which allows creating a gap for ventilation.
- Next, the sheathing is mounted and secured with self-tapping screws.
- And at the last stage, the roofing is installed, making sure that there is air circulation, especially near the ridge or eaves.
Schematic representation of vapor barrier installation
In places of engineering holes and protrusions
Next, we will consider the nuances of installation at the junction of the vapor barrier:
- for hatches, attics, and other passages - use a vapor barrier apron or 2-sided butyl tape;
- to ventilation pipes - the material is rolled up and attached with tape from the inside;
External view of attaching the vapor barrier to the pipe
- to window openings - decorative trim is attached to the top, otherwise the vapor barrier will quickly begin to deteriorate under the influence of sunlight;
- for walls with a rough surface - instead of adhesive tape, special mixtures (acrylic or polyurethane) are used.
Important. To create a good indoor microclimate, it is necessary to carefully fix the material on the rafter legs, valley, and crossbars.
We hope that our review of the main materials, advice on their selection, as well as a step-by-step analysis of installation will be useful to you and will allow you to carry out all the work without the involvement of specialists.
Briefly about the main thing
The vapor barrier film is designed to form a monolithic barrier that will prevent the passage of vapors into the protected insulation or structure.
The main materials for the production of canvases are polyethylene (budget options) or polypropylene.
Materials are distinguished according to various criteria: the number and purpose of layers, functions performed, degree of solidity and smoothness.
Laying of the canvases is carried out on the sheathing, maintaining a ventilation gap to remove moisture.
The solidity of the heat-protective layer is ensured by overlapping the edges by 100-15 mm and sealing all junctions and seams.
Ratings 0