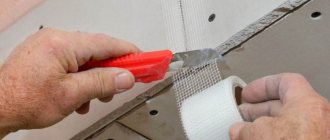
Serpyanka for drywall is a thin mesh tape made of fiberglass. Usually its width ranges from 4.5-23 cm, and it is used to reinforce drywall joints. Not a single large plasterboard structure can do without the use of reinforcing tape at the puttying stage. This tape allows you to avoid cracks in the finishing layer. Paper tape can also be used for these purposes, but we will talk about it a little later.
Why do you need putty joints?
Under the influence of moisture and high temperatures, drywall is subject to certain fluctuations. This is most evident in the weak areas of the plasterboard structure - the joints of the sheets. If you do not use joint tape during the process of filling gypsum board panels, after a while cracks will certainly form on them. At the same time, a special tape product will help prevent damage and facilitate surface leveling.
When installing plasterboard sheets, it is extremely important to seal all seams efficiently. Over time, mistakes made will certainly remind you of themselves and lead to considerable financial expenses. Therefore, the space between gypsum board panels should always be filled with reinforcement.
Puttying drywall seams: video instructions on how to putty
Therefore, both putty and drywall should be chosen from the same manufacturer, thanks to this they will fit well with each other. If, after installing the gypsum boards, a gap appears between them and the floor, such a joint should first be sealed with sealant (elastic tape), and then install a plinth. In such a situation, it is not recommended to seal it with putty, as a sound bridge may form on the sheathing from the floor.
This will increase the noise level in the room, and the putty will crack. Therefore, finally treat the seams with Fugenfinish putty, which has a smaller grain size. Wait until it dries and sand the surface, removing sagging and filling in depressions. To achieve a high-quality surface finish, apply 2 layers of this material, and more if necessary. Pay attention to the temperature column, which should not fall below plus 10˚С.
After sealing the seams, it should remain the same for another 48 hours. 2.5 kg of the mixture should be diluted with 1.9 liters of water, after which they are thoroughly mixed. Complete setting of the solution will occur in half an hour. It should also be noted that the room should not be cold, at least +10˚С.
The unprocessed mixture must be placed on a wooden pallet and stored in a dry room.
Additional information on the topic:
- How to attach clapboard to a plasterboard wall
- Living room interior walls ceiling photo made of plasterboard
- How to screw a self-tapping screw into a plasterboard ceiling
- Laying drywall on walls using glue video
- How to properly attach a profile to a ceiling under plasterboard
How to treat the surface → Room decoration → How to choose the right paint → Surface treatment technologies → Leveling and finishing the walls → Selecting and applying a primer → Removal from the surface → Stretch ceilings and technologies → Reviews and testimonials
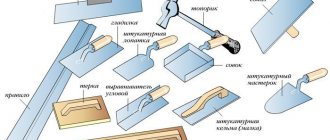
Types of reinforcing tapes
To strengthen the joints of plasterboard sheets, two types of tape products are often used:
- fiberglass;
- paper
Additionally, when finishing seams between drywall, the following tapes can be used:
- non-woven – reinforces corners;
- with metal strips – designed for reinforcing external corners;
- wide made of fiberglass - helps strengthen the junction of drywall and the wall, can have a width of 10 cm or more.
Serpyanka
It is a thin fiberglass mesh with a special adhesive composition on one side. To prevent the glue from drying out, it should be stored wrapped. In cheap products there is no sticky layer at all. They are attached using a construction stapler or laid directly on the putty.
The width of the serpyanka strip is 5 cm, the length of the roll is 20 m or more. This material is extremely easy to install; even beginners can easily handle its installation.
If self-adhesive fiberglass tape was used when sealing the seams, it must be packed in polyethylene after completion of the work. Otherwise, after a while the glue will dry out, causing the material to become unusable.
Important information! It is unacceptable to use serpyanka to reinforce internal corners or transverse joints. It can stretch even under a small layer of putty. In addition, there is a high probability of cracks forming at stressed seams.
Paper
Tape for plasterboard joints is made from durable paper containing transverse and longitudinal fiberglass reinforcement. To make it easier to handle internal corners, it has a special fold. This product is produced in rolls of various lengths with a standard width (5.2 cm).
For beginners, using paper tape is much more difficult than using sickle tape. If there is not enough putty, air will accumulate under it and bubbles will begin to form. To avoid such problems, it is better to use perforated products.
Compared to fiberglass tape, paper tape is considered less convenient to use. But at the same time, it is superior to serpyanka in a number of parameters:
- more affordable;
- the minimum thickness of the material allows it to be used when strengthening completely finished surfaces;
- goes well with putty and drywall, is completely invisible after drying, and provides special strength to the seam.
To improve adhesion to gypsum board panels, roughness is provided on the adhesive side of the paper tape.
Seal the seam with sickle and putty
Method number 1, simpler and less reliable:
- Glue self-adhesive sickle tape onto the seam. Do this from top to bottom, carefully unwinding the roll. smooth the mesh thoroughly.
- If the joint is long, it is more convenient to reinforce it with several pieces so that the tape does not warp. Lay them overlapping, overlapping each other by 1–2 cm. Cut off the excess with scissors.
Be sure to ensure that the tape is positioned symmetrically relative to the seam. If the installation is uneven, its ability to withstand vibrations of drywall fragments is sharply reduced.
- Carefully apply putty to the taped joint, pressing it into the mesh.
- Wait for the mixture to dry (8–12 hours). Then apply a finishing layer to remove any imperfections left when sealing the seam.
- Sand the joint with fine-grit sandpaper.
- Prime the entire surface of the drywall twice with a universal compound. Apply the second layer only when the first one is completely dry.
If the serpyanka does not stick well or lags behind, clings to the spatula or simply does not have an adhesive layer, you need to use a second, more reliable method - installation on putty.
Mr. Build recommends: do not try to glue the serpyanka with PVA glue. Putty does not adhere well to it, and the self-tapping screws that secure the sheet can rust, causing stains to appear on the finish.
- Apply mortar to the joint. The putty layer should protrude slightly beyond the boundaries of the recess, and its width should exceed the size of the tape.
- Unwind the mesh and smooth it with a spatula, gently pressing it into the putty. This must be done carefully so as not to tear the serpyanka and create folds. Excess composition will protrude through the mesh, after which it must be leveled or removed.
- Wait for the solution to dry, then putty again, as in the previous method. Then sand and prime the seam.
Advice from Mr. Build. When installing serpyanka onto putty, all the convenience and simplicity that self-adhesive provides is lost. Therefore, we again recommend abandoning the serpyanka in favor of paper tape. Working with it is not much more difficult, and the result will be better.
After all work is completed, the surface is ready for painting, wallpapering or other finishing.
Proper use of reinforcing tape will avoid the appearance of cracks on the surface of the drywall caused by the displacement of individual elements. If you still decide to choose a serpyanka, a video tutorial will help you understand the technology of working with it.
Self-adhesive reinforcing mesh
In construction, serpyanka is used for sealing small holes, cracks, and processing seams formed by gypsum plasterboard sheets with a thinned edge. Products of many brands demonstrate high tensile strength.
Gluing serpyanka to seams
Serpyanka, in turn, is divided into non-self-adhesive and self-adhesive.
The first option is somewhat cheaper, but the process of sealing seams is more labor-intensive, since they are fastened with special paper clips. When using self-adhesive sickle tape, make sure that the packaging is sealed, otherwise the adhesive layer may dry out.
Conditions for carrying out work
There are a number of certain conditions, the use of which contributes to a positive final result:
- First of all, the temperature inside the room must be observed. This indicator should not be less than +10°C. In addition, the temperature level must be maintained throughout the entire period of work, preventing the possibility of temperature changes.
- Drafts are prohibited. Under no circumstances should windows and doors be opened while sealing joints.
- There are some conditions regarding indoor moisture levels that must be observed. For this reason, you can begin installing drywall and sealing its seams only after completing the pouring of the floor screed, leveling the ceiling and other wet work. This is due to the fact that increased dampness is the reason why the putty will not adhere well enough to the sheets of finishing material.
- Fixing drywall to a metal frame must be carried out in accordance with all rules. If the fastening is not strong enough, peeling of the sheets from the sheathing may occur, which in turn will lead to the formation of cracks at the joints even under light loads. In this situation, neither the serpyanka nor the putty mixture will help.
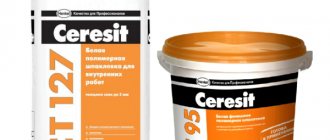
Mixtures for sealing joints in drywall
To reinforce the joint, you should choose the right mixture. The material used must be gypsum based and have good adhesion.
Knauf Fugen - putty produced by specialists for sealing seams between plasterboard sheets. But, sometimes it is used as an adhesive.
Knauf Uniflot is a durable waterproof mixture. After drying, this putty does not absorb moisture, so it is intended for rooms with high humidity. When using putty, reinforcing tape is not needed. The mixture is also used to seal cracks on plasterboard surfaces.
Semin CE78 - “New Formula” is intended for sealing seams in plasterboard construction. It has sufficient strength, does not crack after drying, and reinforces joints well.
JS weber vetonit is a polymer putty for sealing drywall joints. The maximum thickness of applied putty is up to 5mm.
Volma Shov is a non-shrinking putty mixture intended for reinforcing seams and correcting defects on drywall. The thickness of the applied putty is up to 5mm.
Sequence of operations
When sealing joints, they are first cleaned of dust, which can interfere with the adhesion of putty materials. Applying a primer will facilitate good adhesion of the putty to the sheets.
When mixing the mixture, you must adhere to the rules described in the instructions for the work.
Almost any putty for drywall joints is mixed using the same technology.
We prepare the amount of material that will be required to carry out the work within forty minutes. After this period of time, the solution will harden and will be unsuitable for work.
Do not dilute the hardened mixture with water. Even if the required viscosity is obtained, the desired properties of the composition will be lost. This will lead to cracks, peeling surfaces and other unwanted ceiling defects.
Excess mass is removed with a staple. The resulting seams should have an even structure. The surface of the screws is covered with an even layer of putty.
Working with perforated corner-forming tape
Be that as it may, perforated paper tape for drywall was created. The logical interaction of paper tape and the cardboard surface of the plasterboard sheet greatly increases the reinforcing properties of the tape and significantly strengthens the formation of corners and joints.
However, it is worth noting that it is better to use an aluminum perforated corner to form the external corner. It is more durable and really protects the corner from minor impacts.
When working with perforated tape for drywall, as always, there is a different approach. The first one recommended by the manufacturer. Second, from practitioners.
For all manufacturers of perforated reinforcing tape, the recommended method of application is approximately the same.
- Apply a layer of putty to the joint of the sheets;
- From the ceiling to the floor, continuously stick the tape to this layer;
- From top to bottom, slightly holding the tape at the top, press the tape into the putty layer with a narrow spatula. Remove excess putty from the wall with the same spatula;
- Wait until it dries and cover the tape with a second layer of putty;
- After the second drying, you can proceed to sanding the joint.
The second option for working with tape is similar to the first, only before using it, the tape is soaked in a bucket of water. Let me explain the difference between these methods.
The classic (let's call it that) KNAUF-Kurt reinforcing tape contains reinforcing synthetic fibers. They prevent the tape from stretching when the putty absorbs moisture. This prevents the tape from swelling when wet and warping when it dries further. This is exactly the tape that is applied to the putty joint.
Other manufacturers, such as Unibob, do not add synthetic fibers to the tape. As a result, if this tape is not wetted with water before use, it will take water from the putty, get wet unevenly and, as a result, go in waves. That is why the tape is wetted before use.
In addition, for gluing perforated tapes it is better to use special putties for seams. They are less wet and interact better with paper. For example, KNAUF-Fugen putty or Volma Seam.
Laying serpyanka
Most often, such tape is glued to putty, but in some cases it can also be attached to a dry surface.
In the first option, the algorithm of actions will be as follows:
- The putty is mixed. When purchasing, you should choose a special composition intended for processing drywall seams, for example, Knauf Uniflot. You need to prepare the mixture in small portions, this will allow you to use the material before it dries out and deteriorates. The consistency of the finished solution resembles thick sour cream.
- Use a narrow spatula to press the putty into the seam. A thin layer of it should also fall on the drywall on both sides of the seam at a distance slightly greater than the width of the tape.
- The serpyanka is laid from top to bottom, slightly embedded in the putty solution. If you have to fasten several pieces, then their edges are overlapped. The excess is cut off with scissors.
- Using a spatula, embed the tape in the solution, simultaneously smoothing it. Do not put too much pressure on the tool: this can tear the serpyanka. Or wrinkles may form. The mesh should be completely immersed in the putty. At the same time, excess solution is removed.
- You must wait until the composition dries. This will take 8–12 hours.
- A thin finishing layer of the mixture is applied. Its main goal is to remove all minor flaws.
- After drying, the seam is sanded using fine sandpaper. At the next stage, the entire surface is primed and puttyed.
When fastening dry, self-adhesive serpyanka is first mounted on the joint, and then covered with putty solution.
Sealing technology
Before you start processing the joints of plasterboard sheets, they need to be prepared in advance:
- Using a paint knife, make chamfers (if there are none).
- Sand the seams (remove burrs), then clean them thoroughly: preferably blow them with a stream of air.
- Prime the joints. For this, it is best to use an acrylic solution.
Laying serpyanka
In most cases, fiberglass tape is glued to the putty, but sometimes it is laid over a dry base.
When implementing the first option, you must perform the following steps:
- Prepare the putty mixture. You need to mix the solution in small portions so that you have time to fully use the material before it begins to lose its qualities.
- Fill the seams with putty using a narrow spatula.
- Apply a thin layer of the mixture to both sides of the drywall. It is advisable that its width is slightly larger than the size of the tape.
- Lay the serpyanka, starting from the top. When you have to use several pieces of material, their edges must be overlapped. The excess is carefully trimmed with scissors.
- Gently smooth the solution and remove any excess. The mesh should be completely immersed in the putty.
- Wait until the composition is completely dry. This will take about ten hours.
- Apply a finishing layer of putty mixture. Its main purpose is to eliminate minor errors.
- After the material has dried, carefully sand the seam with fine-grained sandpaper.
- The next stage involves applying primer and filling the entire surface.
It is also possible to lay adhesive or regular serpyanka dry. To do this, the material with an adhesive base is glued to the surface, and in the absence of self-adhesive, it is fixed with a stapler along its entire length. A layer of plaster is applied on top, which is then smoothed.
Laying paper tape
It is recommended to use strips of special paper to seal transverse joints. In these areas, it provides much greater strength than serpyanka and helps avoid the appearance of cracks in the future. When attaching a perforated product, you must adhere to the following procedure:
- Fill the prepared seams with putty.
- Apply a layer of homogeneous mixture completely covering the tape. If the composition used contains lumps, it will be impossible to hide them with thin material.
- Place a stretched tape in the middle of the seam, press it into the putty mixture and, starting from the center, smooth it out with a spatula. The pressure on the material should not be strong, but at the same time sufficient for strong adhesion. Do not squeeze out all the putty, otherwise the tape will not be able to stay on the drywall.
Advice! Since the putty mixture dries quite quickly, it should be applied gradually, to small areas of the joint.
When laying reinforcing paper tape, it is extremely important to prevent the formation of air bubbles under the material. Therefore, it is much more convenient to use products with holes through which air subsequently escapes.
Excess putty, squeezed out from under the paper with a spatula, must be removed in a timely manner so that it does not have time to dry out. The finishing layer is applied after the material has dried. Then the putty strip is carefully sanded and the entire surface begins to be puttyed.
After proper treatment of the space between the plasterboard sheets, the plane is finished using the traditional method - plaster mixtures using reinforcing mesh. Subsequently, the resulting base can be finished with any material.
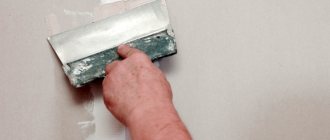
How to reinforce seams with serpyanka
Let us remind you that the joints between the gypsum boards have already been trimmed (chamfered) and puttied once. This was done along with other preparatory work. Now let's look at how to putty drywall seams with tape. A serpyanka 5 cm wide will be quite enough. The length of the skein can be easily calculated by summing up the length of all the joints. You can take a little more in case of defects if you are working with serpyanka for the first time.
The serpyanka should be glued so that its middle runs clearly along the seam. In this case, with its help the greatest effect is achieved. Small displacements will not be critical, but if 70% of the serpyanka is on one side of the seam, and 30% on the other, then the quality of such reinforcement of the seams is in great doubt.
There are two approaches to how to glue serpyanka to drywall. In the first case, it is glued to the seam due to its adhesive surface. After this, putty is applied to it, which secures the sickle and reinforces the seams. However, the second approach is considered more correct.
Using a narrow spatula, putty is applied along the entire length of the seam. Then sickle tape is glued on top of the putty. At first, you can simply press it with your hands. However, after this you need to run it over it with a wide spatula with slight pressure several times. Due to its cellular structure, the sickle for drywall will allow putty to pass through it. It will come straight out through the cells. The serpyanka will be pressed in more strongly, and excess putty will be removed with a spatula.
Three stages of using serpyanka
The reinforcing tape itself is cut off in advance. You can cut locally, but this is not always convenient. With any option, you will need to run a spatula over the surface several times, as if pressing in a sickle, squeezing out excess putty from underneath it. They are then removed with a spatula (if there is a lot) or spread over adjacent areas (if there is a little). If you need to join pieces of serpyanka (vertical and horizontal joints intersect), then this is done with an overlap, but only by a few millimeters. Now there should be no questions about how to glue serpyanka to drywall.
The process of sealing seams using self-adhesive serpyanka
To reinforce the longitudinal joints formed by two sheets of gypsum plasterboard, self-adhesive mesh is used. Much less time is spent on the sealing process with serpyanka, since it is easier to use. The danger of air bubbles is not terrible for the serpyanka; they do not worry about it.
The disadvantages of using serpyanka include:
- Reduced level of strength compared to paper tape;
- Selecting the appropriate type of putty solution.
Applying a plaster layer over serpyanka
If the joints are treated with serpyanka, then experts recommend carefully applying it to all the seams of the room. Before applying the reinforcing mesh, the surface is dust-free, otherwise the formation of wrinkles cannot be avoided. When gluing the serpyanka, press it well against the wall or ceiling. Afterwards, a layer of putty material is applied over the mesh and into its depth using a spatula. The putty layer should be uniform and thin.
The following video clearly demonstrates all the subtleties and nuances of gluing paper tape:
What is serpyanka and why is it needed?
Serpyanka is a thin tape made of fiberglass in the form of a mesh with rectangular cells. The standard width is 45, 50 and 100 mm, the footage is 20, 45, 90, 150 m. Usually the manufacturer applies an adhesive composition to one of its sides, thanks to which it is attached to the surface in the same way as masking tape.
Serpyanka is needed for reinforcing plasterboard seams on walls, ceilings and any structures. Without gluing the joints, cracks will inevitably appear on them, which means the finish will be damaged. Such a mesh for seams can be replaced by a special paper tape or fiberglass cut into strips.
Advantages of reinforcing mesh for drywall:
- Easy to use: glues without problems, cuts with ordinary scissors.
- Unaffected by aggressive environments.
- Improves the strength characteristics of the surface. Fiberglass tape is not subject to shrinkage and tolerates vibration and displacement of individual elements well.
- It interacts well with putty and, in combination with it, provides a reliable connection.
- Cheap and available material.
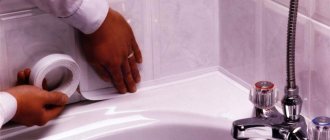
In addition to strengthening seams in drywall, self-adhesive reinforcing mesh is used:
- When sealing cracks in walls or ceilings.
- When finishing door or window slopes.
- When processing places where the door frame adjoins the wall.
Rules for sealing seams using Knauf tape
Fiberglass mesh is an excellent material for sealing seams formed by gypsum board sheets with a thinned edge. But its strength is not enough to seal transversely located seams. Paper tape will reduce the risk of cracks in these places. It forms a seam of extreme strength, regardless of the chosen brand of putty. But the sealing of seams will be of high quality only if certain subtleties of the work are observed:
- Knauf does not have an adhesive base, so a uniform thin layer of putty solution is applied to the joint, which will act as glue;
Sealing seams using paper tape
- The putty solution, especially a thin layer, dries quickly enough, so do not apply putty to all joints at once. Otherwise, the work process will become somewhat more complicated, and air bubbles may form;
- The tape is adjusted in the center of the seam. Holding it in a taut position, applying slight force, press it into the layer of putty. Its ends overlap when crossing;
- From the center to both sides of the seam, use a spatula to “stretch” the glued tape. In this case, a force is applied so strong that it is sufficient for reliable gluing, but so that an excess amount of putty solution is squeezed out. There should be approximately 0.8 mm under the edge, 2 mm under the middle of the tape. If too much putty is squeezed out, the tape will have nothing to stick to;
- After completing the gluing stage, smoothing out wrinkles, they remove the excess amount of putty solution that has formed on the longitudinal edge;
- Then, after the putty material has completely dried, using a spatula with a wide blade, more than 100 mm, the seam is finally smoothed out. Attention is drawn to the fact that the layer of putty mixture on the plasterboard sheets forms a single plane. For the process, super-thin putty solutions from Knauf or Semin are used;
- The last stage is sanding.
Using paper tape to seal joints on drywall
When creating plasterboard structures, joints appear on the ceiling and walls - the border between two sheets. The joint should be properly sealed, this serves as the strength of the entire structure. Paper drywall tape is one of many materials designed for such purposes.
You should also choose a putty that will last a long time.
This is what paper tape for sealing drywall joints looks like. There are the following materials on the market for sealing drywall joints: Sealing drywall joints is not difficult, but important. Do not forget that the strength of the entire structure depends on this. Video on sealing drywall seams with paper tape. Knauf paper tape for drywall is a high-quality material: Paper tape for drywall seams is produced by many manufacturers, but the high quality of the Knauf brand is noted.
For the production of reinforcing tape, high quality raw materials are used, which are durable.
- It perfectly reinforces the seams, creating structural strength.
- The tape does not break after getting wet.
- It allows air to pass through well.
- Not toxic to humans and animals.
The tape is threaded throughout the strip with fiberglass. The paper tape is a little rough to the touch. This is done for better adhesion to putty.
Kraft paper + PVA - this is possible, as our drywall workers worked this way, everything is fine.
Personally, I don’t like it for the reason that when installing gypsum board sheets on a profile, there are still gaps between the sheets and the edge of the sheet still has to be embroidered, and the uniflot fills it all out well, and the PVA and paper hold it in place, but I still think what about those cracks? 2 Nail
I agree, I am considering the option with PVA tape for the case of very small gaps between the edges of the sheets. If the gap is large, then you probably shouldn’t leave a void under the putty.
- paper tape is thinner than serpyanka. Due to this, the consumption of putty for the entire drywall is minimal;
- low cost;
- ease of use. It is no more difficult to glue paper reinforcing tape than sickle tape;
- good adhesion to putty. The perforated paper tape does not fall off during work, and upon completion firmly secures the seams.
Putty is applied to the joint transversely to the seam line. After this, it is smoothed out with longitudinal movements, and then a reinforcing tape is laid on top. Sealing drywall seams with paper tape is done using a wide spatula. The same glue is applied to the already prepared joint of drywall sheets. The prepared strip is placed on top - naturally, it must be carefully smoothed.
After the glue dries, the tape will look like one piece with the drywall. Such a seam can be treated with any material (paint, varnish, etc.). The resulting seam is filled with putty, and it must be smeared along the edges (slightly more than the width of the tape). The tape is literally pressed onto the layer of putty.
It should be pressed well and smoothed out. After this, the seam should dry. Depending on the composition of the putty, its drying time can reach a day.
The main types of tapes used for sealing seams
To strengthen the joints of sheets of plasterboard structures, two types of tapes are most often used:
- serpyanka, consisting of fiberglass;
- paper reinforcing tape.
In addition, when finishing drywall joints the following types of tapes can be used:
- Non-woven or bandage - to strengthen the corners.
- With metal strips - for reinforcing external corners other than 90 degrees.
- A wide piece of fiberglass to strengthen the joint between drywall and the wall, for example when constructing an arched structure in a doorway. It can have a width of 10 cm or more.
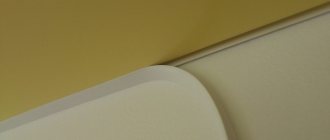
How and with what to seal cut drywall joints
As already mentioned, sealing the cut edges of drywall with tape creates a bump in this place. You can seal such joints with strips of fiberglass, which is much thinner and does not swell when wet. One of the disadvantages of paper tape is that it can swell when wet, but when placed inside a seam, it will not swell, which cannot be said about cut seams. Therefore, it is more advisable to use strips of fiberglass on cut seams.
It is better to seal seams with cut edges of gypsum boards with fiberglass
That's all, our joints are ready for further finishing and will not crack!
Ideally, after sealing the joints, the drywall can be glued with fiberglass over the entire area, so nothing will crack, and, moreover, the surface will be uniform, which is good when painting. But the method described above is quite sufficient for high-quality sealing of gypsum board joints. Leave your tips and comments below. Subscribe to our newsletter. Good luck to you and good luck to your family!
Useful tips
In order to obtain the highest quality result after sealing plasterboard joints, during the work process it is necessary to follow the following recommendations of specialists:
- Ensure optimal temperature (more than 10 C°) indoors. It is also extremely important to eliminate drafts.
- In conditions of excessive humidity, the tape for sealing gypsum board joints will not adhere well. Therefore, its installation should be planned after the completion of wet finishing work.
- Before you begin laying the reinforcing tape material, you need to make sure that the drywall is securely fastened.
- If there is no chamfer at the joints of the gypsum plasterboard, you definitely need to apply it yourself.
- To prevent cracks from appearing in the corners over time, they should be filled with putty carefully and evenly.
- When special tape is not used to finish the corners, ordinary tape must be folded in half, then glued to the seam.
- Before using putty, you need to read the information on its packaging. Some compounds are incompatible with reinforcing tapes and are not able to hold them at the joint.
- If air bubbles have formed on the paper tape material, they should be pierced with a needle, then the air should be removed.
- To process joints that are too long, it is advisable to divide the reinforcing products into meter-long sections, which are then glued in stages.
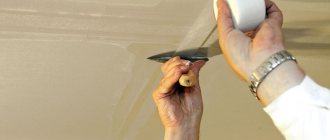
Making chamfers
At the joints of plasterboard elements, chamfers must be made in advance. Most standard sheets already have a special thinned edge. But during the installation process, you often have to cut them into pieces, which results in unfinished ends. You can make a chamfer after fixing the drywall with a paint knife, but it is much more convenient to shape them with a plane before fixing.
This photo shows a chamfer cut with a knife after attaching the gypsum board. It turns out not so neat.
This V-shaped recess is necessary to ensure that a sufficient amount of putty gets into the seam. Without a chamfer, even reinforcing tape will not protect against cracks.
Why is it necessary to glue the joints of plasterboard sheets (GKL)?
The area where two sheets of drywall meet is the area where the most problems arise. Most often, builders (especially beginners) encounter the following:
- Violation of the integrity of the edges due to mechanical impact;
- Deformation (bending) of the edges of drywall in the joint area;
- Reactions of drywall to temperature changes, leading to expansion of the sheet and cracking of the finish;
- Formation of mold and peeling of the finish coating as a result of moisture accumulation in the remaining untreated gap;
- The appearance of unevenness on the surface of the walls due to unaligned joints.
Therefore, in order to obtain perfectly smooth, problem-free surfaces, puttying of drywall joints must be carried out.