Updated: 03/06/2021 14:58:26
Expert: Andrey Nikolaevich Kuznetsov
*Review of the best according to the editors of expertology.ru. About the selection criteria. This material is subjective in nature, does not constitute advertising and does not serve as a purchase guide. Before purchasing, consultation with a specialist is required.
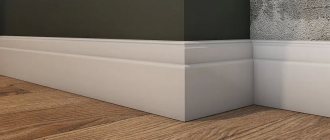
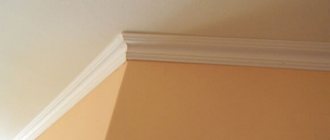
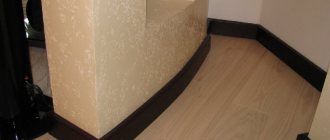
Usually the floor, walls and ceiling are demarcated using skirting boards. They add a touch of originality and are made from a wide variety of materials. The main thing is to buy high-quality glue.
How to choose adhesive for baseboards
Before starting the procedure, it is important to adhere to the following rules:
- Polystyrene foam adheres to almost any specialized substance. It must not contain solvent.
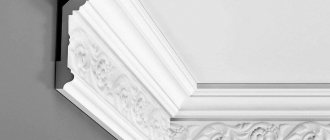
- Ceiling plinth made of polystyrene looks stylish and attractive. To install it, you will need a composition with a transparent structure without fillers.
- When purchasing liquid nails, it is important to pay attention to the components, conditions of use and intended use.
- Wooden skirting boards are usually glued using liquid nails with a nozzle.
- The glue must be applied in a dotted manner. It is used in a room with good ventilation.
- The plaster must first be removed and the base coated with a primer.
When compiling the rating, we relied on the following criteria:
- strength;
- lack of pronounced odor;
- suitability for specific material;
- drying speed;
- safety for people;
- ease of application;
- efficiency.
Reviews from specialists and customers deserve special attention.
What to look for when choosing glue?
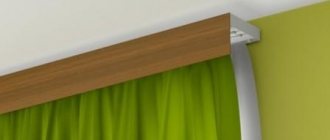
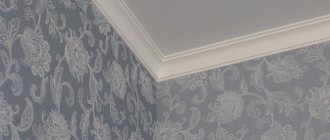
The ceiling plinth performs several functions at once. By decorating the ceiling surface, it hides installation problems and levels out the curvature of the walls. In order for the decorative strip to be securely fixed to the base, the choice of adhesive composition should be treated with extreme caution.
In order for the selected adhesive composition to reliably fix the decorative plinth, it must meet a number of requirements. When choosing the appropriate option, you should make sure that it:
- Helps form a strong, reliable connection;
- Convenient to apply;
- Dries quickly;
- Does not have a pungent odor;
- Can be used to secure certain materials.
In manufacturers' catalogs you will not be able to find a special adhesive composition designed specifically for fixing ceiling plinths. You will have to use a universal one, focusing on the above requirements.
Attention! When choosing an adhesive, you should first take into account the characteristics of the material that was used in the manufacture of the plinth.
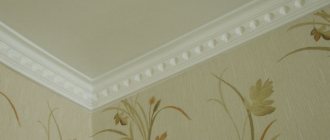
Decorative strips can be made of foam plastic, polyurethane, polystyrene foam, wood, PVC, or gypsum. With the right glue, you can securely fix the baseboard to the base.
Rating of the best adhesives for skirting boards
| Nomination | place | Name of product | price |
| The best adhesives for plastic skirting boards | 1 | TITAN WILD Universal | 135 ₽ |
| 2 | Eco-Naset | 45 ₽ | |
| 3 | Polymer glue Moment “Installation” | 212 ₽ | |
| The best adhesives for polyurethane skirting boards | 1 | Europlast | 400 ₽ |
| 2 | ORAC DECOR FDP500 | 543 ₽ | |
| 3 | ORAC DECOR FDP700 | 1 066 ₽ | |
| 4 | Uranus | 32 ₽ | |
| The best adhesives for skirting boards in the form of liquid nails | 1 | KRAFTOOL KN-915 | 220 ₽ |
| 2 | Makroflex Mf910 | 215 ₽ | |
| 3 | Quelyd Mastifix Ultra | 175 ₽ |
If the joints are cracked
No matter what polyurethane plinth is glued to, they very rarely fall off the wall. But the problem with corners is not uncommon. It usually occurs if the joints were glued with assembly adhesive or any other composition. Then hairline cracks form first, then they can increase to several millimeters. What to do with cracks in the corners of the baseboard? How to fix?
The first thing to do is clean the old glue from the joint. The easiest way to cut is with a knife. Then the joint can be filled:
- Acrylic sealant.
After application, try to level it out, repeating the relief. After it dries, we sand it and then paint it. This is the most realistic method and the easiest to implement. And at the corners the gaps may be larger - If the gap is small, you can apply joint adhesive. Just keep in mind that once it dries, it is difficult to work with. So after applying, remove the excess immediately, wipe off the remaining residue with a rag with acetone. If there are any irregularities left, we try to give the desired shape with sandpaper on a block.
- Seal the joint with polyurethane foam, trim, putty, paint. Foam is the easiest to work with, but you need to use it with a small expansion and make sure that as it increases in size it does not tear the baseboard away from the wall. So the option is still problematic. The truth is not in terms of processing.
All these methods will only give a temporary effect. If cracks appear at the joints, there are reasons for this. And until the causes are eliminated, cracks will appear again. If it is simply an unsuitable composition (not for joints, but for installation), then the normal appearance may last longer. If the joints were glued with the “correct” glue, then the reason is more serious. Possibly - shrinkage of the house, cracks, etc.
The best adhesives for plastic skirting boards
Plastic interacts well with the adhesives presented below. The main thing is to take into account the design and material of the wall.
TITAN WILD Universal
Rating: 4.9
The nomination opens with an adhesive with an excellent reputation. Its main advantages are versatility and accessibility. It glues ceiling and floor skirting boards, parquet, and ceramic tiles. This is an excellent option for foam products.
The composition includes innovative polymer materials and contains no fillers. In case of sloppy movements, excess substance is easily removed from the front side, leaving no streaks. The main thing is to hold the plinth for a while so that the material grips more firmly. 0.5 liters cost 152 rubles.
Advantages
- versatility;
- optimal price;
- excess is easily removed;
- minimum odor;
- quick result.
Flaws
- No.
Features of the material
The main purpose of the plinth is to complete the overall appearance of the interior, as well as to hide all the shortcomings of the connection with the wall. You should also know that planks made of different materials have their own characteristics. Plastic panels are equipped with additional parts that simplify the fastening process - these are:
- end caps;
- linear connectors;
- corner details of internal and external location;
- brackets.
Additional details are designed to hide joints, including corner joints.
The planks have special recesses designed to hide utility lines (cables, electrical wires, wires). Given this feature, you should know how to attach a plinth to a concrete wall so that it fully fulfills its function and looks beautiful. This minor detail makes plastic products more practical compared to their wooden and MDF counterparts. Additional elements are sold separately, as each situation requires an individual quantity. Installation is carried out with special fasteners.
The best adhesives for skirting boards in the form of liquid nails
A distinctive feature of this category is the presence of mineral fillers. Liquid nails provide reliable fastening and high setting speed.
KRAFTOOL KN-915
Rating: 4.9
German glue is optimal for gluing PVC skirting boards to wood, metal and plaster. Setting time is about 10 minutes. The substance is convenient to use and safe for humans. Liquid nails are not afraid of moisture and high temperatures.
Professional finishers choose the product for its good adhesion, antiseptic properties, and low price. We also noted the high-quality tube made of durable plastic. The piston moves smoothly in it, no special effort is needed. KRAFTOOL KN-915 costs from 157 to 210 rubles.
Advantages
- super grip;
- high adhesion;
- reasonable price;
- elasticity;
- water resistance;
- without smell;
- strong tube.
Flaws
- No.
Installation technology
Necessary tool
- Knife with replaceable blades
universal knife with retractable, replaceable trapezoidal blade
- Carpenter's pencil
- Roulette
- Miter box (device for cutting moldings at a certain angle):
miter box for making cuts from wood, plastic, polyurethane in workpieces of medium and small thickness at angles of 45 and 90
Miter box Matrix 420 mm precision
- Installation gun for sealant:
Assembly gun for glue and sealant
- Rubber spatula
Required material
- Ceiling fillet (plinth) PVC
- Corners for fillets (internal and external)
- Glue or putty
- White acrylic sealant
Basic principles of installation
- It is advisable to start gluing the ceiling plinth from the most visible inner corner.
- We cut the fillet using a miter box, file or knife from one edge at 45%:
plinth trimming
- We install a tube with the selected glue into the mounting gun, then apply the composition in a wave-like motion to both shelves of the plinth:
Applying glue to the baseboard
- We coat the joint of the skirting boards with glue.
- We carefully remove the glue that came out during installation with a damp cloth and carefully smooth the joints with a rubber spatula.
- When working with external corners, first glue long pieces of baseboard, and then make short inserts.
- After the glue has dried, fill all the gaps with acrylic sealant and clean the seams again with a rubber spatula.
cleaning joints using a rubber spatula
Installation of polyurethane ceiling products
There are two types of installation.
First. Installation of polyurethane ceiling plinth is carried out on glued wallpaper using Dragon glue, “Moment Installation” or white acrylic sealant.
Second. Installation of polyurethane products is carried out on plastered, primed walls/ceilings. Installation is carried out using putty or acrylic sealant. Then the wallpaper is glued. This method has advantages over the first method - the cornice and ceiling look like one.
Tip: If you have uneven walls and you plan to change your wallpaper in the near future, use method number two. It allows you to efficiently, without cracks, frame the ceiling with polyurethane plinths, and you do not need to be afraid that the adhesive composition will not get on the wallpaper.
Cutting polyurethane skirting boards
Before installation, the polyurethane product must be marked and cut at the corners.
First method. A miter box, a device for cutting at an angle, will help you do this job. With its help you can get an even, precise cut.
Advice: If you do not have the skills to work with this tool, then practice. For this purpose, use trimmings of baseboards.
Second method. If you are unable to use a miter box or the angle is not straight, then use a stencil, which can be made from cardboard or thick paper.
What to cut with? In both the first and second cases, cutting polyurethane plinths is done with a hacksaw for metal with fine teeth or a construction knife with replaceable blades.
Polyurethane ceiling plinth photo - cutting using a miter box and a thin hacksaw with fine teeth
Installation of polyurethane skirting boards
How to glue a polyurethane product to the ceiling? First, it is better to do the most difficult work - decorating the corners. Then add straight sections. Carrying out work in this sequence is easier than going around the entire perimeter of the room in order.
Let's look at an example of gluing a polyurethane baseboard to a ceiling using finishing putty or acrylic sealant.
List of tools:
- mounting gun;
- construction knife with replaceable blades;
- hacksaw for metal;
- rubber spatula;
- construction mixer;
- container for diluting putty.
Technology for installing polyurethane cornices using putty:
Stage 1. Using a construction mixer, bring the putty poured into water - the amount of water and dry adhesive according to the instructions - to the desired consistency.
Stage 2. Using a spatula, carefully apply the mixture to the wall and the back surface of the baseboard.
Stage 3. Apply exactly to the installation site and press. Use a spatula, then a sponge or a wet rag to remove the excess and cover the cracks, if any.
Stage 4. After the putty has dried, you need to cover the cracks again.
Polyurethane ceiling plinth - installation video tutorial:
Technology for installing polyurethane cornices using acrylic sealant:
- Apply sealant to the baseboard using a glue gun, making sure that all uneven areas are filled with sealant.
- Press to the surface at the installation site and hold for 30 seconds.
- Remove excess with a wet cloth.
- Carefully seal the cracks after the sealant has set.
- Paint the ceiling and polyurethane baseboard.
- Put up wallpaper.
Installation of polyurethane plinth to a suspended ceiling
The main nuance is that a polyurethane product is glued only to the wall and in no case is attached to the ceiling, so as not to damage the expensive canvas.
Tip: Before starting work, protect the canvas from accidental contact with the adhesive mass using a polyethylene film. After installation it can be easily removed.
The further stages of installing a polyurethane plinth to a suspended ceiling are absolutely identical to the above methods. It must be taken into account that the large weight of the products does not allow the use of wide, massive polyurethane skirting boards, because they can sag under their own weight. If you have a high ceiling and like crown molding, use a wide decorative polystyrene foam cornice.
Masking joints and painting
Painting skirting boards is carried out both for decorative purposes and to mask the sealant. It is especially recommended to paint when there are quite a lot of joining seams; they need to be hidden. You should also be sure to paint white baguettes, because without coating they will turn yellow over time.
Professionals advise that after the glue has completely dried, go over the cornices with finishing putty (dilute as thick as water-based paint), paint them well, and let them dry. Remove excess composition and drips with a plaster sanding sponge (sold in hardware stores). The baseboards will look beautiful, and any traces of sealant will be completely hidden.
If you didn’t have to use sealant or there weren’t enough seams, you can simply paint the baguettes with water-based paint, latex paint, or acrylic paint. It is possible to use nitro paint, but with preliminary priming. The work is carried out with a small brush; it is better to do it before gluing the wallpaper. This will avoid problems and get the perfect ceiling plinth.
Some advice from experts
So, we hope that we have answered in sufficient detail the question of what to glue first - the ceiling plinth or wallpaper. Below you will find some useful tips from experienced craftsmen, following which you can mount the baguette as quickly and accurately as possible:
- Experts advise buying skirting boards with a small margin. This is especially true in cases where there is no miter box at hand. Trimming baguettes in corners is actually a very complicated procedure. And if you can’t cut it neatly the first time, its ends are simply cut off. Then the procedure starts all over again. As a result, of course, the consumption of skirting boards increases.
- Experienced craftsmen recommend painting the molding only after it has been installed in place. This procedure should not be performed in advance, before gluing. Otherwise, glue stains will remain visible on the baseboard in the future.
By mounting the ceiling plinth on the wallpaper and painting it after that, unfortunately, the walls can get dirty very easily. To prevent this from happening, experienced craftsmen recommend using a clean rag and a long spatula when installing baguettes. Experienced craftsmen advise placing this tool along the bottom edge of the baseboards when painting them. This will prevent paint stains from appearing on the wallpaper.
Of course, you shouldn’t apply too much glue to the planks when fixing them. It should not protrude from under the baseboard when pressed. Drops of glue, if they appear on the wallpaper, should be removed with a rag immediately - before they harden.
Sticking to different surfaces
There are some features of attaching baguettes to walls and ceilings, depending on the type of base material. The differences are described below.
On a suspended ceiling
Now stretch ceilings are at the peak of popularity; they are installed everywhere. A smooth surface is achieved without laborious leveling, the design can be varied
Before starting work, you need to pay attention to some features:
- Light weight. It is best to buy foam, polystyrene foam products; plastic and polyurethane products are slightly less preferable.
- Special form. The side lying on the ceiling is smaller in size than the side located on the wall. This is due to the specifics of gluing - the substance is applied only to the part of the panel adjacent to the wall. Do not apply glue to the baseboard on the ceiling side!
- Reliable composition. You should choose a product with maximum hold, quick-drying, and durable.
- Additional fastening. If wooden cornices or other massive skirting boards are chosen, they are secured with glue and dowels and anchors.
PVC plinth looks good on a suspended ceiling. It is secured with clips, they must be mounted with self-tapping screws. The corner is decorated with one plank, which is bent. It is necessary to glue the baguettes carefully - if glue stains get on the stretch ceiling, it can cause damage.
For wallpaper
By purchasing high-quality glue, you can install the border in its “rightful” place
It is important to make sure that the wallpaper adheres securely to the wall, especially if the finishing was done a long time ago. If necessary, glue the canvas with wallpaper glue and wait 1-2 days
You can also use PVA glue. When installing cornices, try not to stain the wallpaper. To do this, first make a thin mark with a pencil along the width of the baseboard, then stick masking tape to the border. Upon completion of the work it is removed.
For plaster
Before attaching the baguette, it is important to check how smooth the surface is. Small defects can be sanded down or left unchanged if glued to a putty mixture
She will straighten the wall, eliminating imperfections. You can also purchase skirting boards with soft edges to smooth out uneven surfaces. If there are significant defects, you will have to eliminate them - level the wall, prime and sand.
On drywall
Since drywall is a very smooth material, gluing ceiling panels to it is a pleasure. Only at the joint areas of gypsum board sheets may putty drips remain, which must first be cleaned with sandpaper. Any type of skirting boards is suitable for gypsum plasterboards. Reducing the area of the room when using drywall is inevitable. To visually expand the space, you can attach cornices with the wide side to the ceiling. This will enlarge the room and will look original.