When designing a roof, it is recommended to pay special attention to the distance between the edge of the eaves light and the wall of the building. If this gap is up to 40 cm, then it is worth considering that water flowing from the roof during precipitation will directly fall on the wall and blind area, while strong gusts of wind will blow into the space under the roof. The filly in the rafter system is used quite often; with its help it is possible to arrange an overhang of the required size.
What is a filly on the roof
The filly is an element that is present on the roofing frame. The purpose of this element is to lengthen the rafter leg, which rests on the mauerlat of the structure, made of brick or blocks, and is located on the top frame of the structure made of logs or beams.
To put it simply, a filly in a rafter system is a piece of board used as a continuation of the rafter system, resulting in an overhang on the roof. As a rule, this element is suitable for the rafter system in cases where the rafter leg does not have the required size, which prevents the formation of an overhang.
To install fillets on the rafter system, it is recommended to choose boards whose cross-section is much smaller than that of the boards suitable for the rafter system. In addition, thanks to this approach it is possible to significantly facilitate installation work.
The use of this material in the rafter system can significantly facilitate installation work on the construction and further repair of the roof frame. In addition, it is possible to significantly reduce the level of load on load-bearing walls and foundations.
This is due to the following:
- since the length of the rafter leg will be much shorter, it is not necessary to provide for an overhang of 40-100 cm beyond the plane of the walls for further arrangement of the overhang, as a result the structure is quite light, short and not so expensive in cost;
- installation work is carried out on boards that are thinner compared to the building material suitable for arranging the rafter system, as a result the weight of the structure becomes much less;
- if necessary, it is possible to quite easily align the line at the overhang, and if an error is made in the construction, then it will be enough to replace this element;
- If during operation the support of the eaves overhang begins to rot, then it will be enough to replace the damaged element rather than carry out repair work.
In addition, it is worth considering that fillies in the rafter system can be used during the construction process as a decorative element. If necessary, this product used in the rafter system can be given any shape, making it as decorative as possible.
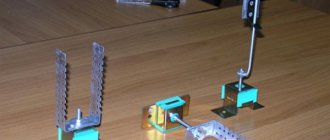
Attention! For a better understanding, it is recommended to look at what the fillies on the roof look like in the photo.
Attaching the rafters to the mauerlat
Correct fastening of the rafters to the ridge beam and to the mauerlat is an indispensable condition for professionally performed roof installation.
To install the rafters to the Mauerlat, one of two types of coupling is used:
- sliding;
- hard.
The choice depends on the shape of the roof and its structural features, and accordingly on which rafters are chosen - layered or hanging.
The rigid method assumes that the connection of the rafters and the Mauerlat is carried out in such a way that the possibility of rotations, shifts, bends, and torsions between these two elements is excluded (read: “How and how to attach the rafters to the Mauerlat”).
To achieve this result, you can use one of the following methods:
- using corners for fastening rafters and supporting frame beams;
- by making a gash on the rafter leg and further securing the connection with nails, staples and wire.
As for the second method, it is used more often than the first. It provides that nails are nailed from the sides at an angle towards each other (as a result they intersect inside the Mauerlat). After this, the third nail is driven vertically. The resulting fastening points for the rafter structure provide high rigidity (read also: “Rafter fastening points - structural elements”).
Additionally, both connection methods are secured by fastening the rafters to a brick or concrete wall using rolled wire and anchors. Prepare the rafters for installation if they have the same angle of inclination throughout the roof by using a template.
Installation of the rafter system, details in the video:
A sliding connection, also called a hinged connection, is achieved by creating a special fastener that allows one of the mating elements to move freely within specified limits. In this particular case, such a part is the rafter leg, and it will move in relation to the mauerlat.
There are the following methods for installing rafters to the mauerlat, providing offset:
- with the help of sawing and subsequent laying of the rafters, the place was washed on the mauerlat;
- by driving two nails diagonally from the sides in the direction one to the other;
- connection using one nail, which is nailed in a vertical position from top to bottom through the rafter leg into the mauerlat. An alternative is to use rafter fastening plates that have holes for nails;
- fastening method using a bracket;
- by extending the rafter leg beyond the wall using single plate fastening;
- by using steel fasteners specially designed for rafters, which are called “sleds”.
All the described methods, on the one hand, make it possible for the rafter leg to rest against the Mauerlat, and on the other hand, if the structure moves, its elements can move relative to each other.
The sliding type is found quite often in the construction of houses; this connection of rafters and mauerlat is especially popular when arranging wooden houses that are built from logs or timber. Over time, the original geometry of the structure is distorted as the walls shrink and the use of rigid joints leads to the integrity of the walls being damaged. Attaching the rafters to the frame using a sliding connection allows the log walls, gables and other elements of the building to adjust to shrinkage.
It is also not possible to rigidly fasten the rafters in the ridge. The entire structure is assembled first on the ground. Before installing the rafters for the roof, measurements are taken, cut-outs are cut into the mauerlat and rafter legs, and then a careful adjustment is made.
Installation of fillies on the roof
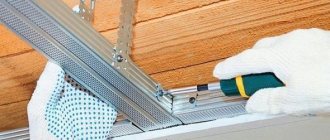
The eaves overhang, which has a width of 90 to 100 cm, is quite easy to install. To do this, you will need to secure the fillies to the roof using rafters for these purposes. The rafters in this case should be installed along the Mauerlat or on the top trim. The fillies are a continuation of the rafter system, as a result of which, during installation work, sheathing, waterproofing material and roofing must be installed on them. Before installing the decking, it is recommended to install a cornice board along the edge of the roof, on which the drip line will later be located.
After the roof is completely installed, it is necessary to sew up the overhang on the eaves. For these purposes, you can choose soffits or jointed boards. The location must be perpendicular, with a small gap remaining so that ventilation is not impaired. Thanks to air circulation, moisture will be removed, as a result of which the process of rotting of wooden elements can be prevented.
If you plan to install an overhang, the length of which will be more than 1 m, then in this case the filly on the roof will experience a fairly large load. In order to prevent roof collapse, it is recommended to support the elements of the rafter system on consoles, which are beams located in a vertical position.
As a rule, the consoles can be separate; they do not necessarily have to be connected using a horizontal connection along the perimeter of the entire slope. In this case, the fillies can rely on the Mauerlat. As practice shows, the choice of design depends entirely on the width of the cornice extension. It is recommended to use consoles if the material for the filly exceeds 1.5 m.
Varieties
Using movable fasteners to fix the rafter legs to the Mauerlat is the only way to prevent roof deformation during the shrinkage of wooden houses. As a rule, sliders have a fairly typical design, consisting of a static guide base and an angle with a loop that moves along it. The following types of movable fastenings are distinguished:
- Open type. Sliding fastenings for open type rafters are a collapsible structure consisting of a guide, firmly fixed to the rafter leg, and an angle, which is attached to the mauerlat of the rafter frame. Different models differ in only 2 factors: the number of mounting holes, which can be from 1 to 5, as well as the power reserve. The minimum travel reserve of the sliding support is only 60 mm, and the minimum is 160 mm. The larger this parameter, the better the fastening protects against deformation, providing maximum mobility to the rafters.
- Closed type. The sliding support of the rafters is closed, unlike the open one, and cannot be assembled or disassembled. This is a one-piece, monolithic structure that is sold and installed immediately assembled. In this case, the corner attached to the Mauerlat has a loop through which, during the manufacturing process of the fastening, a guide strip is threaded and fixed to the rafters.
Characteristics of movable mounts
Another version of the sliding support design
Roof frame dimensions
If during the construction work it was decided to use fillets for the rafter system, it is recommended to correctly make calculations and calculate the length of the filly in the rafter system. As practice shows, it is best to carry out installation after the roof has been installed. When calculating the required length of the parts, it is important to understand that a margin of about 30-50 cm must be made, since the fastening will be carried out overlapping.
Only after this can you begin to select materials for further work. In this case, it is allowed to use boards with a cross-section of 50*150 mm, while 120*40 mm or 100*30 mm are perfect for making fillies. Many experts recommend giving preference to materials made from coniferous trees. In this case, it is necessary to ensure that the humidity level varies from 8 to 10%. There should be no rotten fragments or knots on the elements.
Advice! After all the parts have been prepared and adjusted to size, it is recommended that all elements be thoroughly treated with an antiseptic composition, which will prevent the appearance of rot and fungus during operation.
Rules for installing layered rafters
Spacer-type layered rafters in their design are practically no different from the three options described above, with the exception of one nuance: instead of rigidly fastening the rafters, you need to use a movable fastening. Spacer rafters of this type are distinguished by the fact that it is not necessary to install a purlin for them. For the spacer system, you need to very carefully attach the Mauerlat to the walls of the house. At the same time, they must be thick and strong.
A little about layered rafters with struts. They represent a third rafter leg that works in compression and is installed with an inclination of 45 degrees. As a result, even 14-meter spans can be covered, while beams of smaller sections can be used.
There is no need to calculate the fastening of the struts; you can simply fix them on both sides, placing them under the rafters. This will prevent the strut from shifting
You just need to evenly cut the angle of the brace, taking into account the slope of the rafters. To determine what cross-section the nodes of the layered rafters are needed, calculate the pressing force.
The last type of layered rafter systems includes structures on sub-rafter beams.
If your house has two load-bearing walls, you will need to install two rafter systems. These include beams mounted on the longer side of the roof. The racks are mounted under the beams, and the supports and the walls of the house located inside the house serve as supports. If there are no purlins, racks are installed under all rafters. The tops of the rafter legs are connected to each other, after which they are tied with overlays made of wood or steel. Due to the absence of a ridge girder, a thrust is created.
The tightening is installed below the through girder - in this way they get rid of the thrust in a non-thrust system. Contractions are secured at the bottom of the posts to improve stability. They perform the functions of a crossbar, taking on compression loads, and also prevent the racks from falling. The joints are fixed crosswise.
In this article, we talked in detail about how to strengthen the rafters of a gable roof, what such systems are, and how to install them.
How to make fillies for rafters
It is recommended to carry out roof construction work, where it is planned to install fillets on extended rafters, using standard technology. After the rafters are installed, it is necessary to proceed to the preparation of other elements, the number of which should be equal to the legs used.
The size of the elements depends entirely on the width of the overhang, to which it is worth adding about 30-50 cm for fastening. It is important to remember one rule - the longer the fillies used, the more reserve you will need to leave for fastenings. This is the only way to achieve the required level of rigidity and completely eliminate subsidence of the erected structure. It is recommended to use boards of the required section or trim from beams.
The step-by-step installation algorithm is as follows:
- The first step is to prepare a template according to which the elements used during construction will be cut out. After this, each trim must be treated with a fire-retardant composition. Installation must be carried out with an overlap on the rafter system - about 30-50 cm, after which the upper ends of all elements are leveled. Rough or regular nails can be used as fastening. To ensure high-quality adhesion, each node should require up to 4 nails, which are driven in 2 on each side. To ensure that the fasteners do not loosen during operation, the ends of the nails must be bent.
- Initially, the outer fillies located on the slope must be secured, and the size of the overlap must be measured as carefully as possible. You will need to tighten the cord between these elements, and then carry out further installation. This method is excellent for short-length slopes, since the cord used should not sag.
- If during the construction process the overhang requires the presence of consoles, then the fillies should be fastened flush from the side of the horizontal beam. To strengthen the structure, it is recommended to additionally install reinforced or continuous sheathing, which will allow achieving the desired level of rigidity.
- After the construction work has come to an end, the cornice will need to be hemmed.
It is allowed to use soffit, siding or boards as a backing - this method will prevent moisture from getting inside the rafter system.
Fasteners for installation work
To efficiently connect the rafter assemblies with the Mauerlat, you will need the following materials and tools:
- dry timber;
- boards;
- axe;
- hacksaw;
- hammer;
- roulette;
- plumb line;
- level;
- screwdriver;
- drill;
- Bulgarian.
Particular attention should be paid to the presence of all fasteners. The beam consoles are fixed using galvanized steel beam brackets, which do not reduce the load-bearing capacity of the structure. There is no need to embed brackets into beams
You also need to buy perforated mounting tape, which will strengthen the Mauerlat nodes. With its help, a strong connection of all structural elements is made. The tape also does not cut into the beams. To securely fix it, nails and screws are used.
In addition to brackets and perforated tape, to securely support the rafters to the mauerlat, you should purchase:
- universal timber connectors;
- fasteners for rafters;
- embedded supports;
- wire rod;
- steel corners;
- rack mounting;
- self-tapping screws;
- nails;
- staples;
- plates;
- galvanized nails;
- studs with washers and nuts;
- anchor bolts.
Tips and tricks
When carrying out construction work, it is important to take into account that the fillies on the rafters must be cut off at the same level as the wall of the building. The length of the board used for arranging the overhang depends entirely on the desired size.
The length of the cornice filly must necessarily be increased by 30-50 cm, since the work will be carried out overlapping. In addition, this approach ensures high-quality fastening.
The elements used must be made from the following tree species:
- larch;
- pine;
- cedar.
It is important to consider that the service life directly depends on the quality of the materials used during roof construction and the technologies used.
Attention! It is not recommended to use a croaker.
We complete the installation of the cornice
If decorative fillies were chosen for construction, or even in ordinary ones, with the help of impregnations, it was possible to reveal a beautiful wood structure, then in this case the work on organizing the consoles can be completed. In other cases, they resort to installing a cornice box. The main thing to remember is that the entire roof must “breathe”. That is, there must be circulation of air coming from the eaves, passing through all layers of the roof and exiting outside. This process is natural ventilation, keeping each roof element dry and extending the life of the structure as a whole.
To install a cornice box, another element is attached horizontally to each filly - a hemming board. The design is necessary to obtain a closed contour: fillet - hemming board - section of wall. Next, the cornice is hemmed. When choosing materials and installing a box, you should remember not only that the quality of its execution will affect the aesthetic perception of the house as a whole, but also the need to create a “breathable” roof. Therefore, the cornice, like other roofing elements, cannot be mounted hermetically; the use of polyurethane foam or silicone is not recommended.
Decorative options
Since the underside of the roof canopy is visible, the desire arises to make this part of the structure more decorative. There are possibilities for this. You can simply round the limb of each filly, or you can make their bottom curly throughout the entire visible area.
Using a jigsaw you can actually make shaped cutouts in the middle part of the boards. Here you need to know when to stop and not overdo it with too many of them, which can weaken the structural strength of the fillies.
For greater decorativeness, it is advisable to cover visible wooden elements with oil paints or colorless varnish to preserve the texture of the wood.
Aesthetic appearance
With the help of this seemingly insignificant structural element, you can even change the shape of the roof - usually the rafter and filly form one line, but this roof line can be “broken.”
The underside of the roof can also be decorated in a variety of ways. For example, decorative carvings look interesting.
Even undecorated wooden elements can look attractive thanks to the color saturation and natural texture of the wood - various antiseptic impregnations will help achieve the desired effect.
Moreover, their use allows you to kill two birds with one stone: both the aesthetics are increased and the absence of insects is taken care of.
Design of a roof truss system
The design of the house truss system must be tested for strength by specialists. When calculating strength, they take into account, in addition to loads,
. the slope angle of the slopes and the shape of the roof, as well as the type of rafter system and safety factor.
The rafter system consists of many elements. Each element is acted upon by forces that are different in magnitude and direction.
The rafter system as a whole and its individual parts are subject to loads directed vertically, horizontally and tending to rotate the part.
When designing a rafter system, they take into account whether there will be an attic or attic on the roof, the presence of windows in the roof or gables, the conditions for supporting the rafters on the walls, the shape of the house plan and other factors. It is better and more correct to build the roof of a house according to a project completed by a specialist designer. The construction of simple types of roofs can be entrusted to an experienced specialist who does not have designer qualifications
The construction of simple types of roofs can be entrusted to an experienced specialist who does not have designer qualifications
It is better and more correct to build the roof of a house according to a project completed by a specialist designer. The construction of simple types of roofs can be entrusted to an experienced specialist who does not have designer qualifications.
The roof truss system of a private house must meet the following requirements:
- The rafter system must be strong and rigid
- changes in the shape or size of the roof under the influence of loads must not exceed permissible values. - The roof should be light
. in order to put less weight on the walls and foundation of the house. - The rafter system should not transmit thrust
(force in the horizontal plane) to the walls of the house. - The rafter system must be durable
. Replacing or repairing a rafter system is an expensive proposition.
To fulfill the first two requirements, the rafter system is made of separate linear elements assembled into a structure in the form of a triangle. A separate flat triangle of a rafter system, made up of two rafters and associated parts, is called a rafter frame or truss.
Rafter frames or trusses installed on the walls parallel to each other at a certain distance and form the roof truss system
.
Changes cannot be made to a rafter system designed by a specialist at will. Adding or excluding any part will lead to a redistribution of loads to other nodes of the system. Even changing the number of nails used to connect parts can lead to the destruction of the house.
For example, increasing the number of nails used to nail the rafters can lead to unacceptable thrust on the walls. Read about it below.
Try to make the rafter system symmetrical. The symmetrical arrangement of rafter legs, racks, and struts will allow the loads to be evenly distributed along the roof slopes, which will increase the stability of the roof and walls of the house.
To remove moisture from the wooden parts of the roof and condensation, the attic space must be ventilated
with the help of perfumes. For this purpose, ventilated gaps are provided in attic roofs.
To protect against moisture, the mauerlat and other wooden parts of the rafter system are separated from the masonry walls by waterproofing.
If this is not done, the tree will quickly rot.
The rafter system for a private house is made of wood. Sometimes, for example, in frame houses with a metal frame, metal profiles are also used to make the rafter system.
Generalization on the topic
In conclusion, I would like to highlight the point that fillets are elements that are used only if the purchased lumber is not long enough to cover the entire span of the roof slope, taking into account the overhang. For example, if the length of the purchased boards is 6 m (by the way, standard, they are no longer made), and the length of the rafters, taking into account the roof overhang, should be 6.25 m (according to the project), then, of course, fillies will have to be added to the boards.
Or another case in which the length of the rafter legs, taking into account the overhang, is 5.5 m. There are no options here - fillies are not needed. You will even have to cut the installed rafters to the required size.
In addition, keep in mind the simple truth that the connected parts of one part are inferior in strength to a solid element. There are always stresses at the joint that reduce the load-bearing capacity of the material. Therefore, try to do without fillies when constructing the rafter system.
Source
System parts
The rafter system consists of trusses, which are flat structures in the form of a triangle. They are placed on the Mauerlat and then fastened together using purlins. Several components of the farm can be distinguished.
- The rafter leg is the name given to the rafters themselves on which the sheathing is attached and the roof is laid. The truss consists of two beams, which are connected at the top into a triangle. They should be inclined at the same angle as the roof slope.
- The tie is a crossbar that connects the rafters horizontally, preventing them from moving apart under loads. Often seen in hanging systems.
- A crossbar is a beam that is responsible for compression in the system and looks like a tightening. Used to fasten beams at the top.
- The beams are connected horizontally with a grip to increase the stability of the truss. Used in layered rafters.
- The stand is used for additional support when fixing systems and is a horizontal beam.
- The strut is mounted at a certain angle and is used to provide better stability.
- The fillies are needed to lengthen the rafter legs if you need to make overhangs.
There are also elements that do not belong to trusses, but are part of the truss structure.
- The purlin in the form of a beam is installed along the slopes.
- The sheathing is placed on the rafters in order to install the roof on it. Made from boards and beams.
- Mauerlat is mounted along the perimeter of the walls of buildings in the form of boards or timber. The lower ends of the rafters are attached to it.
- The bench is laid along the internal walls of the building in order to attach vertical posts to it.
Calculation (angle, load, length)
The calculation of the rafter system of a gable roof is based on the fact that in the frontal dimension it has the shape of an equilateral triangle, the sides of which can be easily calculated using simple trigonometric formulas.
These simple calculations help determine the optimal distance between the rafters, their thickness and length. The design calculations are performed in the following sequence:
- Determine the design and slope of the roof. There are various ways to select the type and slope of the roofing structure. This parameter depends on the climatic conditions and performance characteristics of the selected roofing material.
- Determine the total load on the structure. To do this, sum up permanent loads (the weight of the roofing, the weight of the frame, thermal insulation and floors) with temporary loads (snow load, wind load), multiply by a correction factor that takes into account the slope of the slopes, and then add 10-15% to this figure so that the frame had some margin of safety.
- Calculate the length of the rafter legs. To do this, they use the Pythagorean theorem, because the truss is an equilateral triangle. It turns out that the square of the length of the rafter leg is equal to the sum of the squares of the height of the blood and half the length of the laying. Knowing how to calculate the length of the rafters, you can calculate the height of the ridge.
- Determine the cross section of the elements. The optimal cross-section of elements is selected from tables in accordance with the length of the rafter legs and the distance between them. The higher these indicators are, the thicker the rafters should be.
Formula for calculating the height of the ridge of a gable roof
Selection of rafter section
Load calculation
Material selection
Calculating the angle of inclination
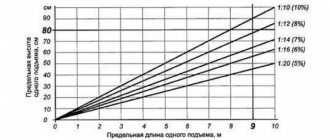
The angle of inclination of the slopes is selected not depending on aesthetic preferences, but based on weather conditions, taking into account the roofing material. Steeper slopes of 40-45 degrees are built in areas with a lot of snow cover, and flatter slopes of 10-20 degrees in places with strong gusty winds.
Keep in mind that the steeper the slope, the higher the consumption of materials, the higher the final cost of the roof.
Be sure to take into account the requirements of the material:
- Tiles and slate require a slope of at least 22 degrees, otherwise precipitation will seep through the joints between the elements.
- Metal tiles are laid at an angle of at least 14 degrees, since they suffer greatly from gusts of wind, they can become deformed or even fly off.
- The soft roof allows an inclination angle of up to 5-10 degrees, making it possible to cover slopes of any geometry.
- Ondulin is considered one of the most reliable materials and can be used even for roofs with a slope of less than 6 degrees.
- Corrugated sheets cannot be laid at an angle of less than 15 degrees, however, it is advisable to treat slopes even with an acceptable slope with sealant for better waterproofing.
The angle of inclination of the slopes of a gable roof
Selecting the material
If you decide in favor of installing fillies, it is necessary to perform a high-quality calculation of the length of future parts. It is better to carry out the work after installing the main roof rafter system. When calculating the length of the parts, do not forget to take into account the overlap on the frame ribs, which is 30-55 cm.
After this, we select the material for work. If boards with a section of 50x150 are used for rafters, the fillies can be made from boards 120x40 or even 100x30. Mostly softwood lumber is used in the work. Make sure that its humidity is no higher than 8-10%. In addition, the absence of falling knots and rot in the fillies is mandatory.
Parts selected and sawn to the required length must be treated with antiseptic compounds that prevent the formation of fungi and mold. Despite the fact that the filler is working under the roofing deck, the humidity of the surrounding air can have a negative effect on the material. It would also be a good idea to impregnate the wood with fire retardants.
Content
You can improve this version of the lining in different ways, focusing on your own tastes and preferences, in view of this, the roof of the house, where the lining of the eaves bowl is organized by installing a filly, will without any doubt look natural and attractive. What is such an important element of the eaves structure that the roof filler includes? How to install it correctly? What requirements should it meet and what functions should it perform? This is worth talking about in more detail.