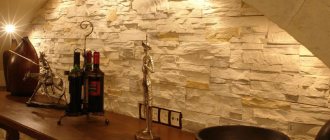
Gypsum stone is a durable artificial building material widely used in the process of cladding the internal walls of buildings. It has an aesthetically attractive appearance, is resistant to open flames and is affordable. The light weight of the material allows you to quickly cover wall surfaces without having any special skills or experience.
This type of facing material is not recommended for installation on certain surfaces. It can quickly lose its original qualities and require replacement.
Gypsum facing stone: properties
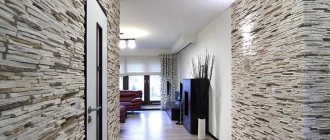
Gypsum stone is an artificially created material and looks like decorative tiles. Beautiful stonework is great for cladding walls, doorways, window openings, fireplaces, and is suitable for fragmentary or complete finishing of premises.
Features of gypsum decorative stone:
- Ease of operation. The shape of each element can be changed: cut with standard construction tools. The stone is easy to stick to any type of surface.
- Ease. Gypsum practically does not increase the weight of the wall and does not put much pressure on the foundation and floor even when fully finished.
- Improving quality of life indoors. If you cover the walls with decorative stone, the sound insulation will significantly increase. In addition, the material provides additional thermal insulation, while being breathable and does not interfere with the vapor permeability of the walls.
- Harmlessness. Gypsum is a natural material, it does not contain harmful additives, does not release toxins into the air, but on its own it protects the walls from the colonization of mold and mildew.
- Compatibility. Decorative stone can be combined with tiles, wallpaper, plaster, wood trim, and photographic canvases. It also looks good together with stucco moldings, moldings, and other decor.
- Long service life. The material lasts for many years, especially when using varnishes and special protective impregnations. It is quite durable and is damaged only by strong mechanical stress.
The main component of the stone is gypsum, which is mixed with sand, water, and modifiers. To give a certain shade, pigments are added to the mass. Gypsum stone can be stylized as brick, tile, different types of natural stone - the range of products in construction stores is quite large.
Features of artificial stone
The main components in the creation of this finishing tile are quartz, pigments, and polyester resin. Among artificial stones, this material is distinguished by its greatest strength. Therefore, many buyers give it preference. Other advantages of decorative quartz stone:
- Durability and high strength.
- Resistant to sudden temperature changes.
- Easy to clean.
- Resistant to fungus and mold, even in high humidity conditions.
This artificial stone is used to cover many indoor and outdoor surfaces, from ordinary walls to swimming pools, fireplaces, steps, countertops, sinks, sinks, etc. The production of coffee tables is carried out using quartz tiles.
How to calculate the amount of decorative stone on the walls?
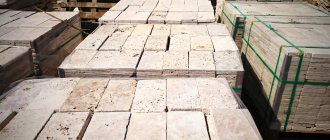
If you have to buy a ready-made stone, it is important to calculate the required amount of material in advance - this will help to avoid unnecessary expenses. For any group of elements, you should add 5–10% for breakage, incorrect cutting, and other flaws in the work. Most craftsmen lay stone without leaving seams. When cladding walls, taking into account the gaps, you don’t have to make an allowance for errors.
Calculation of the amount of decorative and artificial stone for cladding an arch in a room
Order of counting elements:
- Flat parts. You should multiply the length of the wall by the width to get its area. Next, in the same way, calculate the area of all openings (windows, doors, niches, arches) and subtract them from the total, because they are not subject to cladding.
- External corner details. The range of most companies includes special elements made of decorative stone. They are used to decorate only the outer corners of windows, doors, and niches. Having measured all the lengths of the angles, they need to be added together to obtain a number in linear meters.
- Internal corner details. For arrangement you will have to cut flat stone. It is necessary to calculate the length of the internal corners in linear meters, multiply it by the overlap coefficient (0.25). The result will be the area covered by the wall with corner elements in square meters (it is already included in the main one and is calculated for reference).
Finish coating
In order to ensure a long service life, it is worth applying a topcoat.
This can be done after 24 hours from the end of installation so that the glue has time to set. If the room is damp, you should wait a little longer. After this, you will need to wash the stone with a wet sponge and clean the seams. Next, you will need to dilute the grout of the required shade and grout the seams so that they do not stand out against the background of the overall picture. It is better to take the grout a little darker than the stone - this way you can create an interesting and unusual design.
If something goes wrong during grouting, the coating can be washed off with a damp sponge. At the end of the work, wipe the surface with a dry cloth. After this you can enjoy the result.
Today you learned what to glue gypsum decorative stone to and how the methods of gluing it differ depending on the surface. This is not too difficult to do, so even if you are not an expert in repair work, the result will not disappoint you, and the process will be exciting and interesting.
Technology for manufacturing decorative stone from gypsum
Professional production takes place in a factory using special equipment. But you can make decorative stone yourself, for your own purposes and even for sale. It is only important to strictly follow the technology, because without following the standards, gypsum will remain fragile and short-lived.
Required materials and tools
First you need to buy molds, which can be silicone, plastic, or polyurethane. If desired, you can make them yourself. Products made from polyurethane are considered the strongest and most comfortable. When working with plaster at home, some craftsmen use molds made of metal and wood, but they are not flexible, so it will be difficult to remove the finished elements.
To work you will need:
- white powdered gypsum;
- bucket for mixing - plastic with a flat bottom, not wide (a cut-off bottle or canister will also work);
- scales;
- sand;
- pallet;
- drill or screwdriver with attachment;
- polyethylene or glass;
- laundry soap;
- beaker;
- spray;
- water;
- putty knife;
- dye;
- wax or turpentine.
What kind of plaster is needed?
The stores sell gypsum of different brands - expensive and cheaper. The packaging always has an R mark with a number: the larger it is, the stronger and more reliable the gypsum. The most fragile material, R-6, is also suitable for the job, it’s just that finishing the walls will need to be done with more care.
Gypsum R-16 is the most durable and expensive; it is usually used if the finished decorative stone is to be transported and sold. Also in stores there are gypsum mixtures with plasticizers and additives introduced into them, which increase the strength of the material. The color of the powder should also be given close attention. Gray takes less color, and the result may turn out unsightly. The ideal option would be durable white gypsum of the finest grinding.
How to make a mold for a decorative stone with your own hands?
If you decide to create forms yourself, this stage of work should be the first. An additional list of materials and tools will be required:
- smooth, varnished plywood or chipboard sheet with sides made of the same material - they should have a height of 5 cm, fastened with European screws;
- fibreboard dividers 5 cm high;
- level table indoors;
- acrylic sealant;
- polyurethane;
- machine oil;
- large stones with the desired relief;
- liquid nails, superglue;
- construction hair dryer;
- marker.
First, you need to prepare a master model from which the impression will be taken. For this purpose, stones with suitable relief on one side and absolutely smooth on the other are selected. Their shape can be any (it doesn’t matter), thickness - 10–50 mm. The stones are laid out on a form board so that the gap at the walls is 1.5-2 cm, and outlined with a marker. Glue is applied to the flat side and the elements are glued. The gaps between the board and the uneven edges are filled with acrylic sealant, and sides 5 cm high are installed directly through it.
The upper part of the stones is lubricated with a release agent - machine oil. The procedure is performed several times to thoroughly fill the pores of the elements. Prepare polyurethane strictly according to the instructions and fill the formwork with it. The “liquid rubber” is allowed to dry, then the mold is separated from the master model, and further work on making the stone begins.
Preparation of the workplace
To make it easy to remove the decorative stone, the mold is moistened with water and laundry soap. The solution for molds should not be too saturated; it is enough to add only a little planed soap. Shake the liquid and pour it into a spray bottle.
The form is placed on the table and sprayed with the solution. The mixture should not flow down the walls; you just need to slightly moisten the molds. Some craftsmen prefer to lubricate molds with a mixture of wax and turpentine (3:7), after melting the wax in a water bath. All necessary materials and tools are placed nearby so that they are accessible during the work.
Making gypsum dough
The volume of the solution must correspond to the number of molds, otherwise the excess plaster will harden and deteriorate. In any case, the next fill will have to be diluted again. Pour water into the container, then gradually pour gypsum powder into it, stirring with a drill. The result should be a fairly thick mass. To strengthen the solution, add white quartz sand, no more than 10%. You cannot pour all the gypsum into the liquid at once: it will be impossible to mix it, and as a result there will be many lumps left in the bucket.
Calculation of plaster for the mold
When purchasing molds, you can see information on the packaging about the amount of gypsum dough it contains. If the molds are made independently, or there is no exact data on the volume of gypsum, you can proceed differently. The mold is filled with dry gypsum powder, and the excess is removed from above with a metal spatula. Pour it into a bucket, weigh it, separate about 30% - this part is not needed. Then the material is diluted with water 1:1 - usually this volume is enough to fill the mold. It is worth remembering the exact amount of the substance in order to know in the future how much mass should be prepared for one pour.
Creating Color
A dye is introduced into the gypsum dough. If it is in powder form, it is diluted separately with a small amount of water. The mass is mixed with a construction mixer until smooth or the effect of uneven coloring and veining is created.
Processing forms (matrices)
The molds, greased from the inside, are covered with a thin layer of gypsum dough. If you do not apply the material to the inner surface of the mold, “sinks” will often appear in the finished stone: unsightly recesses and voids. After the form, they are placed in pallets, placing the latter on a flat table.
Pouring process
You should not stir the gypsum mass for too long: it sets quickly and may begin to harden already during preparation. Immediately after kneading, the dough is poured into molds, the top is leveled with a spatula. Do not put too much pressure on the tool: this can lead to the appearance of notches. A few minutes after pouring, they once again carefully go over the future stones with a spatula to finally level the back side.
Pouring gypsum dough into a mold for making decorative stone
The forms are covered with polyethylene or glass and subjected to light vibration to remove internal bubbles and voids. Allow the plaster to harden for 20 minutes, then remove the film and remove the stones.
Stripping
Unmolding is done in this way: the edge of the mold is pulled down towards the table so that it hangs in the air. The separated tiles are gradually removed and placed on pallets. You can also turn the form over and shake out the elements, but you will have to act with extreme caution.
Drying stone
In summer, the tiles can be laid out outside or in a greenhouse - this way they will quickly dry naturally. A special dryer is worth purchasing for those who do not have the opportunity to ventilate the material, or for craftsmen making stone for sale.
What to glue gypsum decorative stone to?
Among the adhesives that are well suited for installing decorative stone, we can name specialized and some universal products. Also, a number of users use improvised compounds for fastening the material.
Special adhesives
Most often, experienced craftsmen prefer to attach gypsum stone to special adhesives, which are ideal for working on concrete, plaster, and drywall. Adhesives are sold in the form of dry building mixtures, made on the basis of gypsum or alabaster and include hardeners, plasticizers, and special additives that enhance adhesion and elasticity. Such products can eliminate damage to individual elements of gypsum stone if they have small cracks.
When purchasing glue, you should pay attention to the presence of quartz sand in the composition. It is ideal for improving the properties of cement adhesives, but has no value for gypsum mixtures. Sand is used by manufacturers only to reduce costs, so it is better to choose adhesives without it. If the instructions indicate that per kilogram of dry powder you need less than 0.3 liters of water, this product contains too many other additives, but not enough gypsum (alabaster). Such a composition will be fragile, and it is also better to refuse to purchase it.
When choosing a specialized product for gypsum stone, you need to take into account the hardening time of the solution. High-quality adhesives dry in 25–30 minutes; they need to be prepared in small portions, but you don’t have to hold the elements with your hands for a long time. You also need to carefully evaluate the composition of the glue: it should not contain toxic components, because you most often have to work with the product indoors.
Compatible formulations
In addition to specialized dry mixtures with gypsum and alabaster, adhesives for ceramic tiles and porcelain stoneware are well suited for gluing stone. Often they are also produced in powder form and sold in bags of 10–25 kg. Such products are strong, reliable, durable, easy to apply, but have a disadvantage: they take a long time to dry, and it will take longer to press the elements to the wall. As for the high degree of adhesion to the surface, this has no practical value in relation to gypsum stone: the elements are very light and adhere well to the wall.
Also in stores there are ready-made compositions for tiles and adhesives such as liquid nails. Working with them is easy, comfortable, and the time until the product sets is minimal. But the price of such adhesives is quite high, so they should be used for fragmentary finishing or repair of a small area of decorative stone.
Available means
Some putties for roughing or finishing contain alabaster. They can also be used for gluing gypsum decorative stone. The putty is diluted a little thicker than for plastering walls, the elements are glued, having previously treated the base with a latex primer. To slow down the drying rate of alabaster, you can drop a little liquid soap into the diluted composition. In addition to putty, other painting mixtures, including cement, are suitable for gluing gypsum parts to walls.
Features of gluing on different substrates
Before you figure out how to glue gypsum decorative tiles, you need to find out what base it needs to be laid on. There are no special restrictions here; it is important that the base is dry, clean and level. If there are significant differences in height, it is necessary to level the base. Let's look at the features of working with different types of surfaces.
Wood
Mandatory cleaning of old coating. Any paint and varnish material is removed. The wood is cleaned and large defects are smoothed out. The base is coated with an antiseptic and allowed to dry completely. If required, the surface is strengthened with fiberglass, after which a layer of putty is applied.
Plaster
Before gluing the tiles onto gypsum or other plaster, tap the old base and remove poorly retained fragments. If there are a lot of them, they plaster the wall again. If there are a small number of defects, they are sealed with a repair solution. Allow to dry completely. The base is cleaned with sandpaper and completely removed from dust. The use of cement mixtures in this case is not recommended. Homogeneous materials are prone to peeling, causing the finish to fall off.
Drywall
The best preparation option is to lay fiberglass and putty the surface. This strengthens the base and prevents it from absorbing excess moisture when gluing. If this is not possible, glue the cladding directly onto the drywall. But in this case, only polymer adhesive compositions are chosen. They dry quickly and do not contain much moisture. This way, the cardboard plane does not have time to become saturated with liquid and soften during the gluing process.
- Decoration Materials
How to putty drywall correctly: detailed instructions for beginners
Brickwork
If it is smooth, you can stick it directly onto the brick. Use any glue. But we must remember about their features. The finished gypsum mastic is applied in a thin layer, which is not very convenient on masonry. The cement composition is not plastic and takes a long time to dry. Perhaps your best choice would be one of the polymer solutions.
Instagram lightstone.by
Instagram djemdecor
Instagram djemdecor
- Decoration Materials
How to glue tiles: a detailed guide that will leave no questions
Laying decorative stone
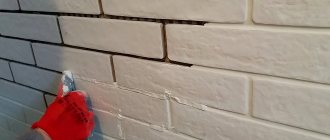
Before finishing the walls with gypsum stone, they must be primed, choosing a product depending on the type of base. Deep penetration primers are most often purchased for concrete walls; latex primers are used for highly absorbent surfaces. It is better to apply 2-3 layers of the composition, which will seriously improve the quality of adhesion of the glue to the wall. The seams on the brick bases are leveled and sealed with putty using a narrow spatula.
Stone elements are cut out according to the outlines of corners, protrusions, and other non-standard parts. This can be done with a regular hacksaw. They begin gluing the decorative stone only after the primer has completely dried. Using a convenient-sized spatula, apply a layer of glue up to 1.5 cm onto the stone, then pass over it with a comb to remove excess product. The spatula is regularly washed with water to remove any remaining dried glue, otherwise it will form lumps.
After installation of the coating is completed, the glue that has come out from the surface of the stone is removed before it dries. To gain strength, wait 24 hours, but with high air humidity this period can be extended up to 7 days. Only then can artistic processing be carried out.
Advantages of gypsum stone
Gypsum stone is used very widely for finishing the interior of a room. Stucco can imitate any material, but often it looks identical to natural stone. The material is widely used for decorative interior design and creating unique designs.
Speaking about the advantages of decorative gypsum stone, it is worth noting the following:
- wide range of colors and textures;
- creating a pleasant microclimate inside the building;
- resistance to deformation and temperature changes;
- light weight, environmental friendliness and long service life.
The material has few disadvantages, but they are also worth mentioning. It is poorly resistant to the negative effects of moisture, as well as physical influences. It is worth taking these features into account when choosing materials for finishing the bathroom, kitchen and other rooms with high humidity.
Gypsum stone is an excellent material that is good for large volumes of work. Its cost is much lower than that of natural materials, especially when purchased in bulk.
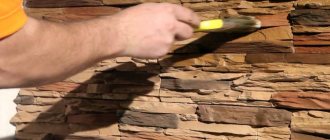
Application of a protective composition
Even before varnishing or painting the stone, you need to impregnate it with a special hydrophobic agent. It is required to reduce hygroscopicity, prevent moisture saturation, and reduce the risk of mold growth. Stores sell ready-made liquid formulations or concentrates that you need to dilute with your own hands. The following are considered good impregnations for decorative stone:
- "Optimist S405";
- White Hill;
- "Tiprom" and others.
Application of the solution does not lead to the appearance of a film that could interfere with the vapor permeability of the surface. The product penetrates 10–15 mm into the plaster, which prevents its damage when applying paint. It is usually recommended to apply 2-3 layers of protective agent one after another, without waiting for the previous one to dry completely. The easiest way to work is with a spray gun, but you can use a regular roller.
Painting the stone
Silicone, silicate, acrylic, and latex products are used to color stone. Most of them are water based. If the paint is used for exterior use, it must be resistant to external influences. Usually they process decorative stone, into which no dye was added during manufacture.
To ensure that the paint adheres better and does not fade longer, the glued stone is first primed with protective compounds with a hydrophobic effect, which reduce water absorption by 20–25 times. To get a glossy effect, you should use a special varnish instead of paint.
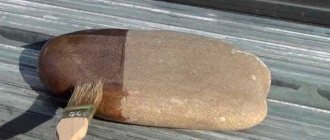
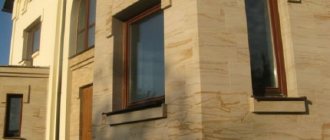
Can gypsum stone be used for exterior decoration?
Exterior finishing can be done using this material. The only thing is that when carrying out work you should make sure that the weather conditions will be favorable. There is no need to carry out cladding in rain or strong wind, as this can significantly reduce the quality of the material and negatively affect its performance characteristics.
When choosing an adhesive, you should give preference to a composition that is high-strength and resistant to moisture and sun. Its packaging must indicate that it is intended for outdoor construction work. After the adhesive has dried, it is recommended to treat the plaster with a special impregnation, which will protect it from external influences and preserve its color and texture.
Using plaster varnish
Standard plaster products are grayish or white, and painting them or tinting them with a colored varnish will help give the wall the desired look. With its help, you can design the surface in an original way and stylize it in accordance with the chosen direction in the interior. Varnishing helps increase moisture resistance, because gypsum products deteriorate when in contact with moisture. After varnishing in several layers, the decorative stone will be suitable even for finishing wet rooms. Also, applying varnish reduces the susceptibility of the tiles to impact.
Varnish for gypsum decorative stone: types
There are varnishes of different types, compositions, with different characteristics and properties on sale.
Shellac varnish
This type is usually used in decoupage, but it is often used in finishing work. Shellac is alcohol-based, so it works well with plaster. It can be applied as a stand-alone coating or over any paint. Shellac creates a thin polishing layer that looks stylish and very attractive.
The composition can be transparent and colored. There are even special varnishes with an aging effect that are used to give the base a vintage look. If you combine the product with rosin in a 1:1 ratio, a protective film will be created on the surface of the plaster, eliminating the appearance of dirt and giving the wall a marble look.
Acrylic varnishes
Acrylic-based varnishes perform a decorative and protective function. They are moisture resistant, do not deteriorate from household chemicals, ultraviolet radiation, temperature changes, dry quickly, and do not have a pungent odor. When thickening, acrylic varnish can simply be diluted with water.
In appearance, acrylic coatings can be matte, semi-matte, or glossy. Matte ones help give the stone the appearance of a natural, rough material. Semi-matte varnishes work in a similar way, only their transparent varieties may leave a slight light coating after drying. Glossy products shine and lead to glare, which must be taken into account when planning the decor in the room.
Oil varnishes
Oil varnishes contain artificial resins and plant extracts. After application to the gypsum stone, a thin film is formed, protecting the material from any external factors and extending its service life. Oil-based varnishes can be transparent or colored, glossy or matte. After this product has dried, the surface of the decorative stone will look a little darker than initially.
Yacht varnishes
The most durable, long-lasting and reliable varnish for stone is considered to be yacht varnish. It has a high degree of water resistance, making it suitable even for handling yachts. Contains solvents, has an unpleasant odor and is more suitable for outdoor use, although after complete drying it ceases to be toxic. For maximum surface protection, yacht varnish is applied in 2 layers.
Varnishing rules
Before applying the coating, you need to make sure that all elements have dried well after priming or protective hydrophobization. The adhesive to which the decorative stone was attached must also dry out, otherwise the integrity of the cladding may be compromised.
Tips for varnishing stone:
- rough parts should be sanded before spraying varnish; fine-grain sandpaper is well suited for this purpose;
- if impregnation was applied to the stone, you need to read the instructions for it and clarify the possibility of subsequent varnishing and compatibility with a particular varnish;
- shiny compositions reduce the effect of the naturalness of the stone, so for country styles, Provence and other styles striving for naturalness, it is better to choose matte products;
- Before varnishing, be sure to wipe off all dust from the stone;
- during work, do not wet the wall or elements - they quickly absorb moisture;
- The most convenient method of varnishing is spraying from a spray gun or airbrush.
By using your imagination, you can use decorative stone to find very interesting solutions even in a small apartment. This material looks unusual, fresh and gives the house a special flavor, fills it with warmth and comfort.
Gluing methods
Decorative gypsum stone can be glued in several different ways. The choice of method for laying the stone depends on which surface you plan to glue the gypsum product to.
Be that as it may, the walls will need preliminary preparation. You will need to level the walls, filling holes and cracks, removing too much surface relief. If the gypsum stone and its texture are similar to natural stone, you don’t have to deal with the elimination of small and minor defects. If the wall decoration is very old, it is worth removing the plaster and removing the old wallpaper. After completing the preparatory work, the wall is coated with a liquid primer, which will ensure good adhesion. Decorative stone can be laid immediately after the surface is completely dry.
Using gypsum-based adhesive
If you decide to glue gypsum stone, it is recommended to use a special gypsum-based adhesive. This is quite simple to do: you should choose a good glue, for example, Volma or Knauf. Next you will need to do the following:
- Dilute dry glue with water in the proportion determined by the instructions. As a rule, this is a kilogram of dry mixture per half liter of water.
- Stir the mixture thoroughly so that no lumps remain.
- Treat the walls with a hydrophobic primer to ensure a high level of adhesion.
- You will need to carefully cut the coating along the contour. The design should be made a little smaller than what was originally conceived.
- Lay a guide strip of stones on the wall, then lay the remaining stones.
Using ceramic glue
This gluing method is also considered acceptable. It can only be used in rooms where there are no difficult operating conditions. This is done simply:
- The wall is coated with a hydrophobic primer. If you plan to glue stones to a metal surface, you will also need reinforcement.
- After this, a guide strip of stones is laid out.
- The way the stone is held is checked. After the glue has hardened, you need to lightly pull the stone towards you. If it does not fall off, you can continue gluing.
- If glue seeps between the joints of the stones, it must be immediately removed with a sponge before it hardens.
It is worth remembering that this type of gluing is possible, but it is difficult to call it expedient, because glue for ceramics is more expensive and takes longer to dry. Its advantage is durability, but gypsum stones are rarely intended to be used for long periods of time.
Using liquid nails
This method is appropriate to use only if you plan to finish a small section of the wall, or to spot repair an already finished surface. The operating instructions are as follows:
- If necessary, apply markings in the form of horizontal lines along the surface of the wall.
- If the rows do not fit on the wall, it is worth leaving space for trimming at the bottom of the wall - this way it can be hidden behind the baseboard.
- Apply glue to the decorative stone, then let the mixture sit for 10-15 minutes so that it has time to dry a little and does not seep between the seams.
- Place stones on the surface of the wall. Installation should begin from the corner of the building.
“Liquid nails” are a high-quality material that is completely ready for use, but it is not practical to use it for covering large areas due to its high cost.
We recommend watching a video about using sealant for installation: