Stoves have become commonplace in private homes and cottages; in addition to being able to cook food, they provide people with warmth. Since ancient times, the stove was a nurse and cured all illnesses, gave rest and strength, so painting the stove with your own hands always brought good luck and peace to the house, putting a piece of soul into the interior. That is why it was in the center of the house, creating the complete impression that it was not the stove that was built in the house, but the dwelling was built around it. At different times, stoves were decorated in their own way, and in each region and region of even one state they could differ significantly from each other. The painting of a Ukrainian stove can never be confused with a classic Russian one, and the latter from the central regions of Russia is significantly inferior in beauty and splendor to the stoves built beyond the Urals.
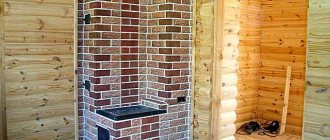
Russian stove: cladding, whitewashing, drawing
The best option for heating a country house is a real Russian stove with a pattern.
It can become indispensable, especially if the house will not be used all year round. With its help, you can not only heat the room, but also heat water, dry fruits collected on the site, and prepare tasty and healthy food. The functions of the Russian stove are varied. But don't forget about the interior. The structure occupies a significant part of the room, so it is worth paying attention to its decoration - lining or painting the Russian stove with your own hands.
Rules for preparing the solution
In order to achieve good results, close attention must be paid to the process of preparing the solution itself. In this case, it is necessary to follow a number of simple rules not only at the time of mixing the plaster mixture, but also when preparing the components
Clay:
- clear away debris;
- Place in water to soak for several days;
- filter the resulting slurry through a coarse sieve.
Lime (work to prepare this material is carried out only outside):
- pour pieces of lime into a bucket (it should only be metal) - no more than half the volume of the bucket;
- fill with water (no more than 0.6 bucket volume);
- Allow the solution to cool overnight;
- drain the solution;
- pass the lime slurry through a coarse sieve.
Sand also needs to be sifted, asbestos or fiberglass must be thoroughly crushed.
To prepare a high-quality solution, you need to reproduce the following sequence of actions:
- Sifted sand is mixed into the prepared clay.
- The remaining components of the solution (for example, fiberglass) are added.
- The solution is thoroughly mixed. This can be done using a drill, a construction mixer, or a hammer drill with a special attachment.
A high-quality solution should not contain solid particles or lumps; it looks homogeneous and plastic.
There are a number of nuances associated with storage and use periods, depending on what solution it was decided to use:
If gypsum was used as a base, such a solution hardens very quickly. It must be prepared in small portions, which should be immediately applied to the stove;
The prepared solution with a cement base should be used within an hour after it has been diluted with water;
The clay-based mixture can be prepared in advance. It can be stored for a long time if the container is sealed.
What do you need to consider when starting plastering and finishing?
When plastering a stove, you need to take into account some points that may affect the quality of the work performed.
You cannot apply plaster to a newly erected stove structure. A “fresh” stove should not only be well dried, but also go through the stages of shrinkage. To do this, it is used for two to three months, and only after this period can finishing work begin.
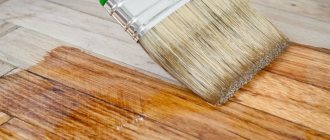
To paint a plastered surface, only water-based paints can be used. Other coloring compounds containing drying oil or organic solvents will release harmful substances and unpleasant odors into living spaces when the stove is fired.
For all plastering and decorative work on the stove, it is recommended to use natural-based materials, without any synthetic additives that are harmful to human health.
It should be noted that all the methods discussed in the article are not as easy to implement as they seem at first glance. Therefore, if you have a complete lack of experience in this work, you should not take risks and translate quite, sometimes, expensive materials. It is better to entrust these important activities to real professionals who know first-hand the secrets of masonry and subsequent finishing of the stove.
Preparing the oven for whitewashing
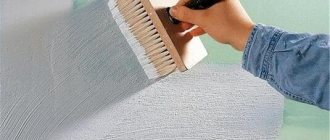
The first stage is surface preparation. First of all, the walls of the new oven are covered with a layer of plaster, then coated with clay. If it is old and the plaster is falling off in places, you need to re-plaster these places. You should choose a special plaster that is heat-resistant; you can buy it or make it yourself.
The treated surface is left to dry. This process may take two days. Less is not necessary, since the plaster may not dry out and then it will quickly fall off.
After two days, the stove is heated at least three times. This is necessary so that the clay layer becomes as strong as possible. But at first you should not heat the oven too much: its walls should become slightly warm.
Before whitewashing the stove, it must be covered with a layer of plaster.
If the old plaster holds up well, it only needs to be cleaned of dirt and soot. Soot stains can be easily removed with a wire brush or dish scrubber. To remove greasy marks from the surface, use a caustic solution (2%). Rust stains are removed with a solution of copper sulfate in a proportion of 100 g of powder and 1 liter of water.
How to whitewash a stove with your own hands?
First, you need to conduct a visual inspection of the stove; if there are deep cracks and chips on it, then they must first be covered in the old fashioned way with clay or specially purchased putty. It will not be possible to beautifully whitewash the stove without preparatory work; you need to carefully eliminate all defects so that your efforts do not go in vain.
Tools for work
Before whitewashing the stove, you should clean its surface with a broom or brush; for old exhibits, you can use a metal brush, but the main thing is not to damage the plastered surface with it. Then you need to determine the method of applying whitewash, for this you can use:
- A brush is chosen by those who have painted any surface more than once and are confident that they will do everything smoothly and without streaks. Before painting, it is advisable to soak the brush in water so that no hairs remain on the surface of the stove during whitewashing.
- A sponge is an alternative method; it does not give a clearly even color; it is used only for small stoves, since it will take a lot of time to obtain the desired painting density.
- Roller - suitable for both beginners and professionals; it covers a larger area with one stroke than with a regular brush. Applying the selected composition with a roller is very simple; the main thing is to move along the surface in the direction of the window to create uniform stripes.
- Spray gun - it is used for large stoves. It is easier to handle with two people: one person will maintain the required pressure in the device, and the second will monitor the uniform application of the composition filled into it. Before using it, you need to check the spray gun, and then constantly hold the spray gun at a right angle to the oven wall, while maintaining an optimal distance of 30 cm from it.
Whitening technology
- Initially, all seams, chips and cracks are sealed using a spatula and putty; the latter can be replaced with putty, using it in its original form, before diluting with water.
- After all the surfaces of the oven are smooth and without visible defects, you can proceed to preparing whitewash for them using putty, lime, chalk or tooth powder.
- The preparation of any of these compositions is carried out according to the recipe; the components are taken strictly in the specified quantities to obtain a mixture that is resistant to heating and cracking. It should be homogeneous and without lumps; its optimal consistency is liquid sour cream.
- The walls of the oven should be slightly moistened before whitewashing, but if a composition of tooth powder is used, they need to be warmed up. Then the selected whitewash option is applied to all surfaces.
- When using a spray gun, painting is carried out as conveniently as possible, but in the case of a brush or roller, a certain technology for applying strokes must be followed: first they are made vertically, and after the first layer has dried, they are duplicated by horizontal stripes. This method of applying whitewash can achieve its most uniform distribution and avoid gaps and yellow spots. If, however, they appear somewhere, then the whitewashing should be repeated, but after the oven has completely dried.
Methods for whitewashing a stove
After preparing the surface, the question arises of how and with what you can whitewash the stove in the country. Traditional options that come from time immemorial are lime or chalk.
Lime is good because it is harmless to humans and resistant to high temperatures. Lime whitewashing of the stove is non-toxic and can be used even in rooms with high humidity and in a bathhouse.
Lime powder must be diluted with saline solution to the state of liquid sour cream. Salt will make the coating strong and not prone to cracking.
Lime for whitewashing must be diluted to the state of sour cream.
A liter of diluted lime is enough to paint 2 square meters. m area. If drops get on the floor, they can be easily washed off, the main thing is to do it quickly, before the lime is eaten away.
Do-it-yourself whitewashing with chalk allows you to get a bright white beautiful color. The disadvantage of the coating is that upon contact with the surface, white marks remain on the clothing.
It is recommended to dilute it not with water, but with milk. To make the coating stronger and not “whitewash”, you can add wood glue.
The powder is sifted and diluted in milk, mixed, and additional components are added. The mixture with lime is heated, without allowing it to boil, until all components are completely dissolved. The resulting solution must be filtered and only then proceed to coloring.
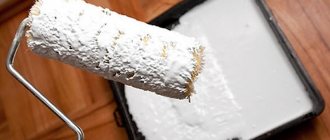
To whitewash the stove, you can use a roller or a wide brush. There is no need to heat it before bleaching - it should be cold.
First, the surface is moistened with water and the first layer is applied. To paint a wall without streaks, it is applied horizontally. Without waiting for the first layer to dry completely, apply the second, but horizontally. The whitewash should be left until completely dry, and only then proceed to applying a design or ornament to the stove.
Tools and materials needed for painting
For a modern user, acquiring the necessary materials will not be difficult, but the presence of a huge number of different tools for performing the same type of work sometimes confuses. In order to competently paint a Russian stove, you need to prepare the following:
a set of sandpaper from coarse to zero in order to clean the furnace wall;
chalk or lime to prepare the surface for applying ornaments;
a set of flute brushes for whitewashing a stove;
a set of artistic brushes for drawing;
acrylic or water-based paints.
This is the necessary minimum of materials, which allows almost anyone to apply the ornament they like to their home stove. (See also: Types of stoves)
Painting
Initially, beautiful Russian stoves were white, as if symbolizing the purity of the thoughts of the owners of the house. But in the modern world, stoves have not been installed in every home for a long time, so the meaning has gradually been forgotten. Many people find a simple white stove uninteresting, so they often make unusual paintings of stoves.
In order to paint a stove with your own hands, you do not need to be a great artist. Now it’s enough to choose the right stencil. You can find it in the store - a stencil for painting walls. Another option to make a stencil of a design for the stove is to find any image and print it on thick paper. The stencil is fixed to the surface of the oven using adhesive tape (or, if the stencil is “purchased”, it already has a self-adhesive base). It is then transferred to the surface using a colored pencil.
You can apply painting to the surface of the stove using a stencil.
If this is your first time dealing with such work, it is better to choose a simple design for a Russian stove. National patterns may be the best option: they will look harmonious on the stove, and also consist of individual simple elements that can be easily mastered.
You can color the pattern using whitewash, to which a coloring agent is added. It can be simple gouache, but it is better to purchase acrylic paints, which can withstand high temperatures much better.
The drawing itself is applied using ordinary artistic brushes of different sizes. After the drawing on the Russian stove is ready, it is not recommended to heat it for at least two days so that the paint can dry.
Photo gallery
Master class on painting a stove.
Nadezhda Viktorovna Suyurova
Master class on painting a stove.
Stoves have already become common in private homes , which, in addition to the ability to cook food, provide people with warmth. Since ancient times, the stove was a breadwinner and cured all illnesses, gave rest and strength, so painting the stove with your own hands always brought good luck and peace to the house, putting a piece of soul into the interior.
That is why it was in the center of the house, creating the complete impression that it was not the stove that was built in the house, but the dwelling was built around it.
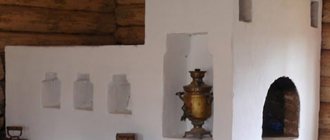
At different times stoves were decorated in their own way , so I decided to decorate my stove with Gzhel painting .
For our country, a simple Russian stove with the whiteness of the first snow is more familiar, which symbolizes purity of thoughts and order in the family and household.
I painted the stove without applying a preliminary drawing, I immediately copied the Gzhel pattern from the picture onto the stove.
I painted patterns with gouache and regular brushes for gouache paints.
Gouache patterns dry immediately after being applied to the stove, since the stove is whitewashed with lime, which tends to quickly absorb moisture.
In the same way, I painted the stove in the children's room based on the cartoon about Umka.
Holiday of the Russian House Once upon a time, people lived in houses called izbas. The brownie Kuzya lives in this hut. Today he invites you all to visit him.
"The stove in the life of the Russian people." Introducing preschoolers to Russian culture Do you know the riddle: “There is a mansion, in the mansion there is a box, in the box there is a bug, in the mansion there is a bug”? Her answer: there is a hut, in the hut there is a stove, in the stove there is ash, and in the ash.
Furnace lining
In the old days, in rich houses, stoves were covered with tiles, but now they are almost completely out of use: tiles are more often used to cover Russian stoves in summer cottages.
You can also do the furnace cladding yourself. First, a layer of plaster is removed from the walls. The surface is covered with a mesh and secured with dowels. Then a layer of a mixture of cement and clay is applied. Using a level, level the surface so that it is perfectly smooth. After this, the stove is heated well so that the mixture “sets” and hardens.
After this, you can proceed to surface finishing. The tiles are laid and secured using an adhesive mixture. When tiling the stove, you cannot do without a tool such as a tile cutter - you will need it to trim the tiles. The last stage of work is grouting the joints. This requires a special mixture, but you can use the same one that was used for gluing. At this point, the cladding work is considered completed.
It is enough to put in a little effort - and the result will be a beautiful Russian stove, which will become not only a “heating method”, but also the real soul of a country house.
Painting like from a cathedral
Our user with the nickname Bilibin was inspired to paint her stove while walking around Red Square.
Bilibin
Before you is a painting of St. Basil's Cathedral!
It’s interesting here that this stove was not whitewashed before painting; the design was applied directly onto the unpainted plaster.
Bilibin
The main thing is to plaster on a plastic mesh so that there are no cracks.
Furnace design
Before choosing the material from which the finishing will subsequently be made, it is worth paying special attention to the design of the room. Most often, the presence of a Russian stove suggests a rustic kitchen style, embodied in rough wall and floor decoration, a whitewashed ceiling, chintz curtains and wooden floorboards. However, imagination and a little effort will allow you to create other unique design options that fit perfectly into the environment.
Russian stove in the interior of a modern kitchen
Most often, refractory bricks are used to lay a stove with your own hands. As a rule, it does not require additional cladding and can be used as an independent decorative element. But, in case of obvious dissonance with the kitchen design or violation of the integrity of the surface during operation, the material needs additional finishing.
There are plenty of options: the stove can be covered with tiles or stone, used tiles for decoration, or simply plastered and painted in any of the colors presented in the palette. The choice will depend only on the complexity and cost of the work.
Painted brick
Another option is not to plaster the stove or varnish the bricks, but to paint them. This is what our user with the nickname adi-vrn did, and many, having seen such a successful example, wanted to try painting the bricks of their stoves.
adi-vrn
I removed all the plaster, opened the seams, grouted it with terracotta grout and painted it with lime with the addition of black tint and salt. It turned out to be a great gray color.
Plastering and painting the stove
Materials and tools:
Before painting on the stove, its surface must be prepared.
First you need to prepare the structure for decoration. First of all, you need to plaster the surface of the structure. To do this, you need to make a fireclay mixture, which is designed for conditions of temperature changes - from strong heating to cooling.
First you need to align the corners of the product using an aluminum profile. Then start plastering. After plastering, the surface of the device will become smooth and acquire a light gray tint. After you plaster the stove, the product should dry for two days. Then you need to light the oven, increasing the heating temperature. After this, they begin to decorate the stove.
First, the stove is painted white.
You need to choose a special paint designed for conditions of severe temperature changes.
You can purchase such paint in stores or make it yourself. This kind of paint is very expensive in stores. Therefore, you can paint the stove with building facade paint that has a latex composition.
A stove painted with a single color paint can be decorated with various patterns. For this purpose, paint that is resistant to high heat is used. If you are good at drawing, you can decorate the stove with excellent drawings, colors, patterns, using all your creative imagination. If you don't draw well enough, you can buy a stencil with patterns. If you liked any ornament in the magazine, you can transfer it to tracing paper, enlarge it using a photocopier and transfer it to the surface of the stove. The design of such a furnace is shown in Fig. 1, which shows a photograph of a stove decorated with stenciled patterns.
You can make a pattern that matches the pattern on the tiles in the kitchen. This combination of kitchen decoration ornaments and stove will create a special style in the interior of the room.
Painting or stenciling
To decorate a stove with painting, it is not necessary to have the talent of an artist; this process is quite artisanal and requires only care and precision in application. There are enough stencils on sale for every taste, and you can choose a plant, floral or fairytale motif - as desired. It is possible to make a stencil yourself by cutting out the design you like on thick plastic film. You can attach the stencil for applying paint with tape. Ready-made stencil designs have an adhesive base, which, after washing with water, returns its properties and can be used dozens of times. Complex designs are not necessary; sometimes a simple floral or ethnic ornament looks more organic, the main thing is that there is overall harmony with the interior - in colors and style of design.
About paints for painting - there are options here: you can paint the patterns with the same whitewash composition, adding dry water-soluble pigments, in portions. This method gives a uniform, aesthetic surface. The choice of dry pigments is huge, the colors are luxurious, and the cost of coloring pigments is low. But you can also paint with gouache, although this is not the best option in terms of durability. Acrylic or acrylate paints are more convenient to use, and acrylic coatings can withstand heating to high temperatures without problems, do not fade, burn out or crack.
Finishing the stove surface with plaster
Designing with plaster is the simplest way of finishing. Previously used clay compositions have already lost their relevance due to the advent of dry heat-resistant mixtures.
The Russian stove is finished with plaster and decorative tiles
It is important to remember that before starting facing work it is necessary to wait a month from the date of completion of the furnace laying. This interval is necessary for complete shrinkage of the structure.
Before plastering the brickwork, it is necessary to carry out certain preparations:
The plaster is applied in several layers until an even layer is obtained.
The immediate plastering process consists of layer-by-layer application of the solution at intervals of 4 hours - for each layer to completely dry. The first batch of the solution should be quite liquid. Its task is to level the surface and form corners. On average, three to four layers are applied to obtain a smooth surface. The result of such work will be a durable finish.
Preparation of materials
The solution is prepared immediately before plastering work . If the stove maker uses ordinary clay from a quarry, it is soaked overnight . Fireclay clay is filled with water for up to one and a half days .
The sand is washed in running water. Only fine material with a particle diameter of 0.15 cm or less . The ratio of sand and clay in the solution is determined experimentally, ranges from 2:1 to 5:1 and depends on the quality of the clay.
Important! A normal solution applied to a trowel does not slide off the tool when it is tilted 45 degrees .
Construction stores sell ready-made mixtures for plastering stoves . They contain clay, sand, lime, heat-resistant adhesives, and plasticizers that increase the strength of the plaster. A solution from factory mixtures is made according to the manufacturer's instructions . If all requirements are met, the result will be a paste of normal composition and optimal viscosity.
How to calculate the amount of materials
The amount of mortar for plastering a Russian stove is calculated in the same way as for walls. The calculations take into account the surface area of the oven and the thickness of the plaster:
For example, for a wall measuring 1.5x1.35 meters you will need 36.5 kilograms of mortar (with a plaster thickness of 10 mm ). To speed up calculations, stove makers use a plaster calculator on the Internet.
The number of tiles is calculated after measuring the surface area of the oven. When purchasing material, take into account that in some places you will have to glue not whole tiles, but parts of them.
Furnace painting process
The basis for painting a stove in a private house can be either a plastered surface or natural brickwork, provided that its integrity is not compromised. There are many options for paints and whitewashes. You can choose the appropriate option for painting the stove surface, taking into account the level of complexity of the work, the financial base and the overall design of the kitchen.
Painting the stove with lime
The easiest way to paint a stove with your own hands is chalk or lime whitewash. To strengthen the composition, salt is added to it, which during the operation of the structure will prevent the coloring composition from falling off. It is necessary to paint with a chalk or lime composition in several layers; not only the quality of the coating, but also the aesthetic appearance of the stove will depend on this.
There are also a number of heat-resistant paints that are easy to apply and come in a wide range of colors. The most common types among them are:
Painting the oven after preliminary preparation
With their help, you can paint the surface of the stove in any color, as well as create a unique painting with your own hands. The painting process itself is not complicated, it is only important to carry out preliminary preparation of the surface. To do this you need:
Note: The stove can be painted without prior priming.
Painting the stove surface (brickwork or plaster) is done using a medium-pile roller. The brush is used only to paint seams and hard-to-reach areas.
It is best to paint the stove with your own hands in several layers, at intervals for complete drying.
Tip: Before you start painting, it is advisable to heat the oven a little. Any paint adheres better to a warm surface. But after completion of the work, the stove can be heated no earlier than 2-3 days later.
Can the stove be painted?
It is possible to paint a brick oven; moreover, it is advisable to do this before the start of operation. This is done not only for aesthetic reasons. Untreated brick has a porous structure and, like a sponge, absorbs grease, soot and other contaminants. The resulting stains cannot be washed off without damaging the brick.
Paint or varnish applied to brickwork seals pores and microcracks. After the paint mixture has completely dried, a dense layer is formed that protects the brick from dampness and dirt, and also makes it easier to maintain the stove. Some modern paints contain additional components, for example, antifungal or anti-corrosion. A stove painted with such paints is better protected from destructive factors, so it always looks new and lasts longer than the same, but unpainted stove.
Types of cladding for furnace devices
Before carrying out work on lining the furnace, you should very carefully select the material to change the appearance of the furnace device. Properties to consider when choosing materials:
Most often, materials with a thickness of at least 6 mm with a low-porosity structure are used for lining the furnace.
Since ancient times, brick, natural stone, tiled material, and ceramic tiles have been used to change the appearance of the stove. Modern industry offers artificial stone, as well as soapstone, for such work.
Application of bricks
Brick cladding can be done simultaneously with the laying of the furnace itself. It can compete in beauty with such expensive materials as granite and marble.
For better adhesion, one of the surfaces of the brick should be rough; the outer side, on the contrary, should be smooth to look most aesthetically pleasing. Of course, refractory bricks should be used for such work. This material is also used to decorate a metal stove. To “smooth out” the different heating characteristics of metal and brick surfaces, a layer of ballast made of dry sand of fine consistency is laid between them. This step will prevent deformation of the decorating layer when the heated metal expands and increase heat transfer.
How can you paint a brick oven?
Modern means for processing brickwork surprise with their diversity. What paint or varnish is best to use? When choosing a painting material, factors such as:
For example, it is more advisable to emphasize the beauty of new brickwork without a single flaw using a transparent coating (drying oil, varnish). An old stove that has defects or has been damaged by dampness can be painted with paint of the desired color.
Different types of paint
To paint a stove in a house or country house, you need to use a special type of paint. They are called heat-resistant because they retain their structure even under high heat. Heat-resistant paints are divided into several groups:
Only paints with high heat resistance are suitable for coating ovens. Stove masters recommend combining different types of paints when painting different elements of the stove. This allows you to get high-quality results without unnecessary expenses.
The main part of the stove, made of brick, can be painted with Ecoretta paint or Thermolux antifungal paint. For metal parts of the stove (doors, dampers), it is recommended to use paints of the Certa, Dali, and Celsit-500 brands. These materials, in addition to high heat resistance, have anti-corrosion properties.
Drying oil and varnish
Drying oil is suitable for those who want to preserve the original appearance and texture of brickwork. As a rule, new stoves that do not have defects are coated with drying oil. Drying oil is distributed with horizontal movements over the surface of each brick.
Popular types of oven varnishes today are heat-resistant silicone varnishes (KO-85, KO-815, Siltek-1). They provide reliable protection for bricks and seams, adhere well to the surface, and withstand prolonged heating and temperature changes. The disadvantages of this group of varnishes are the presence of acetone and other toxic substances in the composition, and a pungent odor at the time of application. However, completely dried varnish does not smell even when heated and is absolutely safe for the inhabitants of the house.
Apply the varnish to a clean, dry surface of brick and metal parts using a brush or spray in 2-3 layers with intermediate drying for 20 minutes. Drying time is 30 minutes. The varnish contains the flammable substance acetone, so it should not be used near an open flame.
Supporters of environmentally friendly materials can use the old recipe for stove varnish. The gloss mixture contains chicken egg whites, milk and brick chips crushed into powder. The surface of the brick is covered with a brush with the mixture in one layer and allowed to dry for 24 hours. The result is a beautiful matte terracotta finish. However, this method has a significant drawback: when heated, the stove begins to smell like baked milk.
Cladding the stove with tiles
Tiles are a unique and antique type of decoration. The material is presented in the form of ceramic tiles on one side, and on the other - a pump, with the help of which the installation process is carried out.
The color range of tiles is varied; in addition, they can have different reliefs and patterns. A stove lined in this way will have a unique look. However, the cost of the material can significantly exceed other types of cladding. This is due to the fact that the finished tile is painted by hand.
Russian stove decorated with tiles
To cover a stove with tiles, you must adhere to certain technical recommendations and perform it in the following order:
Scheme for attaching tiles to the stove surface
Important advice: Horizontal seams are rubbed with a gap of several millimeters, taking into account the shrinkage of the tiles.
A stove lined with tiles in a private house is a reinforced, monolithic structure with an almost unlimited service life.
Types of designs that are used today
Gas, electric and solid fuel boilers are the main heating devices in country cottages and private houses. Some connoisseurs of everything ultra-modern use solar panels for these purposes. But still, a large percentage of residents of the private sector use an old Russian stove to heat their premises.
Until the 19th century, stoves in village huts and even in noble mansions were a box for burning fuel with a hob, a stove bench, and sometimes an oven. For owners of a modern home, overflowing with newfangled household appliances, a Russian stove in the interior is more of a decorative detail than a practical one. Today, the range of designs has expanded and is represented by such structures.
A large percentage of private sector residents use an ancient Russian stove to heat their premises.
Nowadays, the stove acts as a decorative element
- “Dutch” - intended exclusively for heating rooms, is a compact one- or two-tier vertical structure with a chimney. This type is rarely found in modern buildings due to its inexpediency (it is easier to heat apartments using a central heating system - pipes and radiators).
- A Russian stove in a stove bench is a mandatory attribute of a village hut in Rus'. The firebox located in the lower part of the structure heated its upper part, and in the middle there was a cast-iron hob. The chimney in such a system is duct.
- “Shvedka” is an improved and simplified version of the traditional Russian stove, which is characterized by high efficiency while saving fuel. The “Swedish” can be equipped with a hob, a stove bench, and a platform for drying food (berries, mushrooms).
Each type can be built from scratch or an outdated version can be reconstructed. In order for a Russian stove to perform its functions 100%, the structure must be positioned correctly.
You can equip a place for rest on the stove
A stove in the kitchen interior will create a cozy and warm atmosphere
Tiles - the experience of centuries
Stove masters spent a long time looking for a way to protect the finish from temperature deformation, until they came up with tiles. In essence, these are ordinary clay tiles, but with a special “volumetric configuration”. On the back side of the tiles there are special projections - rumps. They serve to connect the tiles to each other and connect them to the masonry mass.
The laying of tiles is carried out simultaneously with the construction of a stove or fireplace, row by row. This creates a strong self-supporting wall. It is connected to the main masonry by wire “tendrils” placed in the seams between the bricks.
Decorating the stove with tiles
An alternative to tiled design can be finishing the stove in a private house with ceramic tiles. Majolica, a glazed tile produced by pressing and double firing, has special decorative properties. The facing material is made from colored clay, and the front part is decorated with bright paintings. Using it, you can cover the stove much easier than with tiles, and the final design will organically fit into the space of a rustic kitchen.
A budget option for finishing can be unglazed terracotta tiles. It is not inferior in strength to majolica, and also has more design options: imitation brick or natural stone.
The process of lining a stove with ceramic tiles
As the most durable finishing material, you should pay attention to clinker - a type of ceramic tile made from highly plastic grades of clay. This material can be used to cover not only the stove in the kitchen, but also any other surface subject to sudden temperature changes.
In order to cover the surface of any type of tile with your own hands, you must use a special heat-resistant water-based composition.
Note: Before tiling the stove, it is necessary to carefully plaster and reinforce the surface.
Plaster
Plastering is the simplest method, for which special dry mixtures with heat-resistant properties are used. All you have to do is select the material, dilute it with water according to the instructions and get to work. Traditional clay mortars are rarely used; they are usually the basis for subsequent whitewashing. The most commonly used are special dry mixtures.
Materials and tools
The following materials are used for plastering:
- poppet for wetting the wall;
- plaster hammer for removing chips and irregularities;
- plumb line;
- container for preparing the solution;
- metal brush for cleaning the walls of the structure;
- mixer for mixing the solution;
- nails or staples for mesh;
- level, galvanized beacons for checking the horizontal and vertical finish;
- ladle (used for pouring solution);
- trowel (can be replaced with a trowel for carrying the solution);
- spatulas;
- steel corners;
- finishing smoother;
- grater, grater;
- rule for distributing the solution.
Dry mixtures can be used as finishing solutions, which are diluted with water in accordance with the instructions (the proportions may vary from manufacturer to manufacturer; they are indicated on the mixture packaging). Traditional clay mortar is made on the basis of fatty clay, and components are added to it to improve the structure of the mixture. These are the following elements:
- asbestos chips;
- chopped burlap or hemp (strong grinding required);
- shredded fiberglass).
Example of clay mortar
For mixing, use fatty clay with sifted sand in a ratio of 3 parts clay to part sand. The volume fraction of improving components is 5-7% of the total mass; water must be added gradually until the solution acquires a thick, plastic consistency. Also, for plastering you will need a reinforcing mesh with a cell size of 20 mm or more, which will prevent cracking.
Instructions
Plastering a Russian stove is carried out using the following steps:
- You can begin work a month after the completion of masonry work;
- Before finishing, the surface of the walls must be treated with a brush, a solution must be selected from the joints to a depth of one centimeter, and then treated with a penetrating primer;
Furnace wall treatment
- After the soil has dried, a mesh is stretched over the wall and secured into the seams with nails (the mesh should not be pulled too tightly);
Net
- The oven is heated, after which its walls are wetted;
- The solution is applied to a damp surface, the first layer must be made more liquid than the next one;
Applying the first layer
- The first layer is leveled, the corners are shaped, after which the surface is rubbed and left to dry;
- During the drying process, the first layer becomes covered with small cracks; they need to be slightly expanded and moistened with water;
Soak any cracks that appear with water.
- After drying, a second layer is applied; if necessary, the total number of layers can be 3-4, which allows you to create a durable and very strong coating.
Apply another 2-3 layers to be sure
Kitchen with Russian stove in a wooden house
Historically, the stove is used in several styles: country, Provence, rustic, chalet. For example, for Americans, a rustic interior means country details, for the French it’s romantic Provence, and for Swedes it’s a rural chalet. All of them are rustic, so the layout and decoration of the building is similar. The main features of a rustic kitchen with an oven are natural shades, natural materials and homemade decor. In rural interiors, the colors of wood and stone predominate - brown, beige, gray, white. Natural timber and stone are used as the basis for finishing and furniture. Materials for creating decor or small-sized furniture - rattan, straw, metal (implies the use of forged elements).
Usually the oven is placed in the kitchen
Rural interiors are dominated by the colors of wood and stone.
Antique stoves can be used very advantageously in a modern interior. To do this, you need to pay attention to details: colors, lighting and proper use of space. Light shades – white, ivory, beige – will help to make the area visually wider. To prevent the space from seeming boring and monotonous, you can dilute it with bright details.
Lighting in a small kitchen should be central (chandelier) and local (above the work area). It is better to use cold incandescent lamps, as their white color advantageously expands the space. And the last point is the rational use of space: the location of furniture, stove. In a small room, the use of bulky furniture sets is unacceptable.
To prevent the stove from looking monotonous, you can cover it with tiles. Antique stoves in a modern interior can be very advantageous
Since ancient times, wooden houses have been the main architectural element in Rus', because wood was an affordable building material. Today it has been replaced by brick, cellular concrete blocks, aerated concrete, and ceramic blocks. Despite such abundance, people who want to create a cozy home use natural wood. In such rooms, the stove complements the warm, soulful atmosphere. In order for the apartment to look stylish, you need to correctly place accents.
The working wall (apron) in a wooden house is represented by a stove, a sink, tables and places for storing kitchen utensils and food. It is best to decorate it with bleached bricks and mosaic tiles. It is important to use only natural shades comparable to brown (wood color).
It is better to finish the floor with wood. In a wooden house, a stove will create a cozy and comfortable atmosphere. It is better to decorate the stove with tiles of natural colors.
When choosing a stove, you should be guided by the characteristics of the room and the requirements of the homeowner. If the unit is planned to be used exclusively for heating, then it is better to install a “Dutch”, which can easily heat a room of up to 50 sq.m. If the apartment has a small area and the stove will also be used for cooking, then a compact Swedish stove will be the best option.
If the stove will only perform a heating function, it can be made in the form of a fireplace. When choosing a stove, you should be guided by the characteristics of the room
How to paint a stove, the easiest option
Do-it-yourself sewerage in a country house made of concrete rings without pumping
The easiest way is to paint the walls with a chalk-based composition with the addition of a small amount of casein wood glue, laundry soap and blue. Casein glue is sold in the form of a dry whitish powder, which is diluted with distilled water and brewed in a water bath. Casein glue is colorless; flesh or bone glue may have a yellowish tint. The second most popular is lime mortar. Slaked lime is diluted with clean water to the consistency of very liquid sour cream and applied with a whitewash brush made of matting.
You can paint with a regular brush, but in both cases, working with a matting brush or a brush requires some skill. If you simply rub a brick or plastered wall with a lime solution, then due to the large thickness of the layer, marks and stains from the bristles will remain on the whitewashed surface.
You can use lime or chalk to whitewash or paint a newly plastered stove or one made of facing bricks. If the furnace is laid with the fur coat facing outwards, then brushes and rollers cannot be used; you can paint with a well-diluted solution using a low-pressure spray gun and a home vacuum cleaner.
The quality of the whitewashed surface turns out to be quite high, but short-lived, so periodically, every six months, you have to re-paint the walls around the stove ash pit, firebox, wherever soot and soot settle. In addition, even if you paint the stove with chalk and glue, the surface will still be wiped off by touching your hands or clothing.
What kind of water-based paint can be used to paint a stove?
The versatility of water-based compositions and paints allows you to paint almost any surface, even, at first glance, not particularly suitable for these purposes. But it is worth remembering that water-based paint behaves differently on different surfaces.
Water-based paint is available in three types:
- On a water-soluble polyvinyl acetate emulsion;
- Based on acrylic and latex copolymers;
- Using silicone polymers;
- Silicate water-based compositions.
Of the above, water-based paints based on PVA and butadiene styrene emulsions are definitely not suitable. It is possible to paint the stove with paints based on PVA and butadiene styrene, but both compositions are prone to cracking and loss of the original white color.
Painting a stove is quite simple, but the surface must be prepared before painting. Unlike the walls of a living room, the brick or plastered surface of the stove “breathes”, that is, it expands when heated, so it is possible that if you paint directly on the brick, then if adhesion is poor, the surface will simply peel off.
Painting technology
First of all, you will need to remove all dirt and dust from the brick surface. If the stove has already been plastered and painted previously, then traces of old paint must be removed using a metal brush or a special brush attachment on a drill. Defects and cracks are smoothed out with sandpaper. It is advisable to level and sand all problem areas as much as possible before painting the stove.
Next, you need to treat the base with a deep penetration primer. Such a substrate will allow you to paint the stove with a high-quality water-based composition, even if the walls absorb water very poorly. According to reviews from owners of brick kilns, in many cases, before painting the walls with a water-based solution, instead of a primer, Kron polymer putty was used to level and prime the walls.
At the next stage, you will need to warm up the oven and let it cool to a temperature of 30-45 ° C. If you paint the cold walls of the oven, cracks and swelling will form on the surface of the laid water-based emulsion layer due to tiny air bubbles accumulated in the pores of the brick. You will need to cover the oven walls with two or three layers. In this case, you no longer need to heat the oven; it is enough to thoroughly dry the first sublayer of water-based material.
Stone cladding
The surface of the stove can be lined using natural or artificial stone. Every year this method becomes more and more popular. This is due both to the fireproof qualities of the material and to the aesthetic qualities. In addition, after a certain period of operation of the stove, you can add variety to its design by simply painting the surface in the desired color.
The stove is finished with stone
The nature of the stone laying work carried out has a certain similarity with the design of tiles. But there is also a certain difference, which lies in the fit of the material. Especially if the question concerns natural stone, which has a variety of shapes and sizes.
The cladding process consists of the following steps:
Tip: Stone cutting must be done at low speeds of the grinder to avoid chipping.
The stove is a special design element of a modern country house.
You can create a unique kitchen design in a private house with a stove not only using one type of finish, but also by combining several at once. Alternatively, the surface can be plastered and the corners covered with natural stone. Or use a combination of brickwork in the lower part of the stove, and paint the upper part in a tone or pattern.
By decorating the stove with your own hands, you can create a unique piece of furniture that will fill your home with comfort and warmth.
How to choose an ornament
In addition to the need to select materials and tools, the user may be faced with the problem of choosing the required ornament. It would seem that there should be no problems with this, but not everyone has innate artistic abilities, so applying complex multi-colored designs or even just a sketch of a future ornament can cause a number of difficulties.
But these problems can be avoided if you choose national ornaments that are classic and familiar to the eye. Almost all of them are simplified so much that they can be easily reproduced by both adults and children.
When choosing what to paint the stove with, you can turn to books with fairy tales, with color illustrations that will help you find the desired design. You can also go to the library or the Internet, the main thing is that the drawing is of high quality and understandable. (See also: How to decorate a stove with your own hands)
The ornament itself must be printed on a standard A4 sheet and if you do not have drawing skills, line it into a small square, this will allow you to quickly and conveniently transfer the ornament to the surface of the oven.
The procedure for applying the ornament to the surface of the structure itself is not very complicated and allows for significant breaks between the stages of painting the stoves, but it is still better not to delay too much and carry out all the work as quickly as possible. From the beginning of work to obtaining the final result, you must perform the following steps: