Laminate flooring is one of the most common on the market due to its practicality, attractive appearance and ease of installation. Laminate flooring is laid using floating floor technology, which allows the boards to freely contract and expand with changes in temperature and humidity levels.
In order for the laminate to serve for many years, you should adhere to the basic rules, and the main one is maintaining the technical gaps between the walls and the material, as well as joining the coatings in different rooms. Thus, it is possible to avoid “raising” the floor, since there are no rigid fastening points.
Another common question that arises among buyers who decide to do the flooring on their own is whether it is necessary to connect and how to join the laminate between rooms? There is no definite answer to these questions, since everything depends on the operating conditions and the chosen coating. Let's look at what you need to know about connections and when you can do without them.
Important points to keep in mind
And these points are quite simple to understand - you need to maintain the maximum possible gaps from all fixed elements of the floor: walls, pipes and other obstacles for free “swimming”.
The gaps from the walls should be maximized, and the “drying out” of the laminate should also be taken into account - in my humble experience, shrinkage of the flooring happens more often than expansion. For large gaps, the gap should not come out from under the baseboard when the covering is reduced
A regular PVC skirting board with cable duct covers 20-25 mm, therefore, the optimal gap will be 10 mm. — 10 for expansion to the wall and 10 for reduction until it comes out from under the baseboard.
Possible reasons
The main thing is not to panic! Blistering laminate flooring can be eliminated and corrected. In such a disaster, first of all try to find out the reasons for this incident. There may be several of them. The most common are considered to be:
- — the compensation gap between the wall is not maintained;
- — spilled water on the floor;
- - low quality of the product.
Mistakes when laying laminate flooring
The first two are not difficult to eliminate, and only the third case will be more expensive both in terms of finances and labor costs, and sometimes only re-flooring helps. Let's look at each case separately.
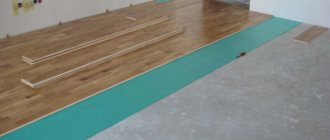
Preparation of joining surfaces
Only a flat base will allow the laminate to last a long time.
Before joining the laminate, you should take into account several nuances, the observance of which will significantly simplify the work and increase the subsequent service life of the floor coverings.
- The base of the floors in adjacent rooms must be perfectly level and without differences in the horizontal level in the place where two floor coverings will be connected. Otherwise, a noticeable joining seam with a height difference may form in this place.
- If the floors at the junction are fairly level, the problem may be caused by the decorative coating itself. The fact is that a laminated floor can vary significantly in thickness - the thickness of the floorboards can vary from 0.6 to 1.2 cm. Therefore, when purchasing two flooring options that you plan to connect, pay attention to their thickness. However, this problem can be solved with the help of special multi-level connecting profiles.
- The technology for constructing the floor “pie” (waterproofing - substrate - finishing coating) should be the same for both coatings.
- If you plan to make a joint between laminate and laminate, then both coatings must belong to the same resistance class. This will avoid a situation where one surface has already become unusable, while the other will still be quite suitable for further use.
The table provides recommendations on the areas of application of laminated floors of various classes.
7th mistake. Using a substrate that is too thick.
Trying to correct insufficiently good preparation of the base, many use a thick substrate, hoping that it will compensate for the remaining differences in height. However, in practice, this only leads to the fact that the laminate begins to absorb too much when walking and sag strongly under the furniture. As a result, after some time the panel locks are destroyed, cracks appear, dust gets in, the slats begin to move relative to each other and ultimately the entire coating becomes unusable.
To avoid this, it is necessary to carefully prepare the base and choose the correct thickness of the substrate according to the recommendations of the laminate manufacturer.
Types of joining laminate flooring between rooms
Considering the frequent need to join laminate flooring, manufacturers offer a wide variety of options for solving this problem. Most companies specializing in the sale of floor coverings produce accessories, including thresholds and baseboards in the color of the lamination.
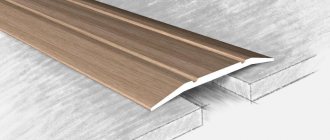
Joint overlapping thresholds
The main task of this strip is to maintain the temperature regime between the slats. Before joining laminate to laminate, you should take care of purchasing the correct threshold:
- corner – covers the attachment points at the corners;
- straight - hides the seam between the laminate of the same level;
- transitional - connections of lamellas of different heights.
Bonus – 12th mistake. Do not follow the instructions on the laminate package.
There is no uniform standard for laminate flooring sizes and locking systems. Therefore, after purchasing the material, you must read the installation instructions that manufacturers print on the package. It usually provides recommendations on the choice of underlay, installation and care of the floor covering. Compliance with the instructions guarantees a long service life of the new floor.
Instructions for laying laminate flooring can be downloaded in good quality
.
Selection of decorative thresholds
The correct choice of threshold must be made according to a number of criteria:
- functional purpose of joined coatings. For example, if laminate is installed in the hallway, and tiles are installed in the kitchen, then the threshold connecting them must have sufficient strength and moisture resistance in accordance with the operating conditions in both parts of the house. It is best to use an aluminum or plastic strip in such conditions;
- from a design point of view, the choice remains solely with the owner, who should determine how harmoniously the threshold will look in combination with the joined floorings. Here you can play with the method of contrasts or, on the contrary, create a uniform coating. When it comes to delineating rooms, it is best to select a threshold that will be monochromatic for one covering and will set off another;
- if we are talking about height differences, then it is necessary to select multi-level thresholds for the laminate and focus in this process on the thickness to be covered.
Naturally, we should not forget about the prestige of even such a small decorative element as a threshold. A priori, a low-quality plastic threshold cannot be located next to a very expensive laminate.
What to consider when choosing a threshold
To choose the threshold correctly, you need to determine why it is being installed. It can be installed to zone space, to disguise multi-level floors, etc. It can emphasize or, conversely, hide the junction of materials. This must be taken into account when choosing. In addition, you should pay attention to such characteristics.
Seam configuration
Any thresholds can be installed on straight joints. For curved ones, only flexible options made of metal or plastic. The depth of the joint is also important. If it is small, it is optimal to use parts with a flat inner side. They can be glued to the seam. The easiest way is to purchase self-adhesive thresholds.
Photo: Instagram double_v_design
Part material
Various materials are used to produce thresholds. Metal and plastic thresholds are most in demand. Wooden ones are used less often. They are very capricious because they cannot tolerate high humidity and sudden temperature changes.
Fastening method
Parts can be installed openly or hidden. In the first case, self-tapping screws are used, the heads of which remain visible. For hidden installation, glue or special decorative overlays are used to cover the fasteners.
The color and size of the part are also important.
Photo: Instagram germes.bsp
What to consider before starting installation work?
Before you start joining two separate sections of laminate flooring or connecting it with another type of floor finishing, you should take into account several features and make sure that all the necessary requirements for the working conditions have been met. For example, installation of laminate and its joining can only be done if the rough base is perfectly level. There should be no differences on it.
Laminate installation process
On a note! The maximum horizontal deviation of the floor prepared for laying laminate should not exceed 2 mm.
Also, you should not install the purchased laminate immediately. He must rest indoors for two days before starting work. Otherwise, the coating will most likely bulge over time, and even the presence of expansion gaps will not save the situation.
Installation of laminate can only be done at above-zero temperatures. Work begins from the corner of the room farthest from the exit. It is also recommended to orient the slats along the direction of incidence of the light rays, so the joints between the slats will be minimally noticeable.
Why do you need a connection?
Why is it so important to correctly design laminate joints between rooms? There are several correct answers to this question:
- It is sometimes easier to connect individual sections of the covering between rooms than to continue laying out the covering in a continuous pattern;
- According to the recommendations of experts, every 7-8 meters between the rows of laminate there should be gaps about 10-15 mm wide. They are necessary to compensate for the thermal expansion of the slats;
- registration of joints is necessary for joining different types of laminate, the locking connections of which do not match;
- the procedure is carried out by combining lamellas of different colors or different coatings when zoning a room;
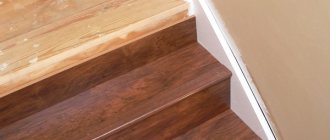
- it is also indispensable when decorating steps if the room has a podium.
Joining laminate with tiles using a flexible profile
The locking connection between the lamellas itself is quite strong and reliable; it will not allow individual parts of the coating to move. But laminate is a “living” coating; it is capable of changing its size depending on the temperature and humidity of the air, either expanding or contracting. That is why the presence of deformation gaps is necessary. Still, laminate also has a wood component in its structure, which reacts sharply to changes in humidity and temperature.
On a note! Such deformation gaps must also remain along the walls around the perimeter of the room. Otherwise, the coating may rise over time.
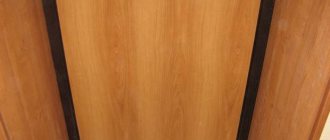
Finishing a doorway with laminate
Thus, it is necessary to join individual parts of the covering, and the reason is not always that it is necessary to connect the floors in separate rooms. It will also look unsightly if different types of coatings are left without joining.
How to join laminated flooring?
In fact, there are several fairly simple and uncomplicated ways to connect laminate to laminate. The most common ones are:
- The simplest option is to install two types of laminated floors from the same manufacturer. In this case, as a rule, the laminate in both the first and second cases will have the same locking system, so joining panels of two different types will be extremely simple. An excellent option in this situation is to purchase different decors (for example, dark and light) from one collection of a specific manufacturer. True, this method is suitable if you need to join the laminate in one room.
If the connection of laminated coatings is carried out at the junction of two rooms (for example, in a doorway), then it is necessary to provide for a technological gap between the materials. If it is not there, then there is a high probability of defects, swelling and a reduction in the service life of the laminate floor.
- Use of thresholds. In most cases, thresholds are used to connect two laminated coverings. With the help of modern joining profiles, you can make smooth and unnoticeable transitions between two types of coatings. Thresholds also allow the formation of a small gap, which is necessary for thermal expansion of the wooden material. Connecting thresholds can be made of plastic, metal, wood - the choice of one type or another will depend on the stylistic decision in the room and the preferences of the owners.
In addition, many manufacturers of laminated floors also produce connecting thresholds along with the laminate. They, of course, will cost much more than traditional options presented in specialized stores, but from the point of view of style and harmony of transition, such a solution will be as correct as possible. Such products can be found from Quick-Step, Pergo, Tarkett, EPI, Alloc and other large manufacturers.
- Not long ago, cork expansion joints appeared on the construction market, with which you can easily connect two different models of laminate floors. The main advantage of this method is the absence of a gap as such. The cork insert completely fills the gap between the materials. The installation of the cork insert is carried out after the installation of the laminate floors. Simply cut the compensator, approximately fit it to the size of the gap, and then insert it.
In most cases, the external cork expansion joint will be invisible in the transition, because its shade is neutral. If the cork insert is noticeable and catches the eye, then it can be painted over using a marker of a suitable color or special paint to get a more or less similar shade.
- The use of construction foams and sealants, which are available in a wide variety in stores, to connect two laminates is not a very common solution. At the same time, they can be used to remove the joint between panels of different sizes.
The main disadvantages of such a solution to create a connection between the coatings are: it will not be possible to dismantle the panels that come into contact with the sealant without damaging them; If there is sealant or foam in the joint between the coverings, the material will not be able to expand when exposed to temperature, which will cause damage to the boards and reduce the service life of the floor.
Conclusion
The diagram for the correct installation of laminate flooring must not be violated.
To understand why laminate flooring rises after installation, you first need to find the reason for this. To determine, first remove the baseboard and inspect the entire area for the presence of an expansion joint. If the gaps are maintained, then the swollen area should be opened and the moisture underneath should be removed.
In this case, replacing the substrate is mandatory, but you can save money by replacing the strips of the coating itself. If detected in a timely manner, the laminate will return to its original appearance after drying, but if restoration fails, these boards can be replaced with those that lie, for example, under furniture or in corners.
And in almost all cases, when purchasing cheap varieties, you will need to treat the laminate after installation. After sealing them with wax, the joints should be thoroughly polished.
In other words, the problem of laminate swelling can be corrected and there is nothing wrong with it.
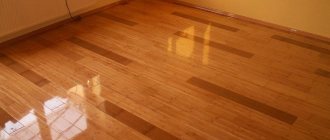
Laying laminate flooring in a doorway without a threshold
Laminate flooring without thresholds between rooms is laid in the usual way. Layout options for laminated panels:
- along the windows;
- across the windows (the seams between the laminate will be less noticeable);
- at an angle of 45 degrees - when using this method, the space visually expands, but the material consumption is the greatest.
Diagonal laying of laminate flooring in a seamless manner
Some features of installation without a joint appear only in the area of doorways. Work order:
- If the doors are already installed, it is recommended to remove the door panels before joining the panels near the openings.
- The distance from the laid laminated panels to the walls must be at least 1 cm. To comply with this condition, wedges can be installed near the box.
- File the door frame and place a laminate board underneath it, into the resulting gap. Then the transition of the floor between rooms will be invisible.
Preparing the door frame for laminate installation
Carrying out work on installing a threshold-free joint between laminate and tiles:
- Start finishing the floor by laying tiles.
- Lay the tiles in the area of the doorway, extending beyond the joining line.
- Having laid the entire laminate floor, lay its last row on the tiles without fastening it to the previous one.
- Mark the joint line on the boards.
- Cut the panels that will be connected to the tiles according to the markings made. Cuts must be made extremely carefully. If necessary, they need to be sanded with sandpaper.
- Remove dust from tiles and laminate.
- The laminated panels are fastened together and with the previous row.
- Fill the joint with grout, silicone sealant or mastic.
Flexible molding fits curved joints.
Most popular brands
The rating of noteworthy mixture options was compiled taking into account consumer reviews, as well as expert opinions.
Professional builders always use only high-quality components in their work in order to provide the customer with a good result; the floors must last a long time, otherwise the authority of the team will instantly drop.
| Nomination | place | Name of product | price |
| The best sealants for parquet and laminate | 1 | Bostik Clic Protect | 342 ₽ |
| 2 | GAP FILLER Vermeister | 493 ₽ | |
| 3 | KIM TEC Parkett Laminate | 200 ₽ | |
| 4 | MasterTeks ProfiMaster | 149 ₽ | |
| 5 | Click Guard | 279 ₽ | |
| 6 | TYTAN 17171 | 229 ₽ | |
| 7 | SOUDAL sealant for floors, parquet, laminate | 403 ₽ | |
| 8 | Pufas Click-Safe | 488 ₽ | |
| Best Tile Sealants | 1 | Quelyd 007 | 477 ₽ |
| 2 | Krass sealant, silicone, for kitchen and bath, 8711595055604 | 198 ₽ | |
| 3 | Silicone sanitary sealant Tytan UPG | 360 ₽ | |
| 4 | Silicone sanitary sealant Soudal | 297 ₽ |
How to close the joint between tiles and laminate: two options for solving this issue
The joint is a joint, but no matter how beautiful it is, it still looks like an ordinary hole in the floor - no matter how you look at it, it needs to be covered with something. As a rule, special thresholds are used for this purpose - a kind of beautifully designed aluminum strip, which is attached to the floor with self-tapping screws or hidden dowels. By the way, the latter are a very attractive product - no screw heads that spoil the appearance of the floor as a whole, no problems with screwing them. Installing such thresholds at the junction of tiles and laminate is quite simple - a hidden dowel slides along a special groove located at the bottom of the threshold, so getting it into a pre-drilled hole will not be difficult. Subsequently, the dowel is hammered in together with the threshold using a hammer and a wooden adapter. A very important point in the process of installing connecting thresholds is cutting them to each other - the need for this action arises in the case of a broken line between laminate and tiles
Here it is important to do everything slowly and efficiently adjust the threshold to the threshold
This applies to straight, even and broken joints between tiles and laminate. What about a joint along an arc or radius? You understand that it is impossible to bend a flat aluminum and plastic threshold without violating its integrity. This is where the so-called flexible joint between laminate and tile comes to the rescue. Products of this type can be of two types.
- Soft plastic. This is a universal product, made in the shape of the letter “T” and consisting of two parts - a flexible clamp that is attached directly to the floor, as well as a flexible decorative lining that snaps into the clamp. Both parts of this product bend very easily and no tools are required to install them. Everything is elementary simple - with the help of such a threshold, the question of how to connect tiles and laminate is solved even with a relatively crooked trim. The decorative T-shaped overlay can hide a centimeter on each side.
- Aluminum. Unlike the previous option, this product can hardly even be called a threshold - rather, it is an embedded part that is installed along with the tile. You can’t count on the fact that it can be used to hide uneven trimming - it only covers the edge of the material by about a couple of millimeters. It is simply technically impossible to make a wider side in this embedded part, since it will be impossible to bend it after that. In general, this option is for professionals who know how to cut laminate and tiles accurately, perfectly and to any radius or arc. Moreover, such an embedded part is sold straight - you still need to manage to bend it as needed.
Basically, that's it. There are no other options for solving the question of how to make a curved joint between tiles and laminate - unless, of course, you count the perfectly precise cutting of these materials to each other with a small gap and its subsequent sealing with colored sealant. Not every professional can master this approach to business.
This is how things stand with the question of how to make a joint between tiles and laminate. In principle, there is nothing complicated, but you need to be precise and attentive - these two points are the key to high-quality design of the connection between tiles and laminate.
Foreign attachments to the base
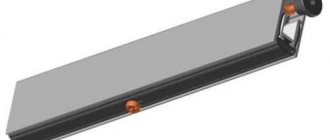
Floor door stop with a wide base is attached to the screed and not to the laminate
It also happens that unfortunate builders, as a result of their illiteracy, nail the laminate with nails or screw it to the base with cuts. In such a situation, the laminate will also swell at the joints, since in any case, when the air humidity in the room changes, it must “walk” and this is inevitable.
If for some reason you find such a structure on your floor, immediately clear the floor of these couplings. And after literally 2-3 days, the laminate should settle down to a flat surface on its own. The decisive factor in such a situation will be the timely detection of this problem and its elimination. If you notice this too late, it will not be possible to eliminate such a defect and you will have to replace the entire floor.
Lay the first row
Installation of the first row is the most difficult and responsible
All subsequent ones will copy the first one, so it is important to lay it evenly along the wall. Otherwise, the pattern will unfold and the floor will look ugly.
YouTube channel Kronostar
- Inspect the laminate locks and remove small debris and dust from them.
- Cut the lock on the short side of the first board and place it on the floor. Insert the second one into it at a slight angle.
- Align the width of the slats exactly to avoid any “teeth” and lower the second board, clicking the lock into place.
- Place wedges at each wall to accommodate the expansion gap. They can be cut from pieces of laminate.
- Completely assemble the first strip in this way.
- Don’t cut the last lamella, but for now just lay it overlapping on top.
- Mark the length of the last plank, trim it and install it in the right place. Don’t forget: it should be no shorter than 20–30 cm.
How to cut laminate
- Place a wedge against the wall and place the board to be cut on top of the row in which it will lie.
- Mark with a pencil the distance to the front surface of the adjacent lamella.
- Draw a straight line using a square.
- Cut the board to the mark with a jigsaw, hacksaw or circular saw.
When using a jigsaw, consider the direction of the teeth. If they are oriented away from you, the laminate should be face up. If the teeth are facing you, turn the board face down. This way you will avoid chipping.
If you don't have a power tool, cut with a hacksaw or other fine-toothed saw. Do not apply much force so that the cut is neat and without chipping. To be on the safe side, you can stick masking tape along the line.
What to do if the wall is uneven
- Completely assemble one strip and move it close to the wall.
- Using a compass, find the place where the laminate is as far away from the wall as possible.
- Using a compass, mark this distance on the laminate along the entire length of the strip.
- Draw a line along the marks. It will completely copy all the irregularities of the wall.
- Cut out pieces on each laminate board, reassemble the row and install.
Laying laminate flooring without thresholds
Not every owner of a private home likes joints in the floor covering covered with specialized ceilings. In this regard, the question arises, how to join laminate flooring without thresholds? This is possible, but provided that the length of the continuous coating does not exceed 10 m. The indicated values are average; each manufacturer provides its own tolerances for laying with a continuous sheet.
When laying without thresholds, it is difficult to repair the flooring if one of the boards is worn or cracks appear on the surface. In this case, you need to completely disassemble the flooring to get to the deformed part.
If, however, the desire to lay laminate flooring without thresholds becomes a priority, then you should pay attention to product options with an adhesive base. In addition to the lock, the material is treated from the bottom with a fixing compound. The installation process is carried out as in the case of a standard laminated coating, but the risk of gaps and cracks between the dies is reduced to zero. It is important to note the sound insulation of such a floor; there are no characteristic sounds when walking, since the panel is less shock-absorbing and there is no air cushion.
Did you buy a standard laminate for installation without thresholds? And in this case, there is a solution - diagonal laying. The technology makes it possible to reduce the tension between the lamellas and the risk of deformation of the locks, but it is worth understanding that the cost of cutting will be many times higher.
Using thresholds
Making a joint between laminate and tile using thresholds makes sense in three cases. The first is when the joint is made under the door. In this case, the presence of a threshold is logical and “does not hurt the eyes.” The second option is if there is a difference in height between the two materials being joined. There is simply no other way out.
And the third case. When the hallway has tiles next to it, and then there is laminate. Even if their levels coincide, it is better to put a threshold here. It rises slightly above the finish and will trap sand and debris that inevitably gets carried in by shoes. This is the option when you can close your eyes to some aesthetic imperfection.
Types of thresholds for joining materials
There are the following thresholds that can be used to close the joint between laminate and tiles:
It just seems like there are few options. There are all these thresholds in different sizes and colors, with different fixation systems. There are a lot of them in big stores.
Installation of flexible PVC profile
As already mentioned, a flexible PVC joining profile consists of a base and a decorative lining, which is held on it due to elastic force. It must be installed after the tiles have been laid, but before installing the laminate.
First, a base is installed along the cut of the laid tile. It is attached to dowels or self-tapping screws. Choose fasteners with flat heads so that when screwed in, they hardly protrude and do not interfere with installing the trim.
The installation process is as follows:
Using a flexible PVC profile, the joint between laminate and tiles is easy to seal. Outwardly, of course, not everyone likes it, but the installation is simple.
Features of installation of connecting profiles
It is necessary to think in advance how the joining will take place, how many areas there will be where a joining strip will be needed to close all compensation gaps and open sections of the laminate.
The sequence of actions depends on the type of connecting profile. If this is a connecting strip (molding), then installation will take several steps.
- The guide rail is laid next to the already installed covering and attached to the floor with glue or screws.
- A second coating is laid nearby, with which it is necessary to dock.
- Upon completion of the installation of the laminate, the decorative part is inserted into the guide strip and, by lightly tapping with a hammer, clicked over the joint area through a wooden block.
The connecting threshold is attached slightly differently, depending on the type of fastening.
- If the profile already has ready-made holes, then they must be moved to the center of the gap between laminates from different rooms.
- Then holes with a diameter for dowels are drilled in the concrete base, which are then inserted into them.
- The threshold is placed on the gap, the holes are connected, and the screws are screwed into plastic dowels, firmly holding the strip above the joint.
For hidden installation, work also begins with marking the holes for fasteners.
- Then the screws are fixed in the groove on the back side of the threshold at specified points, and dowels are screwed onto them
- Then the entire structure is inserted into the prepared holes. With confident blows of a hammer through a wooden block, so as not to damage the decorative surface, the threshold is lowered until it stops at the junction of the laminate.
In order for the new floor in the apartment to look decent and last for many years without additional repairs, it is not enough to lay a high-quality laminate with reliable locks on the prepared base. You need to know how to join laminate flooring and take care of the correct design of the joints, both between rooms and with other floor coverings.