It is the roof that first catches your eye when you look at the house, and it is it that determines the degree of attractiveness, elegance and reliability of the entire structure. It becomes your very clothes, by which, as they say, you are greeted. And it is not at all necessary to invest more money in the purchase of a roofing covering than in the foundation for it to look decent.
For example, a budget but quite practical ondulin looks great and fits into absolutely any modern project. It is only important to provide it with a reliable foundation!
And in order for a bitumen roof to have an accurate geometry and serve for a long time, first of all, the sheathing for ondulin on roofs with different angles of inclination must be arranged according to all the rules. And this only at first glance seems like a simple matter. Needless to say, there are many nuances here, and we will now tell you about all of them in detail.
What should be the basis for ondulin?
Let's start by debunking the myths. So, there is an opinion among people that the way ondulin looks on the roof primarily depends on its quality. What if you take Belgian or Russian ondulin, and not French, then within a year it will certainly go in waves, become discolored and begin to crumble.
Yes, of course, if we talk about fakes, it’s difficult to predict the result. But if we compare European-made ondulin with each other, we note that Belgian, French and Polish products are actually practically no different from each other. And recently, the French manufacturer of ondulin opened its factories in Russia.
Let's put it this way: the price of branded foreign and domestic ondulin is fully consistent with its service life and quality. Those. Such material is indeed not produced “to last,” but in practice it often turns out that it successfully outlasts more expensive coatings. And exactly how Euro slate will behave throughout the entire period of time largely depends on how high-quality the sheathing was made for it.
So, the most valuable point in this regard is the correctly calculated pitch of the sheathing and its evenness. If you take the step too wide (and in general you can’t go more than 65 cm), then over time the ondulin will really go in waves.
Firstly, the snow will put pressure on it, and secondly, under the hot rays of the sun it will soften too much and seem to sag. This will not have a critical effect on its functionality, except for unnecessary snow piles in such recesses, but in general all this is not good.
In addition, such waves run the risk of the joints coming apart, which will lead to leaks. And therefore, lathing with a pitch of 46 cm is considered ideal for a pitched roof, even if the slopes themselves are quite steep.
After all, accurately calculating the snow load in a region is not so easy. Therefore, if you have doubts, do this universal option. Moreover, the overuse of bars here will be small and this will not greatly affect the overall budget for the roof:
Of course, if you have doubts about whether ondulin will withstand snow, you can initially make a complete sheathing for it. But it is worth considering that the cost of roofing costs will increase significantly.
Therefore, for pitched roofs not with a minimum angle of inclination, it is more logical to make a sparse sheathing, and for the rest - a solid base:
And now we will tell you what the rules are for making sheathing for ondulin.
How to properly cover a roof with ondulin - design, tools, installation diagram
The completion of the main construction work can be called the installation of the roof. This is the last stage, after which the interior is finished and communications are connected. Do-it-yourself ondulin coating can speed up roofing work. This modern roofing material is made on a bitumen base; it can be installed on a newly erected structure and on an old roof without prior dismantling. Ondulin is considered a universal material, since it covers roofs of any shape, area and angle of inclination. If the installation rules are followed, the coating is sealed and durable, able to withstand any natural phenomena.
Quality requirements: material of manufacture
The main point in making lathing is that the distance between the bars should not exceed 61 cm. But there are still other points that relate to the quality and thickness of the material itself.
Unfortunately, ondulin sheathing is often made from something and somehow. The coating is budget-friendly and appears to be quite durable – that’s what they’re saying at this point. In fact, a poor quality base can negate all the characteristics of a bitumen roof! Therefore, treat this issue with full responsibility.
So, both wooden lathing and a galvanized steel profile are suitable for ondulin. Metal is even more preferable here, because it is not spoiled by fungi and is not sharpened by insects:
But let's start with a review of the technical characteristics of wooden sheathing, because... This is exactly the type of base that is most often installed on the roofs of houses in Russia.
Type and type of wood
So, before installation, the timber and boards must be brought to the standard humidity level for the rafter system - 19-20%. This way you will be sure that during operation the sheathing will not become deformed. Additionally, all bars should be treated with deeply impregnated antiseptic compounds. This measure will at least double the service life of the roof.
By the way, if for the manufacture of the sheathing you received wood with insufficiently low humidity, then before attaching the ondulin to it, firmly fix each board with two screws at once, on both sides. You may ask why use such material at all and why can’t you purchase normal material in the first place?
The fact is that some craftsmen like to work with this type of material, because the fibers here are still elastic, and therefore driving nails or screwing in self-tapping screws does not lead to random cracks. Although this is wrong.
But in any case, if you have doubts whether the purchased wood is really dry enough, pay attention to high-quality fastening. After all, without a special device it is difficult to measure this parameter, and in case of an error, the entire sheathing, unfortunately, will “lead.”
As for the quality of wood, the lumber market today will offer you quite a wide choice. To order, the bars will be cut to the required size and impregnated directly at the factory with antiseptics and fire retardants. Specifically, spruce and pine are best suited for lathing, because have the required strength and flexibility.
The main thing when choosing is to ensure that the wood itself is of high quality, without fallen knots, rot or anything else incomprehensible. Wooden blocks are marked according to grade from 0 to 5.
Also, be sure to check the purchased bars and boards for evenness. And not only with the help of a level or a cord. Take the board in your hands with one end so that its surface along its length is parallel to the ground and look at the entire length of the board through its end - this way all the irregularities will immediately become noticeable.
In addition, if we are talking specifically about ondulin, in which all the elements of the wooden sheathing will be in contact with the coating, it is necessary to sharpen them, creating a perfectly flat surface.
Boards, bars or slabs?
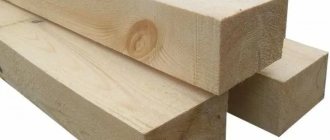
So, for the manufacture of wooden sheathing, boards that are at least 25 mm thick, or timber with a thickness of 50 mm or more, are suitable. And the greater the distance between the main roof rafters, the greater the thickness of the sheathing should be.
And the type of lathing looks like this:
- Edged, which is a neat board, sawn on all sides.
- Unedged, with partially sawn or not sawn edges. Inferior to edged only in appearance.
- Tongue and groove boards are edged boards that have special grooves for joining.
If we talk about continuous sheathing, then plywood with increased moisture resistance and OSB boards made from pressed wood shavings are suitable.
For small buildings, such as gardens, utility rooms or garages, it is allowed to use 4x5 or 4x6 cm timber as sheathing:
This is what 5x5 cm bars look like:
Unedged lumber without wane is also suitable as boards. Here is an example of using a board in combination with the bars that were used to make the counter-lattice:
Summarize. Wood as a sheathing is good primarily because it lends itself well to cutting, installation and is generally unpretentious in processing. From this pliable material it is not difficult to build everything you need, of any shape and design.
But such lathing has noticeable disadvantages in the form of deformation over time if it is not prepared correctly, as well as destruction due to fungus or bugs and dampness in some cases.
Advantages of metal profiles
Metal sheathing does not have all of the above disadvantages. Its main advantage is that it creates a perfectly flat, millimeter-accurate surface. Then laying ondulin or any other roofing covering on such a roof is a real pleasure! Moreover, if you are concerned about the fire safety of ondulin, then a metal sheathing under it is much more appropriate than a wooden one.
Second point: ondulin is attached to the metal sheathing with roofing screws. There are even special ones with a wider cap. This way, the ondulin sheets are fixed to the rafter system much more firmly, and the wind cannot tear them off.
But welding such a sheathing is not difficult in ordinary home conditions. Just remember that all welds are susceptible to corrosion and will have to be additionally treated with a primer and special anti-corrosion paint.
Also, anyone can assemble a metal sheathing like a construction set, from ready-made corners and profiles - directly onto the bolts. U-shaped profiles made of anti-corrosion steel are especially suitable for this purpose.
Of course, in the case of installing metal sheathing, you will have to spend more time than usual cutting wooden blocks, but you will do without splinters!
Calculation of the amount of construction raw materials
To find out how many boards or beams it will take to create sheathing for ondulin, you first need to measure the length and width of each roof slope, as well as the purchased material. By multiplying this data, it will be possible to determine the area of the roof and one structural element for the final roofing covering.
For continuous sheathing
The cubic capacity (number of cubic meters) of material for the manufacture of continuous sheathing for ondulin is determined in several steps:
- The roof area (including all slopes) is divided by the area of one unit of purchased material. As a result, they will find out how many sheets of plywood or OSB will be needed to construct the sheathing.
- The resulting value is multiplied by the thickness of the sheathing element. Both quantities must be converted to meters. As a result, they find the number of meters per cube that will be needed to build a support structure for the ondulin.
A continuous sheathing is constructed from the amount of material that was obtained by dividing the area of the slope by the area of one sheet
For sparse sheathing
The cubic capacity of material for the construction of sparse sheathing is calculated as follows:
- The length of the slope is divided by the length of the gap between the boards or other selected material. This action allows you to find out how many sheathing elements are required.
- The number of sheathings is multiplied by the width of the roof slope and the required number of linear meters of lumber is obtained.
- Linear meters are multiplied by the thickness of the purchased building materials. In this case, all data is converted to meters.
A sparse sheathing is constructed from a certain number of boards, which is determined by knowing all the parameters of the material used
For special areas
Where the roof is adjacent to the walls, on the ridge, near the dormer and dormer windows, next to the eaves, and also under the valleys, the sheathing is arranged differently.
Around window openings, chimneys and under valleys, the sheathing for ondulin must be continuous. The amount of material for its construction is calculated by dividing the area of the area that is located near the opening or other object in the roof by the area of one element of building raw materials. And in the area of the ridge, additional elements are nailed to the sheathing.
The chimney sheathing is solid, made of fire-resistant material
Solid base: perfect geometry
We've figured out the material for making the sheathing, let's look at what step it should be placed. As we have already said, for different angles of inclination of the roof it has its own requirements:
The logic here is simple: the flatter the roof, the more snow falls on it, and the more stable the base should be. And the more often there should be a step in order to hold the ondulin sheets on yourself without sagging.
Therefore, to lay Euro slate on flat roofs up to 10° (but not less than 5°), you should make a continuous sheathing of boards, plywood or OSB boards. Here's the principle:
As you can see, the thickness of the wooden flooring varies, depending on the pitch of the rafters or the presence of additional sheathing.
If you are laying solid plywood or OSB-3 flooring, be sure to leave a 3 mm gap in order to compensate for linear expansion later in the warm season. Moreover, the flooring itself should be laid in a checkerboard pattern, with the seams staggered.
And fasten it with rough nails or self-tapping screws, for which it is especially convenient to use automatic tools:
If such a sheathing is made from boards, then they should not be placed close to each other, so that later the entire base does not move. Therefore, leave a gap of 5 cm.
If you are making a sheathing from a continuous laying of boards, leave a gap of 3-5 mm between them. Coniferous wood is well suited for this. Moreover, it is desirable that the fragments of annual rings be oriented with their convexities upward.
In this case, if the sheathing board does move, it will gradually straighten out and fill the resulting gaps. And the impact on the roof in this case will be minimal. If this is not taken care of, the sheathing will bend into a “hump” and noticeable waves will appear on the ondulin.
Step-by-step instructions for installing sheets
- Before laying ondulin, the sheathing should be filled.
The sheathing bars are nailed to the rafters at the required distance from each other. To maintain the parallelism of the sheathing bars, use a wooden block of the required length - a jig. - The laying method does not affect the marking of ondulin in any way.
The main thing is that the markings are done carefully. To do this, use a colored pencil or marker and a convenient piece of paper. - Ondulin sheets are best cut with a regular wood hacksaw, but one with small teeth.
To prevent the hacksaw from getting stuck in soft material, it should be lubricated with oil during operation. The use of reciprocating or circular electric saws is also acceptable. - The weight of one sheet of ondulin is 6 kg. Even one person can lift it onto the roof and lay it down.
- They begin to lay sheets of material from the edge of the roof, which is located on the opposite side from the prevailing winds.
The second row of sheets begins by laying half a sheet, so that there is then an overlap of three sheets in the corner. With this installation method, installation is much faster. - The sheets should be nailed to the sheathing at the ends of the sheets in each wave, also at the edges of the overlaps on both sides and in the end overlap. One sheet is nailed with 20 nails.
- To ensure that the fastening occurs exactly along the centerline of the sheathing bar, pull the rope between the outermost nails.
- Special elements should be used to install valleys. To install them, it is necessary to arrange additional sheathing.
- Attaching the ridge elements begins on the leeward side. Definitely with overlap.
The amount of overlap is 125 mm or more. When attaching the element, nails are driven into each wave of the sheet that joins the ridge. - The design of the side joint is done in exactly the same way as the design of the valleys. For waterproofing, a special silicone sealant is used.
- To design a gable, as a rule, the edge of a sheet of material is folded and secured to the gable board.
But for this method to be used, it is necessary that the temperature outside be high. Then the ondulin sheet softens and bends easily. - In order to properly arrange the roof edge, ridge or gable elements are used.
- At the end joints of ondulin sheets with vertical walls, ventilation and chimneys, a covering apron is used.
To reliably waterproof the joint, silicone sealant is used. The apron must be nailed to the material at each wave. - To design the tong, a special tong element is used. Sometimes, as a last resort, a ridge element can be installed.
- In order to organize lighting in the attic room, use a roof window.
It is fixed on each wave. The top sheet is laid so that there is an overlap over the base of the window. - To arrange ventilation ducts through the roof made of ondulin, a special element called an “ondulin ventilation pipe” is used.
They strengthen it on every wave. The top sheet should be laid overlapping over the base of this element. - In order to eliminate the gap between the sheets, ridge elements and on the eaves, “frame filler” is used.
- If the sheathing elements are not wooden, but metal, then self-tapping screws are used to fasten the ondulin sheets.
You cannot screw them in by hand. A screwdriver is required.
Sparse lathing: precisely calculated step
For roofs with a slope of 10 degrees or more, it is allowed to install sparse sheathing specifically under the ondulin. We will try to cover all the technical aspects of this process.
How to achieve precise pitch?
Let's start with the fact that in order for the step to be perfectly accurate, make a wooden template and apply it from block to block:
Make the same template as in the illustration, or just a flat piece of timber that will be convenient to place between the sheathing boards.
How to guess the length of the bars?
Second point. The eaves overhang itself is provided with a fillet - a special board that is nailed to the lower end of the rafter. And on gable roofs, using the overhang of the laths and the length of the filly, you can increase or decrease the size of the entire roof slope.
In this way, a minimum number of ondulin scraps is achieved. That's why make the slats and fillets a little longer, and then saw off all the excess:
How to avoid getting a nail stuck in a piece of wood?
Let's tell you one more secret: when laying sparse lathing, carefully ensure that there are not many knots on it. Because when the nail gets into such a place, then you have to tinker. After all, the wood at the knot has a completely different density.
In this case, some craftsmen act simpler: they fold a stack of sheets, simultaneously make a thin hole in all of them, and then hammer nails into the roof at precisely located points, as if using a stencil.
This has its advantages: you can insert a nail into the hole and immediately feel for a piece of sheathing there, and then punch it.
How to check the evenness of the sheathing surface?
The next important requirement: the sheathing itself must be level. Of course, ondulin is one of the few materials that perfectly hides all the unevenness of the roof.
But this does not mean that you can not worry about this and prepare the foundation somehow. Any such errors in the plane geometry always result in future deformation of the roofing sheets.
But checking the evenness of the mounted sheathing is quite easy - using a stretched thread. If unevenness is found in any place, then make special pads from plywood. For this, take pieces about 4 and 8 mm thick and stuff them in the right places. Very comfortably!
Disadvantages of operation
It is necessary to note the disadvantages of the material in order to ensure the possibility of an objective choice of roofing:
- sun and rain can cause the roof to burn out, which will negatively affect the appearance of the coating;
- resistance to water is ensured only for the service life specified by the manufacturer;
- if you intend to purchase a large volume of slate, then it may turn out that some sheets differ in shade;
- fragility - the surface should not be walked on, as most likely dents or other damage will remain on it; the same criterion should be taken into account during transportation;
- As you can see in the photo, the limited color range currently includes only 4 colors: brown, green, red and black.
The technology for laying ondulin is similar to fastening slate, but before starting work you should do a little preparation.
Workshops on making sheathing
Let's take a step-by-step look at the process of making roofing sheathing for modern euro slate. So, if the slope angle is within 10° to 15°, make the sheathing from wooden blocks 4x5 cm or 5x5 cm, with a distance between elements of up to 45 cm:
The higher the roof slope, the less often you can do lathing. So, for a roof with a slope of 15° to 30°, the step should be made up to 60 cm. But, if you live in a region with a significant snow load, still reduce this step to 45 cm.
This is what the correct sheathing of an insulated roof under ondulin with an inclination angle of 30° looks like:
Always fasten the sheathing itself strictly parallel to the roof ridge. Make sure that its joints are staggered:
Now we install a new 3D ondulin on the finished sheathing, effectively imitating tiles:
But a roof up to 60° is good for snow melting. This is where it is better to use boards rather than bars:
Calculations
The amount of materials is calculated after taking measurements and selecting the required step. After this, the cubic capacity of the lumber is determined. A separate calculation is required for special areas where continuous flooring is required. These include:
Self-tapping screws or nails are used as fasteners. The latter are used if the rafters are in the same plane. When adjusting the height, it is more effective to use self-tapping screws.
Important: To speed up the installation process, you can use a wooden template for the sheathing. This is much faster than measuring the distance between the boards every time. If you are not sure about the geometry of the rafter system, secure the bars with self-tapping screws. If necessary, they can be unscrewed and adjustments made.
Roofs of complex and unusual shapes
If the roof has a complex shape, it is better to entrust the cutting of the roof to a specialist, but in extreme cases it can be done independently in a special computer program. Although it is still worth calling a surveyor to the site.
If we are talking about an intricate gazebo roof or a country house building, then you can use tracing paper on graph paper and try a variety of solutions for optimal design.
So, if you are building a hip roof, position the sheathing so that later the top of the corner sheets is directly on it - this will be more convenient. If this is not done, you will have to install additional bars, and then trim them along the edge of the hip.
By the way, sometimes they do without lathing at all. For example, if you have scraps or extra sheets of ondulin left, then it is good to cover a gazebo, country toilet or well with them. In this case, there is no need for lathing; a pair of strong rafters is enough to take on the entire load. Like in this project:
We tried to cover in as much detail as possible the process of calculating and manufacturing sheathing for ondulin. Do you still have questions? We will be happy to answer them!

