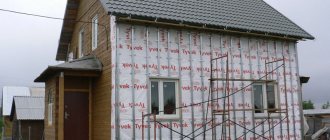
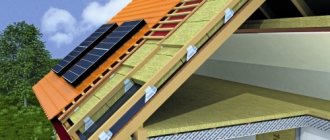
You can independently insulate a house made of timber from the outside with your own hands under siding using mineral wool even on a limited budget. A competent selection of materials and installation technology in accordance with all the rules will provide excellent protection of the room from the cold in harsh winters, and useful recommendations from the article will help a novice craftsman complete complex work.
Choosing insulation for siding for a wooden house
Siding is the outer cladding of a house, which is designed to perform a protective and decorative function. Today there are different types of it: vinyl, metal, wood. These are very practical non-combustible materials that have their intended purpose. Installation of cladding panels is a fairly simple process, which allows you to do it yourself.
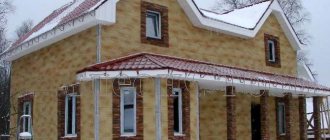
Wooden houses are more susceptible to environmental influences than others: rain, sunlight, temperature changes, etc. Therefore, finishing such houses with siding that would cover the wood from the weather is a necessity. Also, siding will do an excellent job of updating the facade of the house and will give the old house a new “fresh” look.
When exterior cladding a house, the walls are often insulated, which is advisable in our climatic conditions. The insulation is placed directly under the siding, thus achieving three goals at once: thermal insulation of the building, protecting the wood from negative environmental influences and creating a stylish facade.
Insulation for siding for a wooden house must have the necessary performance characteristics: low level of thermal conductivity, durability, environmental friendliness, chemical and biological resistance, stability of shape, ease of installation. When choosing insulation, you should consider the following factors:
- climatic region in which the house is located;
- purpose of the house (summer cottage or permanent place of residence);
- humidity level and the presence of constant winds in the region.
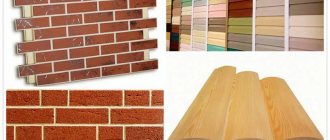
The range of thermal insulation materials is quite wide and is represented by the following items:
- Roll materials. They are sold, respectively, in rolls. The thickness of such insulation is 3–20 mm. They are attached to the wall using special adhesives. Such materials are best used in regions with mild climates due to their small thickness.
- Basalt insulation. These are materials based on basalt mineral fiber. Sold in the form of slabs or mats of varying hardness (soft, semi-hard and hard). They have high sound and heat insulation and a low level of vapor barrier.
- Mineral wool. Popular materials such as stone wool, glass and slag fall under this definition. These materials do a good job of thermal insulation and sound insulation, and are resistant to chemicals.
- Foamed polyethylene. This insulation well insulates buildings, reduces heat loss, and prevents condensation. Widely used in both residential and industrial premises.
- Styrofoam. This is a very durable material, probably familiar to everyone. Due to its porous structure it has a high level of thermal insulation. Polystyrene foam is produced in slabs of various sizes and thicknesses, is lightweight and easy to cut.
Material selection criteria
It is important to understand that only high-quality material is selected for a reliable layer of thermal insulation. Therefore, when buying expanded polystyrene, do not make a choice on the first one you come across, focus on the following criteria:
- Availability of quality certificates and related documentation.
- Manufacturing standards. If the documents indicate specifications, refuse such products; GOST gives the green light to purchase.
- Marking - PSB-S is suitable for facade insulation; this material is treated with fire retardants, which means it will extinguish on its own in the absence of a fire source.
- Density not less than 40 kg/m3. Other options are not suitable for facade insulation.
- Try breaking off a corner of the slab of the option you like. The scrap should be smooth, and the visible elements (balls) should have the shape of a polyhedron. If this is not the case, the option is suitable for packing things during transportation, but it will not withstand the load that the facade is subject to.
How is a wooden house insulated under siding?
The most optimal insulation for a wooden house is mineral wool. The cost of this material is low, it is easy to work with, and it has all the necessary qualities for thermal insulation of walls. Mineral wool holds its shape stably and is suitable for any siding.
Mineral wool for facade work differs from the material intended for interior work.
Facade wool is denser and repels moisture well without absorbing it. Available in the form of slabs and mats, mainly in sizes 600x1200 and 500x1000 mm. When purchasing, you should pay attention to the fact that the density of the wool is at least 80 kg/m3. What does insulating a wooden house with siding include? This is an isolation process that consists of several components:
- Vapor barrier of house walls. This is a layer of material that protects the insulation from condensation that can form between the insulation and the wall of the house. Such material can be polyethylene film, vapor barrier film, roofing felt, etc. In the case of mineral wool, this layer will not be necessary, since this material allows steam to pass through and does not accumulate moisture. A vapor barrier is useful when insulating with polyethylene or foam.
- Insulation. It must be laid very tightly, leaving no gaps or cracks. Due to its high density, mineral wool can adhere well between boards without additional fastening. This feature is a big plus, since additional fasteners (nails, staples, screws) will become cold bridges.
The vapor permeability of the insulation allows the walls to “breathe”, which prevents the appearance of mold and mildew.
- Waterproofing insulation. This layer is necessary to protect the insulation from moisture (snow, rain). The waterproofing film does not allow water to pass through to the insulation, but releases steam from the wall. It is applied over thermal insulation and attached to the same frame.
Execution of work
After selecting and purchasing materials, they begin to insulate and cover the house with siding. If all stages are followed exactly, the work will not take much time.
Preparing the base
The whole process is easy to do with your own hands. The algorithm is as follows:
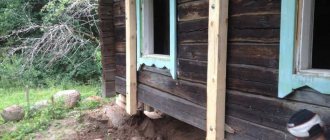
- The old decorative covering is removed (buildings made of timber are often sheathed with boards that become unusable).
- The base is dried.
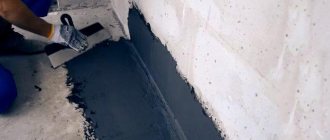
- The surface is cleaned and inspected for defects. If there are traces of fungus and mold, then the damaged areas are cleaned and well treated with special products.
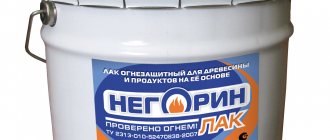
It is convenient to clean old wood with a cord brush attachment or sandpaper. - The facade is completely saturated with antiseptics and fire retardants and dried.
- The joints between the timber are clogged with tow or similar material. It is recommended to lay a layer of sealant on top.
- The cracks are covered with elastic wood putty.
Treatment with complex primer is considered a mandatory procedure during preparation
Further work is carried out only after the coating has completely dried.
Important! It is necessary to insulate and sheathe a house with siding in warm weather with a humidity of no more than 65–70%.
Laying vapor barrier and installing frame
Finishing a residential building involves creating sheathing; for this purpose, when working with timber foundations, it is recommended to use wooden materials.
Frame creation process:
- A vapor barrier is laid on top; it is better to use rolled products. The film is stretched over the base, the joints are overlapped by 15 cm. In the corner areas, whole sections are used, without joining. Fixation is carried out with a stapler.
For a house made of timber, vapor barrier is not mandatory, but a desirable element of the insulation cake - The surface is marked. The pitch between the frame posts should be equal to the width of the insulation minus 1–1.5 cm.
- The wooden beams of the sheathing are treated with agents that protect against the spread of fire and the appearance of microorganisms.
- The racks can be fixed with screws or nails. The first option is preferable. The screws are screwed through pre-made holes in the slats. The racks are aligned using a level in a single plane. A spacer is placed between the timber and the base.
- Window and door openings are sheathed separately around the perimeter.
In wooden houses, it is better to use wooden beams as lathing for insulation.
To ensure reliable insulation, it is recommended to carefully fill the gaps that appear between the frame and the wall with foam.
Installation of hydro- and thermal insulation
The material is laid as follows:
- The insulation is unpacked and placed between the frame posts over the entire surface. It should fit tightly into the available space.
Scheme of an insulating pie for a house made of timber - The waterproofing is stretched from the outside and attached to the frame posts. An overlap of 10–15 cm is maintained at the joints and secured with adhesive tape.
- For additional fastening in some places, the waterproofing and insulation can be stitched with a dowel with a wide head. It is recommended to seal these areas.
If it is necessary to create a ventilation gap, then slats of the required cross-section are placed on top of the racks.
How to install siding with insulation - step-by-step diagram
Step 1: Preparing the work surface
If this is an already built house, then you need to remove the drainage systems, platbands, decorative elements and everything that can fit into the finishing work. The surface of the walls must be thoroughly cleaned of dirt, and all cracks and crevices must be sealed using tow or silicone sealants.
Step 2: Vapor barrier
The vapor barrier film is attached with the rough side to the beam using a stapler. The joints can be taped with construction tape to ensure complete insulation.
Step 3: Preparing the frame for insulation
At this stage it is necessary to arrange a vertical sheathing. For lathing, you can use bars with a section of 50x50 and 40x50 mm. It is better to treat these bars with a special compound that prevents the wood from rotting. The slats can be fastened with dowel nails, at a distance of 2 cm less than the width of the insulation boards.
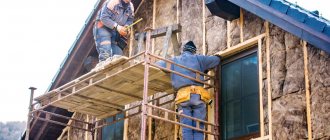
Step 4: Installation of insulation
The installation of mineral wool slabs must be carried out very tightly without gaps. Thanks to its structure, the material can be held without the help of fasteners. If the house is located in a region with a harsh climate, then the insulation can be laid in two layers, in which case it will be necessary to fill a higher frame.
Properties of mineral wool
The fibers of the material are made from basalt, a particularly strong rock. The big advantages of mineral wool are its resistance to mold, fungi, insects, and the ability to withstand temperatures above 1000°C.
In addition, mineral wool fibers have good vapor permeability, which allows vapors to evaporate rather than accumulate in the walls. An important quality of mineral wool is the absence of toxic substances in its composition.
The thickness of the applied insulation slabs depends on the width of the walls of the house itself. For example, for a 150 mm beam it would be correct to use only 5 cm of mineral wool. Thinner slabs are mounted in two continuous layers. The joints must be covered to enhance the heat-saving effect.
Types of mineral wool
URSA mineral wool is a mixture of dolomite (mineral) with quartz sand. Its main advantages are high elasticity and flexibility (facilitate installation) and excellent thermal insulation characteristics (the thermal conductivity coefficient of such insulation is 0.032 W/mK).
For the walls of ventilated facades, the Ursa FACADE material is used in the form of semi-rigid fiberglass slabs, covered with black high-density fiberglass. Additionally, the boards are treated with water-repellent agents. Thanks to all these qualities, there is no need to install windproof films.
ROCKWOOL mineral wool is made from basalt rocks impregnated with a hydrophobic mixture - the chaotic arrangement of mineral fibers ensures high strength. Such material contains a minimal amount of binders. ROCKWOOL is not subject to deformation during operation. It is produced in a variety of forms - rolls, slabs, mats of various thicknesses and areas, which also differ in the degree of rigidity.
ISOVER mineral wool is made from glass fiber and is characterized by excellent heat saving properties, dimensional stability and durability. The upper surface of such plates is covered with fiberglass, so they do not require the use of diffuse membranes. When carrying out two-layer insulation, such material acts as the top layer.
Why do you need a vapor-permeable membrane?
Cladding wooden walls using mineral wool requires creating free vapor exchange. For this purpose, a special covering material is used in the form of a film, which allows excess moisture to escape, but does not allow it to penetrate back. Such finishing products are laid on top of the insulation and fixed to the wooden frame posts with a stapler, and to the metal sheathing with double-sided adhesive tape.
Important! A high-quality membrane must be supplied with installation instructions, and also has markings that allow you to avoid mistakes in the location of the sides.
Where does moisture get into wood?
There is an opinion that moisture enters the walls of a wooden house from the outside with slanting rain, fog and snow. Precipitation actually moistens the walls. But wet weather does not last so long; the sun and especially the wind help to quickly remove excess moisture. An attentive reader will tell you: the average annual air humidity outside is 78% (data for the Moscow region), and in the house it fluctuates between 40-70% - which means there is more moisture outside and it should penetrate from outside to inside.
But actually it is not. The fact is that climatologists operate with relative humidity, this is the ratio of the proportion of water vapor to the maximum possible, taking into account the temperature. And the colder the air, the less moisture it can contain. To understand the real moisture content in the air, absolute humidity values are used in building physics. In the summer, when the temperature outside and inside the house is approximately the same, the humidity is similar. But in winter and in the off-season the picture is completely different. For example, at an outside temperature of -20 ºС and a relative humidity of 80%, the absolute value will be 0.6 g/m3, and inside the house at 20 ºС and a relative humidity of 60%, the absolute value will be 10.4 g/m3. Accordingly, the actual moisture content in the air inside the house is 17 times higher. It is not surprising that wood, like a pump, absorbs moisture from the inside and releases it to the outside through micropores and joints between logs filled with flax, moss, jute or other “breathable” inter-crown insulation.
It is important to know: most of the year, with the exception of the warm period, water vapor penetrates the wood from inside the house and tends to escape outside, the greater the quantity, the colder it is outside and the warmer it is in the house.
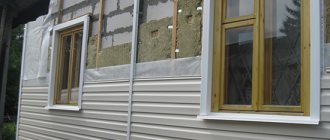
Facade cladding and insulation with your own hands using mineral wool as an example
Let's consider the procedure for insulating walls with mineral wool and covering them with metal siding:
- Preparing the walls. We clean the facade from cement stains, metal pins, communications, drainpipes and other things. We seal cracks and chips with cement mortar and apply an antifungal coating to those areas where there is mold.
- Installation of horizontal lathing. The pitch of the horizontal lathing is determined by the width of the thermal insulation boards with a deduction of 2 cm (to ensure the necessary density when laying the insulation). Use bars with a cross section of 50x50 mm or 40x50 mm.
- Laying insulation boards. We lay slabs between the beams. They will hold on due to the reduced pitch of the sheathing. One edge is inserted behind the bar, and the other is tucked in for good fixation.
- Waterproofing layer. We attach a diffuse membrane with waterproofing properties to the bars with construction staples.
- Vertical lathing. This part of the sheathing is attached level. If there are irregularities, you can make special linings. 25 mm thick boards are used here.
Siding installation:
- When inserting siding into a special lock, do it smoothly, without pulling, until it clicks. If there is no click, then the element is not fixed.
- After fixing the profiles, fasten the panels in the direction from the middle to the edges. Vinyl siding can be fastened with nails, screws, but always with galvanized hardware to avoid rusty streaks.
- The fasteners must fit into the panels strictly vertically, with a gap of 1 mm between the surface and the cap.
- When the temperature changes, the panels will “walk”, so there should be gaps of 5 - 8 mm at the joints.
The durability and efficiency of insulation and cladding service depends entirely on the selected material and proper installation. Comfort and warmth to your home!
What are the stages of insulation?
External insulation of the walls of a timber house is the last stage of arrangement. Getting 100% return depends on the work done before. In order not to regret wasted funds, learn the rules that:
- will save energy resources;
- will increase the efficiency of insulation;
- will provide a comfortable atmosphere in the room;
- will increase the service life of materials.
Rules are created based on the thermal imager's performance. If a person is wearing a sheepskin coat, but walks with his head uncovered, he will generate more heat to keep warm. Same with the house. Therefore, in order not to heat the street, and therefore save energy resources, insulate the roof and floor.
To caulk the walls or not? The answer is definitely, no options.
Whether the insulation is laid between the beams or not does not matter. After drying and shrinking at home, it will present surprises
He will twist the wood so that in some places you can stick your hand into the cracks. Explore the house - walk around the perimeter with a lit candle.
Identify cold bridges, make sure that the inter-crown cracks absorb heat. Don't rely on external insulation, it's designed for something else. The right caulk will eliminate the problems of correcting the consequences of a hack job.
Having insulated the inside and eliminated the “cold bridges” (ceiling, walls, windows, doors, floor), proceed to the external arrangement. To do this correctly, choose high-quality materials, and do not overdo it with the cover layer technology. You don’t need anything extra - save your finances, the heat capacity of wood and get the desired effect.
Interesting ideas
Facade decoration is not the least important thing in modern construction conditions. It is necessary in order to hide existing defects and imperfections in construction work. Decor is also often used to update the appearance of a country house, restore it and achieve greater attractiveness. The structure can be given a Gothic, Scandinavian, Byzantine look. It all depends on desires and design imagination. An important argument in favor of decorating the facade are some practical aspects. For example, insulation.
Currently, he identifies several of the most popular preferences for decorating the facades of private houses.
Decor of curved and framed facades
As a result of recent years, there has been a noticeable increase in demand for various curved and framed facades, for the manufacture of which high-quality MDF is used. These materials can be used to decorate both the walls of a building and the corners of a country house. In addition, there are some developed technologies, following which you can install the facade of a house in accordance with any style and architectural direction that will emphasize individuality.
Provence
This style is most preferable for adherents of natural facing materials such as brick, ceramics, and stone. Predominantly the presence of light shades, in which the decor of the facade of the house is carried out. This finish is refreshed with some kind of colorful, eye-catching panel with a ceramic tile base. The façade can also be finished using decorative plaster, overlay elements or painting.
Scandinavian
The founders of this style are lovers of laconicism, the predominant absence of eye-catching decor and the presence of uniformity. Thus, the Scandinavian style of installation pursues the goal of visually increasing the space in size. This style is characterized by cladding materials such as wood, brick or stone masonry. The Scandinavian style is suitable for light and warm shades of colors and a lack of contrasts.
High tech
This style is characterized by modern origins and focuses on the use of various modern construction technologies that provide maximum convenience. The high-tech style is characterized by the extensive use of glazing in combination with different geometric shapes.
European style
The world's architectural art is dominated by a considerable number of very different design styles, including characteristic features from the Gothic and Byzantine movements. Both in Western countries and in Russia, Gothic styles and designs that came from the Middle Ages are especially popular and in demand. A popular trend is to combine the Gothic style with some other style. This style is characterized by difficulties in installing the facade.
In addition to the above styles, there are others, each of which has its own characteristic features and practical aspects, namely:
- avant-garde;
- country;
- colonial;
- classic;
- minimalism.
Very interesting and original design solutions can be obtained as a result of the correct combination of two or more styles of facade decoration. Today, there is an opinion among designers that the most original and unusual design can be obtained by combining a modern “chalet” with some additions to the classical style.
To learn how to cover a wooden house with siding, watch the video below.
Extruded polystyrene foam
The material is a plate made of foamed polystyrene. It is characterized by high strength, low moisture absorption and excellent heat saving properties.
Advantages:
- ease;
- cheapness;
- durability;
- possibility of internal and external insulation;
- corrosion resistance;
- low water absorption coefficient;
- simple insulation of the walls of a wooden house with your own hands.
Flaws:
- flammability;
- non-vapor permeable.
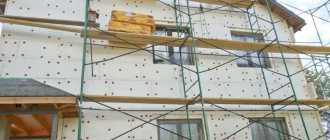
Marking and installation of the frame
The next stage is marking. Marking is necessary in order to determine exactly where it is necessary to install the hanging elements, which will later hold the frame elements. When marking, you need to know the basic rules for installing a siding frame. Namely:
- The first frame elements are installed at a distance of no more than 10 cm from the corners of the house;
- It is also necessary to install a metal profile along the edges of windows and doors;
- The sheathing pitch must be at least 40 cm and no more than 60;
- Each frame profile must be supported by at least three hangers.
Once the sheathing is in place, you can begin assembling the frame. The profiles that form the basis of the sheathing for siding must be positioned strictly vertically. To control the location, a level and, in some cases, a plumb line are used. The outermost elements are installed first, then the control cord is pulled and with its help the rest are mounted.
Siding fastening
After making the frame, you can begin attaching the siding. To do this, you will need to have sharp 13 mm PN self-tapping screws.
Important: the strips of finishing material are attached strictly horizontally and any deviations from this rule may lead to the fact that the plates above the windows may simply not come together and the work will need to start again.
After the siding is fixed, it is necessary to install slopes and ebbs on the windows, as well as close the inner and outer corners of each wall, using pre-made or purchased corners.
Thus, the work on proper insulation of the house using extruded polystyrene foam as insulation is completed.
Now let's look at the main differences between insulation using polyurethane foam and installation of extruded polystyrene foam.
Differences between polyurethane foam insulation
The most basic difference is that polyurethane foam does not require any type of fastening, since when it is applied to the surface, it sticks tightly and after undergoing the polymerization process, it can only be removed mechanically.
The second difference is the application stage. As a rule, polyurethane foam is applied after the profile fastening hangers are installed, this is done immediately after preparation and marking have been carried out. After the foam has been sprayed, it needs a little time to complete internal processes and gain strength, and after that you can continue work on further finishing the house.