In any apartment a situation arises when it is necessary to replace the old faucet. Calling a specialist costs money. And you can do this simple job yourself. Connection options are studied in advance before the faucet is installed on the sink. Choose between rigid wiring or flexible wiring. Installing the faucet on the sink in one way or another depends on the model of the water distribution mechanism.
For example, it is recommended to choose a single-lever kitchen faucet with a high spout. We must not forget about the size of the washbasin. If the washbasin does not match, then drops of water will fly in different directions. The small size of the spout reduces the power of water pressure. For exclusive models, the installation method may differ from standard ones. Each device is supplied with instructions from the manufacturer for its installation.
When you can't do without replacing the faucet
Not all crane breakdowns require replacing it with a new model. Sometimes repairs can be made and the device functions well. But there are breakdowns that cannot be repaired.
- A broken faucet does not stop the flow of water. The water in the tap does not shut off in the “closed” position.
- A clogged faucet aerator significantly reduces the water pressure when supplied.
- The service life of a water hose is from 3 to 7 years. It is called an unreliable place, and it breaks and leaks.
- The faucet's attachment to the sink has broken and it's wobbling.
The listed breakdowns can be repaired, but it will be so problematic that it is better to install a new device.
- The device case burst.
- The model simply fell out of favor and seems outdated to the owners.
In this case, repairs will not help at all. A new mechanism is being installed.
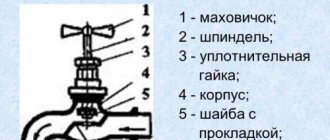
Valve repair
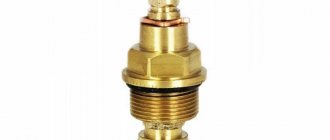
The valve is a safety valve, so its reliability and tightness of locking require closer attention.
The condition of the valve gasket deserves special attention. The gasket rib has no protection from water pressure or hydraulic shocks, since the valves do not have recesses. This drawback is mitigated by the fact that the gaskets are attached with a nut and a threaded stud to the valve, and the pressure washer gives the gasket additional rigidity and strengthens it. The valve has neither a chrome-plated body nor a union nut, so replacing the gasket is easier than with taps and mixers. If necessary, you can also make a gasket for the valve yourself if you make a notch in advance. You can also place a workpiece cut from a piece of rubber, having previously pricked a hole in the center, onto a threaded rod near the valve, and secure the workpiece with a nut and washer in the same way as the finished gasket. Using a sharp cutting object, bring the contour of the workpiece to a perfectly even circle.
The requirements for the technical condition of the valve correspond to the requirements for the condition of water taps - for example, the valve seal must be tightly packed to avoid water leaks along the stem, since it is always under pressure.
Valves must be inspected regularly and their condition carefully monitored.
If a leak is detected, you must follow the same sequence of actions as when repairing a faucet - try to tighten the packing by tightening the union nut or, if that doesn’t work, add packing. To check the tightness of the connection, you need to tighten the flywheel all the way, open any tap installed after the valve - if water does not flow out, then the gasket is in order and you can start packing the oil seal.
Bring the valve to the closed position, unscrew the bushing or unscrew the union nut, remove the flywheel, leaving the stem motionless, put a seal in the gap between the stem and the body, tamp the seal with a screwdriver, thus eliminating the malfunction.
It should be remembered that if you remove the bushing, the pressure will squeeze out the seal, since the water is not blocked, and a flood will not be avoided. If the valve does not hold water in the closed position, it should be borne in mind that large foreign particles may have entered - in this case the valve must be closed and opened several times. If these actions do not lead to the expected result, you need to unscrew the valve head and understand the causes of the malfunction. In case of serious damage, for example, if there is a destruction of the ball joint between the stem and the valve, which can fit into the socket, the stem and valve must be replaced.
You should always remember that before any work related to the replacement of plumbing, it is necessary to shut off the valve at the inlet, but if it is impossible to fulfill this condition for some reason, shut off the entire riser, in order to avoid possible troubles associated with flooding of the room uncontrolled flow of water.
Installation, replacement of taps, mixers in Moscow, all districts 8 (925) 712-24-15
Tips for choosing a faucet
- The water distribution mechanism is easier to install and replace later without removing the sink if it is selected with two pins instead of one large nut. Models whose price is average and above average are usually attached with pins. They can be installed and dismantled without disturbing the position of the washbasin.
- A cheap faucet comes with unreliable hoses. It is recommended that you purchase new hoses before installing the faucet on the sink. This will help avoid having to replace them quickly.
- An easy way to choose a reliable faucet is to choose by weight. Several models are selected and their weights are compared. The heaviest mixer will be made of brass. The rest are made of aluminum and its alloys.
- Non-standard models are more difficult to repair, as there may be problems with spare parts. Then only installing a new mechanism will help correct the situation.
Appearance
The appearance of the faucet is of great importance when looking for solutions for how to install a faucet in the kitchen, since the plumbing equipment must be selected in accordance with the design style of the kitchen. In specialized stores, mixers are presented in a wide variety. These can be models made in loft, hi-tech, classic and minimalist styles. The shape of the faucets can be chopped or streamlined; in addition, chrome, copper or black products are produced.
As for the cost, it is important to adhere to the rule: the higher the price, the better the quality of the plumbing equipment, including faucets.
Selection of eyeliners
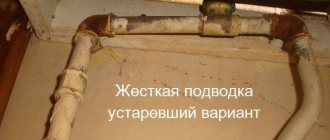
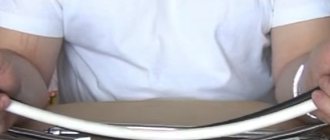
The tap is connected to the water supply system using flexible and rigid connections. Rigid hoses are reliable, and flexible hoses are easy to install.
The standard length of flexible hoses is 86 cm. This is enough to prevent the hoses from breaking. They are laid in a semicircle.
If the kit comes with short eyeliners, 30 cm long, then they will have to be sharpened. Extra connections and problem areas for leaks appear. Therefore, it is recommended to immediately purchase hoses of the required length. The eyeliner should not be stretched.
The compatibility of the mixer materials and connecting hoses is taken into account so that corrosion does not appear on the elements.
Preparing the necessary tools
Installation of the faucet requires several steps. To begin with, you should carefully familiarize yourself with the equipment included in the device. Next, you should prepare the necessary tools.
To carry out installation work you need:
- different shapes of screwdrivers;
- adjustable wrench;
- flashlight;
- sandpaper;
- several flexible hoses;
- dishes for water;
- WD-40 product;
- end keys.
If you don’t have any tools, you can purchase them at any hardware store. Having the entire list will significantly speed up the work process.
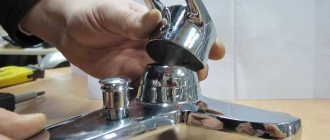
Algorithm for removing an old crane model
- Installing a faucet on a sink begins with shutting off the water supply in the riser. To make sure that it is absent, just open the tap.
- The old device is unscrewed from the hot and cold water pipes. After this, the threaded connection on the pipes is cleaned. If the threaded connections are stuck and they are difficult to unscrew, then the places are pre-treated with kerosene. After 20 minutes the thread unwinds.
- It is recommended to mark the location of the cold and hot flow pipes. Only after this is the eyeliner disconnected.
- The device is secured in place with a nut. It is unscrewed with a small adjustable wrench. Sometimes the mixer is secured with a pin or a pair of pins, onto which nuts are screwed for fixation.
Mounting the device on a wall surface
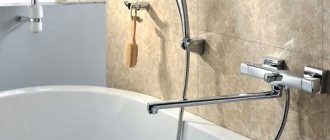
Installing a faucet on a wall surface
A current and popular way to install a faucet is to mount it on a wall. The device does not occupy a large area and can also be located at different heights. A pleasant appearance is also caused by the absence of pipes and components that are hidden in the walls.
To install such a tap, you can use different types of pipes. Special parts - couplings, tees and angles - will help ensure that their sizes and the mixer match. Special fittings are available for some situations.
Important! The tap should be connected to the central water supply only when the water is turned off.
The main difficulty in installing a mixer lies in the correct installation of the water supply and sewerage systems, installation of adapters and fasteners. They can be of several types - valve, cartridge, with sagging and solid spout. For the flexible type, a wide range of placement options is possible. A solid is characterized by limitations in position and angle of rotation. Any wall-mounted faucets are distinguished by ease of use, interesting design and build quality.
Installation proceeds as follows. Linen thread should be wound around the cut liner pipes and the eccentrics should be screwed on. The axial distance between the pipes should be 15 cm. If there is no coincidence, it is necessary to turn the eccentrics and set the required distance in relation to the surface.
The installation of the faucet should result in completely covering the connecting fasteners and defects on the wall surface. If a gap occurs, you will need to shorten the eccentrics to the required size.
The next step is to secure the nuts, having previously sealed them with gaskets included with the device. You must first tighten it by hand and then with an adjustable wrench. Be careful when doing this to avoid damaging the threads. Lifting of the joints can take place at any time, depending on the need.
Installation of a new model
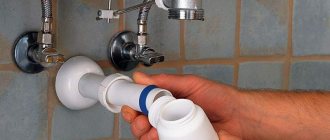
- Before installing the bathroom faucet in the sink, the device is assembled. At the initial stage, a flexible hose is screwed into the mixer. Particular care is taken when working with rubber cuffs. They are located on the eyeliner fittings.
- Before screwing them in, it is recommended to immerse them in water. The mixer is secured at the bottom with stud fasteners. A ring-shaped rubber seal is installed.
- In the sink, hoses with hot and cold water supply are threaded into the hole. After this, the crane is installed in its place.
- A clamping nut under the sink or under the washbasin secures the position of the tap. A rubber gasket is placed between the washer and the sink to prevent leakage. After this, the clamping nut is screwed onto the stud. The mixer takes a more stable position.
- The tap nuts are tightened carefully. After they are fully tightened, the faucet is fixed to the sink.
1 – fastening pin; 2 – hot water supply hose with red streak; 3 – cold water supply hose with blue streaks.
Installation of the new device ends with connecting flexible hoses to the cold and hot water supply pipes. The nuts for supplying the hose are screwed onto the threaded connection of the pipes of the water supply system. The nuts have rubber seals. Therefore, they are twisted without using force so that they are not damaged.
The threaded connection is covered with FUM tape. This seals all connections. After connecting the flexible line, a check is carried out to ensure that the work was done correctly and that there are no leaks in all places where the connection was made. The water supply in the riser opens and the mixer lever is moved to the “open” position. The absence of leakage confirms the correct installation of the faucet on the sink.
To prevent the surface of the mixer from being scratched during installation, it is recommended to cover it with regular electrical tape.
If the tightness of the connections is not broken during use of the faucet, it will last for more than one year.
How to choose a siphon for a sink according to the size of the hole. Types of siphons
They are divided into types according to different principles. One of them is at the installation site. Highlight:
- Bath siphons. They often have a second pipe connected to the overflow hole. Since different bathtub models vary greatly in the location of the drain holes, siphons for them are made so that they can be easily adjusted.
Dry siphons, also known as drains, are sometimes used for showers. They can be installed directly in the floor - the water goes into a recess in it. They differ in that when they dry out due to infrequent use, a special damper lowers and blocks the outlet, preventing the smell from seeping out from the sewer. The usual type can also be installed in the shower, the design differs little from those intended for a bathtub, only it does not require an overflow pipe.
The specificity of sink siphons is that they often become dirty due to the fact that it is into the sink that the most waste goes into. Therefore, it is preferable to install easily disassembled devices, mainly bottle ones.
And here is the time to analyze the common types by design:
Bottle
Most often used. They consist of drain and discharge pipes, as well as a container between them, usually shaped like a bottle - called a flask. It can be easily unscrewed if necessary and cleared of accumulated debris. This design has other advantages. If some valuable item falls into the pipe, it will not go straight into the sewer, but will remain in the siphon container and can be retrieved. Fittings for household appliances (usually a washing machine) can be connected to such a device instead of installing an additional pipe.
- pros
+ Takes up less space compared to a pipe siphon
+ The flask is easy to remove and clean.
- Minuses
— Installation is more difficult than other types of devices.
— It gets clogged quickly, water starts to flow poorly, so you have to remove the flask for cleaning quite often.
— Leaks more often than others because there are too many connections.
— When moving the sink, the siphon will need to be changed.
A hidden siphon is rarely used. It also belongs to the bottle type, but differs in that the container itself is located inside the wall and is not visible. It costs significantly more.
Corrugated
Corrugated siphons are the simplest of all. This is a corrugated pipe, the frame of which is curved at the outlet. The ability to bend the pipe greatly simplifies the connection in non-standard locations. This device is easy to install and is inexpensive.
- pros
+ The design is very simple and easy to install, you can install it yourself.
+ Does not take up much space, which is valuable when space is limited.
+ The sink can be moved to another location along with the siphon.
+ Low risk of leaks.
- Minuses
— Due to the fact that the surface is uneven, deposits accumulate on it faster.
— Cleaning a corrugated device is much more difficult compared to a bottle device. If chemicals do not help, then it will need to be disconnected to clean it.
— The pipe cannot be disassembled, although this is also a plus - since there are no intermediate connections, leaks occur much less frequently.
Pipe
A pipe siphon is a pipe that differs from a regular one only in that it is curved, usually in the shape of the letter U or S. At the bottom there is usually a hole through which it can be cleaned. But you can’t bend it, which makes cleaning more difficult. There are both collapsible and non-collapsible models.
- pros
+ Simplicity of design.
+ Low price.
- Minuses
- Difficult installation.
— Difficult to clean - not recommended for installation in the kitchen.
If used infrequently, the water may evaporate since the water seal is not deep. Because of this, the device will stop working and the smell from the sewer will begin to penetrate into the apartment. If you are away from home for a long time, the drain must be closed with a stopper.
Dry
Dry siphons are less common than previous types and work completely differently. Inside them there is a flattened rubber tube. It opens when there is water inside the device, the rest of the time it contracts. Thus, there is no water inside the siphon: it should be used, for example, in dachas without heating, where other types freeze.
How do they work
Now let's pay a little attention to the devices of the above-described cranes. The pressure and water temperature in two-valve mixers are adjusted using a pair of faucet axle boxes located in one housing. In single-command designs, you can increase the pressure by lifting the handle up, and by turning left or right you can adjust the water temperature. Using a lever, we change the gap between a pair of polymer plates or spheres responsible for the flow of liquid. The cartridges of such faucets are ceramic and ball. The first ones consist of two metal-ceramic plates ground to each other. In the second case, a steel adjusting head is used.
Mono-team crane design
The design of thermostatic devices includes a special cartridge consisting of wax and bimetallic plates, which are very sensitive to the slightest temperature changes. This cartridge controls the mixing element. By independently setting the mixer handle in a certain position, you will activate the fastening and adjustment screw, and water will always flow from the faucet in the bathroom at the required temperature.
Thermostatic device with cartridge
The operation of contactless devices is based on the action of an infrared sensor that controls the locking element. But the temperature and pressure of the liquid are set using an external lever or a screw hidden in the housing. These mixers differ in their operating principle. Some supply water for a certain period of time. In others, the valve stops the flow of liquid instantly as soon as you remove your hands from the action area.