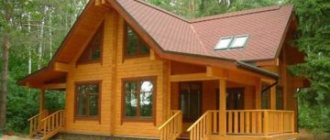
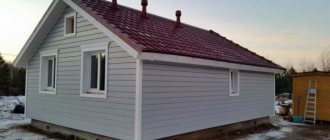
Do-it-yourself technology for building a house from profiled timber
The basic principle of building a house from profiled lumber is determined based on the shape and size of their cross-section.
Therefore, for laminated timber and natural humidity they will be the same. So, first of all, a foundation must be built, which can be strip, pile or columnar. Its surface must be covered with a layer of waterproofing material (bitumen mastic, roofing felt, etc.). The timber is laid in the log house in accordance with the design documentation. Therefore, in a house assembly kit, all elements have indexes to unambiguously determine their position in its structure. First, the casing crown (the lowest) is laid. In this case, it is necessary to carefully maintain horizontality, flatness and angles. Most often, floor joists are also inserted into the framed crown (they can also be supported on the foundation).
After this, the beams of subsequent crowns are laid sequentially. For better thermal insulation and to prevent air leakage, it is recommended (and mandatory in the corners) to lay sealing material. Adjacent crowns are fixed to each other with dowels, which prevent relative horizontal shift and torsion of the beams, but do not prevent the shrinkage of the log house.
The topmost crown of the log house is called the Mauerlat. The roof truss system is installed on it. Therefore, the Mauerlat bars must have sufficient mechanical strength and be carefully secured.
Then a roofing covering is constructed to prevent moisture from entering the frame during the shrinkage period, which lasts several months. After its completion, you can begin finishing work. At the same time, a log house made of profiled beams does not require caulking - thanks to their precise dimensions and the correct drying mode, an increase in the width of the crown joints is eliminated.
Step-by-step instructions for building a house from profiled timber with your own hands:
| Stage number | Name | |
| 1. | Design | – standard project of a house made of profiled timber; – individual project (unique). |
| 2. | Foundation | – determination of the type (tape, pile, slab); – calculation of characteristics; - excavation; – formwork installation; – installation of reinforcement frame; - pouring concrete; – strength gain. |
| 3. | Construction of a box house | – waterproofing; - the first crown. |
| 4. | Subfloor | – fits into the period of wall construction. |
| 5. | Box assembly | – subsequent crowns; – interior partitions; – interfloor ceilings. |
| 6. | Installation of the rafter system | – roof truss system; – insulation of the under-roof space; – laying roofing material. |
| 7. | Installation of individual elements | – installation of columns, supports and other vertical elements; – installation of window and door units; – arrangement of stairs to the second floor (attic, attic). |
| 8. | Interior finishing | – connection of communications; – decoration (cladding) of the room. |
| 9. | External wall treatment | – grinding; – treatment with antiseptic, primer, fire retardant, painting. |
If you know how to build, learn to wait
After you have brought the house under the roof, closed the windows and doors and left only gaps for drafts (let excess moisture blow out), you need to wait for shrinkage. Under its own weight, the tenons of the timber will cut deeper into the grooves of the structure. The pause lasts up to six months. Windows and door frames are waiting in the wings, otherwise the structure will warp.
Now is the time to carry out additional insulation from the inside. It should be noted that in this way the costs of profiled timber are reduced: a reduction in size by 50 mm in thickness and width results in savings of 2–2.5 thousand rubles. per cubic meter
The only condition: natural and artificial materials that have vapor conductivity are used. Let's turn the house into a polystyrene box - destroy the tree, set up a bathhouse in the room. You will have to invest in forced ventilation.
No matter how good the profiled timber is, the smoothness of the walls is relative. If you like the interior of the hut, leave it as is. The texture of the timber under a layer of varnish looks attractive. But, of course, designing a modern, stylish home requires a different approach.
As an option, drywall mounted on vertical holders will hide the flaws. A heat insulator will be placed between the guides and the house will not be afraid of the cold. While one floor is being finished, the other will become residential. Protecting the facade of a house made of profiled timber, as a regular event, will drive you crazy. Varnishes, paints, and impregnations fade under the sun and lose their protective properties. Perhaps sooner or later you will have to think about a ventilated facade. But a house made of timber, covered with plastic cladding, will lose the charm of the natural material.
Result: own roof over your head
Caulking crowns
For caulking can be used:
- Tow.
- Moss.
- Hemp hemp.
- Jute.
- Linen felt.
The main task: to seal the gaps between the beams through which the wind will blow. Caulking work should ideally be carried out in several stages, at different times after construction:
- Immediately after completion of construction, before final exterior finishing. Newly built walls have not yet settled, so the gaps may be very small or not noticeable at all.
- 1-1.5 years after completion of construction. During this time, the walls will have already settled down, and cracks will definitely appear. They need to be caulked tightly, without leaving any hanging seal.
- 5-6 years after completion of construction. The cracks that appear are caulked, and the seal is also refilled where it spilled out or was pulled out by birds. This step is skipped if the house is covered with siding.
The process of filling the seal is simple, but labor-intensive and time-consuming. You need:
- Walking around the perimeter of the house, look for every crack.
- Using a narrow spatula (or just a narrow and thin strip of metal), tightly hammer it in with a sealant.
Arrangement of window and door openings
Openings (both door and window) can be made in one of the following ways:
- Where windows and doors will be located, the beams are laid out at a distance from each other. The distance should be equal to the width of the opening. On both sides of the opening, the beams are fastened with dowels.
- The beams are laid around the perimeter without preparing openings (that is, a “blind” perimeter without holes is obtained). After completing the construction of the walls, openings are cut out in the right places.
The first option allows for more rational use of building material. But it will take more time to adjust, and you can still make a mistake.
The second option is simpler, faster and more accurate. But this way you will waste more material: the sawn pieces are unlikely to be used for construction.
Arrangement of floor and ceiling
Floors are made in the form of flooring, which is laid on logs or beams. To attach the logs, holes are cut in the first or second crown (this is done at the stage of laying the timber). The process of laying the floor is standard: thermal insulation and waterproofing are performed, a subfloor is laid, and the top is finished with the selected material.
The ceiling is installed during interior finishing. The options are:
- Leave the hanging beams as decoration;
- Mount a suspended plasterboard ceiling on the beams and finish it (paint/hang wallpaper);
- Install siding onto the beams.
Roof selection
The roof (both the material and the type of roof) is selected based on the budget and the desired appearance. There are no rules or restrictions for houses made of timber.
Exterior works
After completion of construction work, you can begin exterior finishing. For this:
- The cracks are caulked (how and with what – discussed in the section “Caulking crowns” above).
- The surface is polished.
- The wood is varnished or painted.
You can also install siding or sandwich panels on the outside. There are no restrictions or prohibitions on such options; they will additionally protect the tree from direct contact with moisture and wind. But on the other hand, log houses are good for their “natural” appearance, and modern finishing will hide it. Therefore, the exterior decoration is chosen at the discretion of the owner.
Completion of construction
After shrinkage, you can begin roughing and finishing, as well as constructing the roof. At the same stage, entrance doors and windows are installed. The subfloor is being installed. If the walls have a thickness of 195 mm or more, then they do not need additional insulation and cladding. They will retain heat perfectly.
Whereas protective impregnation must be applied. This will keep the wood in excellent condition for many years. If you wish, you can purchase a composition that will perform two functions at once - protective and decorative. With this mixture you can emphasize the structure of the wood and give it a rich shade.
How to make your cherished dream of owning your own home come true?
It's easy to do it yourself. It is easier to build a house with your own hands from wooden beams. Wood is a traditional material with time-tested quality.
The production of finished softwood timber in our time is represented by a wide number of options. If you have a ready-made project, it is possible to order material for the template.
Production will take a long time, but will be compensated for during installation.
7 steps to realizing your dream
After making a decision to build housing, it is necessary to carry out a number of preparatory measures.
The best time for this is considered to be late autumn and winter. It is necessary to spend a lot of time on all actions and it is advisable to time this period by the beginning of the construction season from mid-Vienna to early autumn:
- Decide on the choice of site.
- Order or buy a ready-made standard project for your home.
- Order and purchase basic material.
- Carry out preparatory work.
- Prepare consumables.
- Purchase a tool.
- Conclude agreements with contractors.
Let's give the floor to the Scandinavians
There are a lot of insulation materials that are superior to wood in terms of heat conservation. And large-format profiled timber is used for roads due to the abundance of waste that is unsuitable for processing into building materials. Swedish builders decided to reduce the cost of processes by including paired parts with a thickness of 70 mm.
Using smaller section wood reduces costs by up to 40%. Foamed breathable insulation seals joints and allows you to reduce the power of heating devices even in the Arctic zone. Penoizol is ideal in terms of cost and thermophysical properties on the market.
An option was tested with the replacement of wooden beams with a laminated analogue of chipboard made from chips. The 100 mm heat insulator bears the main load for heat conservation. The resulting monolith is not afraid of warping and cracking. Shrinkage has also decreased. It often makes sense to adopt such a new product.
Progress does not stand still
Stages of building a house made of timber
A log house has several advantages:
- The walls turn out to be light, which is why the load on the foundation is low, which means that the costs of its construction will be lower.
- Wood is an elastic material and it compensates for small movements of the foundation without compromising the integrity of the building. And this, again, allows you to make shallow foundations on well-draining soils.
The choice of foundation type depends largely on the soil, but most often they make a strip foundation; if there is no need for a basement, you can install a columnar one (for small temporary residence buildings - dachas, bathhouses, etc.) or a pile foundation (with or without a grillage). It is advisable to base the choice on the results of geological research. The process is described in more detail here.
While the foundation is “setting,” the wood is prepared. All timber and dowels are treated with antiseptics and fire retardants. Use compounds that do not form a film on the surface of the log. They will not interfere with the drying process. After preparing the timber, the actual construction of the house begins:
- Cut-off waterproofing. To prevent the wood from the foundation from drawing moisture, it is necessary to lay a layer of hydrophobic material. Previously, two layers of roofing material were laid under the first crown. Today there are more modern materials - coating and roll. You can use them, and in combination: coat them, stick them on a roll.
- Laying the trim crown. The timber is selected without signs of blue, with a minimum number of knots. Preferably - from the middle part of the tree - with a maximum density of annual rings. It is additionally treated with impregnations intended for wood in direct contact with the ground. In order to ensure better preservation of the first crown, there is a trick: a wide board impregnated with bitumen mastic with waste is laid on the waterproofing. Another layer of waterproofing is placed on it, and the first crown is placed on top. All these layers are connected to the foundation with studs that are embedded in the foundation.
- Rough floor. The floor logs are attached to the first crown - a beam with a section of 150 * 100 mm. They are laid in increments of at least 70 cm. To make it more convenient to work, subfloor boards are laid out along the joists without nailing them.
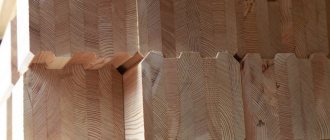
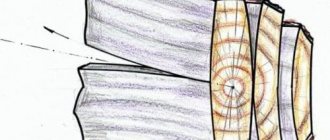
- Assembling walls from timber. If a wall kit with ready-made bowls is not ordered, they are “slaughtered.” Cut out according to the template. A template is drawn from a piece of plywood, traced, and then cut out. A chainsaw is used more often, but a fairly high degree of proficiency with the tool is required: how warm the house will be depends on the accuracy of the cut. The shapes of the timber connection are shown in the picture.
Methods for connecting timber
We have already talked about laying inter-crown insulation: when using regular timber it is required, for profiled timber it is advisable in bowls, the rest is optional. The crowns are connected to each other by dowels - long round bars carved from a single piece of wood, dowels - rectangular in shape or pins - metal rods. In any case, a hole is drilled under the connection into which the connecting element is driven.
- Assembly of the rafter system. The order of work depends on the type of roof chosen. When installing a simple gable roof, rafter legs are installed; when installing an attic floor, the procedure is different. A windproof membrane is rolled out and secured onto the assembled rafter system. In this form, the house is left to dry out for a long period of time.
- Door and window openings. To speed up drying and shrinkage, you can cut out window and door openings, install a frame or fixing strips. Door and window blocks are not installed until the main shrinkage is complete.
After a year or two, you can begin finishing work. All the time while the log house is settling, it is necessary to monitor the processes occurring in the wood. It is necessary to immediately inspect the corners and, if necessary, caulk them. Then monitor the condition of them, as well as the beam connections. If the dowels are driven in with great force, during drying the timber may hang on them, causing cracks to form. You can solve the problem by hammering: take a huge wooden hammer and knock on the walls, causing faster shrinkage. The same technique is used if the house is settling too slowly.
The video shows the main stages of how to build a house from timber. Despite the lyrical digressions, there is a lot of valuable information.
Common mistakes
When installing gables, people often forget to make holes in the eaves. They are needed to ensure ventilation of the rafter system. To prevent condensation from heating up and the roof rotting, air must enter through the holes in the gable and exit through the ridge strip.
When buying timber for the construction of a private house, it is not always possible to determine the moisture content of the purchased material.
Important! A house even made from dry timber should stand for 12-18 months until all excess moisture gradually evaporates. If you speed up this process by installing heating ahead of time, the wood will begin to crack.
If cracks do appear on the beam, it is better to use sealant rather than putty to seal them. The wood may continue to dry out, and then the putty layer will crumble. The gaps in the corners can be covered with panels.
Material selection
It is not possible to create this type of house from every type of tree. If you want this structure to stand for many decades, you need to select tree species that are especially durable and not very expensive. Coniferous trees such as pine, larch, as well as linden, willow, oak, aspen and birch have such measurements.
Installation of timber frame crowns.
Here it is necessary to take into account the fact that the construction of a log house will be carried out from logs whose diameter is not less than 20 cm, but not more than 26 cm. You must use even logs, of the same thickness along the entire length and without cracks.
You can make a log house from timber from 2 materials:
- profiled timber;
- rounded logs.
The creation of a rounded log is made by processing an ordinary log into a shape in the form of an ideal cylinder. In this case, a special machine is used. It is capable of removing the very top, not very durable layer of the log.
Making log houses from timber with your own hands begins with the development of a project and the choice of material. And if we leave the building plan to your discretion, since everything depends on specific wishes, then regarding the timber it is quite possible to give a number of general recommendations.
Structure and advantages of laminated veneer lumber
The difference in the functional parameters of these materials is also quite significant:
smooth parts that are cut from logs in the shape of a square or rectangle are cheaper, but do not provide proper tightness when connecting the crowns. So if you want to get maximum thermal insulation of walls even without finishing, choose profiled timber with special locks on the connecting surfaces;
Please note! Some models of profiled timber even have a special selection for laying inter-crown insulation. The use of this thermal insulation technology significantly increases the level of energy saving of the wall. As for the structure, the most common is solid material
However, when drying, long beams can become deformed, so sometimes timber glued together from lamellas with multidirectional wooden fibers is used for construction. Of course, the price of such products will be higher, but by choosing glued blanks, we practically guarantee that their geometry will remain unchanged;
As for the structure, the most common is solid material. However, when drying, long beams can become deformed, so sometimes timber glued together from lamellas with multidirectional wooden fibers is used for construction. Of course, the price of such products will be higher, but by choosing glued blanks, we practically guarantee that their geometry will remain unchanged;
Any of these combinations can be successfully used to build a log house. And yet, lately craftsmen have given preference to solid profiled products that have undergone air drying. According to most experts, it is these raw materials that have the optimal combination of cost and operational parameters.
We invite you to familiarize yourself with the thickness of timber for bath walls: the correct choice of material size
Which wood to choose
Coniferous wood is usually used to build a house. There are several reasons. Firstly, the increased content of resins, which are natural preservatives and antiseptics. Thanks to their presence, wood does not deteriorate for a long time. Secondly, affordable price. You can, of course, build a house from beech or oak beams, but the price will be simply exorbitant. Thirdly, the wood is soft and easy to process.
Of all the coniferous species, a house is most often built from pine beams. With good characteristics, it is relatively inexpensive. Houses made of larch and cedar are rarely built: they are too expensive. Spruce is even rarer, but for a different reason: it deteriorates the fastest, and is also difficult to process. So, regarding the type of wood, there is, in fact, no choice. 95% of it is pine. But you need to understand the type of timber.
According to the processing method, timber can be:
- Regular or solid, unplaned timber. Sawed from a single log, the cross-section is a quadrangle (square or rectangle).
- Profiled timber. It is also sawn from a single log, but is then processed: tenons and grooves are formed with milling cutters - profiles with the help of which one beam is joined to another. The side edges are also processed. They come out of the machine already planed. The section is of complex shape. The side edges can be smooth, rounded, figured - with chamfers, the shape of a “lock” - numerous beards and notches.
- Glued timber. Outwardly similar to profiled, but assembled (glued) from several boards.
Let's look at the features of each type of timber regarding the construction of a house.
Home decoration
At this last stage, you should install internal interior partitions, window frames, and door frames. In addition, rough flooring and ceiling are installed, then insulation is laid on it, then the floor and ceiling need to be finished with a finishing coating. At this stage, communication networks are laid - electrical, water supply, sewerage and heating.
As for the exterior decoration of a house made of timber, everything depends on the wishes of the future owner. You can leave the house in a rustic style, that is, without external decoration, if, of course, the quality and type of timber allows this, or you can paint the house if you want to give the house color and zest.
Read also:
- Effective technology for building a house from foam blocks
- Construction of houses from aerated concrete
- Loan for building a house: to take or not
- Monolithic construction: technology, requirements, stages, materials, pros and cons
←Return
Price
The price for constructing a log house will depend on many factors, which include the quantity and quality of the timber, as well as its cross-section and complexity of construction.
Prices are approximate.
| Manufacturer | 150m2 in rub. | 300 m2 in rub |
| Brus House 53 | 1,290,000 | 3,356,000 |
| WILLOW | 1,060,000 | 3,190,000 |
| SVOD_STROY | 1,155,000 | 3,070,000 |
| BUILD kit-C | 1,240,000 | 3,270,000 |
| THREE builders | 970,000 | 2,500,000 |
Preparatory work
First of all, a garage project is developed, and it is important to decide on the following parameters:
- dimensions of the building (for one or two cars, with space for a workshop, etc.);
- location of the entrance gate, entrance door;
- the presence of an inspection hole;
- type of foundation (slab, strip, columnar);
- type of floor (earth, concrete, wood);
- warm or cold garage (in the first case, the method of insulating the walls and roof, the installation location and the type of heating stove are considered);
- roof configuration (single or double slope) and type of roofing material (corrugated sheeting, roofing felt, metal tiles, etc.).
Prepare a drawing indicating all dimensions, this will greatly simplify the assembly of structures. On the Internet you can find ready-made projects for wooden garages and take a suitable option as a basis.
The configuration of the foundation depends on the characteristics of the soil on the site, the dimensions of the building and the availability of materials
It is important to take into account the depth of soil freezing and do not forget that the upper edge of the foundation must rise above the surface by at least 10 cm so that the wood of the lower crowns does not come into contact with the ground
Laying the foundation
The weight of 1 m3 of dried coniferous timber is 0.5 tons. Roofing, interfloor ceilings, furniture, wind and snow loads will be added. The total weight will not exceed 40 tons for a two-story house 10 x 10 m. The depth of groundwater and the type of soil influence the choice of base.
The pile will speed up the start of the assembly of the log house. Columnar and shallow foundations are labor-intensive: the volume of excavated soil is large. To prevent the concrete from getting wet, a compacted sand bed of 0.3 m is made, with a gravel cushion on top.
The concrete foundation is poured in advance, at least six months before the start of construction. Box reinforcement with a metal period of Ø 12–14 mm will strengthen the monolith. After the concrete has polymerized, the base must stand so that the heaving of the soil during freezing and thawing reveals weak points or confirms strength.
The marking of the foundation of the house is carried out in accordance with the drawing. Corner reference points of external and internal mates require special attention. Precision is required in the placement of threaded inserts. After removing the formwork, the walls and top edge are coated with a waterproofing agent. Insulation with polystyrene foam will extend the life of the foundation. Backfilling of clay is done with an outward bevel.
Walls and floor
If you do not know how to properly build a house from timber, then below is the method for constructing walls:
- The first crown - for greater reliability, the assembly of a house from timber is carried out with a larch board with a cross-section of at least 150x50 mm under the crown. Antiseptic-impregnated beams are usually joined in the corners using a half-timber joint; this is considered the toughest joint, and it is quite airtight;
- The wedding board is placed so that rotting does not spread from the timber, but from it. Once this process begins, replacing the board will not be difficult, which cannot be said about the first crown.
- Laying logs - if the foundation is sufficiently wide, the logs are laid directly on it, but if the first crown completely covers it or the foundation is made using the pillar method, they should be cut into the crown. There is also the option of independent genders, but this is a topic for a separate article. The distance between them varies depending on their cross-section, but should not be more than 1 meter and less than 40 cm. The logs are installed at the end for greater rigidity of the future floor;
- Subfloor - for laying it, use a board after initial processing. Gradually build up the floor, driving nails from it into logs no shorter than 100 mm long. For this operation, a board with a thickness of 25-50 mm is used, it depends on the distance between the lags, the greater the distance, the thicker the board is needed;
- Waterproofing layer - placed with the rough side to the board, secured around the perimeter using staples;
- Insulation layer - polystyrene foam is usually used as insulation, but for greater environmental friendliness it can be replaced with mineral wool. The insulation does not need to be specially fixed;
- A layer of vapor barrier is necessary to retain moisture formed in the atmosphere of the house; it must be secured around the perimeter, like waterproofing with a stapler, but not to the floor, but to the bottom of the walls;
- The finished floor usually consists of sanded boards.
- Subsequent crowns - beams - their components can be of a smaller cross-section than the first. Corner locks can also be different, regardless of what the lock of the first crown was like. To preserve heat, each subsequent crown is caulked using flax or special strands.
Most often, when building a house from timber with your own hands, three types of locking connections are used:
- Back to back;
- Half a Tree;
- Using a root tenon.
Dowels - the crowns are connected to each other using special wooden pins called dowels. Sometimes metal dowels are used. They securely fix the beam, preventing it from moving along the groove. Usually their length is enough to pierce from 2 to 4 beams; to do this, a hole is drilled in them the length of the dowel.
Window and door openings are another complex element that is important not to miss when building a house from timber with your own hands without experience. To ensure that the beams do not sag in wide openings, they are supplied with specially prepared wooden boxes consisting of boards no less than 50 mm thick. The boxes can be replaced by installing temporary supports made of logs;
The boxes can be replaced by installing temporary supports made of logs;
The last crown - it must completely repeat the first and, if necessary, be of a larger cross-section than the intermediate ones. The locking connection is made halfway across the tree;
Internal partitions - they must be erected last, after the load-bearing walls have been built. An exception may be a partition made to strengthen the structure of the house, and also serving as a load-bearing partition, in the case when the house is built more than 6x6 with your own hands;
Arrangement of the second floor - if you are building a two-story house, then you need to know that the second floor is erected after laying the ceiling on the first, which in turn will serve as a subfloor. The beams holding the ceiling are made of the same section as for the floor. Steam and waterproofing should not be used for the interfloor space, but insulation can serve as additional sound insulation.
Openings for doors and windows
The formation of a doorway begins with the 2nd crown, the height to the window is at least 70 cm. The formation of openings can be carried out in two ways. “Rough” opening in preparation for creating the opening. The opening itself is prepared for installation after the timber shrinks. The assembly of the structure is accelerated; beams are installed in the openings to secure the walls.
Openings can be arranged during the construction of walls Source krsk.au.ru
In the second option, they immediately prepare for installation, installing decks that connect the beams and act as slopes. If metal-plastic windows are installed, then decks may not be installed. A vertical groove is made at the ends along the opening into which the rail is inserted. The slats/blocks are made 5-7 cm smaller than the opening so that it does not interfere with shrinkage.
Installation of windows and doors with a “rough” opening is carried out by cutting it to the appropriate dimensions. The joints are sealed using insulation; it must be nailed at an angle. Then the window frame is inserted, fixed to the deck with self-tapping screws, there is a gap on top for shrinkage, it is filled with soft insulation.
When installing a window frame, be sure to leave gaps for shrinkage Source patter.ru
Types of profiled beams
Profiled timber can be glued or natural moisture. These varieties differ in manufacturing method and technical characteristics. For example, in the production of laminated veneer lumber, carefully dried boards are used, which can be of various types. They are glued together until the required profile section is formed. This technology provided this profiled building material with:
- increased accuracy of geometric parameters,
- lightness,
- the possibility of simple implementation of internal (hidden) placement of communications,
- presentable appearance.
To produce profiled timber with natural humidity, coniferous wood (spruce, cedar, pine) is used. The process of its manufacture involves processing a single log using milling and other woodworking equipment. The result is a building material that provides:
- reduction of production costs,
- uniform shrinkage of the frame,
- reduction in the cost of finishing work,
- environmental friendliness.
Project
The house design is chosen based on personal ideas about what country housing should be like, and, of course, financial capabilities. You can buy the project from the relevant companies or draw it yourself. But in any case, it is necessary to coordinate it with the administration of the area where the house is planned to be built and obtain all the necessary permits. After obtaining permission, you must contact the woodworking enterprise where profiled timber is produced and order the amount of building material corresponding to the project.
Corner connection of timber in a wooden frame
The main types of corner notches for solid or rounded logs were discussed above. They are also fully applicable for beams, with the exception of notches “into the bowl”. Cutting “in the paw” with various modifications is the main type for cobblestone walls.
Depending on the design of the bathhouse, installation of the beams can be done either with or without the remainder. The terms “in the fat tail”, “in the okhryap” and others also apply to block joints. Although, due to the peculiarity of their design, they use only their own additional methods of fastening - this is the use of dowels, wooden inserts, as well as main and inserted tenons.
Corner notches in beams with remainder
Return to top
Is this realistic in “handicraft” conditions?
"Nothing is impossible!" - you will say, and you will be right. Despite the fact that large enterprises can afford to use technological lines that include expensive machines for the production of profiled timber, almost improvised tools are quite suitable for the production of a limited volume of material. A hand-held milling machine, a circular saw, a chainsaw, an electric planer, etc. are used. - all this can be bought at any specialized store.
Important! In order not to mislead the reader, we warn you: the process of independently producing the material we are considering is labor-intensive, tedious, and lengthy. Only take on a job if you are confident in your abilities and have enough time.
What kind of corrugated timber will it be?
When profiling independently, they rely on the simplest options. Most often, it is assumed that the crowns are connected “into a rail” or “into a block.” In such cases, a square groove is cut out in each beam from two opposite sides, and a block of the appropriate size will act as a connecting element. The groove can also be triangular - it is more convenient to make it using parquet. As for the parameters of the groove: its width and depth should not exceed 1/3 of the thickness and height of the beam. To make corner joints, bowls are cut at the ends of the beams using a chainsaw. You can also use a “claw” connection, but it is more labor-intensive to implement.
What is needed to obtain such material?
Equipment requirements are determined by the type of profile selected. If we are talking about triangular grooves, then the bet is on using a hand-held circular saw with the ability to set a certain angle for the cutting element. A hand router is better suited for cutting a square groove. Prices for such power tools can vary widely. So, parquet flooring will cost from 2 thousand rubles. The cost of milling cutters starts at 2-3 thousand rubles. An additional tool for cutting bowls may cost much more. There are 2 options: make the frame yourself or buy a ready-made “Brus-1” set, the cost of which is about 25 thousand rubles.
vote
Article rating
Additional points
When building from sawn timber, there are even more analogies with logs. Here the corners of the log house can be assembled both into a paw and into a bowl. The cutting of internal walls, beams and floor joists is done with a frying pan (in visual appearance, such a connection is similar to a dovetail connection).
In this case, it is mandatory to fasten the crowns with dowels (spikes) and pins. This also affects the partitions, since they must be maximally strengthened not only by the structure itself, but also by themselves.
When building from such material, walls inevitably shrink. And periodically it is necessary to tighten the nuts on the studs.
Regardless of the type of material used, when building a house from timber, a number of rules must be strictly observed:
- During the installation process, each beam must be installed in its place and fixed to it using fasteners of design features or auxiliary devices. It is necessary to strive for the highest possible installation accuracy.
- All fixing structures must ensure free shrinkage of the walls of the house and prevent changes in the geometric parameters of the beam.
- All work related to the installation of dowels must be carried out after securing the timber.
- The holes for the dowels must be made strictly vertical. This is possible when using rack jigs for drilling.
- The use of screw ties is highly recommended. This will avoid deformation in the vertical direction.
- After completing the assembly process, the crown joints must be caulked using a natural sealant or protected with a special sealant.
Compliance with the listed rules allows you to get a reliable, warm home that will not have to be patched and repaired periodically and which you can rightfully be proud of.
Roof installation
After completing the construction of the walls, the installation of the rafter system begins. Most often, country houses have gable roofs with an inclination angle of at least 30°. 150*50 mm boards are used as rafters. They are assembled in the shape of the letter A and installed on the walls. First, the outer rafters are placed, a guideline (strong thread) is pulled between them, and then all the rest. The rafters are attached to the wall using corners or 300 mm nails. In the case of an insulated roof, a vapor barrier material is stretched along the rafters, and then a wooden sheathing is installed. A ventilated gap must be left between the sheathing and the vapor barrier.
Why nail the counter batten along the rafters, and then the sheathing itself. Sheet roofing material (corrugated sheets, metal tiles) can already be laid on such a sheathing. And for a soft roof you will have to make a solid base of plywood.
Expenses should be taken into account at the project stage
It is profitable to order a ready-made standard project for the construction of a cottage from timber with reference to the region. It is up to the designer to select from savings on the network and adapt the technical design to the request. What are the advantages of the project:
- Get a detailed cost estimate for materials, components, and work costs;
- Issues of material shortages or sale of remaining surplus will not arise;
- Detailed drawings and subassemblies will lead you out of the maze of errors;
- Transport costs are optimized;
- Laying pipes and cables will not cause any difficulties;
- The maximum cost of a standard project is 20 thousand rubles.
But the implementation of the idea depends on the need to hire a team of qualified carpenters. The level of responsibility, skill of specialists and the seriousness of hidden defects will become clear during the first wintering.
What should an ordinary person, inexperienced in construction, decide to build a warm house from profiled timber with his own hands? Order a house kit from a local house-building plant and save a significant amount of money with this step and speed up your move-in date.
Essentially, a house kit is a kit for the builder. The profiled timber is cut to size, the dovetail type connecting locks are made without gaps using precise factory equipment, which eliminates the appearance of cold bridges.
In the attached video, craftsmen use a chainsaw for this purpose. But are they capable of reproducing the precision of a machine production line? It can be seen that the cuts were made approximately, with a margin. Will they definitely caulk or foam the inconsistencies in the cuts? Doubt encourages self-building. And the cost of the work will amount to no less than factory processing.
Video:
Do-it-yourself house made of profiled timber
The benefits of purchasing a house kit made from profiled timber
A technological worker has replaced a carpenter - that’s what machining means.
The developer is limited in time, looking for an opportunity to reduce the cost of building a timber house. Let’s look point by point at whether the costs of cutting and sampling are reasonable:
- You receive chamber-dried wood with 10–16% humidity in sealed bags;
- End processing with film-forming stabilizer INDULINE. This means that the main channel for moisture absorption is blocked, the web of cracks will not disfigure the cut;
- Each part is numbered, the instructions indicate the location of assembly;
- Adjustments and modifications are excluded, time is spent only on the process of assembling the house;
- Check prices at wholesale stores per cubic meter of long profiled timber. It turns out that the cost of a similar unit of a house kit is the same or up to 10% more expensive - this is where the benefit is hidden;
- A set of timber for a house with an area of 120 m2 will cost approximately 650,000 rubles, for 190 m2 – approximately 950,000 rubles;
- The average assembly cost will be 25% of the cost of the timber. Manage the reserve fund at your own discretion;
- The thickness of the log house will be offered according to the climatic zone: the common size of timber 150 x 150 mm is suitable for Voronezh. In Siberia, wall thicknesses less than 220–250 mm are unacceptable;
- Installation will speed up twice;
- The material is 100% treated with antiseptic and fire retardant.
100% complete from base to ridge, this is the construction service
Video:
Ready-made house kits from the manufacturer
Peculiarities
Profiled timber
During construction, timber has a significant advantage over logs - less of it is needed, but there are also disadvantages. The seams between adjacent products are poorly protected from all kinds of precipitation, so they require special treatment. You can sheathe a structure made of timber with a certain material, but if this is not planned, then a chamfer of 20 by 20 mm must be removed from each timber.
The timber can also be subject to helical deformation, but modern technologies have helped get rid of this by creating a profiled timber with complex “protection”. Manufacturers of the material dry it thoroughly, which helps avoid shrinkage.
There is also glued laminated timber with increased strength indicators. Its important advantage is geometric stability, which does not allow the material to change shape under the influence of moisture.
Nageli
Dowels play an important role in the process of assembling timber walls. Their task is to connect the beams together and prevent them from twisting. Pins are most often made with a diameter of 3–4 centimeters from oak or birch wood. Instead of wooden dowels, it is possible to use a metal tube, but this is quite expensive. For dowels, 3 beams are drilled with a through hole in depth in a checkerboard pattern and they are inserted without effort. Instead of wooden and metal dowels, it is possible to use 25-30 centimeter nails. In this case, we must remember that its cap must be recessed 3-4 centimeters deep into the beam, since shrinkage of a house built from timber is inevitable.
Marking timber
When assembling walls, it is recommended to draw an assembly diagram indicating the number of the crown, connections and location of openings. On the bars themselves you can indicate their numbers and location. The main characters used are:
- 1 – joints;
- A, C/D, B – longitudinal/transverse walls;
- E – partitions.
Walls can be erected from solid timber and extensions, partitions/transverses - from solid timber. An overlap of 15 cm to the floor is made in the longitudinal wall. To obtain the most accurate and identical dimensions and cutouts, it is best to use templates that will help you quickly carry out the process and transfer the contours to the timber.
All markings on the uneven bars are made using the same template Source pinterest.ru
What is a half-tree angle?
After the casing has been laid, you can install the corner of the house. Most often, individual developers ask the question: how to properly lay timber in the corner of a house.
Assembling corners is the most difficult and time-consuming operation; the easiest way is to lay a corner from crowns assembled into a head or paw. The disadvantage is that in both cases significant gaps are formed, depending on the accuracy of cutting out the connecting elements. The corner joints are sealed and insulated.
More practical is a tenon mount, called a “warm corner”; such a connection is more labor-intensive, but has a number of advantages:
- The ends do not protrude beyond the edge of the building, the masonry is called “no residue”;
- The structure has no through gaps, the corner does not require insulation;
- The castle is located inside the structure, the facade takes on an attractive appearance;
- The building can be erected from timber of smaller sizes.
Half-wood masonry simplifies the corner connection as much as possible; in this case, the end of the beam is cut in half with a horizontal cut, and one of the parts is removed. The remaining parts are overlapped at an angle of 90 degrees. The reliability of joining the timber in this connection is ensured with the help of dowels.
This construction technique is used for lightweight buildings made of logs and log buildings. Half a tree is used to build country houses, bathhouses, outbuildings and other buildings not intended for permanent residence.
Craftsmen recommend: regardless of the construction method, the crown molding should always be laid in half a tree.
Drawing up a plan, preparing materials and tools
Without a good project, it is simply unrealistic to build a house, so it is very important to take this stage extremely seriously, especially since it is at this stage that you can clearly understand where you can save.
Ideally, you can turn to special design agencies for help. For a fee, they will individually draw up a complete layout of your future home, taking into account the size and shape of your territory, soil composition, financial capabilities and, most importantly, personal preferences.
If you do not need any miracle of design thought, then you can build a building using standard options. To do this, all the necessary documentation can be found on free Internet resources or you can use one of several 3D editor programs, including FloorPlan3D, CyberMotion 3D-Designer, SEMA and many others. The latter, by the way, is designed specifically for the layout of houses made of timber. SEMA will help you carry out all the necessary statistical calculations, select the type of rafter system and much more.
The drawing should indicate everything, from the general dimensions of the building and the number of floors to the location of door and window openings, furniture, and all communications (light, water, heat).
As soon as the plan is in your hands, you can begin to calculate, if this has not already been done, and select the required materials and tools, including:
- Timber as the main building material.
You can buy ready-made beams with the necessary cut grooves and tenons - bring them, install them - use them, also thanks to the perfectly flat and smooth surface of the edges there is no need for additional finishing work, or you can buy wooden blanks and make the notches yourself, there is nothing complicated about it, and you can save a lot of money.
Profiled timber retains heat indoors better than its analogues
Experts recommend using timber with a cross-section of 150x150 mm during construction. But since you have to work alone or with an unqualified assistant, it is better to use material with a cross-section of 150x100 mm. Such timber is much lighter, and the missing volume can be restored in the future by insulating the facade from the outside of the building.
- Insulation.
To save additional money, you can use materials that are, so to speak, “at hand” as insulation. Moss is considered the best among these. It is not difficult to find and process, and its technical characteristics are identical to its artificial counterparts.
- Nails, screws and other fastening structures (metal corners, wooden dowels, etc.).
- Waterproofing material (for example, roofing felt).
- Ready-made concrete solution or the components necessary for its preparation (water, sand, crushed stone, cement).
- Reinforcement (if a strip foundation is planned).
- Saw.
- Jigsaw.
- Screwdriver.
- Hammer.
- Construction rubber hammer.
- Roulette.
- Building level.
- Plumb.
- Circular Saw.
- Pipes for water supply and sewerage.
- Cable for electricity, TV.
- Master OK.
- Caulk.
- Other tools for small and decorative work.
How to control the assembly of a log house?
During the construction process, a number of parameters are monitored; the following are subject to control:
- Verticality of corners;
- Horizontal masonry;
- Current wall height.
To control verticality, a vertical line is applied to the end of each beam. The line is located at an equal distance from the edge of the corner and is marked using a construction square. When laying the next row, the lines of the bottom and top rows must be aligned. The resulting vertical is controlled using a plumb line; a violation of the integrity of the vertical indicates deformation of the masonry.
When laying the next row, the horizon is set using a building level. The height of the walls is measured from the base horizontal line marked on the rim.
How to collect crowns correctly?
The first and most important operation is laying the first (flashing) crown. The dimensions of the first row of the frame are determined at the design stage; they are commensurate with the length and width of the foundation. Using a building level, a basic horizontal line is applied to the flashing crown to control the current height of the masonry.
The foundation material and wood have different physical properties: the concrete base freezes and forms moisture when it thaws, dew also forms in the summer, concrete has a loose structure and is easily saturated with soil moisture. If waterproofing is insufficient, mold and mildew will appear on the lower beams and under the floor. The trim crown is reliably isolated from the negative effects of moisture.
To waterproof the base of a log house, roofing felt, fiberglass or woven geomaterial with bitumen impregnation are used. To adhere to the foundation, eliminate cracks and air cavities, the waterproofing layer is treated with open fire.
The crown of the house is the main element of the log house; the crown is understood as a closed contour of timber, forming a structure with corners meeting at 90 degrees. The most common standard size for buildings made of solid timber is 250 mm, for buildings made of profiled timber – 150-200 mm. There are the following methods of joining into a crown:
- Cutting into oblo (joining into a bowl);
- Laying in the paw;
- Fastening in a bandage with a main tenon (assembly on a tenon).
Cutting into the claw and laying in the paw are universal joints; this technology can be used in construction from logs and timber. You can do it yourself by attaching it to a headband or a paw. Tenon assembly is used only in timber construction; tenoning is more complex and requires special skills.
Log cutting is the best way to lay a log house for a bathhouse and outbuildings; residential buildings are built in a claw and on a tenon.
Deciding how to lay and fasten the crowns depends on the type of lumber chosen. The profiled timber is reliably connected by its own tongue-and-groove system; for reinforcement, wooden dowels are used; on one side of the building it is enough to install 6-7 such fastenings. When building from solid timber, dowels are installed every 500 mm.
Simultaneously with the laying and fastening, the inter-crown seams are sealed and insulated. For a log house for shrinkage, this operation is performed after completion of shrinkage.
We suggest you familiarize yourself with: Water storage tank for cold water
The slot seal performs the functions of heat and sound insulation and is used in the construction of any wooden structures. The type of sealant and laying technology depend on the size of the lumber. When building from solid timber, a layer of sealant is laid when laying each row. When building from timber with natural moisture, this operation is performed after shrinkage by sealing the cracks. The profiled timber has special grooves for the seal.
The seal for solid timber is produced in the form of a strip of tow, flax, natural moss, for profiled timber - in the form of strips of felt, foamed fine-pored rubber and polyethylene foam. The sealing tape is available in sizes from 100 to 250 mm, the sealing strip is selected according to the standard size.
Mold may appear in a seal that is wet or saturated with atmospheric moisture; it is recommended to recess the seal into the gap to a depth of 20-25 mm, and treat the gap with liquid sealant.
How to organize your workplace?
A workplace for the construction of a log house is organized after the completion of the foundation shrinkage process.
The construction site includes: the foundation of the future house, a lumber warehouse and a place where carpentry work will be performed. The lumber is stacked at a distance of 4-6 meters from the foundation and protected from rain; the stack should not come into contact with the soil and is located on a pallet. Between the foundation and the lumber warehouse, a work area for marking and cutting with a workbench 1.0-1.5 m high is equipped. When using power tools, it is necessary to supply power.
All carpentry work is performed in the work area. The assembly of structures and laying of timber is carried out directly on the walls of the log house. Working on ladders is inconvenient and unsafe; for convenience, industrial scaffolding is used. You can make the scaffolding yourself - place the ceiling on vertical posts and securely fasten the structure with consumable lumber.
The cut parts from the timber are lifted along inclined logs using a rope. All work can be done together.
Harvesting wood and moss for construction
To build a warm and cozy house from timber, in addition to knowing the technology of laying crowns, it is important to understand which type of wood is best suited for this purpose.
Each species, naturally, has its own advantages and disadvantages, but the main thing you need to pay attention to when choosing lumber is strength, density, moisture resistance and degree of drying. So, if the wood is fragile, then your house may very soon simply fall apart; if the density is low, then such material can shrink by up to 20, or even more percent. If a lot of moisture accumulates in the wood fibers, then such a house will never be warm, but if the raw materials are under-dried, then it will simply be impossible to work with them; if the raw materials are over-dried, the material will become too unreliable.
Very serious requirements are placed on the walls of the house, as they must provide warmth, comfort and low noise levels in the premises, especially since wood is a rather fire-hazardous material that can be deformed due to weather precipitation. That is why experts recommend purchasing timber from coniferous species such as spruce, cedar, fir, larch and some others. Due to the high content of resinous substances, conifers are resistant to rotting, cracking and other deformations. Also, trees of this species are very durable, light, and therefore do not create too much load on the foundation.
By choosing softwood timber, you can save money by building a foundation using a simplified system.
If you decide to harvest the wood yourself, then you should know that the humidity coefficient should not exceed 20%, otherwise cracks will soon begin to appear in the walls, which will require additional processing, and this will waste effort, time and budget.
When harvesting, take into account the fact that it is better to do this in the winter period of the year (from January to March), since in winter the process of photosynthesis slows down and the speed of movement of juices along the tree trunk becomes minimal.
Cut the lumber to the desired shape and size, treat it with an antiseptic and leave it stored in a dry place out of reach of sunlight. The bars must be stored compactly in special stacks, at a height of at least half a meter from the ground. There should be a gap of 4-5 and 10-15 cm between the crowns and rows. To do this, several transverse beams are inserted between them. After lying like this for 5-6 months, the tree is ready for further processing and installation.
To keep your home warm in inclement weather, you should think about choosing inter-crown insulation. Professional builders use modern strip materials, but the price for such pleasure is quite high, so we recommend paying attention to moss.
There are more than 300 species of this plant in the world, but only a few varieties are used for construction purposes, among them: sphagnum, cuckoo moss, red moss and peat moss. All of them have excellent bactericidal properties and are excellent natural antiseptics. Among the disadvantages is a high flammability, since after drying the moss becomes dry and brittle, for example, at high temperatures it can spontaneously ignite, to prevent this it is treated with special means.
Moss must be collected; it can be found in swampy areas - these are long, up to 30 cm, stems with small leaves, dried and stored in a dry place for about two weeks. You can use plastic bags as bags, but then the moss will be a little damp. There's nothing wrong with that.