Are you interested in the question, is it necessary to prime the surface of heating objects during their use? Don't know which primer to choose for this? Next, we will tell you what heat-resistant solutions are and when their use is necessary.
Heat resistant primer
Why do you need a primer on a surface that heats up during use?
Heat Resistant Oven Primer
And so, let's start from the beginning and figure out why it is necessary to prime a surface that will heat up during operation.
- To improve the adhesion level of the base coat
As you should already know, many primers have a high level of adhesion on their own. In addition, they also increase the level of adhesion of the surface they cover. Thus, applying a primer that contains a surface converter to heating pipes will help transform a kind of chemical oxide film into a dissolution-resistant coating.
- To prevent corrosion
Such solutions can be used not only as a base coating, but also act as an independent material.
- To reduce the number of absorbed features, as a result, to reduce the amount of paint consumed.
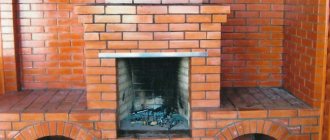
This feature is especially relevant for brick stoves, as well as fireplaces. The cost of such material is much less than a pigment of similar quality, so such surface treatment will be very justified.
How to plaster correctly (step by step)
Whatever the coating, before starting work on a new stove, you need to make sure that the masonry is dry and stable. Rushing will only harm the process, and the finished coating will have to pay for it. At a minimum - shrinkage cracks.
Preliminary work consists of preparing the surface. An operating furnace requiring reconstruction is freed from layers of old plaster down to the brick base. The surface of the new one is cleaned from the remains of the masonry mixture.
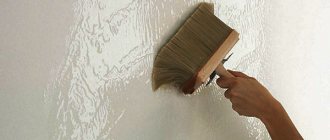
The next stage is priming the brickwork, followed by a waiting period until it is completely dry. Applying the mortar is necessary to ensure better adhesion of the plaster.
The primer has dried, you can begin installing the slats and reinforcing the oven with metal or fiberglass mesh. The slats will be used to level the surface and they are attached directly to the plaster solution. A mesh is attached to nails between the slats, in increments of 10 cm. This is done to further strengthen the coating, despite the presence of reinforcing additives directly in the plaster.
The oven must be coated after pre-firing; the heated surface of the brick attracts the mortar, providing good adhesion. The masonry is moistened and the first layer is applied, liquid, creamy consistency. On top of it is a mixture of greater density, but with the same thickness of 5 mm.
The applied layers are rubbed down with felt or cloth soaked in the solution, sprinkling the drying areas with water.
Next, the stove corners are leveled along the slats; this stage is carried out with control of deviations from the horizontal and vertical levels.
The first warm-up is not earlier than after 3 days and not at full strength. Gradual increase in temperature over a week of daily exercise. Following these recommendations will allow the coating to gain maximum strength and protect it from cracking.
Additional recommendations
The steps for treating the oven surface are the same for any solution you choose. The differences are minor, but they need to be taken into account when working. So a solution with the addition of gypsum hardens 2 times faster than cement. Fireclay clay in the mixture is ideal for application to bricks made of the same material, because the thermal conductivity coefficient is the same.
The plastered stove must dry without the use of auxiliary means.
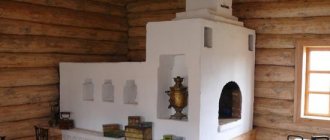
Plastering the surface, regardless of the mixture you choose, will emphasize the beauty of the elements, hide blemishes, and prepare the brick oven for further decoration, whitewashing or painting.
Permissible temperatures
Primer for heated surfaces
Are you wondering at what maximum temperature a heat-resistant primer is needed? Let's analyze the requirements that are put forward for coatings at different operating temperatures.
- Up to 60 o C
As a rule, autonomous heating is installed at this temperature. Their usual temperature fluctuations are 70/50 o C, which on the device itself does not exceed the permissible 60 o C.
With this indicator, you can safely use ordinary finishing materials. If repair work is carried out correctly, you don’t have to worry about delamination or fading of paint and varnish materials.
Conventional materials are also suitable for this temperature, but there is one small feature: you need to use paint with a durable pigment. The binder and solution will be the same as at 60 o C.
But at such temperatures you already need to think about heat-resistant soil. If the instructions for heat-resistant paints and varnishes indicate the need to apply primer, you will need to rack your brains about purchasing a specialized composition that can easily cope with prolonged heating and will retain its properties when the equipment is heated to maximum.
All paint and varnish materials that are applied to equipment whose operation occurs at more than 300 o C do not require the use of primer. At such an operating temperature, the primer can only aggravate the situation and peeling of the coating cannot be avoided.
Preparation for plastering
Before the plastering procedure, you should be patient, since preparing the surface of the stove can take a whole day.
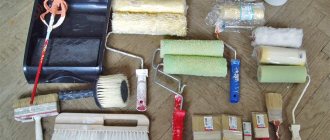
Required Tools
It’s also better to stock up on the necessary tools in advance so that you don’t have to run to the hardware store in the midst of work. So, you will need:
- Spatulas of different sizes (a medium one is suitable for scooping up the solution, but a wide one is better for uniform application).
- Container for liquid plaster.
- Plaster hammer for delicate driving of plaster nails.
- Trowel (trowel) for leveling the mortar on the surface.
- Hammer-cam (used when working with tools such as chisels, trojans, gears).
- Scissors needed to cut fiberglass mesh. Or metal scissors, if the work will use a chain-link mesh.
- Grater and trowel for leveling the finished coating on stove walls.
- Smooth for sanding plastered walls.
- Chisel (you can use it to make notches on brickwork for better adhesion of materials).
- Assortment of primer brushes.
- A metal brush for sanding the stove and getting rid of the old coating.
- Building level, plumb line and rule - to control the evenness of application of materials.
What is the best way to sand a stove?
The first stage of work is to thoroughly clean the stove walls from dust, soot or remnants of the old coating. If the surface is not properly prepared, the adhesion of the materials will be poor and this finish will not last long. It doesn’t matter whether the stove is old or just built.
The next step is deepening the seams . The layer of binder mortar between the bricks should be hollowed out by 5-10 millimeters. But you shouldn’t go too deep, otherwise you’ll have to spend a lot more plaster. The resulting recesses must be cleaned of dust.
After cleaning is completed, it is better to heat the stove. Here, too, moderation should be observed: the coating is applied to warm, not hot walls.
Once warming is complete, you can begin priming.
It is important to remember that only perfectly smooth masonry . If there are significant flaws on the wall, then it should be leveled using a metal reinforcing mesh. It is secured with nails and then primed.
What primer to use before plastering
The primer should never be neglected. This pre-coating helps:
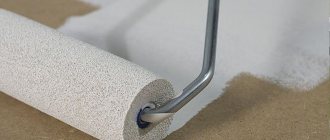
- Apply the plaster evenly.
- Reduce fixed asset consumption.
- Extend the service life of the finish.
The choice of material depends on the type of stove and the degree of its heating:
- Less than 100 degrees C – used for autonomous heating. In this case, ordinary finishing materials will do. If the technology is followed, they will last a long time and will not affect the efficiency of the furnace.
- Less than 300 degrees C - you need to take a heat-resistant primer that can retain its properties during prolonged heating.
- More than 300 degrees C - a primer is not needed at all, even a fireproof one, since it can only provoke peeling of the plaster.
Mesh for plaster
To strengthen the coating or level the wall, special meshes are used. They are sheets of metal or fiberglass fibers with cells measuring 15-20 millimeters. Such a network, in addition to strengthening the plaster, increases the resistance of the finish to temperature changes and increases thermal conductivity properties. It is secured using special nails that are driven into the layers of mortar between the bricks.
Varieties of modern heat-resistant primers
Heat-resistant primer for ovens
Modern heat-resistant mass for stoves and fireplaces is very diverse, therefore, as an example, we will consider the most popular and widespread samples.
This primer is a suspension of dyes with antioxidants, as well as surfactants in glyphthalic varnish.
This mass is used for processing steel, magnesium and aluminum. Very often, GF-031 is used in the civil aircraft industry as a finishing material for aircraft bodies.
The highest permissible temperature threshold is up to 200 o C.
The solvent for such soil is a solvent. Solvent can also be used to dilute the mass when it thickens.
The primer is applied by spraying using hand-held painting equipment.
The recommended thickness of one coating layer should not exceed 20 microns. With such a coating density, the material consumption is about 80 g/m2.
According to standards, the mass is produced in yellow color.
As some may have already guessed, now we will talk about a phosphating primer, which reacts with the base coat and forms a thin layer of insoluble phosphate, which increases the level of adhesion and does not allow corrosion to cover the surface.
The composition of the phosphating primer is given in the table.
| Ingredients | Concentrate | Diluted substance |
(in proportion 1:2)
Furnace finishing with heat-resistant primer
The binder is a mixture of acrylic, formaldehyde and epoxy resin. Based on this composition of binders, it is not difficult to guess that the composition can only be used outdoors or in industrial conditions.
The permissible operating temperature threshold is up to 300 o C.
Due to its unique composition, the primer can be used with any type of heat-resistant and conventional paints and varnishes. The mass can be used not only for work on metal surfaces. The manufacturer allows it to be used to increase the level of adhesion of final finishing on fiberglass and ceramics. The mass can be applied both to a previously prepared surface and to rust.
DIY painting materials
If there are any reasons why you cannot or do not want to buy special materials for painting the stove, you can start making them yourself.
- Chalk or lime solution. To prepare it, you only need water and lime, which can be purchased in large quantities at any hardware store. The difference between these solutions lies only in the duration of their drying: when applying the first layer of chalk, you must wait for it to dry completely, and layers of lime mortar can be applied immediately. To prepare the solution you will need 1 kg of lime or chalk and 1.5 liters of water. To achieve strength in the final result, table salt must be added to the solution - 300 g of salt per 2 kg of coloring solution. If there is no salt, you can use wood glue - 100 ml of glue per 10 liters of solution, but this paint will be yellowish. To avoid this, you can pour 20 ml of blue into the coloring mixture.
- You can also paint a brick stove using natural varnish. To prepare it, you will need chicken egg whites and milk in a one-to-one ratio, as well as dust from bricks that remains after laying the stove. To process one square meter of stove you need about a quarter liter of milk and 8 egg whites. To prepare this varnish, beaten egg whites and cow's milk are added to brick dust until a thick consistency is formed. The well-mixed solution is applied with a brush to the preheated oven surface. The result is a smooth red coating with increased temperature resistance and durability. To achieve a matte surface structure, you can cover it with drying oil on top. Natural varnish has its drawbacks: when it comes into contact with a painted surface, marks may remain. To prevent this from happening, you can apply an egg white solution on top. Also, during the heating process of the stove, the coating emits the smell of baked milk, which is a disadvantage for most people.
What can surface priming achieve?
We use a heat-resistant primer before tiling the stove
The use of primer as a base coat for fireplaces and stoves has the following purposes:
- to increase the level of adhesion of putty and plaster;
- to strengthen the base (the resins that are part of the substance penetrate deep into the pores and bind the topcoat and the base into one).
Please note that at high operating temperatures you need to forget about using ordinary gypsum or cement masses. To decorate the stoves, you need a mixture based on clay, sand, and sometimes skim milk can be a bonding component.
Yes, yes, you didn’t think so, exactly milk! Due to the presence of casein (milk protein), when denatured at high temperatures, the solution will retain its remarkable binding properties.
For each buyer, the manufacturer indicated the following information on the packaging:
- how can the substance be applied to the surface (with a roller or brush);
- gave recommendations on the number of layers (preferably no more than 2);
- indicated the time during which the coating can dry (no more than 60 minutes);
- gave an approximate soil consumption (no more than 400 ml/m2).
Is it necessary to prime the surface of heating objects during use? What primer should I choose for this? Let's consider the types of modern heat-resistant soils.
Functions of the paint and varnish coating of a brick heater
Painting a stone heating device is carried out for the following purposes:
- protection of the stove surface from absorbed contaminants, and clothing from brick dust upon contact with brickwork;
- facilitating daily care, that is, maintaining the necessary sanitary and aesthetic condition;
- increasing the decorative design class of the unit;
- adapting the design of the heating device to the existing interior.
Brick heaters coated with colorless heat-resistant varnish
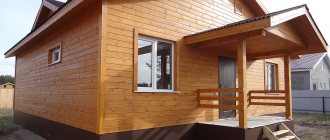
If the brickwork is made without sorting the stone by color, then painting the body with a heat-resistant paintwork material (paint and varnish material) of one or more colors will correct the situation. But even a stove finished with face brick is transformed after applying, for example, a colorless paint coating, which gives a richness and matte hue to the stonework.
Types of popular heat-resistant primers
There are a wide variety of different heat-resistant primers for stoves and fireplaces on the building materials market; let’s look at the most common ones:
Heat-resistant primer in the form of a suspension consisting of antioxidants. The mixture is used for treating coatings. The most permissible temperature threshold is 200°C. The basis of the soil is a solvent, which is used for diluting properties when it thickens. A similar look is applied as a result of spraying actions. The mass is made in a yellow tint.
This heat-resistant primer reacts with the coating and creates a thin layer of phosphate that does not dissolve, and as a result, a significant level of adhesion increases, which prevents the formation of corrosive properties on the surface. This tool is based on the following components:
- Phosphoric acid
- Zinc oxide
- Sodium nitrite
- Chromium trioxide
- Alcohol (g/l)
- Water
The composition of this heat-resistant primer includes a mixture of acrylic, formaldehyde and epoxy resins, and is used only outdoors or in industrial applications. The highest temperature tolerance is 300°C. A lot of the product is used not only for working on metal surfaces, but can also be used for finishing fiberglass or ceramics. The product is applied to a surface that has been cleared of contaminants. In addition, it is also applied to rusty parts of the surface. To dilute heat-resistant primer, solvents such as acetone or toluene are often used. The product can also be applied in sub-zero temperatures down to -10°C). The prime advantage of the soil is that it dries very quickly within half an hour. The consumption of heat-resistant product is about 90 g/m2.
Attention! It is better to pre-clean rusty parts of the surface so that layers do not form on the surface layer of the part.
Heat-resistant primer intended for stoves and fireplaces is distinguished by its heat resistance. The temperature regime is 1200°C, which is significantly superior to other soils.
Permissible temperatures
Let's consider what are the permissible temperatures for priming the surface. First, let’s find out why we need soil that will heat up during operation.
- To improve coating adhesion.
During application of the primer, there is a surface converter that helps transform the coating into a chemical protection during application.
- To prevent corrosive properties on the surface.
- To reduce the amount of special characteristics absorbed and also to reduce the amount of paint consumed. This treatment is very justified, since the cost is slightly lower than a product of similar quality.
Why painting is needed
Paint protects the stove from fungus and mold
The interior decoration of the home should be ergonomic, presentable and efficient. This applies to every element of the environment, otherwise the desired result cannot be achieved.
The decision to paint a brick stove in a house is based on the following reasons:
- Aesthetic component. Correctly selected paint will camouflage red brick well and allow you to achieve an ideal combination with furniture and decoration.
- Accuracy. Applying paint makes the surface monochromatic and allows you to cover up the characteristic masonry pattern in the form of a lattice, which not everyone likes.
- Saving time, effort and money. If you paint a brick stove in a wooden house with high quality, you do not need to plaster it first.
- Increased security. The solution fills all cracks and cracks, preventing the growth and appearance of new similar defects.
After hardening, the plaster solution acquires thermal insulation properties. This will increase the heating time of the walls and reduce the overall heat capacity.
Types of paints
Materials for painting stoves
The retail chain offers a wide range of paints and varnishes that can be used to paint a brick oven in a house without plastering.
- Enamel. It is distinguished by layer density, strength and shiny surface. Looks good, easy to clean, but tends to crack.
- Oily. It is considered the best option for interior painting. The compositions apply well, lie evenly and smoothly. Resistant to high temperatures, have high protective properties. The disadvantages are that it takes a long time to dry and the unpleasant smell in the room persists for a long time.
- Heat-resistant varnish. The substance has a positive effect on the strength of the outer layer of the walls. The work uses colorless and powder-pigmented brands of compositions. Smooth gloss looks impressive, but requires careful handling.
- Drying oil. A time-tested product with antiseptic, strengthening and decorative properties. The solution is inexpensive, retains the color and texture of red brick, with a slight darkening of the shade. The surface remains viscous, and therefore it should be varnished.
Heat Resistant Clay Kiln Primer
The limit threshold for the temperature regime is one thing, but the predominance of substances that pass into the air with increasing temperature is another. After the primer dries, it prevails in the state of a polymer film, volatile substances evaporate during the drying process, and there is no odor. The polymer heats up, retaining its characteristics, then destruction occurs, the film becomes soft, and then cracking and charring occurs. For outdoor work it ranges from minus 40 to plus 50 Celsius. There is no need to worry if the product is in a good range. If you have an ordinary Russian stove, then the temperature will not exceed 70-80 degrees Celsius. Ordinary primers normally predominate. If you spray water, it hisses, which means it’s above 100 degrees, household primers and paints disappear. If it doesn't hiss, the primer and paint will hold up. Check: dry the primer and paint, and then you need to heat the stove.
To avoid problems...
- If the plaster is applied to dry brick, you will not be able to avoid peeling. And too intense moisturizing will lead to scratches and the need to redo the work after the masonry has dried.
- If you use poorly slaked lime, miniature bumps may appear.
- The main cause of cracks is improperly mixed mortar. Moreover, most often the “to blame” for this is too oily clay, diluted with a small amount of sand.
- Cracks can also appear if the applied layers of plaster are too thick or as a result of the previous layer not setting sufficiently.
As you can see, you don’t need to be a seasoned stove maker to plaster a brick stove yourself. And if you still have doubts about whether you can do everything without additional help, watch a video on this topic
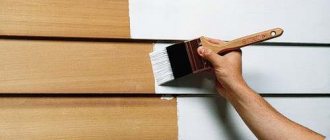
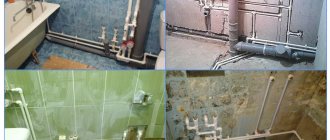
Using heat-resistant primers for metal
Pipes are made of steel and heating radiators are made of metal. Significant temperature conditions during operation should not affect the quality characteristics of the surface layer. For this, it is so important to use heat-resistant enamel, paints and, of course, a primer layer. If the surface looks rusty, it can ruin the entire appearance of the product. And after applying the primer, it can significantly improve the appearance: the surface layer will have a smooth and even surface. If you carefully treat the surface layer of the metal, corrosion damage will be reduced.
The enamel that will be spent on applying the primer will be greater, so it is necessary to carry out coating treatment. It can improve the adhesive properties after treating the primer layer, which can significantly extend the service life of the coating, and the appearance of the product will be excellent.
The main question that concerns those who are planning to plaster a stove with their own hands is: how to make sure that the coating does not crack and begin to crumble over time? In fact, everything is not complicated at all. You just need to adhere to certain rules.
The sequence of work is as follows: first the oven is prepared, then the mortar is made, after which the plaster is laid on the base.
Advantages and disadvantages of plaster finishing
The advantages of lining the stove with plaster include:
- Low cost. Compared to any other type of stove finishing (tiles, clinker or ceramic tiles, red brick, etc.), plaster is the cheapest option.
- Ease of operation. Finishing with clinker tiles or red brick requires experience and knowledge. Even a beginner can plaster a stove with his own hands.
- Versatility. This finishing option, such as covering with plaster, is suitable for absolutely any stove or fireplace: Swedish, Dutch, bell-type, Russian, etc.
- Increased heat transfer. A layer of plaster increases the thickness of the furnace walls, and therefore increases the efficiency of heat transfer.
Any stove can be covered with plaster
The only drawback of such facing work is cracking, but this can be avoided if you strictly follow all technological norms and rules when performing plastering work.
What can cause cracking? There are several options:
- Poor composition of the solution.
- Incorrect technology of facing work.
- Improper priming and preparation of the oven surface.