/Repair/Plumbing/
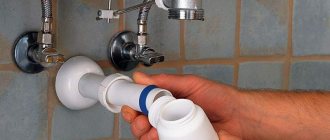
Installing a siphon in the kitchen is a very simple task that takes a maximum of 20 minutes and requires nothing more than a screwdriver. Especially if you need to install a new trap on a new sink that has not yet been installed. But if you need to replace an old device, then the difficulty will lie mainly in dismantling, rather than installation. Therefore, there is little point in calling a plumber and spending money on it.
There are different siphons for the kitchen - for regular and double sinks, with the ability to connect to a washing machine or dishwasher, with or without an overflow, made of metal or plastic, like a bottle or pipe. But they are all installed approximately according to the same principle, so we have written one step-by-step instruction with an addition - for installing a siphon with an overflow and installing a double siphon for a two-bowl sink.
And, of course, all siphons have one repurpose - not to allow gases, that is, odors from the sewer, to pass through using a water seal formed in the sump, and also to retain food debris, garbage, and small objects in it.
In this instruction, we will look at the method of installing a regular plastic bottle-type siphon, which most often complements the kitchen sink, because it is very easy to clean.
Addition - installation of a siphon with overflow
If your sink has an overflow, then installing the siphon will be carried out in approximately the same sequence as described above. Except that at the stage of assembling the device (see step No. 2), you will need to additionally assemble the overflow itself, as shown in the photo below. The principle of connecting the overflow to the outlet of the pipe is exactly the same as in the previous instructions - first we put on the nut, then the ring gasket with the blunt end to the overflow, then we insert the overflow into the outlet and tighten the nut.
Now you need to connect the sink with the overflow using a screw and a screwdriver. Then we proceed according to the instructions in steps No. 3 and No. 4.
Useful tips
The following tips will help you operate the drainage device without any problems:
- When installing a siphon, it is necessary to ensure that the drain grate is symmetrically positioned relative to the sink opening.
- The device is cleaned by supplying hot water, which dissolves fat deposits well. To speed up the process, use soda or special detergents. They are poured into the hole, and then the water is intensively drained, washing.
- The use of a plunger allows you to periodically clean the device without disassembling the sump.
- Thread sealing does not ensure tight connections. Rubber gaskets provide reliable protection against leaks. When worn, they should be replaced.
- It is not recommended to pour overly contaminated liquids into the sink. A fine strainer is installed at the outlet, which should be cleaned periodically.
How to install a siphon for a double sink?
A two-section sink must be equipped with a specially designed double siphon. Such siphons have two outlets, which are united by one siphon, which can be either flask-shaped or tubular. They may also have outlets for a washing machine or dishwasher, as in the photo on the left.
The installation is carried out according to the principle described above, with the only difference that you first need to screw two pipes with a drain to two sinks, then under the sinks you need to connect the two pipes with a conductor, and then screw the remaining parts of the device to the conductor. If necessary, the pipes must be cut to the required length with a hacksaw, sanding the edges with sandpaper.
Support the project - share the material with your friends on social networks:
Preparatory process
To choose a suitable and high-quality siphon, you need to know what it looks like and what it should consist of. The correct equipment and quality of the product will help you quickly and reliably replace the siphon yourself in a minimum amount of time and there is absolutely no need to call a plumber here. So, before starting the installation process, the siphon should be disassembled into parts, checked for defects, the absence of any debris, and for the strength of the thread. All rubber gaskets and threads must also be lubricated with special silicone grease. This is necessary to eliminate the possibility of leakage. To avoid confusion, you need to lay out the siphon very carefully, preferably in the same order in which it was assembled.
To work you will need the following tools:
- screwdriver;
- transition cuff;
- flashlight;
- plastic electrical tape.
All this can be purchased at a regular hardware store. It is also worth taking care of choosing a high-quality lubricant - sealant, which will be needed during the work process.
Quality materials to get the job done
- transition cuff;
- plastic electrical tape;
- screwdriver.
To make it easier to navigate, it is best to start the installation by laying out all the siphon parts in the position and order in which they should be connected. Depending on the diameter of the pipe, it is necessary to install a transition collar.
For installation it is worth preparing all the necessary materials.
Siphon device diagram.
For example, durable
Installing a siphon on a sink or bathtub can only be done with silicone sealant - a gasket.
You will also need high-quality plastic electrical tape. It would be a good idea to purchase a flat-head screwdriver for crimping possible clamps on pipes or disassembling an old system, but it is preferable to tighten everything else by hand.
First dismantle the old system. Remove the old sink trap over the bucket, including the drain line. If the coupling has lost its elasticity, it should be replaced with a new one.
After the drain and socket have been cleaned of dirt and old sealant, you need to temporarily cover the pipe with a rag and then install the siphon. This is how the whole process will be done correctly.
In addition, you must understand that a high-quality replacement of a siphon in the kitchen is a process that you can do yourself. Yes, and connecting the sink, including the sink, is possible with a standard corrugated tube, in particular, a tube with hard plastic tips, which is undesirable for a bathtub.
Manufacturers
The choice here is simply huge, from cheap Chinese goods to expensive branded ones. The choice for each situation is individual and is based on the installation location of the device, what kind of work it will perform and financial capabilities.
Some manufacturers:
- Akvater is a Russian company, quite well known and has its own sales market.
- AlcaPLAST - products of this company, a compromise of price and quality.
- Hansgrohe is a brand from Germany, a leader in quality and design.
Instructions for action
Old siphon
- Before replacing the siphon under the sink, you need to get rid of the old siphon and dismantle it. You need to do this work over a bucket and first prepare a good piece of rag, so that you can then securely close the hole in the pipe. You should not lose sight of the coupling - if it is no longer elastic enough, then it is better to replace it with a new one.
- When the old siphon is dismantled, everything is cleaned of dirt and the ideal place is prepared, you can proceed to the procedure for installing the device. The siphon should be pressed tightly and securely against the sink drain. A tight fit of the gasket must be ensured around the entire perimeter of the pipe area.
- Next, you need to securely fasten the gasket and screw. All this is inserted into a special drain hole. You can thread the screw and then tighten it all the way. After this, work is carried out on the drain socket of the siphon, into which a corrugated pipe with a gasket should be inserted. Everything is tightened using a wing nut.
- Replacing a siphon under a sink requires a competent approach to such work. In this regard, it is better to provide additional reliability and install a special seal in the form of rubber, and the socket of a corrugated pipe can already be inserted into it.
- At this stage of plumbing work, you can check the device for leaks. In this case, you just need to turn on the water, and if it does not leak anywhere, then we can assume that the installation procedure of the device is coming to an end.
Siphon replacement
In order for the device to hold for a long time and reliably, you need to carefully lubricate the gaskets and threads with sealant and, for greater reliability, use plastic electrical tape. This is a prerequisite; this is the only way to prevent the appearance of any cracks and the possibility of any types of leaks.
Installation of cone cuffs
Bottle siphon connection diagram.
Plastic nuts must be placed on the overflow pipe in front of the rubber conical cuffs. Cuffs are placed on the pipes, slightly above the nuts, as tightly as possible to the limiter belts, usually with the wide side facing the nut.
Two pipes should be assembled into one structure: an L-shaped outlet pipe and an F-shaped pipe that forms a water seal. It also happens that a narrow section of the cuff extends around the entire perimeter into the socket of a given part, in which case it is necessary to tighten the nut.
Everyone wants to install the device on the bath the first time and for a long time. You can achieve what you want only if you lubricate the threads and gaskets with sealant, secured with plastic tape.
One spring ring of the chain is inserted into the eye of the overflow lining, which is directed straight down, being careful not to squeeze it between the enamel and the lining. The second ring must be threaded into the eye of the rubber plug.
The overflow and outlet pipes are installed on a corrugated pipe, stretching it to the required length. Often, the installation of a bathtub siphon is carried out using plastic nuts, which must be firmly tightened by hand.
Before installation, the rubber gaskets are moderately coated with silicone gasket sealant, which is not acidic.
Operating rules
In conclusion, some simple tips for caring for the siphon:
- Cleaning from dirt should be done using hot water and using various detergents and soda. This method cleans fat deposits on the internal parts of the siphon.
- For a kitchen siphon, it is better to use a drain from a smooth plastic pipe, since the corrugated one clogs faster.
- You should not immediately resort to replacing the entire siphon structure; often you can simply replace the old gaskets with new ones.
- A plunger should be used periodically; disassembling the siphon will not be required.
- You should carefully monitor the strainer in the sink; you should clean it from various contaminants more often.
Following all of the above methods for caring for your siphon will extend its service life.
If you need to replace the siphon under the kitchen sink, you do not need the help of professionals. By following the step-by-step instructions above, you can easily handle this job yourself.
What to look for when choosing
Given the current criteria for choosing the required siphon, you first need to take into account:
How to get rid of fruit midges in an apartment: effective ways and methodsHow to clean the oven from grease and carbon deposits: tips and more effective methods
What to do if your kitchen sink is clogged: how to clear the clog yourself
- Matching the calibration of the sink, washbasin and pipe.
- The metric characteristic of the maximum amount of liquid into the channel must be increased when connecting secondary plumbing units. In this case, the number of sewer outlets must be increased.
- Matches with available space. With a tiny square footage, you should choose a compact corrugated spillway.
- The selection of a water seal should be in accordance with the design of the sink.
- Carefully check the device for nicks and defective punctures.
When purchasing a siphon, special attention should be paid to its design. Photos of chrome, metal and polymer samples of spillways can be viewed on the pages of Moscow online stores. You can buy a high-quality product at the manufacturer’s price and significantly save your effort and money, without even leaving your home.
Basic selection rules
To ensure effective drainage of used water in the kitchen, you need to choose the right siphon. To do this, consider the following recommendations:
- You need to purchase the kit immediately. In addition to the siphon, it must contain all the necessary components for connecting it to the sewer. If parts are purchased separately, there is a possibility that they will not be able to be assembled into a single structure.
- It is necessary to measure the free space under the sink in advance. If it is minimal, you should give preference to a short siphon.
- With closed installation, there is no need to purchase an expensive designer siphon. It is better to buy a less beautiful product of good quality, but at a lower price. After all, no one will see it, and it will not spoil the interior of the kitchen.
- If the sink siphon is open, it makes sense to buy a product with a decorative design.
Each device always comes with instructions - you need to study them carefully before installation. It is also necessary to pay attention to the absence of damage to the siphon, the quality of the threads, sealing elements and plugs.
Price
The price may vary significantly. A simple plastic siphon of any modification can be bought for 100–300 rubles. For a product with chrome plating or with additional outlets you will have to pay from 400 to 1000 rubles. The price of brass devices starts from 1000 rubles. and can reach 15 thousand rubles. The most expensive are chrome-plated bottle-type siphons made of brass or steel.
What is a siphon and what are these plumbing parts?
A siphon is a very necessary plumbing element, since its design performs important work, and the water lock of the siphon prevents sewer odors from penetrating into the living space.
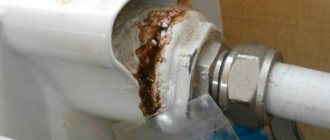
A siphon that is out of order or heavily soiled (so much so that it can no longer be cleaned) requires immediate replacement. It is quite possible to replace this plumbing element yourself; this does not require any special plumbing skills. The execution of the work will depend in part on the design of the plumbing fixture. There are several types of siphons.
- Corrugated siphon. Available in the form of a corrugated plastic pipe, the pipe is bent in the shape of the letter U and secured with a clamp.
- Pipe siphon. Available in plastic or metal, the pipe is also curved to give it the functions of a water lock.
- Bottle siphon. The most commonly used device in installation. The water lock is created by two cylinders. Popular because dirt can be removed by removing the bottom plug.
The best siphon design is a collapsible flask and a corrugated drain. Such siphons are currently made of plastic, their service life can reach up to 10 years, the price is quite reasonable. A pipe drain (instead of a corrugated one) is a good option, but only in this case it is sometimes difficult to combine the sink drain and the sewer drain.
As a last resort (if there is little space in the sink), you can install a flat siphon.


