Has the apartment become too stuffy, the windows started to fog up, and the characteristic kitchen and toilet odors remain in the rooms for a long time? The cause of all troubles is the same - insufficient ventilation.
Ventilation in the apartment with your own hands
This problem requires an urgent solution. Otherwise, you risk saying goodbye to wallpaper, furniture and other apartment furnishings, which will simply begin to rot in conditions of excessive humidity.
You can install an effective and reliable ventilation system in your apartment on your own. It is absolutely not necessary to have any specialized skills to perform such work - you just need to have basic knowledge of carrying out the relevant activities and be able to work with basic construction tools.
Poor ventilation in the apartment
Poor ventilation
Read the presented guide, do everything in accordance with the recommendations given, and you will forever forget about the problems that arise when the ventilation of the apartment is insufficient.
Problems
Problem #1 . CO2 levels affect my productivity. I have plastic windows in my apartment, so when the windows are closed, the CO2 level rises to unproductive levels within 2 hours. Opening the windows is drafty, cold and noisy, we needed a better solution.
Problem #2 . Moscow has dirty air: it negatively affects health. I am at home at least 10 hours a day. Therefore, the air in the apartment needs to be purified.
Ways to increase the efficiency of “inflow”
An effective way to supply air to rooms is to install diffusers. You can purchase new windows with factory diffusers or choose models for wall installation. It is possible to install the device in already installed windows, but this will void the manufacturer's warranty. Typically, one device is sufficient for a room, unless its area exceeds 20 m² (in which case two may be required). The air flow intensity can be adjusted manually or automatically depending on the model. Many devices are equipped with humidity sensors that respond to pressure changes and temperature changes.
Problem Analysis
So you bought a breather or air purifier. How do you know that it is working and cleaning the air? Without a measuring device - no way.
Before solving a problem, you need to learn how to measure it.
Metrics
I decided to find a device to measure CO2 and air pollution.
Air pollution is most often measured using the PM2.5 metric.
This is the content of particles <= 2.5 microns in size in the air. For comparison, the thickness of a human hair is 50 microns. Why this size? In my opinion, for convenience: particles of this size are the most common and harmful to health. What other metrics did I use?
- PM10 - content of particles <= 10 microns in size. The size was chosen specifically: the natural filters of the nose only retain particles > 10 microns in size.
- HCHO - formaldehyde, emitted, for example, by furniture.
- VOCs are volatile organic compounds found, for example, in exhaust gases.
We do not consider rare metrics - NOx, SO2, CO - since the instruments for measuring them are not widespread.
Below we consider only PM2.5 and CO2.
For CO2, the recommended level indoors is 500-800 ppm, typical outdoor levels are 400-500 ppm.
With PM2.5 it is more difficult. In Australia, by law, the annual average concentration must be no more than 8 μg/m3. In Europe - no more than 25 μg/m3. In the USA - no more than 12 μg/m3. Does this mean that values below the threshold are safe? No. Every 10 µg/m3 of PM2.5 concentration increases the risk of lung cancer by 36% . The only safe level is 0 µg/m3. Read more about health hazards in this article.
I set myself target values for CO2 metrics - 700 ppm, PM2.5 - 8 μg/m3.
Disadvantages of PM2.5 Reduction
Reviews sometimes write that lowering PM2.5 levels relaxes the immune system, but I have not found scientific evidence for this.
Measuring instruments
I bought an Air Quality Pollution Monitor for $130 to measure. But it showed zero PM2.5 levels all the time. I haven't figured out how to calibrate it correctly.
So I bought a separate AirVisual Pro for $270 to measure PM2.5. After a year of using it, I am completely satisfied with it.
The large number on the green background on the left (13) is the US AQI level. In this device it is just a different scale for PM2.5. The small number on the black background on the left (3) is the PM2.5 concentration. On the right is the carbon dioxide level (982).
I took photos of the devices at the same time. It can be seen that AirVisual Pro detects PM2.5, but the first device does not.
Operating principle of the AirVisual Pro device
AirVisual Pro uses a laser to calculate PM2.5. There is a constant flow of air through the device thanks to the fan inside. The laser emits a beam through a stream of air. The beam is reflected from suspended particles in the air. Only that part of the laser radiation that is reflected from the particles reaches the photometer. Thus, the device calculates how much was suspended in the air flow. This mechanism is capable of detecting particles from 0.3 µm to 2.5 µm. The resulting values are calibrated against temperature and humidity.
An infrared lamp is used to calculate CO2. The principle is similar: the lamp emits infrared light into the air stream. Carbon dioxide particles absorb it, so not all the light reaches the detector of the final radiation. The carbon dioxide content is calculated from the fraction of light that reaches it.
Read more about the AirVisual Pro device here.
We measure the air
With CO2, everything is easy: we close the windows, go to bed with my wife, and after a couple of hours the level of carbon dioxide rises from 600 to 1200 ppm. I wake up at ~1300ppm. With the windows slightly open, it’s cold, noisy and ~600ppm.
Volunteers with AirVisual Pro instruments share PM2.5 data. This data is collected on a map here, and there is also such a map. Typical PM2.5 levels in my area are 12 µg/m3 or 50 US AQI. On weekends there are often spikes in PM2.5 levels up to 20-30 μg/m3 - most likely these are emissions from enterprises.
Inside my apartment the PM2.5 level is 10-20% lower than outside at the same time. Why? I don't know, maybe there is a device error.
How else were PM2.5 measurements useful to me?
- When my wife and I were choosing an apartment, we went with the device. If the environment is important to you, this is an objective way to measure it. In articles “The 10 cleanest areas of the city” there is often bullshit.
- When turning on the humidifier, we noticed that the PM2.5 readings were rising sharply. It turned out that ultrasonic humidifiers should only be filled with distilled water. Otherwise, the humidifier will release impurities from the water into the air. This is harmful to health, so we no longer use an ultrasonic humidifier.
- When we iron clothes, PM2.5 levels rise. There is research on this topic. It’s not clear what to do about this, but we know that the procedure is harmful to health

I realized that there were definitely problems in my area and my apartment. The air is dirty and CO2 accumulates quickly.
No. 2. How much fresh air is needed?
The arrangement of ventilation or modernization of an existing system is preceded by an analytical stage, which consists of determining air exchange standards . This parameter is different for different zones in the apartment. There are a lot of convenient calculators and programs on the Internet for the most accurate calculation, taking into account all the features, but you can use average values, according to which:
- for residential areas, the air exchange should be at least 30 m3/hour for each person. If the living area is less than 20 m2 per person, then it is necessary to ensure an air exchange of 3 m3 per square meter of the room;
- for the kitchen, the air exchange should be 90 m3/hour if a 4-burner gas stove is used, and 60 m3/hour when using an electric stove;
- for a bathroom, the air exchange is 50 m3/hour with a combined bathroom and 25 m3/hour for the bathroom and toilet with a separate one.
If there is a fireplace or stove in the apartment, air exchange rates increase.
Solutions options
Simple solutions
There are window opening restrictions: it would blow less, and CO2 would be normal. But they don't clean the air.
There are supply valves. With their help, you can control the air flow and heat it. But they don’t clean the air either.
I rejected both options, since I need to clean the air from harmful particles.
Air purifier
A typical air purifier costs 10k rubles. The device is placed inside the room and cleans the air around it. For example, here is a purifier from Xiaomi for 8k.
The purifier will not solve the CO2 problem, but it can be supplied along with a heated inlet valve. It would seem like an ideal option, but the reviews write about two drawbacks:
- Cheap purifiers are noisy, you can only sleep with an expensive purifier. The price of such a cleaner is comparable to the price of a breather or even a blower. For example, there is a powerful purifier from IQAir for 100k rubles.
- The cleaner is a local solution to the problem. It only cleans the air around itself, and may not have time to clean the air coming from the street.
But why let dirty air in and then try to filter it out? Some air will always be unfiltered. Why not put filters from the purifier in the inlet valve?
That's when I learned about breathers.
What I ultimately see as a niche for air purifiers
- If you rent an apartment or cannot make a hole for a breather/inlet in the wall.
- If you need not 95%, but close to 100% cleaning efficiency. May be useful in hospitals. Judging by my measurements of office air inlets, in practice they do not provide a 100% degree of cleaning. Possibly due to gaps in the housings. Then, in addition to the intake or breather, we install a cleaner. By recirculating air, it can increase cleaning efficiency.
- If a major source of pollution is located indoors. For example, in a store we want to quickly get rid of viruses brought in by sick customers. The stitching with this will help with good exhaust. And it will be even better with a cleaner.
- If the budget is limited to 10-20k rubles. For this money, I have not yet seen a breather or an inlet with a HEPA filter.
Breezer
A breather is a device that is hung on a wall indoors. When installing a breather, a hole is drilled in the wall through which it takes air from the street. A typical breather heats and cleans the incoming air.
I considered the following breathers:
Tion . According to Yandex.Market, the most popular among breathers is Tion. It has , and Lite models.
The most advanced model Tion 3S has a HEPA filter E11, a G4 filter and a carbon filter AK-XL for gases and odors. It is HEPA filters that trap PM2.5 particles. Later in the article I will tell you more about filters.
Ballu Air Master 2 . This breather also has HEPA and carbon filters inside. In terms of the number of speeds, power and filters, the device beats Tion.
LufterJET Helix . They wrote about this breather in the reviews that it is very quiet. But it does not have a HEPA filter, so we are not considering it.
Xiaomi Mi Air Purifier MJXFJ-300-G1 . This breather has a HEPA filter. According to its parameters and reviews, it is quite quiet.
I did not consider a number of breathers because I found few reviews on them or they do not have a HEPA filter: Blizzard A+, Oxy, VENTS Micra 200, Aeropac SN, Royal Brezza, Airnanny A7, Mitsubishi Lossnay vl-100eu5-e, iFresh, Prana- 150.
A brief overview of all these breathers is here.
Based on reviews and reviews, I settled on the Tion 3S breather. But I was embarrassed by the large number of negative reviews about its noise. There were similar reviews about breathers from other manufacturers. It seems that the issue here is not in a specific model, but in the class of breathers itself.
I listened to the Tion 3S breather in videos on YouTube and went to listen to it live. It seemed too noisy to me.
My attitude to the noise of breezers six months later
I took the specifications of Tion 3S Standard from this document. It shows volume levels at a background noise level of 18.5 dB. In my apartment the background level is 31 dB. I transferred their noise levels to my background level by simple subtraction. Important: it’s not entirely correct to do this, so all the numbers below should be considered my personal opinion. I would be glad if someone recalculates more accurately or Tion provides exact numbers.
| Speed | Air exchange, m3/h | Noise, dB |
| off, windows closed | — | 31 |
| 1 | 30 | 32 |
| 2 | 45 | 36 |
| 3 | 60 | 42 |
| 4 | 75 | 48 |
| 5 | 90 | 53 |
| 6 | 140 | 60 |
I also found noise level measurements from the older Tion O2 model here:
| Speed | Air exchange, m3/h | Noise, dB |
| off, windows closed | — | 30 |
| 1 | 30 | 33 |
| 2 | 60 | 38 |
| 3 | 75 | 43 |
| 4 | 120 | 50 |
As a result, I installed supply ventilation rather than a breather. My supply produces about 100 m3/h and 37 dB with a background noise level of 31 dB, maintaining 700 ppm CO2. There are two people in a room of 18 m2. Judging by the tables above and reviews on the Internet, Tion should be set to speed 3-5 for the same result. And this is more than 40db.
Perhaps I would have gotten used to this level of breather noise. The numbers in the tables above are approximate ; in my conditions they would be different. So I wouldn't trust them blindly. I would probably take a chance now and pair the Tion with this muffler.
Perhaps, as another option, now I would try to specifically look for breathers quieter than Tion.
Because of the noise, I discarded the option with breathers and began to look for other options.
Forced ventilation
I knew that the quietest solution was to install full supply ventilation. The classic air supply costs hundreds of thousands for equipment and air ducts throughout the apartment with alterations and renovations. I have an apartment that is ready to be renovated, so I immediately rejected this option.
And then I started reading the ixbt forum on fresh air ventilation. It turned out that there are options for installing an air supply in an apartment with ready renovation, if only 1-2 rooms are provided with ventilation, and not the entire apartment.
On the outside wall
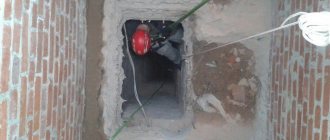
The most popular option for installing an air supply for a finished renovation is to hang the air supply unit on the external wall of the house.
The essence of the work is the same as that of a breather. The main difference is that the ventilation unit is not located in the living room. Thanks to this, the noise can be reduced, but not much: the main noise is transmitted through the hole into the room.
From the street side it usually looks like this:
The units are hung near the window to make it possible to change filters without calling climbers.
I liked the idea and called an engineer from one of the ventilation system dealers. He suggested mounting it near a window on the outside wall of the house between rooms. Thanks to this, it would be possible to distribute ventilation to two rooms at once. I asked if there were other options, but he didn't offer anything else. Two things confused me:
- the illegality of placing on the wall of a house a huge contraption the size of two air conditioning units and air ducts from it. For this to be legal, you need to coordinate the placement with the management company. The air supply is noisy, but if only it were not so far from the neighbors' window. I wouldn't be surprised if they asked for it to be removed because of the noise.
- Is the power of the device enough for two rooms? My CO2 target was 700 ppm. There are two people in the room: me and my wife. Let’s use the CO2 data from here: a person needs 80 m3/h of air exchange for this, and for the two of us 160 m3/h. Therefore, I considered an air supply of 350 m3/h: 160 m3/h per room. The engineer and consultants confirmed that 350 m3/h is enough for two rooms.
Fortunately, I didn't believe them:
- There is an option for placing the air supply on the balcony, which I was not told about. It eliminates problems with illegal placement and noise.
- Yes, an inflow of 350 m3/h will pull two rooms of 160 m3/h, but at one of the maximum speeds. And the main noise comes through the air ducts into the rooms. If you install the air supply in only one room, you can lower the speed, and the ventilation will be much quieter.
On the balcony
The supply unit is placed on the wall of the balcony. It takes air from the street through a hole in the wall of the balcony. Air is supplied to the room through an opening between the balcony and the room.
This is exactly the installation option I chose in the end.
Silencer
On the ixbt forum I saw that some people install noise suppressors when installing them on the balcony. This is a thick pipe 40-120 cm long. It allows you to reduce the noise from the inlet by several decibels. I was impressed by this video. I also drove and listened to the air conditioning with and without a silencer. It was obvious that a noise suppressor was needed.
The principle of operation of the silencer
The noise suppressor operates due to the placement of a mesh and special sound-absorbing material inside it. As a result, vibration and sound vibrations from the fan are significantly reduced. Therefore, the noise from the operation of the air supply becomes quieter.
In total, it became clear to me that the air intake will be quieter than the breather because:
- there is a silencer
- the installation is located outside the living room
- Inflows are equipped with more powerful motors, which means they can operate at lower speeds and quieter.
And I started choosing a specific stitch. But first, let's briefly discuss filters.
Filters
Typically, several filters are installed one after another in breathers, air purifiers and air ducts.
Pre-cleaning . The first filter is a pre-cleaning filter for coarse dust - for example, G4 or F7. Read more about the classification of filters here.
HEPA filter . It protects against PM2.5 particles. A HEPA filter is more expensive than a preliminary filter, so it is protected and installed only after the preliminary one.
More about HEPA
HEPA filters come in different classes: most often in inlets, breathers and purifiers, class E11 filters with 95% purification are used. There are also higher purification classes, for example, H13 - 99.95% purification. Why are maximum cleaning classes rarely used? Because they create more air resistance, which means the device needs more power and noise to overcome it.
HEPA filters have an interesting operating principle, more details here.
Carbon adsorption filter . A carbon adsorption filter is also often installed: it protects against odors, volatile organic compounds, etc.
Photocatalytic filter . Photocatalytic filters are popular in air supply systems to destroy odors, viruses, bacteria and volatile compounds. The photocatalytic filter itself is useless: it must be exposed to an ultraviolet lamp to work.
But photocatalytic filters have problems:
- they can generate harmful substances during their operation: peroxides, CO, formaldehyde, ozone. Comment from Tion and some information. Some studies report that the substances generated may be more dangerous than the substances removed by the filter.
- Unlike other filters, photocatalytic filters have a significant decrease in efficiency at normal operating speeds. For example, at 100 m3/h they purify only 10-30% of substances from the air.
What filters did I choose ? It is important for me that the inlet system has at least a preliminary, HEPA and carbon adsorption filter. Without a pre-filter - the HEPA filter will have to be changed frequently. Without a HEPA filter, I will not get rid of the main harm to health - PM2.5 particles. Without a carbon adsorption filter, I will not get rid of harmful VOCs. It is also important to me that the installation does not have a photocatalytic filter.
Choice of inlet
So, I considered the following tributaries:
- Ventmachine Satellite, PVU-350 EC, Kolibri-500 EC, V-STAT FKO 4A. Price: 110-170k rub. They have dust, photocatalytic and carbon adsorption filters. There is no HEPA filter, but there is a photocatalytic filter - it does not suit my requirements.
- Minibox Home 200, Home 350, E300, E650. The most suitable among them seemed to me to be the Home 350 model for 350 m3/h for 110k rubles with photocatalytic and HEPA filters. But the photocatalytic filter can be replaced with a carbon adsorption filter.
- Vakio Window for 120 m3/h for 19k rub. Low price and interesting design with a noise suppressor indoors.
- A number of systems without a HEPA filter: Turkov Capsule 300 Mini, Salda VEKA 350 EC, Breezart 550 Lux. At that time, I did not know that it was possible to install a filter unit with a HEPA filter separately from the installation, so I did not consider all these options.
A brief overview of all these inflows is here.
Of the considered accessories, the only suitable one was Minibox Home 350.
Signs of disturbance of natural air exchange
- odors after cooking do not disappear for a long time;
- Condensation collects on the windows;
- mold appears on the walls of the bathroom, toilet, and on the window opening;
- the bathroom remains constantly damp;
- there is musty air inside the bathroom;
- condensation also collects on the bathroom walls after using hot water for a long time;
- the wet suspension from the bathtub does not last long;
- wet clothes take longer to dry than usual;
- The air inside the rooms is constantly stuffy.
Minibox Home 350
I chose the Minibox Home 350 air vent for installation on the balcony. It produces up to 350 m3/h and contains three filters.
Filters in it
The first filter is a carbon dust filter FVKas-III-Carb-290-230-30-Bkl/OS0:
I replaced the photocatalytic filter with a carbon adsorption filter FVP-Carb-290-230-25-Bkl-S, which is the second filter:
The last filter is the HEPA filter FVA-II-230-290-30-E11/K1/OS0/U:
The following is a story about how I installed the Minibox Home 350 air vent, what was wrong with it and how I got around it.
System installation
How I bought
I spoke directly with the Minibox manufacturer, not with dealers. Minibox's demo stand is not open on weekends, but their sales manager agreed to show me how the ventilation works on the weekend. Excellent customer focus!
Then I made a 100% prepayment: 109k for the system itself, about 16k for the silencer, wind tunnel and other necessary things, 7k for filters and 17k for installation, a total of 147k rubles.
Overall, the consultation and purchase went perfectly.
The installers arrived and in 1 day they drilled two holes, assembled and installed a completely finished ventilation system. The work was done to an excellent standard: the craftsmen tried not to stain or spill anything in the apartment.
The device consumes up to 3.5 kW, so it needs a separate circuit breaker in the panel. I separately called an electrician and ran a line from the panel to the balcony to the device.
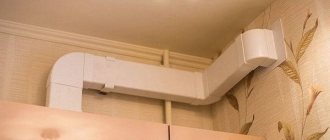
Photos of what my ventilation unit looks like in the end
Silencer and air duct entering the room from the balcony:
The equipment itself on the balcony and the air duct from it to the street:
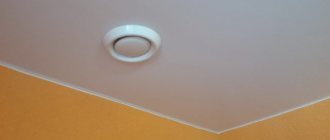
Anemostat - a round distributor of inlet air, and a control panel in the room:
Air duct grille on the outside of the balcony:
First result
My wife and I began to sleep much better: it became fresh, the air temperature was set to a comfortable temperature for us. CO2 level - 600-800 ppm.
The ventilation is quite quiet: we used it at the second speed, it was 34 dB with a background level of 31 dB.
Complete noise measurements
Measurements of noise from my inlet at a distance of 2m from it using the Sound Meter application:
| Speed | Air exchange, m3/h | Noise, dB |
| off, windows closed | — | 31 |
| 1 | 53 | 32 |
| 2 | 104 | 34 |
| 3 | 153 | 37 |
| 4 | 203 | 41 |
| 5 | 253 | 45 |
| 6 | 303 | 46 |
| 7 | 352 | 48 |
But I was alarmed that the PM2.5 level did not drop to 0 after installing the air supply. The measuring device is located 2 m from the ventilation anemostat, so the first hypothesis is a bad hood in the bathroom. I decided to rule out problems with poor hood and measured the PM2.5 level right next to the anemostat. That is, he measured the air that had just come out of the ventilation. The device showed 21 μg/m3.
Photo
At the same time, on the street at the same time, the device showed 27 μg/m3. It turns out that ventilation filtered out only 22% of PM2.5 particles. The HEPA E11 filter installed inside should capture 95% of such particles.
Photo
My hypothesis was that there might be an air leak in the housing past the filter. But I decided to trust Minibox. They should know better what's going on there.
I'm trying to get it fixed
Next, I tried to get the Minibox manufacturer to fix the system. This process lasted about 3 months.
At first they tried to convince me that pm2.5 particles should not be filtered at 0
At first the sales manager suggested that their H11/E11 filter should not filter pm2.5 at all, but that they only filter H13. Of course this is not true.
Then they sent me the filter specification: it indicated that all measurements of filter efficiency were made at an air flow rate of 2m3/h. I use ventilation at 100 m3/h, so the HEPA filter does not work. This immediately seemed strange to me: what about other devices, what about Tion, why haven’t I seen reviews about this for any device, why air purifiers with filters of the same class demonstrate a 99% degree of purification. Let me get ahead of myself a little: the same filter was eventually able to achieve 80% cleaning efficiency at the same 100 m3/h. But I’m not an expert and I haven’t found any research on the topic of speed, I’ll be glad to hear the experts’ comments.
On the one hand, this can be forgiven for a company if they have never had to deal with this before. On the other hand, how can you sell devices with HEPA filters without knowing basic things about these filters?
Then they sent me a HEPA H13 filter
I was suggested to try installing an H13 (99.95% efficiency) filter instead of an E11 (95% efficiency). The idea seemed strange to me, but I decided to try it.
They hinted to me (so it seemed to me) that I needed to pay for the H13 filter. Since I didn’t believe in their idea, I offered payment after the fact: I’ll pay for the filter only if it removes pm2.5 to 0. But they asked me to at least pay for delivery - 350 rubles. Let me remind you that I ordered equipment and services from them for 147k rubles, of which all three filters cost 7k rubles.
Ok, I received the H13 filter and paid for delivery. I take measurements: 18 µg/m3 outside, 16 µg/m3 at the outlet of the anemostat, cleaning efficiency pm2.5 11%. The new filter didn’t help, but I didn’t have to pay for it. I continued to ask the manufacturer to resolve the issue.
1.5 months of communication and waiting
First they told me that they checked the housing and there could be no air leaks anywhere.
They further informed me that they do not state anywhere that they should protect against these particles at all. And that they did not have the task of removing pm2.5. Formally, yes, but:
- I didn't find any promises about air filtration on their website. It seems that if no filter works at all, they will be able to say that this was not promised.
- If the device has a HEPA filter, and it says so on the website, then I expect it to work.
I was then informed that they had ordered filters from a different manufacturer for the test. Ok, I'm waiting. A month later they told me that they tested it, but it did not achieve 99.9% effectiveness. They reported that they were changing the filter manufacturer and there would be improved filters.
I asked them for an improved filter, even if it was not 99.9% efficient. They refused me, reminding me that they had already given me an H13 filter, and in general they had never stated anywhere about cleaning from pm2.5 particles.
I was also informed that the housing still needs to be taped - it seems that this indicates air leakage past the filter.
I make the following hypothesis:
- It seems that minibox has not figured out why the HEPA filter does not clean the air as expected
- minibox seems to have confirmed that there is an air leak
- This means the problem may not be with the HEPA filter. Air can flow past all filters.
- This means that all air purification may not work at all!
I tried to convey the hypothesis to Minibox, but without success.
I'm trying to cover the case as recommended in Minibox
First, I need to show the structure of my ventilation filter unit:
I was offered to cover the side and rear walls with sealant. But this seemed like a dubious idea to me, because there is a huge hole in the middle of the filter block. Even if the filter unit fits tightly on the sides and back, air will still escape through the central part. But I again decided to trust the manufacturer, after all, they should understand this better. I did as they suggested and additionally inserted a thick seal into the central cavity on one side. I covered everything with tape, otherwise it would fall off when inserting the block inside.
I measured pm2.5 again - no change. Pasting with a sealant didn't help at all.
Based on the results of 3 months of attempts to fix the purification of pm2.5 particles, there was practically no result. It was a shame that I spent about 150k rubles on a system that practically does not clean the air. True, everything is cool with CO2, and my sleep has improved. The manufacturer ultimately refers to the fact that he did not promise to clean pm2.5 and refuses to help or return the money.
I fix it myself
I didn’t want to give up and decided to figure out for myself why pm2.5 particles were not filtered. I remembered how I catch bugs in programs and applied a similar approach.
Step #1: eliminate the problem in the filter
The manufacturer referred several times to the fact that the problem might be in the filter, ordered new filters, and reported that they were going to change the filter supplier. First you need to understand whether the problem is in the filter.
We take a hairdryer and a device for measuring pm2.5. We blow into the device with a hairdryer - we get 16 μg/m3 pm2.5. We take a HEPA H13 filter. On one side, use a hairdryer to create a flow of air into the filter, pressing it tightly. On the other side of the filter, we measure the pm2.5 level with the device. We immediately get 0, cleaning efficiency is 100%! True, this was at average speed, at maximum it was worse.
We repeat with the HEPA E11 filter - the result is similar. It turns out that both of my HEPA filters are working, and Minibox was in vain trying to replace them.
Step No. 2: eliminate the problem in the filter block
Ok, the HEPA filter is working. But what if the filters in front of it create pollution? It sounds unlikely, but it's better to rule it out.
We repeat the experiment with a hairdryer, but now with the entire filter block. To do this, I seal all potential air leaks, including the cavity in the center. The result is similar - about 0 μg/m3 at the output.
This means that the problem is not related to the filters at all.
Step No. 3: rule out or confirm an air leak inside the filter unit
The HEPA filter comes last because there is a cheaper coarse filter in front of it. Let's swap them for a while: let's put HEPA as the first filter. If you leave it like this forever, you will have to frequently change the expensive HEPA filter. But it will do for an experiment.
We start ventilation without filters at all - the pm2.5 level is 10 μg/m3. If the HEPA filter is the last one - 8 µg/m3. We put the HEPA filter first - 5 μg/m3. Whoa! It turns out that air actually leaks out and this happens after the first filter. It also turns out that there is a leak even before entering the first filter, since the result is not 0 µg/m3.
Step No. 4: rule out or confirm air leakage in the cavity in the middle
The cavity in the middle of the filter block is needed for a reason: it contains an ultraviolet lamp. The lamp is necessary for the operation of the photocatalytic filter.
This is what the inside of the case looks like, where the filter unit is inserted:
A UV lamp is located on iron mounts. Let me remind you of the structure of the filter unit:
Take the seal:
And we attach it to the cavity in the middle of the filter block so that there remains a small gap into which the UV lamp will pass. We wrap everything with tape to keep it tight:
We try to insert such a block back into the body - without success. The seal does not hold.
Then I remembered that the UV lamp and its holders are needed only for the photocatalytic filter. And I specifically refused this filter because of its potential harm. Bingo! Let's just remove this lamp design. It is attached with rivets, but they are easily pulled out by hand:
Now that the UV lamp and its mount are gone, the central cavity in the filter block is no longer needed. We seal it tightly with a sealant and tape over it.
We insert the filter block back, the result is 6 μg/m3 (outdoors - 10 μg/m3, by default the installation produces 8 μg/m3). The result is good, but a little worse than where the HEPA filter was placed first. This means that there are leaks not only in the central cavity of the filter block.
We seal several potential gaps in the filter block with tape. Let's launch - hurray, 5 µg/m3! So, we have localized and fixed the leak in the filter unit.
Step #5: fix leaks before entering the first filter
When installing the HEPA filter first, we found out that there was a leak even before entering the first filter. This means you need to look at the bottom of the filter block and housing.
The pipe with air from the street is much narrower than the filter unit itself. Air can bounce off the filters and flow back down the bottom of the chassis. Therefore, we tape everything from below with tape that is not above the pipe with air.
We also glue the seal around the perimeter of the lower part of the filter block.
We launch it and get 3 µg/m3. Great! Now we will seal the entire bottom of the ventilation housing with a sealant and tape it. We launch - hurray, 2 µg/m3.
Step No. 6: fix the air leak in the lid
Air seeks the path of least resistance. After fixing the previous leak, the air found its way through the cap covering the filter unit. I realized this by the whistle that came from there. I had to seal the lid with tape:
Bottom line - I fixed several air leaks. On the day of the experiments, without filters, ventilation produced 10 μg/m3, with filters without my changes - 8 μg/m3, after all corrections of air leaks - 2 μg/m3 . I note that the numbers are approximate, since minutes and hours passed between measurements, and the quality of air outside is constantly changing. A level of 2 μg/m3 was enough for me: that’s where I stopped.
Photos of final measurements pm2.5
It turns out that the HEPA filter worked at 80% efficiency instead of 20%. And since the main problem was air leakage, it seems that the other two filters also began to clean the air more effectively.
Previously, we kept the ventilation on speed two: this was enough to maintain 700 ppm CO2. After fixing the air leaks, I had to turn the ventilation on to third speed to maintain the same CO2 level. Because of this, the noise level rose from 34 to 37 dB. It is much noisier, but you can still sleep.
How to install a supply valve - instructions
Before installation, you need to decide 2 questions: where to put the ventilation valve and how to drill a neat hole in the wall. We will give the following recommendations regarding placement:
- Ventilators with a pipe diameter of 50–60 mm are best placed between the heating radiator and the window sill. Provided that the gap height is sufficient. Then the cold street air will immediately mix with the rising convective flow from the battery.
- We place a device with an air duct more than Ø100 mm on the side of the window opening, making an indentation of 30 cm (to prevent freezing). The second option is between the window and the ceiling, the minimum distance from the ceiling is 15 cm. In both cases, the ventilator is located in the zone of convection flow from the radiator.
- The height of the passive valve above the floor is 180...200 cm.
- When installing the recuperator valve, maintain a distance of 0.5 m from all structures - ceiling, window, nearest corner, as shown in the drawing.
- Place the transfer device in a convenient place without restrictions.
Comment. If the room is heated with heated floors, then the passive type ventilator can be placed at any distance from the window; the minimum distance remains the same - 30 cm.
It is better to entrust drilling of a reinforced concrete wall to professionals armed with a machine with a diamond bit of the required diameter. You can make a hole in a brick yourself, although you will have to tinker. Using a long thin drill, make many holes around the circumference, then carefully knock out the middle.
Two important points. Before starting work, make sure that in the selected area of the structure there is no electrical wiring or heating pipes laid in a hidden way. Second: the hole is drilled with an inclination of 2–3° towards the street to allow condensate to escape.
How to properly install a supply valve into a wall:
- We cut the air pipe flush with the structure or with a small outlet - as specified in the manufacturer’s installation instructions. The Vents telescopic air duct cannot be trimmed.
- We insert the pipe into the hole and fill the gaps with construction foam. Cement-sand mortar cannot be used.
- We attach a grille with a mosquito net to the outside. We observe the correct position of the element - the visor is at the top, the blinds are directed downwards.
- We insert a heat-insulating element inside the air duct and, if necessary, cut it to length.
- We disassemble the valve head, attach the body to the pipe and the inner surface of the wall with dowels. We install the filter, dampers and lid with the inlet slots facing up.
Assembly diagram of the interior of the room ventilator
The technology for installing the recuperator valve is identical. First, an air duct is embedded in the wall, an external grille is attached, then the elements of the unit are installed from the inside - a ceramic heat exchanger, a fan and other elements. Differences: thermal insulation is mounted outside the pipe, a power cable is supplied to the fan.
Reference. There are ventilator models with a fan powered by its own solar battery. An example is the Vents valve PSS-102, shown in the photo.
What would I do differently now if I were starting from scratch?
- I would check the ventilation operation using a device for measuring pm2.5 immediately at the manufacturer’s demo stand.
- I would check the design of the housing and filter unit at the demo stand to see if there are any cracks there.
- I wouldn't contact Minibox. It's not even about air leaks, but about the approach to solving my problem.
- I would not install a ready-made system with a HEPA filter, but a separate ventilation unit and a separate filter unit. I would look first of all for ventilation from Turkov: there were excellent reviews about them. Filter blocks - for example, this one or this one.
- I would install a system with an air exchange of 600 m3/h so that it would be even quieter than my current one at 350 m3/h, for example, Turkov Capsule 600. The difference in price from 350 m3/h is small.
- I would not buy the Air Quality Pollution Monitor. I would only buy AirVisual Pro.
- Perhaps I would install a breather instead of an inlet: it’s cheaper and simpler. As an option, Tion with a silencer. Or I would look at breathers that can be quieter than Tion, for example, a breather from Xiaomi. For a room that does not border a balcony, I consider this as the main option.
- I would be prepared for the fact that ventilation in an apartment is largely an accident. You don’t know in advance at what speed the ventilation or breather will need to be set for your room. Therefore, you don’t know the noise level in advance, even if you go to listen.
- I would take a closer look at systems with recuperation to save on electricity bills and maintain humidity. In November-December, I spent 1,500 rubles on electricity to heat the air in the ventilation. Initially, I rejected recovery, thinking that by law it could not be done in apartment buildings. But it seems I was wrong.
- I would glue everything not with ordinary tape, but with aluminum or reinforced tape. In the comments and on the ixbt forum it was indicated that this is better, and aluminum tape is usually used in ventilation.
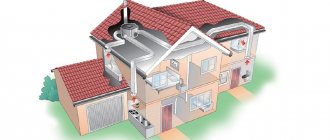
Ventilation schemes for private houses and apartments
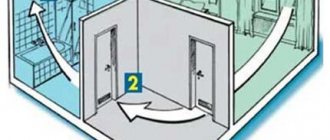
The simplest option is implemented in small houses and apartments. Supply openings are located in living rooms, hoods - in the kitchen and bathroom. The air entering the premises penetrates through the cracks under the doors into the kitchen and bathroom, where it is exhausted. This scheme works for an area of no more than 100 square meters.
When the supply ventilation is separate devices in each room, the exhaust is through the kitchen or bathroom
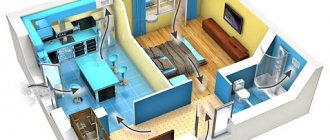
In houses with a total area of more than one hundred and fifty square meters, two separate systems are organized - supply and exhaust. Each of them has its own air duct system. With this arrangement, each room has exhaust and supply openings in each room. In this case, adjusting the intensity of air inflow and outflow is possible in each room - you can adjust the atmosphere to the requirements of its inhabitants.
With centralized supply and exhaust ventilation, heating or air conditioning can be arranged
With a centralized supply ventilation system, it is easier to prepare the air taken from the street - you can create a unified cleaning and heating system. The prepared air can now be distributed throughout the premises. In this case, each room has two ventilation openings - one supply, one exhaust. They are located in opposite corners and covered with grilles or diffusers.
Supply and exhaust ventilation in a private house can be organized in this way: the supply is decentralized, the exhaust is centralized
Even with a large area of the house, the supply ventilation system can be made decentralized, as in the first scheme. With the correct selection of equipment, it will work no less efficiently. The question is which will be more economically profitable, since the problem of air preparation for each supply channel will have to be solved. And the equipment is not cheap at all.
Comment
All described problems with Minibox Home-350 ventilation:
- are subjective, and their presence is only my opinion: if only because I cannot guarantee the performance of my device for measuring pm2.5. In addition, the measurements were made with a difference of minutes or hours between each other, which already makes all experiments inaccurate.
- Applies to my installation only; other customers may not have them.
Everything described in the article is my personal opinion. All statements about products and companies are my value judgments and not facts.