Varieties
Modern manufacturers offer 2 types - one-step craquelure and two-step. The first of them is well suited for beginners due to its ease of application. The surface treated with this varnish resembles enamel cracked over time. A layer of acrylic paint peeks out from under the surface of the varnish - the base.
Two-step craquelure varnish is more difficult to use, but it gives a different effect - more beautiful, aesthetic, and natural. Due to the fact that in this case the varnish itself cracks, it does not overlap the previous layer (for example, some kind of picture, image), and it can be used to finish a wide variety of surfaces.
Both types are used in decoupage. It all depends on the degree of skill of the decorator, his ability to work with this material. Craquelure is not particularly difficult, but still requires certain skills.
In this case, the type of varnish does not play a particularly important role. Some people find two-step craquelure more difficult; for others, working with one-step craquelure is difficult.
What is one-component craquelure?
Craquelure (“fr” craquelure) translated from French is a crack in the paint layer or varnish in a work of painting. One-step craquelure is used to age simple plain surfaces. To do this, the surface of the object to be decorated is covered with the main background. This is the color the cracks will be.
After the paint has completely dried, a one-step craquelure varnish is applied with simple movements in one direction and dried again. Next, paint of the main color is applied, under the influence of which the craquelure varnish begins to crack, and the background paint appears in the cracks. The finished product can be coated with a clear varnish for acrylic paints for durability.
The concept of one-component implies the use of one product (component) in the decorating process. It is worth highlighting that two-component and one-component compositions can give the effect of simple cracking. At the same time, single-component ones can cause cracks in both varnish and paint.
The general scheme of a one-component pie is as follows:
- The first stage consists of high-quality preparation and priming of the workpiece.
- Then we paint it the color we want to see in the cracks and dry it completely,
- Next we apply craquelure varnish. Let it dry a little (here are the following nuances - the longer you dry it, the smaller and longer the cracks will be).
- Apply top coat paint.
- After it you can patina or varnish.
As a result of these manipulations, the craquelure varnish, due to the difference in surface tension, cracks the paint of the main color and the previous layer of paint is visible in the cracks. For clarity, it is recommended to watch the following video:
Necessary materials
To perform crackle plaster you will need the following materials:
- base paint that will show through cracks;
- craquelure varnish, 100 g of varnish is required for 1 m² of wall;
- textured plaster for decoration;
- dye (acrylic or latex);
- decorative wax;
- special grout for cracks;
- transparent fixing varnish;
- primer, etc.
What to pay attention to
When applying the top coat of paint, you must adhere to the following rules:
- You cannot paint twice in the same place, as cracks begin to form immediately, and it is possible to paint over them.
- At one time, the paint should be applied as evenly as possible, covering the layer so that the underlying paint does not show through.
- The consistency of the main color paint is very important - not liquid, but not thick, so that the craquelure varnish allows it to crack.
- It is important to apply this paint evenly, with equal pressure on the brush. If the pressure is stronger, the paint layer will be thin, the cracks will be long and elongated, thin (when applied with a brush) or small and “scaly” (when applied with a sponge).
To recreate beautiful natural cracks, you need to correctly combine a sponge, a brush, layers of paint and drying the craquelure varnish. And, naturally, the selection of the optimal craquelure composition is no less important. Therefore, the nature of the cracks depends entirely on:
- Craquelure composition.
- The thickness of the varnish layer.
- Drying conditions.
- Consistency of top coat paint.
- Thickness of the top layer of paint.
Errors in preparing the base
- The porous base will absorb the craquelure medium, which will not be able to produce full cracks in the subsequent paint layer.
- Only one, thin or uneven, layer of primer or acrylic paint is applied to the base.
- The compositions are applied with a coarse (bristle) brush.
- A well-prepared base (wood, plaster, plastic, ceramics, etc.) is a surface with two layers of acrylic paint or primer.
- If you want to keep the color and texture of the base, you can coat it with a clear finishing varnish with a glossy or matte effect.
- Each layer of product applied to the base must be thoroughly dried.
Which varnish to choose for one-step craquelure
One-step craquelure varnish is a water-based product that looks like a liquid paste. It dries extremely slowly. And acrylic paint applied on top of such a composition dries simply quickly in comparison. That is why its cracking occurs, provoked by movement in the underlying layer.
Varnish for one-step craquelure
On sale on the shelves of craft stores you can find many jars of one-component compositions from various manufacturers. The most common one-step varnishes that are used are:
- Craquelure varnish - DECOLA (Russia).
- Craquelle Medium - Hobby Line (Germany).
- Krakelierlack - Nerchau company (Germany).
- Krakelee Medium - Marabu (Germany).
- Antique Effekt - Sadolin (Denmark).
- Idea Decoupage - Maimeri company (Italy).
- Krakelierlack DecoArt medium - Rayher (Germany).
- Crackle Medium - Decorfin (Holland).
- Craquelure paint Krakelierfarbe - Glorex (Switzerland).
- One-step craquelure varnish - Ars Hobby company (Russia).
- One-step craquelure varnish - Tair company (Russia).
- One-step craquelure varnish - Aqua-color company (Russia).
- Country Style Crackle - Stamperia (Italy).
- One-step varnish Vintage design “I am a decorator” - Rusart company (Russia).
Unfortunately, each composition gives its own peculiar cracks, and it is unlikely that you will be able to choose the composition that you will definitely like the first time. Therefore, you should experiment with different compositions. Feel them and choose the best one for yourself.
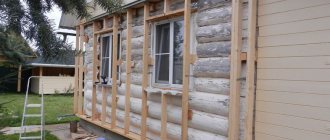
Technology for crackling wooden surfaces
Modern industry produces many compositions for applying craquelure at home with your own hands. Moreover, some of them can be used not only for processing wood, but also for applying “antique” cracks to the surface of products made of plastic or metal. Decorative metal additions to wooden furniture, on which patina or decoupage is complemented with craquelure, will look quite stylish and original.
To apply craquelure cracks, you can buy a one-component crackle varnish or a two-component composition, a set of which is sold in the form of two bottles. For household aging of furniture, a one-component varnish is quite suitable.
Many experienced restorers believe that furniture pieces get a more natural, antique look if cracks are formed using improvised means - vinegar essence, egg white, gelatin and even washing gel. However, for those who want to try their hand at restoration work for the first time, it is better to use a special crackle varnish, sold in household goods stores under the brands “Stamperia” and “Ferrario” (Italy) or “Havo” (Netherlands) called “Creall-Crackle” or "Antique Crackle".
Drying one-step craquelure
It's quite difficult to make a mistake at this stage. To speed up the final result, two options are possible: wait until everything happens on its own, or speed up the process of crack formation using a warm jet of a hair dryer (a hair dryer will also work).
Rules:
- Cracks begin to appear almost immediately, especially if the compounds are applied in a thin layer.
- Large cracks appear first, then they continue to grow and, as a rule, are covered with a network of smaller cracks.
- The heating process speeds up this process.
Two-component craquelure
The main difference between two-component crackle and one-component crackle is that the cracks are created in the varnish layer itself, and not in the paint. The advantage is that you can create a cracked effect on top of the decoupage.
The nuances of working with two-component craquelure during decoupage
Two-component craquelure in decoupage is usually done at the final stage of surface decoration. We apply the first step of varnish to the prepared product with the pasted pattern, wait for it to dry (usually from 30 minutes to 2 hours, depending on the manufacturer), then apply the second step and also wait for it to dry completely.
Do not forget to carefully read the description of the technique for working with the selected crackle. The manufacturer may claim drying time from 2 hours to 24 hours. We rub over the cracks that appear either with oil paint or dry non-aqueous pigment or bitumen. Remove excess with a damp cloth or sponge.
The nature of cracks in decoupage with craquelure depends on the method of applying craquelure varnish. If the first step is applied in a very thin layer, the cracks will be small and delicate. If applied thickly, there will be larger and more characteristic cracks. All this must be taken into account when creating crackle.
Two-component pastes for craquelure
Just like in one-component craquelure, the line of two-component craquelure contains a paste for creating cracks. Such pastes work in tandem with a base to create such a craquelure. Visually, the result will resemble a one-component crackle, only the resulting cracks will be more rounded, uniform and identical.
Stages of applying two-component craquelure paste
First of all, apply a thin and uniform layer of the craquelure paste base to the surface, wait for it to dry (you can use a hairdryer), then apply the craquelure paste using a brush, sponge or spatula.
The size of the cracks will depend on the thickness of the craquelure paste layer. A thin layer will create a cracked paint effect; thick - the effect of a voluminous paste.
To create an additional color shade when decoupage, you can mix the paste with acrylic paint before applying. After drying, the paste can be coated with acrylic paints or decorated with aging materials.
Description and technique of applying craquelure varnishes for decoupage
Varnish with a craquelure effect can be one-step or two-step. One-step (or one-component) is applied between contrasting layers of paint. Two-step (two-component) - on a layer of shellac. The composition must be applied to the surface of the objects to be decorated correctly. This is done, if possible, with a synthetic brush. Shellac should not be shaken before application to prevent air bubbles from forming.
There should be no dust in the room. It needs to be well ventilated before work. The resulting cracks on the object can be covered with dark-colored paint and silver or gold-colored powder. Excess is removed with a swab moistened with vegetable oil. At the end of the work, the surface of the product is thoroughly wiped and coated with a final protective acrylic varnish.
Creation techniques
The term "craquelure" refers more to painting. This is the name given to small cracks that form over time in paintings and objects of art. This technique is quite interesting and requires experimentation. But in the end it can turn out to be a real masterpiece. And you don’t have to resort to professional tools to create it. Everything can be done at home using improvised means. All you need is desire.
Using egg white
Apply acrylic paint to the surface of the object to which you are giving an antique effect. Preferably two layers. Let it dry a little. After this, apply the egg white using a brush. Let it dry naturally, without using additional heat. And then apply paint in a contrasting color.
Making a composition for craquelure from gelatin
You can make craquelure with your own hands by using regular gelatin to prepare the composition, of which you need to take one tablespoon. The substance is poured into a glass of water, and then it must be left until it swells. The gelatin should then be heated until completely dissolved, after which it should be left until it cools. Then you can begin to carry out work. You need to cover the surface with the composition and wait until everything hardens, and only after that should you apply a second layer of paint.
Next you have to do the same as with any other craquelure. You can apply gelatin, and then paint, the consistency of which should be as thick as possible. After this you need to dry the surface with a hairdryer. However, when performing work, you must follow the rules, which include the need to coat the craquelure with varnish. So, you must follow a technique that involves applying pigment, gelatin and base paint. Afterwards, you can use napkins on which the varnish is applied. This will allow you to get a surface treated not only with a craquelure composition, but also with decoupage. Since gelatin never hardens completely, it can always be washed off with water, but in order to fix the finish, varnish is applied.
Liquid washing gel - an assistant in the craquelure technique
Apply the base color to the surface and leave it until completely dry. Next, use a brush to cover with gel. Moreover, it is better to use a thicker gel. Dilute the paint well and cover the gel with it.
Craquelure using PVA glue
Cover the surface with paint. Let it dry. Then apply the diluted glue sparingly. Almost immediately apply a thicker layer of acrylic paint. Here it is advisable to use a hairdryer to dry the layers. The result is a lot of cracks.
Vinegar for artificial aging
Apply acrylic paint to the surface. Wait until the layer is completely dry. Then apply 9% table vinegar with a sponge. The item must be processed very quickly, because cracks appear immediately.
Furniture varnish and craquelure
Remember the main thing - when using varnish, you must ventilate the room, use gloves and a mask, or do not inhale deeply the vapors of the varnish.
Apply varnish to the product. Let dry for at least 4 hours. When the varnish is still a little sticky, apply a layer of acrylic paint. And then start blow drying. After all these steps, let the item dry for one and a half days. And the “antiques” are ready.
Of course, creating a craquelure surface requires some skill. With every antique effect item you create, your experience will grow. And after a while you will create unique masterpieces. Go for it!
Alcohol base (shellac and gum arabic)
- First apply 3-4 layers of shellac. Each layer needs to dry for about 15-20 minutes. The brush can be cleaned with alcohol after use.
- After the last layer dries to a tack, that is, it remains sticky, but does not stain your fingers, apply a layer of gum arabic. Apply with a soft flat brush and then rub over the entire surface using circular movements with your fingers. You need to rub until your fingers stop slipping.
- After 30-40 minutes, a thin network of cracks will appear. Oil paint is best for grouting. Rub the paint into the cracks with a dry cloth in a circular motion. Once all the cracks have been exposed, wipe off any excess with a dry cloth. For the second step, i.e., do not touch the gum arabic with a damp cloth or wet hands. Water will wash away the gum arabic and may spoil cracks that have not yet developed.
- When all the cracks have been rubbed, rinse off the gum arabic under running warm water. The product will become lighter and cleaner. Cover the dried work with any varnish.
When mastering a new technique, do tests every time and be sure to follow the instructions and follow the recommendations. Work only with a dry and clean brush - especially when applying craquelure varnishes - otherwise you risk irreversibly ruining the work. Remember also that you cannot skimp on the second step, because the size and appearance of the craquelure is directly proportional to its quantity.
DIY two-component craquelure
You can actually make two-component craquelure for decoupage with your own hands and at home, although it will be a little more complicated.
Two-component craquelure using eggshells.
Two-component craquelure using eggshells is based on the mosaic principle. We break the dried shells without film into pieces of various sizes. We put together a pattern from the resulting fragments, leaving a gap between the particles. Glue it with PVA glue. We carefully paint the dried mosaic so as not to fill the cracks.
We coat it with varnish so that we can then wipe out the cracks with oil paint or bitumen. Or you can paint everything with one color, then carefully brush it over the surface with another paint so as not to get into the cracked layer.
The result is a beautiful autumn surface, the design of which you can initially create yourself, rather than waiting for what will happen as a result.
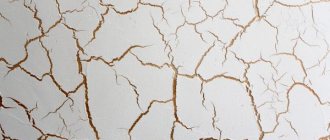
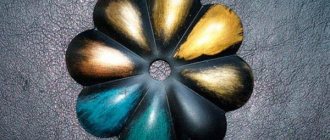
Eggshell craquelure is shown in the photograph at the beginning of the article. There are used shells of 3 different shades - white, brown and light brown. It is rubbed with oil paints in ocher and gold colors and then varnished. This color scheme suited the overall background of the picture perfectly.
How to make two-component craquelure from one-component craquelure varnish
It happens that there is only one-component craquelure varnish, but you want to use a two-component one in creativity and decoupage. The basic idea is that if a one-part varnish can crack acrylic paint, then it can also create cracks in acrylic varnish.
The stages of work are as follows:
- stick a napkin and dry it;
- Cover with acrylic varnish in 8 - 10 layers. We apply them very thinly, without creating smudges, making each layer perpendicular to the previous one. The larger the layer, the larger and rougher the cracks.
- We cover the dried acrylic varnish with a one-component craquelure varnish very carefully in an even layer.
- After about an hour, cracks will be visible. Rub over with contrasting pigments or oil paint. Cover with finishing varnish.
In this topic, we looked at all the main ways to create craquelure when decoupaging various products; now we have an idea of how one-component craquelure differs from two-component craquelure. Crackle compositions can be purchased at craft stores or made yourself without leaving home. A beautiful pattern of cracks can be created from PVA glue, eggshells, yolk, or gelatin.
And in the next article I will present to your attention a simple master class on decoupage of a box using two-component craquelure from VAN PURE, and of course, read on our portal of learning and self-development other articles about decoupage with my master classes and theoretical training in this wonderful type of creativity and handicraft maid, for example, about decoupage on fabric, the most common decoupage mistakes, napkin decoupage technique, and in general, a brief overview of the main existing types and styles of decoupage.
Water base (Maymeri 753-754)
Water-based craquelure is the most convenient for working with decoupage technique. They also create a thin network of cracks on the object, reminiscent of a cobweb. All components are applied very easily, cracks appear quickly enough, the compositions are washed off hands and tools with warm water and soap.
- Use a flat synthetic brush to apply the first step. Leave for at least half an hour. It does not dry out completely and always remains sticky.
- When the first step is completely clear and tacky, apply the second. Work with a dry, flat, clean brush. You can pour a small puddle and smooth it over the entire surface. Rub it in until it starts to dry out and your fingers stop slipping. Leave the work to dry. After an hour, you will notice thin and transparent cracks appear on the surface.
- To highlight cracks, rub in pigment (pastel, shadow) of the desired shade with a dry cloth or brush.
- Rinse the second step under running warm water and after drying from the water, secure the work with acrylic varnish.
Photo master class on decoupage of a key holder with a door using a pair of craquelure Maymeri 753-754
Depending on how you dry the craquelure varnish, the type of resulting cracks directly depends. Using a hairdryer will speed up drying, but the mesh will be very thin and fine. It is better to leave the work to dry naturally.
Recommendations for the craquelure technique
If you use this technique (craquelure), preparing the composition with your own hands is quite simple. But it is also important to properly prepare the surface. For example, if a mixture based on egg white is used, then the surface must first be coated with a primer. Only then is a layer of acrylic paint applied. Varnishing will be required to prevent the protein from being absorbed. Painting can be done in any order, and drying without using glue should last a sufficient amount of time.
The composition for craquelure can be made from different materials, and you do not have to spend money on purchasing factory-produced mixtures, which are quite expensive. This is especially true when decorating a surface of an impressive area.