Painting walls with color transitions has become fashionable again. The gradient method of applying paint allows you to enliven and visually expand the interior, making it mobile and fresh.
We will tell you how to do transition painting with your own hands, and also give a number of useful tips for performing this type of work.
Fade coloring is coming back into fashion.
How to make an Ombre effect on a wall?
How to make an ombre effect
- Choose a dark paint color.
- Paint the bottom half of your wall.
- While the wall is still damp, use a water spray to wet the top of the wall.
- Use a large sponge to brush the paint up the wall.
- Scoop paint as needed from the middle and bottom of the wall, using a sponge to blend the color.
How to make an ombre effect
- Choose three shades from the general palette. One dark, one medium and one light.
- Cover the entire wall with a light color, and then paint the bottom quarter of the wall dark.
- Paint two more stripes of the color above - one stripe of medium tone and one stripe of a lighter mixture of medium + light paint.
- While your wall is still wet, take a dry brush and blend the edges between the colors until they look like a piece of art.
Tool settings panel
For a bucket, in the “Edit” menu there is a “Fill” command, where you can configure its parameters, indicating what color (or pattern) to fill, how to deal with transparent areas, etc. And the gradient in Photoshop colors everything indiscriminately, however, adhering to the boundaries of the selected area, if one is specified, but no other “conditions” are set for it.
The effect parameters, as in all other tools, are set in the settings panel at the top. Left-clicking on the small triangle next to the thumbnail on the left (or right-clicking on the picture) opens a palette with a preset set of standard color transitions.
This window has its own menu, which can be expanded by clicking on the gear (or the small arrow next to it) in the upper right corner. Here you can select several more “standard” sets, moving through them with the “Replace Gradients” command, and set the size of the thumbnails, and by default, the gradient in Photoshop makes a smooth linear transition from the first color to the second.
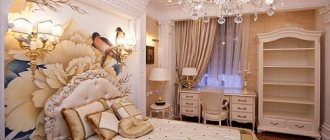
Decor
The gradient is so versatile that it can be added to any interior style. To make it fresh and unobtrusive, it is better to focus on decorative “trinkets”: paintings, figurines, sofa cushions. They are easy to remove when you want to update the interior, for example, add a bright ornament or “animal” decor. And then return to their original places. Or find them new ones.
Photo: desenio.com
Photo: quiltingcompany.com
Photo: watercolor-muse.com
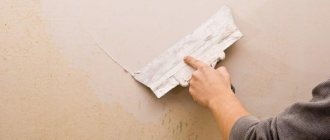
Imitation brick for interior decoration using plaster mortar
The general idea is simple: a layer of plaster or tile adhesive is applied to the wall, and a seam is cut/pressed into it. After processing the edges of the “bricks” and seams, and painting, a semblance of brickwork of varying degrees of plausibility emerges. It's not all that difficult, but there are significant differences and aspects.
Gradient wall painting
Imitation of brick for interior decoration of premises made of mortar, plaster (ordinary and decorative)
Technology no. We use thin tape to draw seams
First, we paint the wall to match the color of the seams between the bricks. Some are planning gray-brown, others white-gray. We cover the wall with paint of a suitable color. Apply markings to the prepared base using narrow masking tape (1 cm or a little less/more). The tape will mark the seams between the bricks, so stick it horizontally, at a distance of about 6-6.5 cm from each other. When the horizontal mowing lines are glued, we glue the short vertical ones. They are 23-25 cm apart from each other - this is the length of a standard building brick, but decorative ones can be shorter.
Now we take the solution and apply it to the wall. The layers are unequal, the thickness is 0.3-0.5 cm. We apply it “as it turns out”, without achieving an even surface, smooth transitions... As it turns out, so be it. We only avoid obvious bald spots through which the wall shines. We filled the area, took a thin trowel (grater), and smoothed out the result a little. Leave until it dries a little: so that when you press with your finger, the composition is slightly pressed.
We apply the solution without worrying about beauty and similar thickness
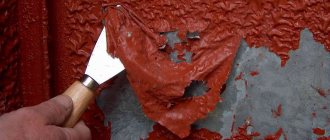
We pry up the ends of the horizontally pasted strips of adhesive tape in any place (when gluing, leave the “tails”), pull, removing along with the substance adhering to the tape. We remove the entire mesh. At the same time, the edges of the “bricks” turn out to be torn and uneven. This is fine. Even great.
Take a toothbrush or paint brush with fairly stiff bristles. Use a toothbrush to go along the seams, removing any remaining mortar. At the same time, the edges of the bricks are rounded. Then we take a wider brush and use it to go over the surface, adding naturalness and removing very sharp edges. Leave to dry at room temperature for approximately 48-72 hours. Do not force dry it - it will crack. Although, if you want to have cracks... If the composition was not painted in bulk, it's a matter of painting.
READ How to glue loose tiles on a wall
Ombre wall - fashion trend
Ombre, translated from French, means “shading”. This is a special coloring technique that allows you to smoothly transition from one shade to another, gradually combining them in the middle, thereby creating a very interesting effect. This technique is very common in hairdressing, which is why in recent years we have often seen girls with an ombre effect on their hair. This trend is also penetrating into the design of our homes.
The ombre fashion lasts continuously for several seasons. And if until recently this technique was associated only with the beauty industry (make-up and hairdressing) and the clothing industry, today it has also made a brilliant triumph in interior styling. World designers have become passionate about this trend. And for good reason, the ombre effect on the walls looks very impressive. Depending on the execution technique, the walls resemble works of art, as if a real artist had worked on our interior.
Where is the gradient technique used?
Ombre has become so popular that the use of this design can be found at every step:
- under repair;
- in makeup;
- in manicure;
- in hair coloring;
- in clothes;
- on kitchen appliances;
- on furniture;
- when painting a car;
- on the curtains.
The gradient became popular back in the 70s of the last century, but over time, interest in this painting technique waned. Since 2010, the fashion for such coloring began to return. At the moment, the gradient is at the peak of its popularity.
How to make a classic ombre at home?
This type of painting is considered expensive due to the technique and the length of time it takes to complete. In addition, if ombre is done on a brown-haired woman, preliminary bleaching will be required. At home, you can dye the ends yourself.
First you need to decide on the color scheme and purchase paint, brightener, and a brush for applying the composition. Algorithm of actions:
- Comb your hair and tie it in a ponytail to color the ends (this is the easiest way to do your own ombre).
- Divide the tail into small strands and comb each one. This is necessary in order to create a smooth gradient transition from natural to colored hair.
- Dilute the paint according to the manufacturer's instructions, which you are advised to read. If you want to create a fashionable shadow ombre on dark hair, lighten it first. In this case, use supra and oxidizer. It is better for fair-haired people to use 3%, for those with too black hair – 6% or 9%.
- Apply the dye for half an hour, then rinse it off and apply a balm or mask to your head to “reanimate” your hair after an aggressive lightening composition.
- The last stage is tinting in color, if necessary. For brunettes, you can apply color to the tail without fear of affecting the natural color, since the dye won’t stick to it anyway.
After this, you need to thoroughly wash your hair and apply protective oil to your dyed hair, which will prevent split ends and nourish the hair shaft.
When using paint at home, it is recommended to conduct a sensitivity test first to avoid causing irritation.
Ombre is a universal hair coloring technique that will help you change your image. Its advantage is that you don’t need to apply paint over the entire length, and if a girl is afraid of drastic changes, then you can only paint the ends and stretch the color to 1/3 of the length.
How to paint a wall that is divided into many sections?
- If you have several sections, you will have to mix colors as you paint. Start by combining equal parts of the two original colors that you chose as base colors. So, you will create a third base color from which you will move.
- Paint the center section of the wall a mixed color.
- Once you're done, add one dark colored measuring cup to your mixed paint and paint the section underneath the center one. Continue in this manner, adding a little dark color and moving towards the bottom. After this, arm yourself with a large brush and use X-shaped movements to remove the clear boundaries between sections. Paint the lowest part of the wall in the original dark color without any impurities.
- Once you're done with the bottom of the wall, mix half and half another batch of paint as in step 1. Repeat the previous step, adding one scoop of light paint to each section until you reach the top. Paint the top of the wall an original light shade.
- Leave a couple of centimeters between each color for mixing. This will ensure that the transition effect is gradual and the boundaries between colors are not so obvious.
- Paints mix better while they're still wet, so it's much more efficient to work in small areas (of course, painting more than one wall at a time is unlikely to work).
- Avoid latex and other quick-drying paints. Oil paint dries much slower and mixes much easier.
- Good blending requires working with a dry brush. Keep extra brushes on hand and change them as needed.
Anton Tsugunov
Reading time: 8 minutes
Some people think that painted walls in an apartment are boring. Indeed, painting walls in discreet colors, the simplicity and severity of plain surfaces are not suitable for everyone. Fortunately, modern painting materials offer endless possibilities for realizing your imagination on the walls and creating your own unique design.
It is often difficult to find beautiful, interesting ones with a suitable pattern and color scheme that is in harmony with the interior. But even if this is successful, deep down you still understand that they are not the only one of their kind. You can make a room unique and expressive, but at the same time cozy, with the help of colors and thoughtful design.
Features of painting with tint transitions
Traditional coloring of walls with paints in one color is the most inexpensive method of decorating walls. This finishing of their surfaces is very simple and can be done with your own hands. However, it looks boring and too simple. Therefore, in the past this type of painting was preferred over wallpaper.
Now, thanks to the discovery of the new ombre technique, everyone has the opportunity to inexpensively, but at the same time very effectively and unusually decorate the walls in any room. Why, besides affordability and beautiful results, is it worth choosing paint with transitions for decorating walls?
This method, simply put, is a combination of paints on one plane. Both similar shades and completely different colors (up to 3) are used, which smoothly and softly transition into each other.
Due to this, a complex gradient surface is created, where color and shade transitions can be performed in different ways:
This, in turn (depending on the location of dark and light areas), helps to divide the rooms into work areas. In addition, different graduations allow you to create all kinds of visual effects in the rooms.
| Type of graduated painting | Resulting effects |
| Lightening the top of the wall and darkening the bottom. | Visually increases the space. The ceilings appear higher and the floors appear more massive and stable. |
| Darkening the top area of the wall. | Makes the ceilings lower, but at the same time the room visually expands. |
| Lightening in the middle of the wall and darkening in the corners. | Allow the room to be a little visually rounded. The space may narrow, and interior details begin to stand out, becoming more prominent and contrasting. |
| Shade transitions are wavy or diagonal. | They bring more dynamics into the space. The interior does not look very strict and geometric, due to the fact that all the angular outlines of the details are visually smoothed out. |
| Spots with transitions expanding in all directions. | They add depth to the wall planes and “break” their rectangular geometry. |
| Darkening in the middle of the wall while simultaneously brightening the window and corner areas. | Visually makes the room lighter and more spacious. The contrast decreases, making the lighting look brighter, but at the same time soft and pleasant. |
All of the above makes this method of painting walls, in contrast to the traditional method, preferable, since it can effectively adjust both the width and height of rooms, as well as create the desired atmosphere in the rooms. And although it is more labor-intensive, the resulting effect is worth learning this technique. After all, there is nothing overly complicated in it, so any adult with at least some skills in painting work can handle it with their own hands.
: prepare a dye solution
You can follow the clear instructions for preparing your dye mixture as recommended by your dye manufacturer. Or you can get creative. If you don't want the color to be exactly what it says on the dye package, play around with adding other colors. Remember that you must prepare the dye for the darkest shade in your ombre palette.
Pros and cons of coloring
The inability to use gradient dyeing on short hair is practically the only drawback of the technique. However, it is worth remembering that doing it yourself at home is also quite difficult, because there is a risk of choosing the wrong shades, as well as not painting over the entire length.
The advantages of gradient coloring outweigh the difficulty of using it yourself. The technique does not require constant updating, since the roots grow naturally. Short hair is tinted more often than long hair, but this is only advice and not a mandatory rule.
The dyeing technique is suitable for everyone, the main thing is to choose the shade. This technique is used by women of all ages and social status. For young girls, a gradient is a way to stand out due to unnatural colors at the ends, and in adulthood, a gradient will help to visually rejuvenate.
Find out more about the popular ombre technique and the specifics of coloring:
How to paint ombre walls
There is no difficulty in applying the material. Follow the painting rules and everything will work out.
Stages of work
First, decide on the colors you will use, as well as what color will be the main one (most of the wall).
- Prepare the painting area. Cover all things, furniture and floors with film so that there is less work in the future. Secure the film so that it does not interfere with your work.
- Thin the white paint with colorant. First, light, because if something happens it can be darkened.
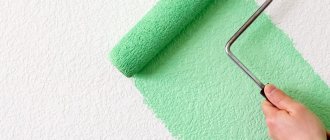
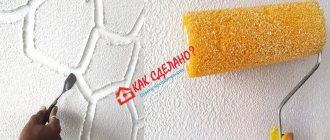
- Pour the tinted emulsion into the tray and rotate the roller well so that it absorbs the liquid. Then, using strong pressure in the tray, remove excess paint from the roller.
- Apply the first layer of paint (light) using uniform movements and equal pressure on the tool. You can apply this shade over the entire plane, then it will be easier to bring the color to the desired shade.
- Dilute paint with a darker shade in a second bucket. It is in a bucket, not in a bath. If this content is not enough, you will have to make the same color again, and it is very difficult to guess the amount of colorant. The colors will be different and the gradient will not work.
- Apply a darker shade below (wherever you see fit, your imagination plays a role here). It's better to start from the bottom up, as the paint on the roller will be a little lighter, there will be less of it, which will create the ombre effect.
- Add a dark tone to the remaining paint. Leave some light paint to smooth out the transitions.
- Apply dark paint to the remaining surface.
- Now we smooth out the transitions. Take a hard brush and dab it into medium-tone paint. Starting with a painted wall of that shade, lightly tap from bottom to top and move toward lighter paint. To improve the transition, wet the tips of the brush in a light tone. In this way, go over the entire surface of the transition from light to medium.
- Do the same procedure with dark tones.
Special requirements
The gradient is done on fresh paint, not on dried paint. This is necessary to correct the flaws that occurred during application. In addition, the transition will be smoother.
After each painting, the roller must be washed, as the remaining tone will spoil the appearance of the previous application.
Step-by-step process for creating a horizontal transition
Horizontal ombre is the most popular and great-looking room design. It is possible to paint a wall with such a smooth transition from one tone to another using a brush or roller.
But when using them, you will also have to solve the issue of polishing the shade transition, and this will take a lot of time and labor. And the result of these painting devices, in the absence of good construction skills, will not be as neat as we would like.
The best quality results can be achieved by using a spray gun. It has a function for adjusting the intensity of the supply of coloring compounds, which allows you to create a natural “halo” of a lighter tone on the treated area. This can be used as a border between different colored areas. That is, this tool is more functional and easier to use, so we will consider the process of painting walls with graduation using it.
The ombre technique using it includes the following steps:
Finally, it should be noted that color transitions are created both horizontally and diagonally using the same principle. Of course, painting walls using this technique may not work the first time. To perform well, you need to get good at it. That is why it is advisable to first repeat all the steps described above on a large piece of cardboard that imitates a wall plane.
Painting a wall using the Ombre technique, or Gradient painting
Painting walls, furniture and clothes in a gradient has been invented for a long time; the so-called ombre effect experienced a particularly high peak of popularity in the seventies of the twentieth century. Gradient, also called Ombre, is a coloring with a smooth transition from one shade to another, often from a dark shade to white, or vice versa.
Currently, the fashion for interiors using this technique is returning. Despite the simplicity of the technology, this type of wall painting looks very beautiful, allows you to visually expand the space, and most importantly does not require any special expenses. Even the most inexperienced person can handle gradient painting; no special artistic skills are needed at all, everything is done simply, quickly, using affordable equipment from available materials.
To paint a wall with a gradient, we need a flat primed wall, paint of one or several shades, white paint, a roller with a paint tray, and for ease of work, a spray gun with two containers or guns is desirable. However, it is quite possible to do without a spray gun. It is enough to carefully apply the paint with a roller. So, let's prepare our wall for finishing. Let me remind you that for proper and durable painting, the wall must be smooth, puttied and primed.
Before painting, protect nearby surfaces from paint. The bottom and top of the wall should be covered with masking tape, the floor and furniture should be covered with cellophane film, newspapers or unnecessary rags.
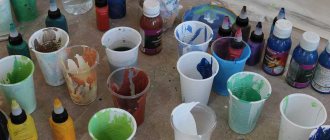
We dilute the paint and pour the required amount into the tray. First we add the darkest color of the gradient, in our case it is dark blue.
Next, apply paint to the wall with a roller. To begin, mentally divide the wall into 4 equal parts. We paint the first part completely with undiluted dark paint. Depending on your idea, this can be either the top or bottom of the wall, or its central part.
In the latter case, you can make a two-way gradient, transitioning to light or white at the top and bottom of the wall.
Now you need to dilute the paint with white. Add a little and gradually. Painting should be done in lines; it is best to dilute each roller tray with slightly whiter paint, if it is enough for one layer of roller along the entire length of the wall. If you use a spray gun, the paint must be additionally diluted with water until the required consistency is obtained.
The required consistency can be found in the instructions for the spray gun.
Pour the solution into the spray gun and continue applying paint to the wall, spraying it evenly from the dark edge to the light one.
Spraying is carried out from a distance of 20-30 cm from the wall surface.
If you have previously primed the wall, following our advice, you can not dilute the white paint, but simply gradually reduce the intensity of the paint spray, passing a little faster and a little further from the wall, gradually negating the main color. If you want a denser color, then you need to dilute the white paint, and again spray it from below from a greater distance (from above, if you have a dark color from below), gradually covering part of the second paint.
If you do not use a spray gun, you need to completely go over the wall with a roller, from dark color to white, each time mixing a little white into the base color.
Striped dyeing
Painting with stripes allows you to transform every room, give it a special, unique design and fully express your imagination. Moreover, you can paint it in even stripes of the same color, make transitions, or create waves with many shades and colors. The simplest and most common method is to paint walls with stripes, which have one color and do not mix.
Visually, such stripes will expand the space, make it more attractive and original. Stripes can be applied in different or equal widths. In any case, for such work you will need one more material - masking tape.
Painting walls with stripes allows you to create a unique and very unusual design.
On a note! Lines of the same color must be made strictly horizontally or vertically.
When deciding how to paint striped walls, determine how much you want to visually expand the room. If it is already large in size, you should pay attention not only to the color combination, but also to the direction of the stripes.
Using bright light stripes you can create a harmonious and interesting design. Wide stripes will make the interior classic and cozy. A single wide strip in the center of the wall, horizontally or vertically, can improve the dynamics of the room and completely transform it.
Wide bright stripes will add color to the interior and lift the mood of those around you.
Preparatory work
Before painting the walls, you should prepare the surface. Old wallpaper or paint is washed off the walls using appropriate liquids. If it is wallpaper, just soften it with water and wipe it off with a spatula. For paint you will need to use special solvents or mixtures.
Important! There should be nothing unnecessary left on the wall - any old finishing should be removed. All irregularities are also eliminated.
The surface is leveled using putty and plaster (for large differences and cracks). Before puttying, you should apply a layer of primer, which will not only reveal all the irregularities, but also increase adhesion. The leveled wall coated with putty is also covered with primer, which will increase adhesion and facilitate the application of the selected paint.
Technology and nuances of coloring
Before you paint the walls with stripes, you should apply markings. This is done using a simple pencil and a long ruler. The correctness of the drawn lines is checked with a level. Then masking tape is glued along the marking line, which will be responsible for the evenness of the painting and will not allow the paint to extend beyond the edges.
Marking a wall for striped painting can be done using a building level
The tool for work is selected depending on the width of the strips. If the stripes are narrow, a more convenient method would be to paint with a paint brush, which will not “extend” excessively beyond the edges of the markings. To save time and speed up the procedure, wide stripes are applied using a roller.
On a note! As you work, the paint will get a little onto the edges of the tape. There is no need to be afraid that it will appear on the wall, because the tape specifically provides for such a procedure, and any type of paint cannot saturate the material of the product.
Work begins from the far corners and near window openings, dividing the room into segments or squares and carefully painting them. Each square or segment should have the same layer of paint as the previous one, while during work you can visually assess the degree of readiness and the need to add solution.