The appearance of bedbugs in an apartment is not the most pleasant event. To live and reproduce, bedbugs find hard-to-reach places and settle in them. They hide in places inaccessible to light, in cracks in the walls, in the joints of wallpaper, carpets, books, in furniture, often in soft furniture such as sofas, beds and mattresses. Bed bugs are active most often at night, but sometimes during daylight hours. The presence of unwanted insects can cause allergies or become a source of various infections. Therefore, it is necessary to thoroughly fight them. If pests appear behind peeling wallpaper, in the joints, under the wallpaper, then simple surface treatment of the wallpaper will not bring results. The best way is to make cosmetic repairs by re-gluing the wallpaper. The answer to the question “What to add to wallpaper glue against bedbugs?” you can find in this article.
Main causes of defects
There are many reasons for the occurrence of defects: from the unpreparedness of the master to the characteristics of the material and glue. These include:
- Wall surface defects. This problem is faced not only by owners of old apartments and houses, but also by new ones. The plaster also comes off due to humidity in the room. Before gluing, you must carefully remove the crumbling plaster and level the wall with a special mixture.
- Improper preparation of the base. An obligatory step is cleaning, priming, and subsequent complete drying of the surface.
- If the walls are made of plasterboard, it is important to carefully process the joints.
- Incorrect application of the composition. Before starting work, you need to read the instructions for the material: what layer to apply, whether two surfaces are applied, how long to wait before gluing. When applying the layer, avoid dry areas.
- The gluing rules were violated: non-compliance with temperature conditions, exclusion of through air, entry of ultraviolet radiation into the room.
- Purchasing low-quality materials.
If compliance with the rules was impossible, it was necessary to postpone the sticking for another time.
What will you need for gluing?
You will need clean water for cleaning the instrument and cleaning.
Tools
The following tools are used for gluing:
- Brush for applying adhesive base. It is better to purchase several with different widths.
- A rubberized roller for rolling joints and removing air.
- Dry, clean cloth.
- Putty knife.
- Syringe for removing bubbles.
- Hairdryer for warming up some fragments.
Which glue to choose
If the cause of peeling is a poor-quality adhesive composition, then the peeling wallpaper should be glued with the highest quality composition of another brand or with a special glue for gluing joints.
When gluing a large area, you must use an adhesive composition for finishing materials. You need to choose according to the type of material or universal. The composition is presented in dry form, the solution is prepared immediately before gluing.
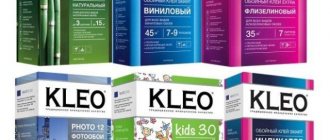
If the gluing area is small, then glue for joints is purchased. It is available ready-made, in small volume tubes. In most cases it is universal. Masters distinguish the following brands:
- Metylan – suitable for gluing even heavy wallpaper. It can withstand high temperatures, so it can be glued behind batteries.
- KLEO Strong – suitable for gluing all types of material, does not spread. Becomes transparent after drying. Convenient for gluing behind batteries and in corners.
- RACCORD – reinforced, for gluing joints. Has an applicator for easy application. Strong adhesion without traces.
Many people try to use paste, citing its quick preparation at home. Should not be doing that. This method of gluing will not work, since the paste is not capable of gluing paper impregnated with the composition.
Using PVA is also not an option. It is waterproof, which is bad if you need to remove the wallpaper later. If the glued material is light in color, then the appearance of yellow spots will be noticeable. This glue can be used on an area of no more than three centimeters in dark colors.
What glue to use for repairs ↑
Not repeating previous mistakes is one of the tasks that must be solved when gluing up peeling wallpaper. A responsible approach to the choice of composition eliminates the need to repeat the procedure and allows you to eliminate damage at no extra cost. How to glue wallpaper that has come off?
Special wallpaper compositions ↑
The range of adhesives intended for finishing materials is quite wide. The compositions are presented in all price segments. On the packaging, the manufacturer indicates what type of finishing materials the mixture is intended for.
Most often they are sold dry and prepared independently immediately before gluing.
Please note that some products are intended for non-woven wallpaper; they cannot be used for paper wallpaper, and vice versa
For peeling wallpaper, you can use the remaining glue after the main repair, if the expiration date has not expired. It is economically irrational to buy a whole pack for a small fragment or several plots. When restoring a large area, when you have to re-glue almost the entire strip, the cost of a new pack is completely justified.
PVA - pros and cons ↑
Familiar from childhood, inexpensive and not requiring special training, PVA is often used when deciding what to use to glue peeling wallpaper. Glue is applied to the paper over the entire area, the strip is pressed tightly against the wall and rolled several times. It would seem that the problem is solved. However, there is a high risk of new ones:
- PVA has high adhesion and reliably glues surfaces, but is practically insoluble in water. The next time you renovate, you will have to put in a lot of effort to remove the remaining paper and completely clean the wall.
- In areas of impregnation, yellow spots with sharp contours may appear, which are especially noticeable against a light background.
- PVA is suitable for treating small areas, up to 5 cm. For more serious repairs, other compositions are recommended.
Glue for gluing wallpaper ↑
The best option for small areas, a good way to glue loose joints, top or bottom edges. Sold ready-made at any hardware store. The tube volume is small - from 50 to 100 ml. This eliminates the worry about excess.
The spout is elongated and narrowed, which facilitates application in hard-to-reach areas and allows for high-quality work on joints and corners. For a better connection, use a roller to roll the glued strip to the wall.
It is recommended to choose glue from trusted brands and pay attention to the instructions and advice from the manufacturer. Most products are universal and suitable for all types of wallpaper - paper, vinyl, non-woven, fabric
At the final stage, the glued areas are heated with a regular hairdryer.
Why paste is a thing of the past ↑
Universal household glue at one time gained so much popularity that many still cannot refuse to use the viscous sticky substance. The main advantage of the paste is its low cost and quick preparation at home. This completes the list of advantages.
If you need to glue wallpaper, paste is not helpful. It is able to cope with clean paper that is not soaked in adhesive mixture and does not harden after drying. And there is a high probability that an unpleasant surprise will await you the next morning - stripes lying on the floor. To achieve high-quality results, we use proven products from recognized manufacturers.
Gluing technology
It is important to adhere to the correct gluing technology, follow the rules and principles.
General rules and principles
The principle in gluing is - do not skimp on material. Don't buy a cheap one or on sale because you only need a little bit of it. Discounted goods may be of poor quality due to improper storage.
Before starting work, you need to prepare your workplace, study the instructions for the adhesive, which layer to apply, how long it takes to dry. If possible, complete the work before the start of the heating season to allow the joints to dry at natural temperatures.
Glue peeling wallpaper with the windows and doors closed to prevent peeling again.
Glue joints
If you need to glue it at the joining place, then:
- Move away the edges of the wallpaper using a spatula and clean the surface of the wall and material from debris and dust.
- Apply glue to the wall and material.
- Press with a rubber roller.
- Remove excess with a clean, dry cloth.
We invite you to watch the training video:
Tears and Bubbles
If ruptures and bubbles occur, certain measures are taken. When a bubble forms, carefully pierce the place where it formed with a syringe with glue and squeeze out a sufficient amount. Wait 5-7 minutes until the canvas is completely softened, then press and smooth with a plastic spatula. Remove excess with a rag.
The bubble can be removed by cutting it with a special construction knife. But this option is possible if the wallpaper is without a pattern. Otherwise, a mismatch will occur. When making a cut, the cavity is also filled with a syringe, time is waited and pressed with a roller.
To get rid of tears, it is enough to treat this place with glue, wait a little and carefully connect the fabric.
Defects are eliminated on a well-moistened cloth. Such corrections cannot be carried out dry.
Wallpapering after the cat
If your beloved cat has ruined part of the covering, then this can always be corrected. To do this, you need to have the same piece of canvas and adhesive. The damaged piece is carefully cut out with a construction knife, the wall is processed, glue is applied, a few minutes are waited and a new strip is applied to the wall. Smooth out using a roller or rag.
If there is an animal in the house or apartment, it is better to glue non-woven material to the walls, or better to paint the walls.
How to re-glue a large area
There are some peculiarities and sequences in re-gluing a large area:
- Before starting work, we eliminate possible drafts.
- We remove debris from the peeled canvas. Debris is also swept away from the wall, excess putty is removed and processed.
- The canvas is spread with the adhesive mixture and soaked for at least 7 minutes. The time increases due to the already existing layer of glue from the first time.
- Apply glue to the wall without touching the glued wallpaper nearby.
- Straighten the strip and apply it to the wall.
- Press and expel excess composition and air with a rubber roller, rag or plastic spatula.
- Treat the joint on top, wait a few minutes, and remove excess with a rag.
Do not open windows until completely dry.
Bonding non-woven fabrics
The non-woven base has its own gluing characteristics. Incorrect application of wallpaper with such a base will lead to its peeling off. There are always instructions for such material, the study of which is mandatory.
This base is glued using glue and a spatula. The joints and the wall are treated with a special mixture, wait at least ten minutes (this material is much denser than ordinary paper wallpaper). Press and smooth with a roller or plastic spatula. Excess is removed with a rag or cloth.
How to glue wallpaper without glue
You can glue fallen wallpaper without a special composition, but prepare your own paste. This option is cheap, but impractical. It’s better not to experiment, especially if peeling has already occurred. It is not recommended to use either paste or PVA during work.
How to glue peeling wallpaper.
If the wallpaper has peeled off and partially torn off the whitewash, paint or putty from the wall, then it must be cleaned with warm water. Do this carefully so as not to damage the canvas. If there is nothing on the canvas, immediately start gluing them.
To do this, apply glue with a brush to the wallpaper that has come off and onto the wall. The canvas should soften for 1-2 minutes, after which you can begin smoothing it with a wallpaper spatula. When applying glue, do not skimp on it. It's better for the glue to come out of the seam than for it to be missing.
The glue used for gluing is the same as for gluing wallpaper. Therefore, after gluing the wallpaper, you need to leave the glue on. When cooked, it can stand for a relatively long time. As practice shows, most often the wallpaper peels off the next day or every other day. During this time, nothing will happen to the prepared glue.
If your wallpaper has come off after a few months or years and you don't have any wallpaper glue left that you used to stick the wallpaper on, don't rush to buy a new pack. You do not use it completely, but it is better to glue it with PVA glue. This glue can be used to glue all types of wallpaper.
In order for you to clearly see that there is nothing heavy in the gluing, I will provide you with this video.
Often, after a while, ours ceases to look as attractive as at the very beginning. It's crumbling and the wallpaper is peeling off in places. But this is not yet a reason to start a new repair; you can simply fix the old one and extend its life for a few more years.
Why does the wallpaper come off the wall?
Most often, the reason is inaccurate adherence to the pasting instructions. This is especially true for heavy types of wallpaper that require special glue and additional materials, for example, paper strips at the joints.
Also, the reason may lie in insufficient surface preparation or uneven application of glue. The peeling of wallpaper is sometimes explained by the dampness of the room. In bathrooms and kitchens, wallpaper peels off often and thickly. And what should we do if the wallpaper has peeled off and we don’t plan any repairs yet?
Timely restored wallpaper joints can save time and money
It is important to choose the right glue and tools. So, how to glue peeling wallpaper: you need a special glue, it is preferable to choose a well-known manufacturer
You will also need a small roller specifically for rolling joints.
We also prepare a sponge to remove excess glue, a vacuum cleaner and a household hair dryer. How to fix wallpaper at the joint if it has peeled off: first, carefully separate the loose sheets, vacuum the wall and the wallpaper itself to remove dust and putty crumbs. Apply glue from a tube or with a brush (depending on the area of the peeled wallpaper).
Next, roll the sheets of wallpaper in the direction from the glued part to the joint. Remove any excess glue with a damp sponge. If you are gluing PVA, dry the seams additionally with a hairdryer and then go over with a roller again.
Let the wallpaper dry, while avoiding drafts. The mini renovation is complete!
Some time after renovation, many apartment owners encounter minor problems: the wallpaper comes off or bubbles.
Wallpaper is peeling off: what should you do? As a rule, such defects can be corrected independently without the help of professionals.
Construction stores offer ready-made mixtures with which you can glue wallpaper. In addition, you can make do with improvised means by preparing the composition yourself.
Most often, wallpaper peels off if the base was prepared incorrectlyTo avoid troubles in the future, before starting finishing work, apartment owners should understand why the wallpaper peels off at the joints. The most common reason is a poorly prepared surface. Regardless of the age of the building, the walls continue to sag and deform, resulting in cracks.
Before you start gluing, you should carefully check the walls, remove weak plaster and repair cracks.
Other reasons why wallpaper peels off from the ceiling or wall may be:
- non-compliance with technology when installing gypsum board slabs or improper processing of joints;
- poor cleaning of the surface from the old finish;
- savings on primer;
- gluing wallpaper onto wet plaster.
Finishers get into trouble because they have too much confidence in their own experience. Before starting any work, you should carefully read the manufacturer's instructions. The application of the adhesive solution may have certain nuances.
Expert advice
Experts highlight several tips when gluing wallpaper:
- Use high-quality materials for repairs.
- The loose edges are cleaned of debris and coated with the same compound that was used during the repair, only diluted with a more liquid one.
- PVA can help, but in the future there will be difficulties with peeling off and yellow spots may appear. Therefore, its use should be avoided.
- The material will rupture when the wallpaper and plaster come off. In this case, you should remove the canvas, clean it, the wall and make a new pasting.
- The material for gluing is purchased with a reserve, which will allow you to resort to replacement when gluing the room.
- If a whole panel is being re-glued, and there are sockets or switches on it, measures are taken for preliminary removal.
- The moment is taken into account when selecting the composition for working with different types of wallpaper.
- The floor for coating the canvas must always be clean.
- Prepare rags without patterns to prevent the pattern from transferring to the material when wet.
Reasons for peeling wallpaper
Most often, you have to glue wallpaper if a low-priced coating is glued to the walls. However, sometimes it happens that even the most expensive non-woven wallpaper may need to fix the seams. If canvases with vertical stripes or a checkered pattern are selected, then the visibility of the resulting defects is extremely low. And on a glossy, textured coating or on wallpaper with a monochromatic pattern, peeling at the seams, on the contrary, will be very noticeable.
If the wallpaper was stored in rooms with high humidity or was transported incorrectly, this will also negatively affect its performance. So, when you decide to purchase new wall material, carefully examine the sides of the rolls. If the ends are even slightly dented, then it is better to choose another product. Indeed, in this case, with one hundred percent probability, the joints will be visible. In addition, make sure that the roll packaging is initially intact, without tears or cuts to the film. We recommend storing printed material exclusively in a vertical position.
Often the reverse side of the canvas is a dark shade of white. After pasting the walls, it also remains white, thereby creating the effect of a peeling sheet of wallpaper. To get rid of this problem, we recommend painting the joints with a pencil of a shade that matches the color of the coating.
For the most part, paper webs are susceptible to peeling at the seams. The fact is that when you spread glue on paper, it stretches. And when the adhesive base dries, the sheet noticeably decreases in size. For this reason, you need to glue the strips immediately after applying the glue so that they do not have time to swell. You cannot hesitate, otherwise you will not be able to avoid uneven shrinkage.
What can you use?
When the joints have already come apart at the seams, it is important to glue them as quickly as possible. This can be done using the following means:
- glue;
- tassels;
- spatula;
- rubberized roller;
- syringe;
- tube with a special dispenser.
However, some people use similar compounds for gluing, subsequently suffering from peeling off the canvases, since PVA secures the trellises perfectly. Wallpaper can come apart at the seams even if bubbles have formed on the surface, which means that the canvas does not lie evenly. You can get rid of unwanted prominence using a regular syringe. The algorithm of actions is as follows:
- pierce the bubble with a syringe needle;
- remove the formed air between the wall and the trellises;
- fill the syringe with glue;
- place a syringe with adhesive inside the canvas;
- wait until the wallpaper is completely impregnated;
- Press the area to be restored firmly and smooth it with a roller.
It must be said that today you can see special reinforced adhesives for joints on sale. They are distinguished by high viscosity due to the presence of polyvinyl acetate emulsion in the composition. In addition, the drying speed of any of the professional types of products is several times higher than the drying speed of classic wallpaper glue. The resulting coating is not only highly durable, but also waterproof.
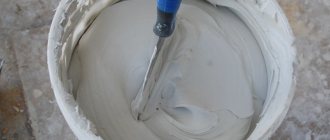
If there is no glue, some craftsmen advise using a solution of flour or starch and warm water. Experts do not encourage the use of this method, but for some it becomes a budget saver. Nevertheless, folk methods exist, and therefore the method of preparing homemade paste is worth mentioning. So, for the adhesive composition you will need:
- a glass of flour;
- 2 tablespoons starch;
- 2 liters of water.
The volume of ingredients in this case is presented for a larger portion, however, it can always be changed. So, put the water on the fire and wait for it to boil. Flour and starch are mixed with each other and poured with a small amount of cold water until the lumps are completely dissolved. Pour the resulting mass into boiling water in a thin stream with constant stirring. The mixture continues to be stirred for 1 minute and then cooled. To get rid of lumps, the liquid must be strained through a colander.
How to glue wallpaper: features of choosing glue
So, we have already taken a look at the main reasons why wallpaper can peel off. Now let's figure out what exactly to glue the wallpaper with if a similar situation has already occurred.
So, most people often glue wallpaper seams with the most common PVA glue. In fact, this is a grave mistake. The fact is that PVA has too weak adhesion, and therefore is not able to firmly connect the canvases to the wall. In addition, this adhesive composition will not hold a sufficiently heavy facing material. Therefore, it is important to clearly know which glue to use so that the work is not in vain.
- Wallpaper PVA. The composition will do an excellent job of correcting the joints of paper-based wallpaper. It is important not to confuse its properties with the properties of stationery PVA, because these two types of adhesive mixtures are completely different in composition.
- Wallpaper glue. Naturally, from a practicality point of view, it is the most suitable adhesive. However, most often such mixtures are sold in fairly large quantities. However, after unpacking, some of them cannot be stored for a long period. Accordingly, buying a large package of wallpaper glue in order to cover only a small area is not the most budget-friendly option to solve the problem.
It is important that it is recommended to purchase glue for gluing wallpaper only from trusted brands. Due to competition in the market, it is in the interests of popular manufacturers to fully justify the declared properties of goods, so as not to lose consumer trust. For this reason, manufacturers maintain decent quality of products sold.
DIY wallpaper glue
DIY wallpaper glue
The point is actually not so much about saving money and your own time, as about the practicality of homemade glue. Wallpaper glued with flour and starch glue can be easily removed from the walls, and its adhesion to the surface is quite good.
And if we take a thorough look at the question of why DIY wallpaper glue is still in demand, then just look at the composition of factory-made wallpaper glue. In it you can clearly see that the main components in production are the same starch, only slightly modified.
DIY wallpaper glue
Making your own wallpaper glue from starch and flour is very simple. However, to do this, it is not enough to simply pour flour into water and then stir everything with a wooden stick. Wallpaper paste made from flour and starch should at least be brought to a boil.
So, in order to make wallpaper glue from flour or starch with your own hands, you first need to prepare all the ingredients for this in the required quantity, namely:
- Flour or starch in an amount of at least 250-300 grams.
- Regular cold water, about 1.5 liters.
- A sieve and a container in which you could bring to a boil, DIY wallpaper glue.
How to glue wallpaper joints: step-by-step instructions
When the adhesive mixture has been selected, it is time to begin work. In order to glue the joints, change into suitable clothes, prepare a wide brush, a rag, a spatula and a roller. Carry out the process, strictly following the detailed instructions on how to glue wallpaper. Repair professionals glue wallpaper joints according to the following principle:
- bend the joints;
- remove any remaining debris or whitewash from the sheet;
- We check the wall for chips and deformations;
- Lubricate the joints with glue;
- press the peeled sheet to the desired place;
- we go over the area with a wallpaper roller;
- smooth out the residue using a spatula;
- remove remaining glue with a clean, dry rag.
How to remove peeling at corner joints?
If the wallpaper has peeled off at the corner joints, you will need to follow approximately the same instructions for eliminating peeling. It is important that in this case it is advisable to work on both sheets of wallpaper at once, between which a joint has formed.
To simplify the work, you can not completely bend the entire sheet, but carefully apply glue to a spatula and coat the wallpaper with it on the wrong side. This will greatly facilitate and speed up the process of restoring the wall covering.
How to glue peeling wallpaper
When we see the result of our many hours of work crumbling before our eyes, the question involuntarily arises, what to do when the wallpaper peels off?
Before you get started, read these tips:
- It is not advisable to use the popular PVA glue, because it does not dissolve in water and it will be very difficult to remove wallpaper from the walls before the next renovation. The possibility of yellow spots appearing on the wallpaper cannot be ruled out;
- Wallpaper that has come off the wall or ceiling can be glued with wallpaper glue. You need to dilute it differently than you did when gluing - the consistency of the glue should be liquid;
- If the wallpaper has moved away from the corner or peeled off at the joints, then it is better to use a special glue, it is sold in tubes. The glue does not leave streaks and provides strong adhesion.
What you may need for gluing wallpaper:
- glue;
- brush;
- rubberized roller;
- clean rag;
- narrow spatula;
- large syringe;
- hairdryer
Gluing the joints
When the wallpaper peels off at the joints, you can proceed as follows: carefully bend the edges and remove the debris with a spatula. Apply glue and press the edges with a rubber roller; remove any remaining glue with a clean, dry cloth.
If you need to glue wallpaper that has come away from the floor or ceiling, then also use wallpaper glue. It is diluted with water so that it is not thick, and then the wallpaper is coated well. You need to wait about 5 minutes, then glue the strip to the wall. It is better not to open windows for ventilation for the next two days.
How to get rid of bubbles and scratches
To get rid of such a defect, fill a syringe with glue and pierce the swelling with a needle. Then you need to carefully inject the glue inside and wait about 5 minutes. During this time, the adhesive solution will soften the paper base, and all you have to do is press and smooth the surface.
Surely you have heard about this method of getting rid of large bubbles when you need to cut the wallpaper with a sharp construction knife. Try to avoid such recommendations, since it is almost impossible to connect the pattern at the cut site.
Getting rid of creases or so-called scratches is also simple: use a syringe and inject a little glue into the crease. Then the surface must be heated with a hairdryer and carefully smooth out the scratch with a rubber roller. If excess glue protrudes, remove it with a clean, dry cloth. You will see that the scratch will disappear very quickly.
It is enough to treat the resulting crack with glue.
Re-gluing a large area
In the case where the wallpaper falls off in large areas or one strip has come off, proceed as follows:
- First, close the windows and doors to avoid drafts.
- Remove any adhering putty and debris from a section of wallpaper. The same is done with the wall. You are allowed to use a vacuum cleaner and scrub the wall well.
- The strip is spread with glue and left for 5-7 minutes so that it is well absorbed. It takes longer to soak than when wallpapering for the first time.
- Treat the wall with glue. If you are working with a strip that has partially peeled off, be careful not to stain the front of the wallpaper with glue.
- Carefully straighten the strip and attach it to the wall. It is advisable to work together to avoid creases and bubbles.
- After gluing, go over the surface with a rubber roller and a clean cloth.
When the non-woven wallpaper came off
A common reason for wallpaper peeling off on non-woven fabric is non-compliance with the rules for pasting. Manufacturers include instructions with the product, which describe in detail exactly how to glue such wallpaper. Non-woven wallpaper does not glue joint to joint; in addition, the glue is applied only to the wall, and the canvas remains clean.
You should also follow all recommendations after completing the gluing work and under no circumstances allow drafts.
Peeled non-woven wallpaper is glued using glue and a narrow spatula. Glue is applied to the joints and the wall, then you need to wait 10 minutes and press the canvas. For better adhesion, you can use a roller and a hairdryer.
If vinyl wallpaper has come off, you need to remember what kind of glue you used to glue it. If it is normal for paper wallpaper, then it is possible that the wallpaper will subsequently fall to the floor. Vinyl wallpaper is glued with a special glue. Neither air conditioners nor fans can speed up drying; this can also cause the wallpaper to fall off completely.
If you follow all the recommendations, you will always be able to stick the wallpaper well, and you will not have any problems with it peeling off.
How to mask a gap at the junction of wallpaper?
Perhaps this is the simplest task of all that you can encounter after covering the walls with a new coating. If you managed to glue the peeled wallpaper back into place by carefully sliding them on top of each other, then there is no gap at the seam.
In cases where this is not possible, we recommend using a simple trick. Carefully draw in the empty joint area with a colored pencil that matches the color of the wallpaper. Naturally, this is only permissible if the gap between the sheets is extremely small.
Removing wrinkles from dried wallpaper
Another thing is if there are glue bubbles on the wallpaper. This can often result in the fact that when the sheet of wall covering dries, quite noticeable folds may remain. Naturally, they can be quite noticeable and will largely spoil the overall appearance of the repair.
If the wallpaper is swollen, then you need to quickly correct the situation. Get to work before the wall covering has time to dry. When the air bubble is too large, it is recommended to simply lift the corner of the wallpaper sheet and carefully stick it in the desired position. A bubble of medium or small diameter should be taken outside the sheet of wallpaper. So, for this you can use a plastic spatula. By gently pressing on the areas around the bubble, you will be able to bring it to the edge of the sheet. Afterwards, if the air does not want to escape, the sheet should be carefully lifted, the bubble released and the wallpaper glued back.
Unfortunately, it is almost impossible to completely remove a noticeable crease after the wallpaper has dried. Some people advise carefully trimming the excess wall covering. The resulting white “scar” can be sketched with a suitable pencil, but such an undertaking is quite risky.
How to avoid peeling: recommendations for all types of coatings
Naturally, it is quite possible to avoid wallpaper peeling if you adhere to certain rules. So, they need to be glued exclusively with a special composition for this purpose. It is also imperative to follow all the rules stating how to glue each individual type of wall covering. Manufacturers often provide basic requirements for performing this task in the instructions for rolls and adhesive mixtures.
It is important to dilute wallpaper glue in the correct proportions. During the drying period, it is recommended to provide the room with complete protection from drafts and high humidity, as they negatively affect the adhesion of wall panels to the wall surface.
Finally
Before gluing wallpaper at the joints, study the recommendations from both the wallpaper manufacturer and the manufacturer of the adhesive chosen for it. Follow the basic algorithm of work and keep the room dry so that the elimination of cladding defects is effective.
We wish you good luck in your endeavors. If you have any questions, we recommend watching a video on how to remove joints in wallpaper with your own hands:
Wallpapering is a real challenge for some people. But when the work is already finished, it’s even more offensive when the seams that took so long to adjust begin to come apart. Is it possible to do something in this situation? The article will discuss methods of gluing and masking seams between wallpaper, and will also discuss the main reasons why wallpaper peels off at the joints.
Preventive measures
Preventive measures include regular cleaning using special detergents, treating carpets and sofas with upholstery cleaning products, sealing cracks and holes in the floor and walls. Change bedding regularly and wash it immediately; experts do not recommend storing it, as pests can multiply. You should periodically look through carpets, wallpaper, furniture, and books. If bedbugs are found, immediately take measures to destroy them.
Let's summarize: the main places where bedbugs appear are upholstered furniture, cracks in walls and floors, and in wallpaper joints. Experts recommend making cosmetic repairs immediately and treating the walls and ceiling first. In this article we looked at the question “what can be added to wallpaper glue against bedbugs?” On the shelves of ordinary and specialized stores you can find many effective products that will help get rid of pests forever. When using an insecticide, you need to remember your own safety; after all, these are chemicals that can cause dizziness, headaches or an allergic reaction. The process of fighting bedbugs takes time, a lot of effort and some financial costs. Timely adoption of certain measures will save you from unnecessary hassle.
Causes of detachment
The success of dealing with any problem depends on correctly identifying its cause. This is also true for wallpaper. The most common reasons why wallpaper peels off are:
- wall defect;
- plasterboard walls;
- poor preparation of the base;
- violation of gluing technology;
- uneven layer of glue.
Often the source of the problem is beyond the owner's efforts. It may lie in how the building material behaves over time. If this is a new building, then the house still shrinks for a certain period of time. During the shrinkage process, some deformation of the walls is observed, which can lead to unsticking of joints or the appearance of tears. This also applies to buildings that were built a long time ago.
Due to certain processes that can occur in soils, rupture occurs along the seam. Another reason could be old building material that begins to deteriorate and affects the wallpaper. To prevent such a problem from occurring, you can analyze the quality of the wall in advance. To do this, you can carefully inspect it and lightly tap to determine if there is any peeling plaster or voids that will lead to the wallpaper peeling off.
The base for wallpapering must go through all stages of preparation; if this has not been done, then problems with joints on the wallpaper may occur. This often happens due to the fact that before gluing a new layer of wallpaper, the old one was not completely removed. You should also not glue wallpaper onto a painted base. It is better to spend more time cleaning, puttying and priming the base than to overpay for a new batch of wallpaper. Preparation will have to be done in any case, but later it will cost several times more.
Each wallpaper manufacturer applies certain recommendations to its products, but some may consider that personal experience is sufficient. It is important to understand that technologies change and what was good yesterday is no longer acceptable today. Sometimes those who apply wallpaper try to finish the process as quickly as possible, which leads to insufficient impregnation of the wall with glue. Before gluing, you must carefully read the manufacturer's insert and follow the instructions exactly. For example, different wallpapers require different waiting times before gluing.
Another nuance that requires special attention when wallpapering is the uniform application of the glue. Don’t think that the more of it there is, the more securely the wallpaper will stick to the wall. In addition, some finishing materials require applying glue not to the canvas, but directly to the wall. If you do not follow the recommendations, then you can count on the fact that the product will definitely peel off, and not just at the seams. A roller will allow you to distribute the glue evenly over the surface. Coping with this task with a brush is somewhat more difficult. Some types of wallpaper require pre-exposure with glue applied before fixing to the plane.
Why is this happening
Wallpapering is a process consisting of several operations that must be performed sequentially. If you violate even one requirement, it can lead to dire consequences.
When wallpaper comes away from the wall, this may mean that the surface was poorly prepared. It is especially difficult to glue wallpaper on a wall covered with lime whitewash. Such walls in “Stalin” and “Khrushchev” buildings are not uncommon. It is necessary to prepare the surface for wallpapering with special care. Experts recommend completely removing lime from the wall and cleaning it well. In addition, if you do not prime the wall or ceiling, you should not expect high-quality adhesion of the wallpaper.
In addition to surface preparation, surprises can also be expected from the glue. It may also be of poor quality
Therefore, before purchasing glue, pay attention to the expiration date. If you decide to glue wallpaper for the first time, it is better not to trust advertisements, but to buy a proven product
And a few more words about glue - often the advice of neighbors can ruin the whole job. In the 50s and 60s it was popular to make glue from water and flour. This glue was widely used for wallpapering. Now the quality of the material has changed and such a “paste” no longer copes with its task. Therefore, you should not listen to such advice - it is better to purchase high-quality glue that will suit your type of wallpaper.
The main reasons for wallpaper peeling off:
Wall defect. In your own house or apartment, over time, the walls begin to deform. Even in a new building this phenomenon cannot be excluded. Therefore, before starting work, you should definitely check the walls for strength. How to do this: take a hammer or other tool and gently tap on the wall, you can use a screwdriver and “pry out” part of the plaster. If it gives in and falls down, then your wall is considered problematic and needs to be strengthened. If you find a crack, you cannot ignore it - if you don’t fix it right away, the wallpaper may fall off along with part of the plaster. It’s better to clean the wall and cover deep cracks and chips with cement mortar. The base is poorly prepared. This is the most common reason for wallpaper peeling off. Perhaps you were too lazy to completely remove the old wallpaper, or there were traces of old whitewash, plaster or paint on the walls and ceiling. Even when you are advised not to remove the old whitewash and glue the wallpaper directly onto it, you should not trust the words, air bubbles will still appear in some places or the wallpaper will fall off altogether. And it also happens that in order to quickly complete the repair, one important stage is skipped - working with the primer mixture. They simply forgot to apply it. Naturally, you should not expect that wallpaper will adhere well to an untreated surface. Failure to follow recommendations. It would seem that everything has been done correctly, but the wallpaper still falls off. The reason may be that between each stage of the wall preparation technology, time must pass so that after plaster, putty and primer, each layer dries well. If you stick the canvas on a damp surface, the wallpaper may come off in the corners. Also, do not ignore the recommendations on the packaging. Even if you have experience in repair work, you still need to study in detail the instructions on the packaging of glue and wallpaper. Operating rules may vary. The glue is applied unevenly. This is a common violation when, according to the instructions, glue must be applied to a wall or ceiling, and it is distributed over the canvas. Or when there is no roller, the glue is applied with a brush and gaps are obtained. It also happens that the adhesive composition was not allowed to absorb properly or that very little of it was applied. Wallpaper dries very slowly or too quickly. To prevent the wallpaper from peeling off, monitor the evaporation of moisture. It shouldn't evaporate quickly. When experts say that you should not open windows and doors to prevent drafts, you need to listen to this advice. If repairs are carried out in the heat, then windows facing the sunny side must be closed. Low temperature and high humidity in the room cause the wallpaper to dry slowly and subsequently develop blisters. Use of low-quality materials
Have you done everything according to the rules, but the wallpaper is still peeling off? Perhaps the reason lies in the use of low-quality materials? It is worth paying attention to the storage conditions and shelf life of building materials. To avoid purchasing low-quality materials, it is better to buy them in construction stores.
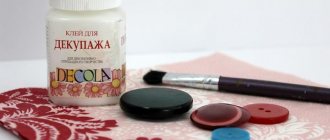
Stationery glue
At one point you may notice such a defect, as can be seen in the photo below.
The canvases at the junction diverged quite significantly. On the one hand, this is good, because this state of affairs will simplify the elimination of consequences. On the other hand, the larger part of the canvas has peeled off, the more glue will be needed to carry out the work. There is no point in completely re-gluing the canvases with a new portion of glue, since the situation will most likely repeat itself. The first step is to remove any remaining glue that might remain on the wall, and try to scrape off any grains of sand from the building material from the wallpaper. Next you will need the tool shown in the photo.
This is an ordinary stationery glue stick that can be easily purchased at any specialty store. After partial cleaning has been done, it is necessary to coat with glue not only the canvas, but also the wall itself at the junction, as shown in the photo below.
There is no need to wait a certain period for the glue to set; it is enough to smooth the treated area with your hand, as can be seen in the photo below.
The best option would be to use a special roller for canvas, which can be purchased at a hardware store. In addition, there is always the option of using a lint-free cloth. It will make it possible to quickly and without much difficulty remove air bubbles from under the material. The result will be as shown in the photo below.
Gluing the loose edges of the fabric
If the wallpaper has come off along the joining seams, then the situation is easy to correct. So, how to properly glue wallpaper joints:
| № | Repair composition | Application benefits |
| 1 | Glue used for basic work | For restoration work, it is best to use the same brand of glue that was used for the main work. But it is necessary to dilute the glue to a more liquid consistency. |
| 2 | Specialized ready-made liquid mixtures | If there is no previously used glue left, you can purchase a ready-made solution for gluing joints at a hardware store: the composition is sold in ready-made liquid form, in tubes and does not leave marks on the finishing material. |
| 3 | Paste | You can save your family budget by making homemade paste. It is possible to make a composition based on flour or starch. This method of repair will not leave marks on the wallpaper and will not turn yellow over time. |
Grouting joints
For plain canvases, you can use a method that will not only glue the joint, but also disguise it well. To implement your plan, you will need regular PVA glue and gypsum putty for walls.
The components must be poured into a small bowl and mixed together. The ratio should be 1:1. Mixing must be thorough so that there are no lumps left in the composition, as they will create problems. The photo below shows that you can use a regular spatula and a plastic container for mixing.
After you have achieved the required consistency, you need to carefully apply the composition to the joint. In this case, the wallpaper must be pressed against the wall and moved well together.
The photo above shows that the composition must be applied directly to the joint between the wallpaper, and a rubber spatula for grouting the joints between the tiles can be an assistant in this. After application, the composition must be given a few minutes to penetrate into the materials.
After this, you need to take a good cloth that does not have lint, moisten it and gently wipe the treated joint. The result will be perfect. If the wallpaper is plain, but not light, then you can add a pigment to the resulting composition that best suits the specific canvas.
Corner joint
In some cases, the wallpaper joint does not fall on the straight plane of the wall, but on the corner of the room. In this case, peeling may also occur, which creates an unpresentable appearance.
If we are talking about a fabric that is made on a non-woven base, then there is no point in using ordinary wallpaper glue to eliminate the problem that has arisen. Regular PVA glue will help solve the situation.
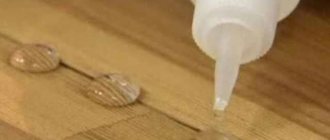
It is enough to move one or both parts of the wallpaper a little and coat them well with glue. It is convenient to do this from a bottle with a dispenser, as shown in the photo below. If you don’t have one in your house, then you can put glue into an ordinary syringe and squeeze it out along the edges of the canvases and onto the wall. Before pressing the wallpaper against each other and against the wall, you need to wait a few minutes for it to absorb and partially set. You can press down the corner joints with a rubber spatula, as in the previous version.
How to use
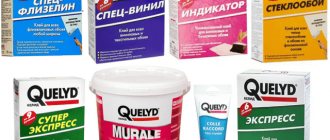
Finally, for comparison, I will give the cost of formulations from different manufacturers:
| PVA | Wallpaper glue | ||
| Brand | Price in rubles | Brand | Price in rubles |
| VGT 10 kg | 790 | Metylan 500 g | 250 |
| Tex 3 l | 250 | TEX for glass wallpaper 10 l | 800 |
| Optimist 2 kg | 230 | Moment “Vinyl” 250 g | 540 |
| Aquatica 3 kg | 180 | Quelyd for paper trellises 250 g | 150 |
Prices are valid for summer 2022.
Masking the joint
In some cases, after restoration of the wallpaper joint, its appearance leaves much to be desired. It is in such situations that it is quite easy to disguise it. The photo below shows how the raw joint between dark wallpaper looks.
To prevent the eye from constantly falling on a white or other stripe at the junction of the wallpaper, it can be quickly and easily removed by selecting the necessary pigment to match the color of the wallpaper. Water-based paint dyes can be used as a pigment, as seen in the photo below.
You need to choose the option that best matches the color. You can always lighten it by diluting it a little with water. Next, you need to place a small amount of dye on a suitable surface. After this, a spatula or knife is dipped into it, as shown in the photo below.
Next, with a gentle movement, the pigment is applied exactly to the joint between the wallpaper, as shown in the photo below. The seam seems to stand out even more after treatment, but this is easily resolved.
It is enough to take a damp cloth and simply wipe the place where the pigment was applied between the wallpaper and the result will be as seen in the photo below.