Hello everyone!) Not long ago I decided to try myself in a new field, repainting furniture. I have long wanted to update my home decor and redo a lot of things.
It was scary to start working on large or good furniture, since I had no experience, so while walking with a friend along the street, we saw an old Soviet table next to the garbage containers. We brought him home. And then it began...
It would seem that everything is as simple as shelling pears, take a brush and paint, but it wasn’t like that!!! I won’t get ahead of myself, but will tell you everything in order, or in a logical sequence. What paints should I use to repaint furniture? My experiments with different paints? What was the most difficult thing about this project? Where to look for ideas for inspiration? And much more…
When does coloring make sense?
After you take a closer look at the price tags in furniture stores, you begin to think about alternative ways to update your interior. A good way to update would be to repaint existing furnishings. There are several reasons why people think about painting furniture and begin to study the issue in detail:
- I would like to update the furniture in my dacha. Most country house sets are made up of outdated furniture of different styles and colors. The update will help bring all items to a single style, making the interior harmonious and cozy.
- It's a shame to throw away your old headset. Many sets left over from Soviet times are durable and can last for decades. But their surface has long lost its attractiveness, and the objects themselves look obsolete; Restoration and painting (possibly with a color change) will help extend their life.
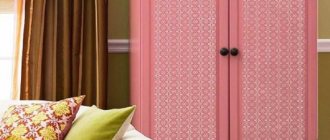
How to refresh an old item Source aviarydecor.com
- The house has an inherited rare wardrobe or retro chest of drawers. Antique furniture is valuable for its original appearance, often more refined than modern models, but its appearance is far from perfect. Skillful restoration will transform an old item beyond recognition and make it a decoration for any living room or bedroom.
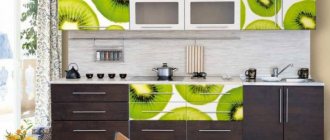
- You want to refresh the interior, but you are not mentally prepared for a full renovation. In this case, point changes are used. They often change the color of one wall, make it an accent wall, and purchase new textiles and lamps. An effective way would be to repaint furniture in a new, sometimes unexpected color: when a brown cabinet turns white or olive, the interior is transformed beyond recognition.
- I want to change my style. They resort to artificial aging of facades when they want to decorate the interior with vintage notes (for example, Provence or shabby chic). A chest of drawers or a wardrobe begins to resemble an antique thanks to a special painting technology. A decorative layer with noble cracks can be obtained in several ways.
Nightstand with aged effect Source luniqueblog.com
Advantages and disadvantages of furniture made from chipboard
To understand the nuances of repainting furniture chipboard for specific furniture, you need to know its pros and cons. All chipboard is made from sawdust and wood shavings, which are impregnated with formaldehyde as a binder. In the future, during operation, chipboard is capable of releasing formaldehyde, which negatively affects the environment and the human body, but the advantage of laminated chipboard is its top layer - a protective film that prevents the harmful substance from evaporating.
Laminated chipboard is quite resistant to mechanical and temperature damage and has a huge number of variations of different textures and colors. It can imitate the appearance of valuable wood, and you can put anything hot on it.
What we paint: getting ready for the process
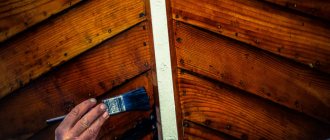
Before wondering how to repaint furniture a different color, you need to determine what material you will have to deal with. Solid wood furniture is quite rare; It is easy to paint a prepared wooden surface. The only problem that may arise after applying paint or varnish is the raising of pile. To prevent this, the coating is sanded after the first priming.
More often, Soviet-made items made from chipboard and MDF need updating. To work with them, you should stock up on a respirator, gloves, and provide ventilation. The direction of action is determined by the type of particle board:
- Painted. You can remove a layer of paint (as well as varnish) using a solvent; The procedure will take more than one hour, plus you will have to spend money on chemicals. There is an alternative cleaning option - a spatula and a hair dryer.
Fashionable white Source kammerat.co
- Lacquered. Repainting old varnished items is harder than any other. According to the technology, the varnish was applied in several layers, and its complete removal can take a lot of time. If the surface has scratches or other damage, it is much easier to polish it while maintaining the original color.
- Laminated. The technology for making furniture from laminated chipboard is used in modern production. The surface is covered with a polymer film, creating a durable and reliable layer. The process of restoring items made from laminated chipboard is very difficult; the coating cannot be completely removed, and there is a high risk of damaging the base material.
Fashionable black Source pinimg.com
- Laminated. The laminating process involves applying glue to chipboard or MDF, followed by pressing on decorative film, budget material on a paper or fleece basis. The paper covering is the most unreliable, it is not difficult to clean it, but in addition it is necessary to remove the adhesive layer. After stripping the glue, the item is ready to apply new decor.
- Veneered. Products made from chipboard covered with natural wood veneer are high-quality products and an alternative to things made from solid natural wood. The decorative layer is not removed, so restoration is carried out only with the help of stain and varnish.
Yellow as an interior accent Source foter.com
See also: Catalog of companies that specialize in paints and varnishes and related work
Required additional materials
Many families to this day keep cabinets with chairs passed down from the older generation, dating back to Soviet times, made so conscientiously that they are still able to perform their task normally. But they have one significant drawback - external “shabbyness”. In order to correct this annoying misunderstanding and finally update the appearance of the furniture, we suggest painting it yourself.
Tools and materials needed for painting furniture
In order for painting furniture with your own hands to be successful, you will first need:
- a product in need of updating;
- sufficient amount of paint;
- tape for painting;
- brushes;
- shallow container.
This is by no means a complete list. Before you start working directly, you need to treat the surface on which the paint layer will be applied.
Materials that will be useful in the process:
- putty;
- face protection (mask or goggles);
- a sufficient amount of sandpaper;
- wooden beam.
Surface preparation
The preparation process may require all or only some of the following procedures:
- Drying and removing mold. You can’t do without them if the old cabinet has spent many years in the barn; The paint will only adhere well to dry wood. If there are areas affected by mold on the surface, they are washed with water, dried, and then sanded. At the end, the tree is coated with an antifungal drug, covering neighboring areas.
- Processing of knots. This is a problem with almost any new wood. The knots release resin, which prevents the paint from adhering tightly. The resin is removed with a spatula; the knot area can be preheated with a technical hair dryer. Then the area is sanded with sandpaper and further treated with cellulose (or ammonia) solvent.
Sanding Source saymedia-content.com
- Removing the coating. If the old coating (varnish, paint) is partially preserved, it is sanded with sandpaper. If it is cracked or peeling, heating with a technical hairdryer followed by scraping with a spatula will help. The varnish can be pre-softened using a paint remover.
- Putty. It is needed to level the surface and remove chips and cracks. Use a special putty for wood (water-based) to fill the uneven areas. Then the application area is carefully sanded with fine-grained sandpaper.
- Degreasing. The wooden surface should not only be dry and smooth, but also frequent, without grease stains or traces of resin. Extraction gasoline or nitro solvent will help wash away dirt.
- Primer. It reduces paint consumption, preventing it from being absorbed into the wooden base, and at the same time improves the adhesion (adhesion) of the layers. Before applying the primer (a colorless primer for wood or drying oil is suitable), the surface is cleaned with a brush or vacuum cleaner.
Filling defects Source pitmebel.ru
How to paint a table a different color at home
Our Nakhodka, of course, was not in the best shape. In general, it was an old table, and well damaged.
Once upon a time it was a lacquered extendable table, which had folding tabletops on both sides. I have exactly the same one at home, only relatively intact; initially I wanted to repaint it. But then he appeared... And I couldn’t resist!) After all, the first experience helps to avoid mistakes in the future.
I advise everyone to start remodeling with something that is not so bad. And you will understand everything about the processes and will not be sorry if something goes wrong!
First, we wash this poor fellow and unscrew all the bolts from the torn out tabletop.
We fill the remaining holes and other chips or irregularities with wood putty, but I think you can use regular universal putty.
Let it dry according to the instructions on the can.
After drying, you need to go through sandpaper, first medium-grained, and then fine, to remove all the unevenness of the putty.
I also go over the tabletop with fine sand to make the top layer of varnish rougher and the adhesion to the paint to be more reliable.
Using a damp cloth, remove all dust.
I still had a deep penetration primer left over from other jobs, so I didn’t buy any special one. I used what I had. Blankets in two layers, with intermediate drying.
The best way to repaint furniture
The choice of paint and varnish products on the construction market is amazing. The owner of an old cabinet, deciding how to paint chipboard furniture at home in white (or any other) color, will first of all have to decide on the choice of composition.
You can use stain if you only want to tint the material (usually it is chosen for veneered furniture). The varnish is applied in two ways. Usually the varnish layer is the final one; it secures and protects the bottom decorative layer, making it resistant to moisture. Varnish, like wax, can be used independently; this helps maintain the natural wood texture.
Tinting Source pinimg.com
How to update and varnish furniture with your own hands
Preparing the furniture surface for work depends on the condition and type of wood, which can be new and untreated, old painted or varnished.
For wooden furniture, there are several main types of surface finishing: painting, varnishing, waxing or oiling.
How and with what you can paint furniture depends on the quality of the wood, the type of furniture and your preferences. Wood species such as mahogany, walnut, rosewood, oak, for example, do not need painting, since their surface has a natural beauty. But furniture made from simple types of wood, old painted or polished furniture can be refined.
For modern wooden furniture, painting and varnishing is quite suitable. Wooden furniture without finishing can be bought in specialized stores or made to order. To get started, you can use inexpensive furniture from IKEA. This is mainly pine furniture, which has recently been increasingly conquering the furniture production market. Conifers have a soft wood and are used in the manufacture of inexpensive furniture for finishing with staining.
See how you can update your furniture with modern and eye-catching furniture painting options in the photo:
Variety of colors
The color range of paints on the construction market is endlessly varied. If you cannot find a suitable shade, you can always resort to tinting, a technology that allows you to obtain the desired tone. Self-tinting is fraught with pitfalls: if there is not enough paint, it is almost impossible to reproduce the same shade.
When using different compositions, the surface type has different degrees of gloss: matte, semi-matte (satin, silky-matte), glossy. The following types of dyes are suitable for furniture decoration:
- Oily. The paint forms a dense matte layer on the surface, the shade is saturated. A significant disadvantage is the long drying time, coupled with an unpleasant odor that lasts for some time after drying. It is better to work with the oil composition outdoors or in non-residential premises.
Chair update Source ytimg.com
- Acrylic. Furniture acrylic paints are mostly matte, close to natural shades. For anyone wondering how to spray paint white chipboard furniture, water-based acrylic is the ideal choice. It will lie flat and dry quickly, without odor or health consequences. To paint laminated chipboard you will need a composition with increased adhesion, and you should not dilute it with water.
- Alkyd (enamel). Alkyd enamel is harmless, economical in use and does not turn yellow over time. The surface dries quickly and becomes glossy. If the furniture has metal parts, they will be protected from corrosion. Fresh paint has a specific smell.
- Latex (silicone). Water-based paint with artificial latex is environmentally friendly, UV-resistant, and dries quickly (within an hour). The composition is often used for the restoration of veneer furniture. The disadvantage is its high cost, as well as the need for careful surface preparation before application.
Coloring Source diy.obi.ru
Painting methods
All paintwork materials can be divided into:
- Decorative or finishing;
- Special purpose.
The former, in most cases, are endowed with protective properties. The second may have decorative properties, although they are intended for painting external wood surfaces. There are several ways to paint old furniture:
- Toning is painting antique furniture or any other style while preserving the structure of the wood. That is, covering the surface with a transparent, translucent composition;
- Complete repainting is the usual application of paint in several layers;
- Varnishing is the application of varnish to a newly painted surface or to an old base to create gloss.
To achieve a distinct wood pattern, it is better to treat the surface of the furniture with stain. There are many shades of this composition on sale, you can choose the most desired and successful one.
Toning
Varnishing
Painting
To create a plastic effect on surfaces, it is best to treat them with a thixotropic compound. It is a little difficult to work with, it has a viscous consistency, but you can still get the hang of it. Spray paint goes on smoother and dries faster. Step-by-step painting instructions:
- First you need to disassemble the object to be painted - remove the doors, pull out all the drawers, unscrew the handles. Cover with paper the areas that will not be painted. Do not forget to close the glass with mirrors if it is impossible to remove them from the furniture;
- Wash all parts thoroughly with warm water and a small amount of detergent. Allow to dry completely;
- Clean all surfaces with fine sandpaper and prime. Choose a primer to match the future shade. This way you can reduce the number of layers and save on the amount of coloring agent;
- After the primer has dried, go over the surfaces again with fine-grained sandpaper;
- Use a dry brush or household vacuum cleaner to remove dust and other small debris. It is not recommended to clean with a damp cloth, since small dust particles can get back into chips and cracks;
- If you plan to work with paint in a can, then before starting work, you need to cover the floor under the object to be painted and nearby objects;
- Open the window, since painting should be done in a ventilated area. Cover the open opening with a mosquito net or other similar material to prevent small insects from getting inside;
- If you plan to use paint in cans, you need to prepare a tray, brushes and roller in advance. Wide surfaces are painted with a roller, corners with a brush, small details with a thin paint brush;
- Leave the object until the first layer is completely dry, then apply the second. If necessary, you can apply a third one for a more saturated shade. But only after drying the second layer;
- These manipulations are also carried out with doors and drawers removed.
We make sure that all layers have dried well and put everything in its place, remove the masking tape or film. It is recommended to wait at least 8 hours before using repainted furniture.
Coating Treatment
Restoration of the coating
Removing the handles
We paint all coatings
We treat the surface inside
Attach the handles after drying
Finished work
Principles for choosing paint
An important selection criterion is the place where the furniture will be used. From this point of view, water-based compositions are chosen for home furnishings. They are harmless to health, resistant to abrasion, and the surface painted with them “breathes.”
They act differently if the restored sofa or armchair is planned to be placed on an open veranda. When considering different options for painting a chipboard chest of drawers white, the choice is made in favor of paints with high elasticity. Drying oil-based paints may be a suitable solution, but they take a long time to dry, and under the rays of the sun the oil layer may crack over time.
On the terrace Source pinimg.com
For furniture intended for outdoor use, other compositions with high elasticity are also suitable: alkyd-oil and alkyd. Water-based wood dyes are also intended for exterior use; they are environmentally friendly and preserve the integrity of the layer during changes in temperature and humidity.
Home furniture can be repainted using acrylic, oil or alkyd paint. A composition based on drying oil is affordable, but it is advisable to choose it for working in a vintage style. Based on the totality of its characteristics, acrylic paint is considered the best, and alkyd enamel surpasses it in terms of price/quality ratio and is therefore the golden mean.
Vintage chair decor Source in-stadtmagazine.de
What is chipboard
Chipboard is a special type of sheet construction and finishing material. The abbreviation comes from the full name: particle board. It consists of sawdust compressed under pressure and at high temperature, combined with special compounds (natural or artificial).
Chipboard is made from residues after wood processing. Use sawdust, small shavings, and so on. Sometimes non-commercial wood or re-grade wood is shredded.
How to paint correctly: secrets of painting and decor
Tips on how to repaint old furniture white step by step include all the important steps, from surface preparation and paint selection to painting technology. However, important little things that simplify the process and improve the result are often overlooked. The following tips will undoubtedly be useful:
- It is useful to stock up on several brushes of different sizes (thicknesses). It is convenient to handle large surfaces and decorative elements using a spray gun.
- The wooden surface is painted along the grain with smooth movements, the brush is lowered into the jar no more than a third.
- If there are fittings on the furniture façade (handles, locks), they are removed during painting or wrapped with mounting tape.
In the kitchen with a touch of Provence Source archidea.com.ua
- Aerosol paint is used uneconomically, for example, when painting a chair. But it is convenient to work with fittings or decorative elements. Color is applied to small details with an aerosol faster and more evenly than with a brush.
- Using spray paint and a stencil, you can apply a pattern to a wooden surface. For example, a plastic lace napkin is suitable as a stencil.
- Furniture in retro or Provence style can be decorated with decorative stucco molding made of polystyrene foam or polyurethane. The decor is attached with wood glue; paint the product after the glue has dried.
- Masking tape is a useful addition to the job. It will protect the already painted part from getting another dye.
Fittings are important for style Source mydecorative.com
Common mistakes
The result obtained may not coincide with expectations if errors were made during the work process. For example, to avoid cracking of a finished surface, it is necessary to use materials from the same manufacturer, which are most suitable for each other in their chemical composition.
Areas with gaps are caused by incorrect movements during painting. The hand and brush should move smoothly; it is important to ensure that weakly painted areas do not appear during the work. Drips occur when the paint is too liquid or applied in a very thick layer. Its consistency should be of moderate thickness. Furniture renovation will be as successful as possible if you take into account all the listed points and avoid them in your work.
Use materials of the same class=”aligncenter” width=”1920″ height=”1080″[/img] Move the hand with the brush smoothly The consistency of the paint should be of moderate thickness
Briefly about the main thing
You can give obsolete furniture a new life by painting it a different color. The method is also suitable if you want to change your boring interior without going into renovations. Before painting, furniture must be prepared and the type of surface determined.
Preparation is a multi-step process, and skipping its stages is highly undesirable. Different types of paint and varnish products are used for repainting. Stain tints the material, varnish and wax complete the process. The main composition, paint, is chosen based on its performance characteristics. To ensure that the paint lays evenly, surface defects must first be repaired and work in good lighting.
Ratings 0
Types of chipboard
Chipboard has several varieties. First of all, it is divided by area of application:
- Construction boards. Used for external and internal work. They are durable, moisture-resistant, protected from the development of fungus and bacteria. To obtain such slabs, special components are added to the chips. This material can be either polished or unpolished.
- Standard slabs. Suitable for indoor use, they are not treated to enhance their protective properties. Furniture is made from such chipboard.
- Special plates. Such material is required to satisfy all additional customer wishes. They can be fire-resistant and have enhanced protective properties.
Each type of work involves choosing a certain type of chipboard.
Paint or varnish application technology
Application of materials is carried out either manually or mechanically. In the first case, achieving high quality is difficult; considerable experience and skills are needed. You can manually renew the coating on country furniture, refresh household or auxiliary items. However, an even layer without streaks or drips can only be applied by spraying.
There are two types of spraying:
- air spray . Use a compressor and a special paint gun. The procedure is quite specific, requiring a separate room and well-organized working conditions;
- airless spray . This application method does not involve the use of a pressurized air jet, so the equipment required for it is much smaller. However, the technology has some limitations on the viscosity of the material and does not produce a thin layer.
Both mechanized methods require experience and skills. An untrained person will never be able to apply a neat layer without drips the first time. Therefore, before starting work, it is necessary to practice, as they say, to get better at it. No explanations will help here; you have to try it yourself, look for the optimal thickness of the torch, select the appropriate air pressure and viscosity of the material.
There are no universal recipes here, but you need to know the general requirements:
- each pass is made in a horizontal direction, along the entire length of the part, holding the gun at the same distance from the surface;
- the next pass should overlap the previous one by approximately 1/3;
- You should not try to completely paint the plane right away. It is better to do several thin layers than to apply a thick one. This will cause streaks that are very difficult to remove.
These rules are quite sketchy; real skill can only be obtained through practice.
Pros and cons of DIY furniture restoration
Before you begin restoring any piece of furniture, it is worth assessing the advantages and disadvantages of doing the work yourself. Let's figure it out - should you do it yourself, or entrust the restoration to a professional furniture maker?
A simple restoration can be done quickly and efficiently yourself
Advantages of doing the work yourself:
- Saving money. Firstly, you don’t have to pay a restorer for the work, and secondly, to deliver the furniture to the workshop, you may need the services of loaders and a truck.
- Possibility of control. You independently purchase all the necessary materials for furniture repair, and have the opportunity to carry out each stage of the work exactly according to the instructions, thereby obtaining a better result.
- Realization of your own ideas. The furniture will look exactly the way you want. If you wish, you can change or supplement the progress of work without coordinating the adjustments with anyone. So, it may seem to you that the resulting paint shade is not the best and the furniture needs to be repainted, whereas once you receive the furniture from the workshop, you will not be able to change anything.
Complex pieces of furniture are best left to professionals
Disadvantages of home restoration:
- Recreating the original shape of furniture, coverings or complex elements is best left to a professional craftsman. A beginner does not know many of the nuances, and when doing complex work for the first time, you may not guess correctly and ruin the furniture forever.
- Saving effort and time. Having handed over the furniture to a restoration workshop, you forget about it for a while, and then accept the finished result. If you do the repair or restoration of furniture yourself, then you will have to work on weekends or in the evenings - during the time allotted for rest. It may suddenly turn out that work will be a burden to you.
- Lack of space to work. When restoring furniture, you will certainly encounter wood dust in your apartment, the smell of various chemical compounds, and cluttered space. If possible, work should be carried out in a non-residential space - in a garage, on a loggia, in the warm season - on the street.
Many wood products have a strong unpleasant odor.
Advice! If you nevertheless decide to carry out restoration work in the apartment, allocate a separate room for this. All other furniture must either be taken out or covered with film or sheets. The floor should be covered with newspapers to avoid the appearance of permanent stains from spilled removers, varnish or paint.
Disposable protective covers for furniture can be purchased at hardware stores.
Ideas for remaking Soviet furniture for inspiration
Sofa in the hallway
A sofa from an old cabinet.
A small homemade mattress or soft furniture pad and a couple of sofa pillows will allow you to turn an old nightstand into a comfortable and functional sofa with space for storing shoes that will fit perfectly into the interior of the hallway.
Kitchenette
Children's kitchen from an old TV stand.
An eye-catching TV stand can be turned into a children's kitchen, which the growing housewife will surely like and will fit perfectly into the interior of the playroom.
Buffet
Stylish kitchen rack from an old sideboard.
Don’t rush to get rid of a bulky and, at first glance, completely inappropriate buffet. The new color and slate stickers on the doors will turn it into a stylish and modern piece of furniture that will fit perfectly into the interior of a modern kitchen.
Pencil case for toys
Redesign of an old pencil case.
A boring narrow pencil case is an excellent base for creating a bright, spacious rack for children's toys. To transform it, you will need white and bright paint, as well as wide decorative molding.
Banquette
Banquette from an old cabinet.
An old cabinet, painted in a light shade that refreshes its appearance, complemented by a soft quilted seat, will become a stylish and functional detail in a modern hallway.
Sideboard in a new way
Magical transformation of a sideboard.
White paint and replacing the wooden sashes with bright curtains made it possible to breathe life into an old sideboard that previously wanted to be thrown into the trash.
Shelving
Door shelving.
Old wooden doors can be used to create creative shelving for books and decorative items.
Decoupage cabinet
Decpage of an old cabinet.
White paint and simple pictures using the decoupage technique will help to transform an old, nondescript cabinet. The updated cabinet will fit perfectly into the interior of a modern kitchen and will become its unique detail.
Patchwork style chairs
Renewing old chairs.
New upholstery in the now popular patchwork style and painting of some elements made it possible not only to update the old chairs, but also to turn them into ultra-fashionable interior items.
Decorated chest of drawers
Transformation of a vintage chest of drawers.
A little effort, imagination and bright colors will allow you to turn your grandmother’s vintage chest of drawers into a bright piece of furniture that will become a spectacular interior detail and something to wow all your guests.
Table with drawers
The sofa has turned into a comfortable ottoman
Table on wheels
The dressing table has become a work table
The carved back was useful for a mini-sofa
Wardrobe-soldier
Coffee table
Worn chairs
All you have to do is change the upholstery and repaint the chair, and it will look like a creative designer has worked on it.
A chair forgotten at the dacha
Look how great it looks after the remodel.
Baushkin sideboards and buffets
Nowadays white furniture is very popular and looks quite stylish. So you can safely paint the sideboard, it will give it a second life! New modern handles will also improve the appearance.
If you are a fan of the shabby chic style, you can decorate your sideboard this way.
Cabinet Ideas
Budget option, but looks good.
Bookshelf from an old radio
Luxurious dark blue chest of drawers
The owner bought this chest of drawers from the 70s made of natural wood secondhand, paying only 300 rubles. Initially there were many cracks on it, and the veneer had defects. There were extra holes on the boxes that needed to be masked. The craftswoman wanted to get a chest of drawers in a deep color while preserving the wood pattern and scuffs.
The old varnish was removed with a grinding machine: careful preparation of the source is the key to a high-quality result. The defects were puttied and sanded, then covered with tinted glaze: 4 layers were required.
The legs and frames from the craft store were treated with walnut-colored stain. The total cost is 1600 rubles.
Black cabinet with engraving
The story of how this bedside table was remade is a complicated one: the owner found it in a landfill and several times wanted to take it back for “disobedience.” It took 10 coats of remover to remove all the varnish from the veneer! This took several days.
After applying protective oil, flaws were revealed, and the craftswoman partially painted them over. The owner was not satisfied with the result, so the cabinet was completely painted black. Only the legs remained intact.
Using a pencil, we drew a design on the door and drilled it out with a small drill with an engraver attachment. The result exceeded all expectations!
In order not to waste time on removing the varnish, you should sand the surface to a rough state, apply an acrylic primer and paint it with moisture-resistant paint in 2 layers. In this example, "Tikkurila Euro Power 7" was used. The top of the bedside table is covered with acrylic varnish.
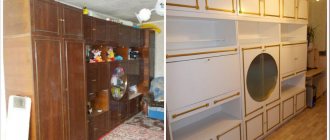
From the wall - into a stylish set
The owners of this brown “wall” took it to their dacha, and then decided to try their hand at remodeling it into modern furniture.
The chipboard covering was cracked and peeling off in places, so it was completely removed. The cabinet frames were dismantled and re-attached with Euroscrews. The parts were sanded, puttied and painted. The tabletops and legs were made from old boards, and the door layout was re-nailed.
Moldings were added to the front of the cabinet, making it unrecognizable. The result was three sets for different rooms: two bedside tables for the living room, a wardrobe for the bedroom and another set of three cabinets.
And here you can watch a detailed video about remaking a bookshelf from an old wall. The owners turned it into a TV stand.
Armchair
The famous armchair, which was found in most Soviet apartments, is again at the peak of popularity today. Owners are captivated by its convenience, simple design and frame quality.
The owner of this specimen used foam rubber 8 cm thick for the back and 10 cm thick for the seat, also adding two layers of synthetic padding. Upholstery fabric with the effect of furniture screed in lemon color was purchased at the store. Rounded shapes were created by bending the foam overlapping the edge of the back and seat, as well as by stretching it tightly.
To paint the frame, inexpensive matte white enamel “PF-115”, tinted with black, was used. Painting was done with a velor roller in three thin layers.
After drying, it is recommended not to touch the chair for about two weeks - this way the composition will polymerize completely and will be stable in use.
Reincarnation of the Vienna chair
This old beauty was found in a landfill. It did not have a seat, but the frame was quite strong. The new seat was cut out of 6 mm plywood, and the base was carefully sanded.
In the 1950s, such chairs appeared in many homes. They were made at the Ligna factory in Czechoslovakia, copying the design of the No.788 Bresso model, which was developed by Mikhail Thonet in 1890. Their main feature is bent parts.
The owner covered the chair with “Tikkurila Unica Akva” without applying a primer: this was a mistake, since the coating turned out to be fragile and now there are scratches on it.
The craftswoman advises using “Tikkurila Empire”, the most popular and reliable coating. The soft seat was sewn by hand: matting fabric, spunbond and 20 mm foam rubber were used. The edging is made from braided bicycle cable.
Soviet cabinet with painting
Another Soviet-made bedside table from 1977, which has transformed from a faceless object into a beauty with its own character. The owner chose a deep dark green color as the main color, which she used to paint the tabletop, legs and interiors, and covered the facade with white. The painting in a botanical theme was done with acrylic paints. The standard handle has also been replaced.
Today, vintage furniture is valued for its laconic design and legs, which give it an airy feel. Thanks to “raised” structures, the room appears visually larger.
New life for the sofa
You can repair not only small wooden objects, but also large items. This book sofa from 1974 was once reupholstered, but has worn out again. His mechanism broke and the bolts were bent. During the remodeling, the owner of the sofa saved not only the budget, but also the space: this model is very compact and takes up little space.
There is no foam rubber inside - only springs and a harsh canvas on a cotton backing, so the design is odorless. The frame is in satisfactory condition. The owner bought new hinges, a piece of furniture fabric and new bolts.
Thanks to the perseverance and patience of the craftswoman, the mechanism of the sofa was updated, and the soft part was reupholstered with new material. All that remains is to add a couple of decorative pillows.
Table makeover
Using the same technology, a banal coffee table can be turned into a modern piece of furniture. In this case, it was covered with wrapping paper. It is dense, adheres well and does not become limp when applying varnish.
Before starting work on decorating the tabletop, the legs of the old table and the edges of the tabletop were painted in a light color: this way it fits better with the new design style. Then the process of its transformation began.
When pasting, the panel is cut out significantly larger than the dimensions of the tabletop. It's necessary. The paper is glued to PVA and rolled with a roller so that there are no lumps or blisters. The surface must be absolutely smooth.
The paper is glued gradually, roll it with a roller so that there are no bubbles
After gluing, take sandpaper with fine grain (it is more convenient to work if it is attached to a block). By running it along the edge, they bend and at the same time separate the excess paper.
How to make a beautiful edge
Even cutting with a guillotine will not give you a fairly even edge. And with this method, it turns out professionally designed. There is no smell of amateur activity.
This is what the edge looks like when all the excess has been removed
After the glue has dried, the surface is coated twice with a thin layer of varnish. It should be applied with a soft brush in a small amount. Layers are applied in different directions: first along the long side, then across.
Bright bookcase
The owner decided not to sand this bookcase - she just primed it with Tikkurila Otex. The wooden lattice and overlays on the facades were made in a carpentry workshop from 6 mm and 3 mm plywood. The overlays are glued to the "Moment Joiner".
The outer sides and fronts are painted in Tikkurila blackboard color. Orange and turquoise coating – “Luxens” for walls, protected with colorless wax “Lliberon”. The back wall is covered with wallpaper. The handles are an old IKEA collection.
Boho nightstand with ornament
To repaint an ordinary vintage bedside table from Avito you needed:
- White paint "Tikkurila Empire".
- Aerosol paint color “rose gold”.
- Masking tape.
- Small foam roller (4 cm).
The author marked the drawing with masking tape and glued it, pressing it tightly to the doors. I painted it white using a roller in three layers. Allow 3 hours between each coat. After the third layer, I waited 3 hours and carefully peeled off the masking tape. I unscrewed the legs, protected them with tape, leaving the tips, and spray painted them. I collected it after it was completely dry.
Remaking furniture is always an interesting and creative process. Things updated with your own hands acquire their own history and add soulfulness to the interior.
What materials and tools are needed?
Of course, the exact set of tools will depend on the piece of furniture you will be restoring. But there is a universal list of tools that come in handy during work. So, in many cases it is more convenient to use an electric tool rather than a manual one, so it would be advisable to borrow such devices from friends in advance or even rent them.
Professional tools not only save effort and time, but also give better results. Those planning furniture restoration may need the following:
- jigsaw;
- grinding (orbital) machine;
- a screwdriver with a good long-lasting charge;
- construction hair dryer;
- a powerful construction vacuum cleaner (to prevent dust from spreading throughout the room).
Popular models of construction vacuum cleaners
Achieving a smooth surface by hand is time consuming and difficult, so it is better to use a grinder
Advice! In addition to large tools, you will also need smaller accessories: brushes and rollers, spatulas of different sizes, sandpaper of different grits. Do not forget to purchase protective durable gloves, as well as a respirator that will not allow toxic fumes of varnishes and paints to enter the respiratory system.
In addition to tools for restoration, consumables are also needed - all kinds of removers for varnish surfaces, furniture wax, sealant or wood putty (compositions that fill cracks or chips), as well as paints and varnishes: enamels, paints, waxes or impregnations.
The modern market offers hundreds of types of finishing coatings for furniture
Note that furniture finishing can be purchased without any problems in any store, but restoration accessories (special pencils, adhesives, furniture edges) are best looked for on specialized online sites.
In addition, on advertisement sites in your city you can find a seller of the material you need - often people sell surplus or goods that do not suit them in color or texture.
Almost any furniture product can be ordered in the online store
Restoring polish
It is more difficult to restore varnish. Work begins with cleaning and degreasing. Furniture is washed with detergent, rinsed with water and wiped dry. Apply an iodine solution to minor damage to dark furniture until the desired shade is obtained. You can use a marker.
For deep scratches, make mastic: mix 3 parts of turpentine and 4 parts of melted wax. The paste is rubbed into the furniture using a soft cloth. When purchasing wax, they take into account what work needs to be done. For small scratches, a wax pencil is sufficient. For large chips you will need a paste composition. The material is applied with a spatula and rubbed into the wood with felt.
Brown shoe polish is also used to fill defects. They smear it on the wood and then polish it with a cloth.
Stains from furniture are removed with clean gasoline. For severe contamination, treat 2-3 times. Polish the wood until it shines. A composition of denatured alcohol and linseed oil will also help restore gloss.
Stains from hot drinks or dishes are removed with alcohol, wiping the area 2-3 times. Renew with flax oil, and remove with a mixture of alcohol and drying oil. Rub until the stain disappears. Remove fat with an alcohol solution.
Composition options for restoring tarnished furniture:
- Flax oil, vinegar, turpentine (2:1:2) are combined and lubricated on the surfaces until the mixture is absorbed.
- Beer is boiled with wax, cooled and rubbed on furniture.
- Rub with beer and oil, mixing the components in equal proportions.
Advice! Wax is purchased for external use. It has water-repellent properties, hardens quickly and does not fade in the sun.
What kind of work do we do?
- Restoration of Italian furniture
- Restoration of lacquered furniture
- Restoration of kitchen facades
- Restoration of luxury furniture
- Repainting of any carpentry: doors, cabinets, tables, chairs, shelves, etc.
- Repainting IKEA products
- Restoration of acoustic systems
- Elimination of defects, replacement of paint and varnish coating, application of decor
Factory quality, huge selection of shades and special effects.