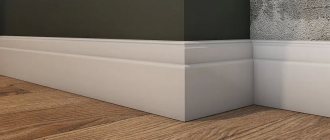
New materials are gradually replacing traditional and familiar ones. But to work with new ones, new knowledge is needed. “At random” you don’t always get a decent result. Before painting a baseboard made of foam plastic, polyurethane or duropolymer, it is worth finding out what paints are compatible with them, how and when it is best to apply it.
Foam plastic, polyurethane, duropolymer - all these are materials for the manufacture of ceiling and floor plinths. The cheapest, but also the most unreliable is polystyrene foam. Unreliable in the sense that it does not withstand static and shock loads well. It also has a loose surface, on which the “balls” of which it consists are visible. The color is not perfectly white, with a grayish or yellowish tint. So they always paint it, even if they are planning a white baseboard.
Painting polyurethane baseboards: you choose the style yourself, but the technology changes little
The other two materials, polyurethane and duropolymer, are much more expensive, but also much denser and stronger. Their color is white, but it is still recommended to paint them, because when exposed to sunlight, the original color changes for the worse. And the seams under the paint are less noticeable, but you can’t do without them. Duropolymer is a new material and is still not widely used, so polyurethane is more often used. And further we will talk specifically about this material, although everything that has been said can be applied to other types.
Features and technology for installing ceiling frames
In the interior of a room, the design of the ceiling is no less important than the walls and floor. Its decor can be different - whitewashing, painting, suspended and tensioned structures, but skirting boards give the ceiling surface a holistic look
They not only hide the joint between the two surfaces of the room, they beautifully decorate the corners, their purpose is to emphasize the decoration of the room, organically completing its design, as demonstrated in the photo below.
Products made of polyurethane can have different sizes, relief and even imitate stucco in appearance. In the interior of the room they can be combined with other elements from this material.
An example of a well-chosen polyurethane ceiling plinth, photo
In addition to standard rectangular joints, non-standard shapes are often used when finishing premises - oval, round and combined. In this case, wooden and foam baguettes cannot be used; they will simply break. The only way out is flexible polyurethane fillets.
Application of flexible polyurethane ceiling plinth in the interior, photo
But this is far from the complete scope of this product. Ceiling plinth made of polyurethane is convenient for decorating bay windows, columns, and multi-tiered ceilings of complex shapes.
Beautiful frame of a suspended ceiling with lighting
Product installation
Before purchasing a polyurethane ceiling plinth, you must correctly calculate its quantity. To do this, divide the perimeter of the room by the length of the plank and take 1-2 pieces. in reserve.
To install the product you will need the following materials:
- tape measure and pencil for marking;
- knife or miter box;
- glue, sealant.
The polyurethane ceiling plinth is fastened using glue, similar to foam products. The surface is first cleaned of dust and dirt and treated with a primer for better adhesion of surfaces and protection against fungus.
Tip: experts recommend installing ceiling moldings before wallpapering (so that the finish can be easily changed).
Preparing surfaces before installing ceiling fillets
The first step towards gluing a polyurethane ceiling plinth is marking. To do this, apply one plank to the corner of the wall and make pencil marks on the ceiling and wall in increments of 10 cm. The same marks are placed at the joints of the baguettes and on the baseboards.
Marking
Next, the necessary elements are cut, because the polyurethane skirting boards on the ceiling are joined at an angle. How to cut fillets? To do this, use a stationery knife or a special device - a miter box, which allows you to cut the plank at the required angle (usually 45 or 90 degrees).
Tip: When cutting wide fillets, you will need an assistant to support the long fillet.
Slicing a baguette using a miter box
Next, the fillets are glued: one side attaches them to the wall, and the other to the ceiling. Laying skirting boards begins from the corner of the room. Glue is applied to the inside of the plank, then the product is pressed tightly against the wall so that the part sets.
Polyurethane strips are glued not only to the wall, but also with their ends together
Recommendation: excess glue can be removed with a damp sponge.
After installing polyurethane ceiling skirting boards, all gaps between them and the surfaces of the wall and ceiling will be filled with sealant.
Sealing fillet joints
Additional processing of the ceiling plinth - painting
After installing the product, the question arises: how to paint polyurethane skirting boards? But this event requires some preparation. Before painting the polyurethane baseboard, its joints with the surfaces should be puttied. In the corners and joints of the planks, they are cleaned with fine sandpaper and coated with a primer; this is necessary so that the paint does not roll off. After which you can start painting. Water-based or acrylic paint is used for this. It can be matched to the color of the ceiling or walls, or be neutral white.
Tip: if the fillets have a beautiful relief, then their details can be emphasized with bronze paint that imitates gilding. However, in this case, similar golden decorative elements should be present in the interior of the room.
The paint is applied with a brush in two layers
More useful tips on the topic of polyurethane ceiling plinth, installation - video:
Do I need to paint polyurethane baseboards?
Before choosing this or that paint and deciding on the method of applying it, it is a good idea to understand the importance of painting polyurethane skirting boards. Finishing masters believe that:
These arguments support the decision to paint the finishing elements of the ceiling, walls and floor.
How many layers of paint
How many layers of paint are needed when painting polyurethane or duropolymer skirting boards? In general, it depends on the color you will paint, and also on the paint. See the paint description for details. There is both the exposure time between coats and the recommended number of coats.
Paint in several thin layers
In general, if you want to make white skirting boards, then it is enough to apply one or two layers to the white material. Three or more passes may be required to achieve a dark color. But let’s say right away that taking “more” paint is not an option. There will be puddles and streaks. They will need to be sanded off and painted again. So it's better to apply many thin layers.
When using a brush, it is better to apply layers in different directions. The first is along the baseboard, the second is at an angle or across, the third is again along. This will create a more uniformly painted surface without any gaps in the base or bald spots.
Dyeing process
If work is carried out before gluing or together with painting the walls and ceiling, it is convenient to use a spray bottle. The spray gun is held at a distance of about 30 cm and the paint is sprayed, slowly moving along the baseboard. If painting is carried out before installation, the baguettes are laid out on a horizontal plane, supported by newspapers, a rag, construction film, etc.
If the molding is already installed, you will need to protect the walls and ceiling from drips and splashes. To avoid staining them, apply masking tape along the fillet (top and bottom). The tape is removed when the layer is slightly (but not completely) dry.
The second option is to cover the surface with a wide spatula, cardboard or thick paper. I put the protection on top and paint the baseboard up to about halfway, then move it down and cover the remaining part. You can do it in reverse order.
Smooth fillets are painted with a wide brush. For embossed ones, use narrow foam rollers. The material fits all the depressions and covers the surface with an even layer. If you are unable to reach small indentations, a thin brush will help.
In both cases, it is recommended to apply the product in two layers (with a break for complete drying). This way the color will be uniform and nothing will show through.
Why is the material popular?
This is largely due to:
- Resistance to external factors and long service life: if you treat this type of skirting boards with care, it will retain its original appearance for at least 25-30 years. In addition, during its entire service life you will not see that the baseboard is susceptible to water/steam, and also does not absorb odor and is very convenient to clean. Such skirting boards are used in the bathroom, as they can withstand high humidity very well.
- Because it is not sensitive to temperature changes, which means it is perfect for rooms with many heating devices. Thanks to heating, it does not deform, retains its original shape and does not dry out.
Important: if you need to decorate a place located next to the fireplace with a plinth, you should use a polyurethane plinth
- Convenience and ease of installation. The material is flexible and flexible, so installation does not require much effort, and you can do it even without outside help. You can also create protrusions and uneven planes, which complicate the work when it comes to simple baguettes. Fitting and cutting is easy and doesn't take much time.
- Installation does not require complex and expensive tools. A sharp knife will do just fine, and when you have secured everything, you can paint the baseboard with any paint - be it acrylic or water-based.
- Easy to care for. Cleaning in this case will be limited to washing only. Since this material is resistant to chemicals, polyurethane will not react with any detergents and will be cleaned without the risk of damaging color or texture.
- A huge selection is another plus. The market is rich in offers to fulfill any whim. These skirting boards differ from each other in texture, color, width and can complement any interior.
Useful tips
There is nothing complicated about painting the ceiling. However, the experts give some useful tips that will make the job easier.
When working, it is recommended to follow them:
- Before starting work, you need to test the paint on unnecessary tiles: whether the shade is suitable, whether it fits well. Several layers are also applied to check. This will help you evaluate the final color.
- If necessary, the color can be diluted with water or the desired shade can be mixed from 2 or more colors.
Using a spray gunSource kraski-net.ru
- It is best to paint three-dimensional elements with a brush; you can also use a dishwashing sponge or a spray gun. The latter will not only save time, but will also allow you to complete the job with the highest quality possible.
- It is necessary to apply at least 2 layers of paint, if it is water-based, then 3 layers.
- When the last layer has dried, the work must be checked using a bright lamp or powerful flashlight. The entire ceiling should be evenly painted, without bald spots or excess paint.
- Waterproof paint can subsequently be washed with a damp cloth, non-waterproof paint can be cleaned with a vacuum cleaner or soft brush.
- If paint accidentally gets on clothes or a surface, it can be removed with warm water in the first half hour. If it has dried out, you will need a brush and chemicals.
Otherwise, there are no difficulties in painting the ceiling.
Watch the video to see what the ceiling looks like before and after painting:
The procedure for eliminating irregularities at joints
After completing the installation of the plinth, it becomes necessary to eliminate irregularities and defects that often appear at the joints and in the corners. For this you will need:
- spatula (you can use a flexible plate);
- acrylic sealant;
- brush;
- water-based paint.
To eliminate and smooth out unevenness, use acrylic sealant, which, in order not to damage the surface of the baseboard, is applied using a small spatula or a flexible soft plate made of plastic or cardboard. At the junction of planks mounted on a flat surface, the sealant is applied from top to bottom along the seam, as a result of which the difference in levels will not be noticeable. In the corners it is better to apply it with your finger.
To apply acrylic sealant, take a sponge and a container filled with water so that you can wash your hands that are stained with it or soak it. This material is easily washed off, which greatly facilitates working with it. According to the instructions, the sealant, regardless of the manufacturer, dries in about 2 hours, and finally hardens within a day.
What paint should I use?
The choice of coloring agent is quite serious, because contact with any solvent threatens to completely dissolve the polyurethane. So what paint should you use to paint polyurethane baseboards? Masters clearly believe that coloring raw materials should be chosen with a water base.
Such paints for polyurethane skirting boards are:
- Acrylic - odorless, absolutely harmless to health. Painted ceiling surfaces have a matte tint, which gives a resemblance to gypsum stucco. The products are easy to clean and resistant to changes in room temperature. Of particular importance is the preference for this type of paint due to its long service life, low cost, and resistance to damage.
- Latex - have excellent resistance to moisture and mechanical damage. In addition, decorative elements made of foam plastic acquire a glossy surface when painted, which looks quite attractive.
- Silicone - have all the same characteristics of previous paints, plus the additional property of repelling dirt.
Adviсe
A few tips will help you do all the work quickly, efficiently and with the least risk of making mistakes:
paint from cans goes on smoother, so it is recommended to use it; if paint gets on the wallpaper, it is important to remember that the water-based type of composition is easiest to remove; work must be carried out only using high-quality materials, otherwise the skirting boards will quickly lose their beautiful appearance; the roller is used only for painting wide baseboards;
The roller can be used to paint wide baseboards
- only if several layers of paint are applied will the coating be of high quality;
- if the color of the plinth matches the shade of the walls, then the height of the ceiling will visually increase;
- if the color of the baseboard matches the shade of the floor, the room will look more voluminous;
- You can’t rush while doing the work, otherwise you can get everything dirty and ruined.
Don't rush when painting
The job of painting skirting boards is not the most difficult, but it requires special attention. Otherwise, there is a risk of hopelessly ruining the materials and appearance of the room.
Therefore, there is no need to rush, and it is important to apply the paint carefully and carefully.
Briefly about the main thing
Foam ceiling tiles are increasingly being used in renovations. It is available in 2 types - laminated (it can be painted only after a few years) and for painting (it must be painted immediately).
Polystyrene foam can only be painted with water-emulsion paints. The rest may damage the material or burn it.
Painting the slabs is easy: a roller is suitable for large and straight surfaces, and a brush or spray gun is suitable for corners, crevices and volumetric elements.
It is recommended to prime the surface before painting. This will improve the quality of the color layer and enhance adhesion to the plates. The paint itself is applied in several layers.
Installation of ceiling plinth, photo and video instructions
Agree, the absence of joints significantly improves the appearance of the plinth
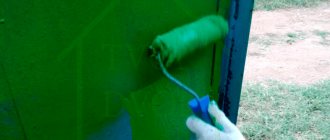
- Wooden products without a protective coating are very susceptible to moisture. Therefore, they also need to be painted, and if you like the structure of the wood, you can use stain or varnish - this way you can emphasize the wood grain and make this part of the finish even more attractive.
- And finally, the color of the baseboard does not always match the rest of the surroundings, which is why it needs to be given one shade or another. Moreover, you can paint the product either to match the main surface or in a contrasting color - in some cases it looks very good.
Most often, the floor plinth for painting made of wood is covered to match the floor covering
Important! In order for the result to be not only beautiful, but also reliable, you should select a paint that is most suitable for a particular type of material. There are not many options, so you can easily choose the right composition
Compositions for polystyrene foam products
The most commonly used types are:
- Regular water-dispersion paint is suitable for surfaces made of polystyrene foam and polyurethane. The advantages include low price and ease of operation. What paint to paint polyurethane ceiling plinth? But the coating is not resistant to water, so you cannot wipe it with a damp cloth, which is not very good.
- A more progressive option is acrylic-based water-based paint. This composition is the most popular due to its many positive properties and fairly reasonable cost. The surface can be wiped with a damp sponge, which allows you to maintain the brightness of the color for many years.
- If the surface is exposed to changes in humidity or will be used in the bathroom, kitchen and other similar rooms, then the best option is latex paint. It reliably protects the material from moisture, is easy to clean and does not lose its color brightness for many years.
- A more progressive option is silicone-based compositions, this is a new type of product that has the highest properties of resistance and durability, their cost is high, but you can make a very durable coating with your own hands.
- If you have installed a floor plinth to be painted from LDF (a special wood fiber material), then all of the above options are also relevant, but it is still better to use a more wear-resistant composition - alkyd paints, which are resistant to abrasion and damage and can last for many years.
Solutions for wood-based products
Important! Many manufacturers sell baseboards that are initially coated with a primer and are intended to be painted. This will save time on preparatory activities and immediately begin applying paint.
LDF plinth is initially covered with white primer
For wooden plinths, alkyd-based stain or varnish is very often used; these compounds can reliably protect the wood, but do not cover, but even emphasize its structure. If desired, you can choose a colorless option, or you can darken or whiten the wood.
Using stain you can reliably protect the surface
If wood needs to be painted over, it is better to use alkyd-based compounds. You should not use oil paint - it takes a long time to dry, emits a strong odor and is not very durable.
Another frequently asked question is, is it possible to paint plastic skirting boards? This material has a smooth structure, so it is better to use aerosol formulations for it, since the brush leaves streaks and stains. Any acrylic-based paint will do; you can purchase it at any hardware or auto store.
When is the best time to paint polyurethane baseboards?
According to the technology, skirting boards are installed after the finishing of the walls is completed, the flooring is laid and the lining of the doorways is installed. This is exactly what they usually do. But when to paint polyurethane baseboards (before installation or after) is a question. After all, during the installation process you will putty the joints and gaps between the wall and the baseboard. Then the putty is sanded so that the joint is invisible, then everything is painted. So it’s more logical to paint after installation and putty.
But if you are installing models with ornaments, it makes sense to paint everything at least once before installation. As already said, the brush is simply too inconvenient. And also at the floor level there are generally a lot of difficulties. So, first of all, we paint a plastic, duropolymer or polyurethane plinth with an ornament on a horizontal surface.
The main advantages of consumables for finishing ceilings made of foam plastic.
Ceiling fillets made of foam plastic are by far the most common consumable material. Unlike other products used for these purposes, foam cornices are installed at the very end of finishing work. In addition, in addition to installation, you will also have to paint the ceiling skirting boards. We'll figure it out a little later whether this is necessary. First, let's look at what foam fillets are and what their main features are.
Today, polystyrene foam for finishing work is a real lifesaver. By spending a minimum of money, you can achieve high quality ceiling design. Why? The thing is that foam curtain rods have the following advantages:
- striking resemblance of the material to natural gypsum stucco;
- light weight of products;
- with appropriate processing, the material becomes durable and resistant to external influences;
- simple and convenient installation;
- high performance characteristics of foam products.
Compared to other types of consumables, ceiling plinth made of foam plastic significantly reduces the cost of finishing work. The budgetary side of the issue in this case is fundamental. When it comes to ordinary, simple ceiling finishing, polystyrene foam cornices are the most acceptable option. Consumables are glued with regular glue to the prepared areas, while at the same time closing the joints and adding the necessary aesthetic properties to the upper part of the room.
Note: do not underestimate expanded polystyrene. The scope of application of foam baguettes and cornices is quite wide. You can use such consumables even in combination with hanging systems. For suspended ceilings this is convenient and practical. Foam cornices and plasterboard ceilings are a fairly common combination of finishing materials in residential premises.
We select materials and prepare the work site
Features of joining ceiling plinths
For each type of profile, you need to select a specific type of composition. The choice of paint for skirting boards depends both on their purpose - floor or ceiling, and on the material from which they are made.
What composition should I choose for coloring?
For painting wooden floor moldings. as well as MDF baseboards for painting; any alkyd enamels, impregnations and varnishes, and oil paints are suitable. Under the varnish, you can additionally treat the moldings with tinting or antiseptic impregnation. The decision about what color to tint the baguettes is made depending on the interior design or the tone of the doorways. What paint to paint a wooden ceiling plinth? The answer is simple: the same materials are suitable as for the floor.
And now about how to paint polyurethane baseboards. This material dissolves when white spirit and other solvents similar in composition come into contact with it. Therefore, the base of the composition should be water-dispersion or acrylic. Painting of ceiling plinths made of foam plastic and duropolymer is carried out with the same compositions.
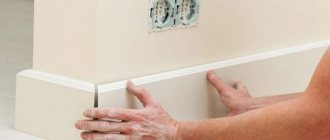
Preparing for work
The first thing you need to do before painting a foam baseboard, or any other one, is to protect the surfaces adjacent to it from getting the coloring compound. The floor is covered with cellophane or newspapers, which are then attached flush to the baseboard with masking tape. Only adhesive tape is applied to the walls. If wallpaper has already been hung, then prepare a strip of plastic or a wide spatula that can be used to cover the wall where the brush will go. The following photo shows an example of such protection.
How to paint a floor plinth without staining the walls: a wide spatula or a strip of plastic will help protect the finish
We do the same with ceiling moldings: where possible - masking tape, in other places - an auxiliary object
We pay special attention to the protection of suspended ceilings. When the tape is pasted, apply pressure along its entire length with a narrow spatula so that the material sticks more tightly to the surface.
This way you will protect the ceiling from pigment leakage.
If painting is done before installing the baseboard. then we skip the previous stage. Next, we inspect the moldings for any defects on their surface. Before painting a wooden baseboard or MDF, we repair any damage found using special wax. Defects on baguettes made from other materials can be eliminated with a putty mixture. It is better to prime polyurethane baguettes before painting, as they have a rather porous surface. The pigment will lie smoother after priming.
Preparing the floor plinth for painting
How to paint ceiling plinth. The video contains detailed instructions on how to properly prepare for painting skirting boards that are installed under a suspended ceiling.
Let's get started
If your moldings are wide and straight, it's a good idea to start painting them with a small roller, like in the next photo. The ends are then finished with a narrow brush. We go over embossed baseboards with a regular brush. By the way, it should be tightly stuffed, with elastic pile that does not diverge too much to the sides: this way the work will be more accurate.
How to paint ceiling and floor plinths: use a roller and brush depending on the situation
If you want to apply a gold or silver patina to the relief of the baguettes, then you need to proceed as follows:
- Using a regular brush, apply the base color to the baseboard.
- Dip a narrow brush into gold or silver pigment and wipe almost dry.
- Using light movements, barely touching, we paint the protruding relief.
Instead of an ordinary brush, you can use a special one with a foam tip to apply patina.
How to paint a ceiling plinth with patina
Please note: when applied to the baseboard, the composition must be “stretched” over the surface as best as possible. This will help avoid brush marks.
Another way is to dilute the composition a little. The composition will apply much more evenly, but it will not cover as well, so we apply diluted paint in 2-3 layers.
2018 construction. The information published on the portal is for informational purposes only. All copyrights to materials belong to their respective owners
Staining technique
Usually, self-taught craftsmen do not know how to evenly paint skirting boards, and do it on a whim. Meanwhile, white acrylic coatings are sold, which can be painted with special colors that have all the colors of the palette. You can mix several colors to achieve the desired shade. The color paste is added to the paint and mixed thoroughly. Also, construction supermarkets have long installed special tinting machines that will help you choose the required shade.
If you plan to paint glued fillets, you can use both paint in cans and paint in spray bottles. But spraying is recommended to be used only if the walls and ceiling have not yet been completely finished. The only drawback of canned paint is that it is impossible to change its color. Therefore, when purchasing ceiling plinth wholesale in Moscow, you need to immediately take care of purchasing the required amount of paint of the chosen color.
After choosing the main color for the ceiling moldings, the surfaces need to be prepared:
- Fill with fine-grained finishing putty. To do this, use a rubber spatula with a blade width of 2-4 cm;
- Instead of putty, you can work with colorless or white silicone-based sealant;
- Water-based paints adhere unevenly to the surface of plastic. You need to prime them first.
- Polystyrene foam is difficult to paint, so first the surface of the cornice must be primed. Primers are made on an acrylic or latex base in the form of solutions of aqueous emulsions. The primer layer clogs the pores and crevices, reducing the consumption of paintwork materials, which will lie smoothly and evenly on the primer. Protective substances are applied with light pressure with a spatula or brush - from top to bottom, so that both primers and mastics fill the cracks and dents. When working with your fingers, wear rubber gloves, as the substances can be aggressive. Excess sealant or putty is removed with a damp sponge or cloth;
- In the same way, corner joints and gaps between the wall, ceiling and molding are covered. The dried putty is sanded with No. 0 sanding paper. Next, the ceiling plinth for suspended ceilings is cleaned of dust and coated with a primer.
There are several options when it is better to paint polystyrene foam molding:
- Before gluing. The disadvantage of painting fillets that have not yet been installed is that you can make mistakes when cutting moldings to size, and this will force you to make new expenses and buy additional skirting boards;
- After installation, but before the walls are wallpapered or painted;
- After finishing the decorative finishing of the ceiling and walls of the room. The disadvantage of painting fixed baseboards is that working at height on a stepladder is not only inconvenient, but also dangerous. In addition to these inconveniences, all surfaces will have to be protected with tape or masking tape.
There are no strict instructions on this matter - do what is most convenient for you. But the optimal solution would be to choose point No. 2.
Advice:
To give the surface of the cornice a patina effect, use a glaze of the “Taire” color. It is applied to the baguette in an even thin layer. The middle part of the surface is not painted, but the joints of the painted and unpainted surfaces of the molding are shaded with a sponge or cloth, and the top layer of glaze is removed. This simple design technique makes the relief brighter and lighter, deeper relief patterns - richer and more contrasting. Next, use “Umber” glaze to shade the remaining relief, and use a brush to enhance the main color of the baguette.
To prime or not?
In general, water-based paints adhere well to polystyrene foam and polyurethane, but it is better to try a specific paint. If it “doesn’t stick”, rolls off, or appears in spots, it is better to coat it with an adhesive primer. Take the composition according to the selected type of paint. Read the description carefully: what surfaces can be applied to. Polystyrene foam and polyurethane are rarely indicated, but if plastic is mentioned, the composition is suitable. Then everything is simple: apply a thin layer of primer to the baseboards with a brush before installation and wait for it to dry. Then they go according to the chosen scenario - either installation and then painting, or painting-installation-painting.
It’s easy to paint a primed duropolymer floor plinth
As an economical option for primer, you can use slightly diluted PVA glue. But only the glue must be “fresh” and of normal quality.
Duropolymer can be primed or unprimed. If you bought it unprimed, the paint usually doesn’t adhere well. Primer compositions for ordinary materials, by the way, too. Automotive primers for plastic work well. It is better to take them not in a can, but in a jar and apply them in a thin layer with a brush. The primer itself “sticks” well, and after it dries the paint also lays down smoothly.
Installation of fillets
As we have already said, installing PVC ceiling plinth is a completely doable task even for a novice master. In most cases, such cladding is attached to a pre-assembled sheathing made of CD and UD profiles or wooden blocks. At its core, the plinth is a starting profile.
Scheme of installation of the structure.
Some sources say that profiles can be attached to perfectly flat walls or ceilings without lathing. This is true, but it makes sense to do such work on a base made of wood or plasterboard. It will take you a lot of effort, time and several Pobedit drills to fix the starting profile on the concrete floor slab every 150 mm. It is much easier to fill the crate here.
When it is ready, you can begin installing the baseboard itself. On both monolithic and split fillets, one of the sides of the end starting groove is several millimeters wider than the main structure. This allowance is made for attaching the baseboard to the base.
Fastening with a self-tapping screw to a metal profile.
The plastic fillet is attached to the sheathing of metal profiles using small metal screws. If the base is made of wood, then it is more convenient to use a construction stapler for fixation. Although, in the absence of one, you can use wood screws.
Beginning craftsmen often have difficulty cutting skirting boards in internal and external corners. To create a right angle, both adjacent plinth strips are cut using a miter box at an angle of 45º. Of course, plastic can be cut with a knife, but to ensure everything is accurate and neat, it is better to use a hacksaw.
Miter box for cutting corners.
But now there is simply no point in bothering with cutting corners on plastic PVC fillets. For these purposes, special fittings are produced, and the bar itself is cut at an angle of 90º and inserted into the groove of the adapter. This is incomparably faster than measuring and cutting profiles, plus such connections are guaranteed to have no distortions or cracks.