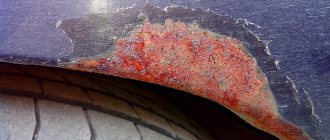
Blistering of the paintwork on a car body is a fairly common occurrence not only after paintwork repairs, but also in new cars. At first glance, the problem is superficial and uncomplicated, but swelling of the paint means that air bubbles have formed under the paint layer, which cause active oxidation and corrosion processes.
If you don’t immediately start repairing the paintwork, then after a few months you will have to repair the body itself, which is much more difficult and expensive. Therefore, if you notice even a slight swelling of the protective layer of paint on your car, immediately contact a service station or do the repairs yourself!
What causes the coating to lift when painting a car?
When applying paintwork to the surface of a car, coating defects sometimes appear. Peeling or wrinkling of the fresh layer of material occurs.
The main reasons when the car's paint lifts when painting:
- low quality composition;
- reaction with solvent;
- very thick layer;
- penetration under the old base through grinding areas;
- poor drying of the previous coating;
- high temperature of the metal surface;
- overexposure or acceleration of drying;
- dust and oil stains.
Sometimes deformation of the material occurs due to drafts and high humidity in the room. If the paint lifts when painting a car, it is necessary to maintain the recommended drying period and apply each layer evenly. In case of extensive defects, it is better to remove the entire coating and re-treat the surface.
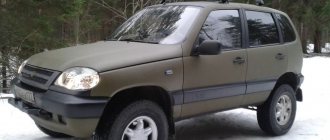
If the factory paint layer is damaged
During the operation of the car, corrosion of metal body parts develops. When rust spots appear under the paintwork, paint lifting may occur.
Car paint scheme
The basis of corrosion is minor damage to the paintwork in the form of scratches and chips and oxidation centers in the thickness of the metal. Damaged areas quickly increase in size and can lead to complete destruction of the surface. Sometimes the paint swells due to poor-quality application when assembling the car on the conveyor.
Penetrating rust
Chips and scratches on the surface of a car body have varying depths and lengths. Minor defects affect only the primer, base enamel and varnish layers. Deep damage reaches the metal base of the car body trim. Moisture leads to the appearance of penetrating rust, which lifts the paint on the car. The coating in the area of corrosion swells and lags behind the surface.
After car repair
Carrying out a body paint job correctly usually does not result in paint chipping.
The main reasons for paint swelling after repairs:
- low quality mixture coating;
- incompatibility of layers and poor adhesion;
- violation of the instructions for preparing and applying the working solution.
Sometimes the reason that the paint lifts when painting a car is in the preparation of the surface. Poor degreasing, poor removal of rust and hidden defects under old paintwork.
During painting process
The reason why a fresh layer rises is most often due to violations of recommendations and instructions for performing the work. New paintwork is deformed when applied to a wet or, conversely, hardened mixture. In addition, a too thick layer of material lifts the paint on the car when painting after the solvent evaporates. Raising the coating is possible in a damp and cold room, as well as when applied to a heated metal surface.
If peeling occurs after repair
If the body paint work is done with high quality, such peeling occurs only in exceptional cases, and the standard layer of paint peels off and swells even less often. However, there is always a possibility of this, and the reasons may be:
- the use of cheap, low-quality mixtures for body restoration work;
- the use of compounds that are incompatible with each other and do not provide the paint with proper adhesion to the surface;
- violation of technologies recommended for painting.
It will not be possible to solve such problems on your own, even if at first glance the defective areas seem small and practically do not increase over time. In fact, corrosion processes have already begun under the paint layer, which can only be prevented by completely removing the paint layer, stripping the body and repainting it. Moreover, attempts to clean and paint over only the damaged areas on top of the old layers will lead to the fact that the damage hidden from view will still increase, but will become obvious only when the processes are already irreversible and the scale of the damage is critical.
What to do if the paint on your car has lifted
Methods for repairing deformed paintwork on a car body depend on the extent of the damage and the causes of swelling. If the paint on a car has lifted over a large area, it is better to correct the defects by completely removing all layers down to the metal. Clean off the rust, the remnants of the old coating and then apply new paintwork.
Paintwork repair
If the paint on the car has lifted in a small area after painting, the defect can be removed only on part of the surface:
- Remove peeled paintwork.
- Sand and dry.
- Apply the mixture in thin layers with intermediate drying.
If the paint on a car has been lifted due to a solvent, then in order to isolate the problem surface from exposure, spray a thin layer of varnish before applying the base enamel. If the sanding and putty areas are large, it is better to use an insulating primer to protect the old coating from exposure.
Car plague: how to prevent and stop car corrosion
Rust is the natural enemy of car bodies, as well as any other metal elements of the car. How to protect metal from rust? Is it even possible to eliminate corrosion, and if not, then at least delay its appearance? Let's look at methods to protect metal parts of a car from corrosion.
An ominous brown spot on the wing. Bubble on the paint at the bottom of the door. Wet floor mats after driving through a puddle. These are signs that the metal has begun to be diligently sharpened by a dangerous worm - rust.
The worst thing about this whole story is that, due to corrosion, good cars that have not used up their service life are sometimes sent to a landfill too early, although, by and large, such cars could still be driven and driven.
The good news is that this problem can be avoided.
This is despite the fact that combating oxidation in iron-based metals can seem like a Sisyphean task. After all, despite all the modern coatings and alloys developed and introduced by chemists and engineers, the unstable chemical composition of iron still means that in its natural environment it will always be susceptible to rust. In fact, sooner or later over time, iron and most steels will completely turn into oxide of iron and other constituent elements. Give him enough time. see also
Anti-corrosion protection in a car: prevention and first aid
Understanding how and why cars rust, knowing the problem areas of your car and how to solve the problem means that your pride and joy can travel on the roads for as long as you monitor the condition of the body.
Car paint repair
You can do the restoration of deformed paintwork yourself with your own hands or contact a service center for help.
Parameters that influence repair methods if the paint on the car has lifted during the painting process:
- type of paintwork damage;
- size and depth of the defect;
- material and shape of the workpiece;
- location on the body.
To assess the quality of paintwork, you need to look at scratches, chips and unevenness in bright light:
- Small indentations are best corrected by retouching with paint and varnish.
- Deep defects and raised areas must be cleaned down to the metal surface before repair.
New layers of paintwork are applied according to the instructions, in compliance with the mixture recipe. Properly performed work restores the appearance of the car to its original appearance.
Surface cleaning
To correct a defect on a car when the paint has lifted during painting, you need to prepare for body repair. For this:
- Remove old varnish and base enamel.
- Remove the primer layer and eliminate metal surface defects - rust, irregularities and welds.
- After washing and drying, degrease the areas where the car's paintwork has been repaired.
The work uses abrasive materials of various gradations and grinding tools.
Cleaning the surface of a car
Applying base to primer
If the paint on the car has lifted after painting, it is better to remove the defect using an automatic spray gun. The metal surface is cleaned and degreased. Cover with a layer of automotive primer to protect against corrosion and improve adhesion to the base. Next, layers of acrylic enamel or metallic are applied.
The repair area is painted overlapping with the old paintwork to make the transition invisible. To get a good result, use high-quality enamel and tint according to the color of the car.
Sequence of the car paintwork repair process
Restoring paintwork in a garage is quite problematic. The point here is not only in the skill of the performer, but in the availability of the necessary conditions and set of tools. Plus, you need to be very careful in selecting the materials needed for the job. After all, peeling of paint or primer occurs precisely because of the chemical incompatibility of adjacent layers. Therefore, before starting work, you should prepare everything you need:
- premises;
- tool;
- consumables and working materials.
When the preparations come to an end, you can begin the first stage.
Cleaning the work surface
How to remove rust from metal car? For this process you will need:
- grinder (grinder) or drill with appropriate attachments;
- sandpaper block;
- sandpaper of various grits.
Sandpaper Grit Chart
Initial removal of old or damaged paintwork can be done using a power tool. It is faster to do this with a grinding machine, since its speed is much higher. However, you need to be prepared for the formation of a large amount of dust, which not only poses a danger to the respiratory system and eyes (you should definitely use goggles and a respirator), but also significantly reduces visibility. Therefore, if a small area (part) of the car body needs to be repaired, it is better to use a drill rather than a grinder.
Surface cleaned for painting
After removing the main layers of the old coating, it is then better to prepare the surface manually using sandpaper mounted on a wooden block. Although the process is tedious, you should strive to strip it down to the metal so that no old soil, and especially no rust, remains. Only in this case will the repair layers stick to the surface.
Metal priming
In the process of restoring paintwork, all stages are important, that is, their skillful and correct execution.
However, priming is the most important. After all, the degree of adhesion of the entire new paintwork to the metal surface depends on the correct installation of the primer layers. When laying primers, be sure to follow the following rules:
- Be sure to select a material that is compatible with the paint that will be applied later. It is better to find out what is compatible and what is not from experienced specialists, because some sources may not be entirely reliable.
Primer of the surface to be painted
- The primer material should be applied in several thin layers. That is, you should not try to lay the required layer in one pass.
- Each applied layer must be completely dried, otherwise the subsequent primer will dissolve the previous one that is not completely dry, which can lead to peeling. You can forcibly dry the soil with a hairdryer or near a heating device (electric fireplace, potbelly stove), but you must not allow the surface to overheat.
Hair dryer for drying primer
Painting
When painting a car, the same rules apply as when priming (compatibility, layer-by-layer application, drying of each layer). It can be added that when applying paints and varnishes, it is still advisable to use a spray gun rather than a roller and a paint brush. Only in this case can you achieve a satisfactory final result of car painting. In addition, professionals strongly do not recommend using aerosol paint, since it is incompatible with most primer compositions, that is, the result may be disappointing (peeling, swelling or dissolution of the primer layer).
Dirtyness.
When painting a car outside a special chamber, it is almost always accompanied by the following defect - debris getting into the base or varnish. A certain amount of dirt is present in the cells and is considered acceptable. Main reasons:
- insufficient cleaning of surfaces or premises;
- neglect of filtering materials through strainer filters;
- poor ventilation.
Read also: Is it possible to add alcohol to a car’s gas tank?
Debris in the varnish can most often be removed by polishing, but in the base it needs to be repainted.
Drips of varnish or base.
Drips appear on the surface immediately during the application of paint or varnish or after a short time. Causes:
- too much feed or pressure in the gun;
- material is too thick;
- The distance between the gun and the surface during application is too small.
Drips of varnish (or acrylic paint), if they are small, can be removed with sandpaper (sometimes you even have to putty them) and polished. However, large drips will most likely cause rubbing to the base, and then the element will have to be painted again. If the base drips, there is only one option - repainting.
Penetrating rust
High difficulty
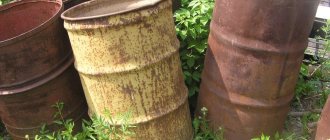
After prolonged exposure to oxygen in the presence of water or moist air, the steel turns into brittle iron oxide and holes begin to form. The body is falling apart.
Rust will eventually eat away at the metal of the car if left unchecked. The final stage is called “penetration rust”. This ranges from Swiss cheese-style holes in the fenders, which are simply unsightly, to more dangerous problems with weakened spars and suspension components.
photo: knowhow.napaonline.com
If you live in areas where cars are prone to rust (metropolises like Moscow or St. Petersburg, where reagents are used), do not wait until bubbles appear on the body of your car. Periodically look under the vehicle to check for any rough or brown plague-damaged parts that could pose a hazard if not corrected.
As rust penetrates deeper into the structure of the metal, the latter begins to crumble, turning into dust, and through holes appear. Now you have a bigger problem, and only two options to solve it.
You can replace the damaged part or panel entirely, or, if it's just a body issue, cut out the rotten parts and weld on metal "patches". If you have no experience in this kind of work, then the service is for you. If you want to try to solve the problem yourself, this is commendable, but remember that intervention in loaded, load-bearing metal structures is unacceptable or requires high qualifications!
Don't try to put your car's frame back together if it's rotten (modern Toyotas still have this problem). A rusted frame (if it has holes through it) means that the structural integrity of the car is in question and only the verdict of a qualified tinsmith serviceman can decide the fate of such a damaged car.
Modern sheet steel comes out with a variety of protective coatings even at the stage of its production at the steel mill. At the automobile plant, additional protective coatings are added to this, including galvanizing and a thick layer of surface protection for the underbody of the car, which literally seals the body from exposure to oxygen elements and the destructive external environment.
The appearance of bubbles.
Immediately after painting or after some time, paint blisters appear on the surface. Such bubbles can be caused by various reasons:
- insufficiently cleaned surface;
- presence of moisture – insufficient drying or “wet” work with putties;
- insufficient removal of micro-foci of corrosion;
- the presence of microcracks and microholes in the metal.
You can tell whether the problem is caused by moisture or corrosion. During corrosion, such bubbles most often appear in single or small quantities, and in the presence of moisture – in large quantities. With corrosion, you will have to strip everything down to the metal and remove it; it is easier to deal with moisture - most likely, simply repainting will help.
Read also: Necessary documents for working in a taxi
Material subsidence (subsidence).
After painting the car, the solvent gradually evaporates from the materials, and they begin to “visit” - some of the material becomes thinner and lower and forms “risks”. This can happen for several reasons:
- non-compliance with the rules for grading abrasive material (at risk of mixing large ones with medium ones, and only then fine ones);
- too thick layers of primer or putty;
- insufficient drying time for materials;
- incorrect amount of thinners or hardeners;
- low quality materials.
To correct the error, in the best case, you will have to re-varnish the element, in the worst case, you will have to prime it again.
Color change.
One of the painting defects that affects color delivery. The color changes immediately after applying the varnish to the base or gradually over time. Main reasons:
- use of low-quality materials (primers, varnishes, etc.);
- incorrect quantitative ratio of hardeners in materials;
- insufficient insulation of polyester materials (putty), reactive primers;
- residues of bitumen, resins and other reagents on the surface (for example, resin dripped onto the car from a tree, or bird excrement can cause such a defect).
Only repainting and removing the cause will help eliminate it - the same traces of resin sometimes have to be cut out to the metal.
Car surface cleaning
For cleaning you will need a grinder. We put sackcloth on it and get started. We clean the metal along with the rust. If in this case it turns out that the surface of the car has become uneven, you need to apply putty. Once the layer has completely hardened, a primer is applied.
Particular attention should be paid to preparation before painting. In some places you need to work with sandpaper wrapped on the timber. If the car has been driving for a long time, you will have to tinker for quite a long time, because it may turn out that the surface of your iron horse is dotted with small deflections and depressions that can only be noticed this way.
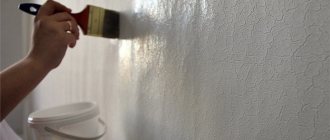
The roller left marks
The painted surface has an uneven structure.
Causes of the defect:
- incorrectly selected roller;
- poor quality paint;
- inability to use a roller to paint walls.
How to solve a problem
First you need to make sure that the roller is correctly selected. Before painting, the roller must be washed and the water thoroughly wrung out. The paint should not pool on the edges of the tool.
You need to start painting from top to bottom, i.e. from ceiling to floor. When painting, you should use the M or W technique. The roller must not be torn off the surface while working.
Craters.
After the varnish dries or almost immediately, depressions appear on it, sometimes quite large (up to 3 mm) - craters. This effect is also called “silicone”. They arise for only one reason - the presence of silicone (fat). Silicone gets in for various reasons:
- insufficiently degreased surface;
- presence of oil in the compressor;
- the presence of silicone in the air – insufficient cleaning of the room;
- the presence of silicone on the old surface (use of various chemicals to rub the car).
Such defects can only be removed with a new varnish coating, but you need to make sure that no more silicone gets in. In such a situation, the worst thing is if various cleaning products (PLAK, etc.) were used on the car.
Cloudiness (“yayuloki”).
In the light, stripes or spots are visible on a large surface (hood), slightly different in color from the main one. Such a defect is possible only on grain base paints. Causes:
- incorrect application of the base;
- insufficient drying of the base before applying varnish;
- low quality base paint.
Most often, the defect occurs on gray metallics. Removal requires repainting.
Hologram effect (after polishing).
A freshly painted part is polished, and instead of shine and gloss, it becomes cloudy and has a hologram effect. The reasons may be:
- insufficient drying of the varnish;
- too thick layer of varnish;
- incorrect amount of hardener in the varnish;
- incorrect polishing technology or low-quality materials.
If the reason was not polishing, then the parts will have to be re-varnished.
Weak solvent and watering - features of paint removal
Whatever the reason for the paint peeling, everything has to be removed and reapplied. This is usually entrusted to specialists after an independent attempt has failed. However, it also happens when a car enthusiast, taking into account the mistakes, makes repeated attempts to put all the necessary components on the body.
When driving onto a road with bitumen melted from the heat, you should switch to safe driving mode:
- low speed (30–50 km/h), especially if there is heavy traffic on the road;
- minimum number of maneuvers: when turning the wheels, viscous bitumen from them will splash directly onto the body;
- movement outside the compacted track, on which the bitumen “floats” more strongly;
- a long distance to the truck driving ahead, from under whose wheels bitumen flies, especially in the absence of mudguards.
Advice. When the paint is dry, treat the body with a low-abrasive polish. Then proceed to non-abrasive. Dry the painted part at a temperature of 40 degrees for 2 hours, then let the paint cool and sit for 24 hours. For best results in amateur conditions, use acrylic paints. They do not require a protective layer of varnish and look great after drying.
How to isolate the old coating from the effects of applied paint solvents?
If there are many zones on the repair surface with different materials (paint, primer, putty), then it is better to isolate all these zones by covering them with a layer of insulating primer. This will make the surface uniform and will not absorb paint or primer differently. In addition, the insulating primer evens out the color. This way the paint will cover the entire panel equally.
To insulate the old coating, you can use either a special insulating primer or an epoxy primer.
An insulating primer is included in the product line of almost any manufacturer of paints and varnishes. It is applied to the surface prepared for painting and after 15–30 minutes you can paint over it.
Why do cars rust?
photo: photo: unsplash.com / Erika Fletcher
Rust is formed as a result of the electrochemical decomposition of iron-based alloys. This breakdown is the result of oxidation, which is a process in which surface iron molecules react with oxygen in the environment and generate a new iron-oxygen compound with the chemical formula Fe2O3, also known as iron oxide. This so-called iron oxide is rust.
For example, cast iron elements in a car are not so quickly subject to harmful oxidation. Primarily due to its thickness. Look at an old cast iron engine block and you will see only a thin surface layer of rust but little penetration into the metal. At the same time, body steel is much more susceptible to rust.
Unfortunately, cast iron itself can hardly be called a good material for making cars, so steel alloys are usually used in modern cars. For example, adding a certain amount of carbon to iron creates certain grades of steel that provide dramatic improvements in flexibility, tensile strength, and other properties. This process is called doping. But you have to pay for additional strength, since during alloying, impurities are added to the steel, which, among other things, accelerate the formation of rust.
Exposed steel rusts at different rates depending on a number of factors:
- alloy components;
- product thickness;
- the environment in which the steel is located;
- the intensity of heat to which the steel is exposed.
Poor quality untreated sheet steel can rust in just a few years.
Let's not forget about salts and other road pollutants dissolved in water. They will act as electrolytes, accelerating the destructive processes occurring in materials.
For motorists, this means that dirty or salty water that gets on the car body accelerates the rusting process. This is why cars in countries with a northern climate, where salt is used in winter (subzero temperatures and their fluctuations are also destructive to materials), as well as cars that spend a lot of time near the ocean, are prone to intense rotting.
The intensity is also affected by:
- Pollution of urban air from car exhausts;
- Saturation of the atmosphere with waste from industrial enterprises;
- Unfavorable environmental situation in the region;
- Evaporation of active substances used in cars;
- And even the quality of the road surface
Rust forms in stages, and knowing where the problem area is during the decomposition process can help you find the right solution. Here are the three main stages of rust and how to eliminate them.
Applying paint after priming
After you have properly primed the surface, paint is applied. This usually happens in 2-3 layers, using a spray gun, in other words, a spray gun - a special gun that sprays car paint, making the layer very thin or thick, depending on the adjustment. A roller with a brush is used less often. A very important note: before choosing a painting method, you need to analyze the weather conditions, the conditions of the painting site, the presence of wind, ventilation, and so on. By the way, painting is contraindicated on cold metal. This is fraught with the appearance of condensation, and as a result the paint simply erodes. However, this does not matter for stripping.
Painting defects or 23 ways to ruin the appearance of a car
Use 400-grit sandpaper to remove any smudges. Take your time and be careful not to rub the sandpaper into the surrounding paint while doing this. From time to time, check the remaining height of the smudge, and also wash off the paint powder formed during the process of sanding the smudge.
Any solvent, even the weakest one, can change the color of the car body paint, making it lighter. Therefore, in most cases, experienced motorists refuse this method of erasing paint.
Based on the temperature in the room where painting is taking place, humidity, air movement and the size of the surface to be restored, select a suitable solvent.
Some advisers have simply never carried out the procedure of removing paint from a car body, so in theory they simply advise unrealistic things. You will have to be patient, and also do all the procedures quickly, before the new paint is ingrained into the paintwork of your car.
Use appropriate gun settings, air pressure and application technique. It is recommended to use a nozzle of 1.3 mm for paint, 1.4 for varnish, and 1.7 mm for primer.
There is no need to apply paint to putty, putty is not putty, prime first, then paint over the primer.
How to remove bitumen stains from the body on your own, why does gas consumption fluctuate, is it normal that xenon headlights do not turn on immediately?
Answers like “buy a new one”, etc. I don’t accept, the car is excellent, simple and reliable, I want to take it to perfection.
Another option for removing scratches on a car without painting is to disguise it with special paint of a similar color. This method will be useful for drivers who have damaged the body deep to the metal. It is convenient to fill the recess with a thin brush or toothpick. Once the area is dry, apply a clear varnish.
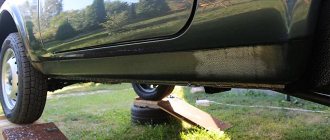
Everyone knows what colors cars are painted now. Especially the Germans and especially the trade winds. Paints are considered more environmentally friendly and water-based, but the quality of the coating suffers from this. This problem also affected my car.
One of these swellings on the hind wing increased slightly even in the summer. Therefore, the decision was made to treat locally. Using a Dremel, I carefully scraped the area being repaired down to the metal to remove only the swollen paint, without going into healthy areas. Somehow, I didn’t take a photo, but the picture gives the idea.
The contents of this Site, such as articles, text, graphics, images and other materials posted on this Site (“Content”), are for informational purposes only. No representations or warranties of any kind, express or implied, are made with respect to the Content provided on this Site as to its completeness, accuracy, reliability, suitability or availability for any purpose.
These are basic things, and most of the nuances can be eliminated if you first try to apply the material to a test surface, set up the tool correctly and fine-tune the operating technique. Also pay special attention to the preparation of the workspace, this concerns the cleanliness and temperature of the room.
After this, if you were able to remove the smudge, then apply varnish; if you treated the varnish coating, then polish the surface using paste and a grinder.
Cases when a car owner needs to wipe off foreign paint from the body of his car are not isolated. A variety of unpleasant situations happen in which the body of your car may be covered with paint of a different origin. It is difficult to list such situations in one publication, but many examples can be given.
Remove the paint layer over an area much larger than the damaged area using a grinder or sandblaster (to the metal if necessary).
That is why, when distilled with a solvent for transition, small smudges remain in the middle of the part. At first glance, everything looks terrible, but once they are rubbed with R-2000 sandpaper and polished, the surface becomes flawless.
In most other cases it is necessary to re-smooth, then carefully prepare the surface (using appropriate preparations where necessary) and apply a coat of paint of the appropriate viscosity.
Spot rust (begins to penetrate into the metal structure)
Medium difficulty
The chemical process not only spoils the surface, but also reduces the strength of the metal.
If you don't correct surface rust and allow decomposition to penetrate deeper into the metal, you may find unsightly bubbles called paint blisters beginning to form under your car's paint. This annoying phenomenon is due to the fact that iron oxide molecules are physically larger than iron or steel molecules. This worsening rusting problem spreads by expansion and peeling of the outer layers of paint and metal, exposing fresh metal, which then corrodes. And so on along the chain until a hole is formed in the sheet of metal.
Simplified metal recovery scheme
Restoring metal from rust means going over the rusted area with a rust converter, as well as a stiff-bristled brush. Next, you should go over the surface with a grinding wheel to smooth out any roughness that appears, and finally clean the surface with sandpaper.
see also
How and why rust appears on a car, and how to avoid it (basic rules)
Make sure you get to bare metal and that there are no flakes of rust left on it. The metal must be clean, free of impurities, before priming and painting the part begins.
Important! After sanding and gripping the surface of the paintwork around the affected area, make sure that the paint on which you will apply the primer is slightly rough. This is necessary for better contact of the surface with the putty and primer.
As we said earlier, a dirty car rusts faster than a clean one. This also explains the long-noted fact why cars in countries with northern climates, where salts and reagents are used in winter, are prone to rot. In Japan, an island state surrounded by the ocean, the problem with rotting car bodies is similar.